Manage
The Manage page enables you to customize different configurations, including privacy, integrations, and VPN settings for the environment.
The Manage page provides users with the ability to access audit logs that capture all console activity, including MDM connections.
General settings
The General tab provides basic information about the environment which includes company Information along with specific user Information.
Company Information: This is general information about fields like the tenant ID, default channel (used in the MDM integration), and plan.
Logged in User: This is information about the user that is logged in to the console.
Change Password: Change the current user’s password that is logged in to the console. The link can be disabled if the account has been configured with an SSO configuration and local logins are disabled.
Set Password Policy: Define the password requirements for the Mobile Security console users.
Preferred Language: Choose the language used for Mobile Security console.
Danger Zone: When the option to Enable the Danger Zone Feature in the GravityZone MTD is selected, the app provides an option in the user interface to display the Danger Zone map globally in the customer's environment. When not selected, this option is removed from GravityZone MTD. Danger Zone is disabled by default.
App Risk Lookup: Allows you to enable or disable the App Risk Lookup feature in GravityZone MTD.
Android Battery Optimization: Allows you to add GravityZone MTD to the Android battery optimization list. Enabling this option ensures that devices are protected while the app is running in the background. This setting is for the tenant level.
Privacy Summary: Allows you to enable or disable a privacy summary in GravityZone MTD for all devices. Enabling this option displays a privacy summary screen to the user, which describes what information your organization can and cannot access from the user's device, based on the Mobile Security console privacy policy settings.
Samsung Knox KPE License: See the Setting up the Knox KPE Licenses section for information on this field.
Device Inactivity Configuration: This configuration controls how long the system waits before determining that a device is dormant.
Enable Policy: You need to enable this checkbox to set any of the fields underneath it.
Allowed Inactivity Time: This is the maximum time a device can be inactive before the device is considered inactive. Enter a valid number in the first box and then select Seconds, Minutes, or Hours in the box to the right.
Warning Interval (Grace Period): After the device exceeds the Allowed Inactivity Timer value, it enters the grace period when it receives warnings. If more than one warning is required, this is the interval between warnings. Enter a valid number in the box and then select Seconds, Minutes, or Hours in the box to the right.
Max Warnings: This is the maximum number of warnings as push notifications or emails that are sent to the device in the grace period or Warning Interval field. An entry of “0” disables the warning messages and no warnings are sent.
Warning Message Types: You can configure these warnings when the Max Warnings field is greater than zero.
Send iOS Notification to Devices: This sends iOS push notifications according to the policy settings when the device is inactive. This checkbox is disabled by default.
Send Android Notification to Devices: This sends Android push notifications according to the policy settings when the device is inactive. This checkbox is disabled by default.
Send email to user (iOS Devices): This sends emails to the user according to the policy settings if an iOS device is pending activation or becomes inactive. This is disabled by default.
Send email to user (Android Devices): This sends emails to the user according to the policy settings if an Android device is pending activations or becomes inactive. This is disabled by default.
Enforce the GravityZone MTD Install on Both Work and Personal Profiles of Android Enterprise: Check this box only if all Android devices use Android Enterprise and have both profiles. When this is enabled, an event is triggered only when one of the profiles (work or personal) has the app installed for a time period greater than the Allowed Inactivity Time value setting.
Note
For Knox devices, make sure in the Knox Configure setup that the MTD app is whitelisted. Otherwise, the app can be stopped. For additional information on this visit the Knox Configure site.
Privacy settings
The Privacy tab allows the administrator to configure the type of forensics data that is collected when an event occurs for each defined console Group.
To apply privacy settings, select the desired group from the drop-down list and choose a template from the following options: Max, High, Medium, Low, and Custom.
The Custom feature provides users with full control over the data collection process.
To modify the custom template, select the Custom option and select the checkboxes to configure the desired settings.
When a setting is selected, click Deploy . The updates will be pushed to the mobile application.
The data is collected for the following timeframes:
At Login: Forensics are reported when the user starts GravityZone MTD.
Threat: Forensics are reported when a threat is detected.
Periodic: Forensics reported each time GravityZone MTD checks into the Mobile Security console. This includes events that are reported when the Wi-Fi is toggled on an Android device and when the screen is locked and then unlocked on an iOS device.
In this table you'll find the default entries and availability for device operating systems.
Template | Device OS | |||||||
|---|---|---|---|---|---|---|---|---|
Item | Max | High | Medium | Low | Custom | iOS | Android | Chrome |
Location: Street |
|
|
|
| Custom |
|
|
|
Location: City |
|
|
|
| Custom |
|
|
|
Location: Country |
|
|
|
| Custom |
|
|
|
Device
|
|
|
|
| Custom |
|
|
|
Device: Running Processes |
|
|
|
| Custom |
|
|
|
Network: Connection Details |
|
|
|
| Custom |
|
|
|
Network: Carrier Information |
|
|
|
| Custom |
|
|
|
Network: Attacker IP & MAC |
|
|
|
| Custom |
|
|
|
Network: Risky or Unapproved Sites |
|
|
|
| Custom |
|
|
|
Application Forensics |
|
|
|
| Custom |
|
|
|
Application Binaries |
|
|
|
| Custom |
|
|
|
Application Inventory |
|
|
|
| Custom |
|
|
|
Browser Extensions Inventory |
|
|
|
| Custom |
|
|
|
Browser Extension Forensics |
|
|
|
| Custom |
|
|
|


Note
Mitigation of a network threat may encounter an issue if the specified condition is not satisfied: Enabling the 'Network' settings is mandatory when the Privacy Policy is configured as Custom in the Threat and Periodic sections.
The default privacy policy is initialized on the device when the app is installed until the user's own policy is downloaded.
If forensics data configuration items are not enabled, threat details in the threat log may not include the risky site visited.
Note
The Risky or Unapproved Sites option affects what shows on the Privacy Screen summary display in the GravityZone MTD.
Suppressing the MTD Location Permission Prompt
Follow these steps to ensure the location permission prompt does not display in MTD on user devices:
Go to the Privacy tab on the Manage page.
Set the Location to None.
Go to the General tab on the Manage page and make sure that the Enable the Danger Zone feature in MTD is not selected.
Click on Save & Deploy.
The privacy changes were successfully submitted for deployment.
Note
For Android devices you need to disable the following Network threats in the Threat policy:
Captive Portal
Danger Zone Connected
Rogue Access Point
MITM
MITM - ARP
MITM - Fake SSL Certificate
MITM - Fake SSL Certificate - Self Signed
MITM - SSL Strip
Unsecured WiFi Network
Integrations
The system facilitates synchronization and integration with numerous Mobile Device Management (MDM) instances and diverse data export destination types within the environment. The integration of each integrated vendor is distinct and necessitates specific parameters that are outlined in the vendor-specific MDM integration guides found in the Customer Support Portal.
The following are these sub-tabs in the Integrations section:
MDM: Summarizes and allows integration by adding multiple vendors for MDM Integration.
Data Export: Summarizes and allows integration for reporting threats and for some integrations, also the Mobile Security console user activity. For threat exports, you identify settings such as threat severity filters.
To configure an MDM integration, navigate to the Manage > Integrations.
Add MDM
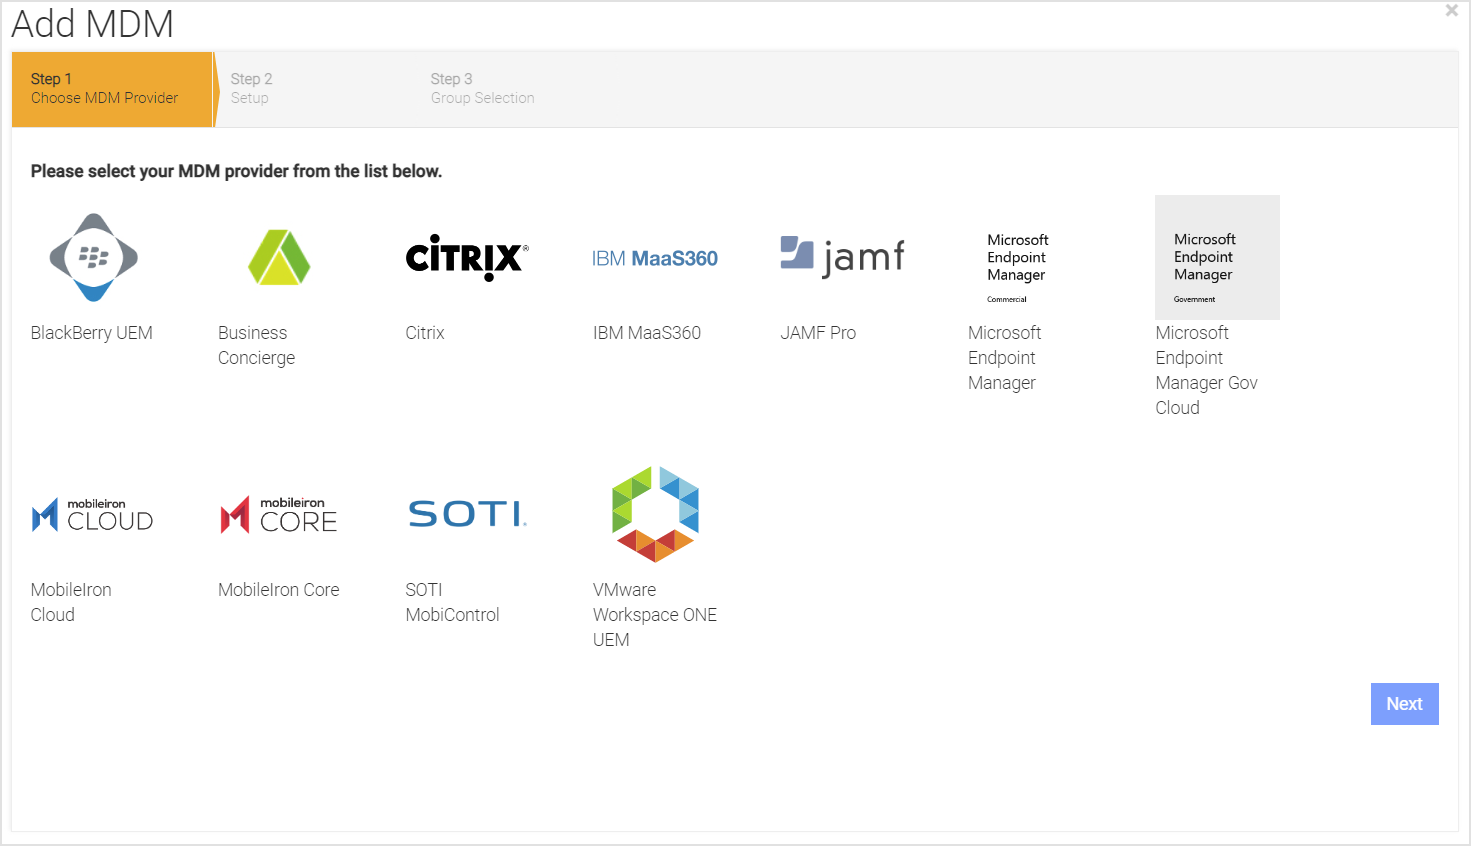
Follow these steps to add an MDM integration:
Select the MDM provider.
Fill in the integration details.
Finish the setup for the specific MDM.
To begin, click the Add MDM button and choose the provider to use.
Note
Refer to the individual MDM guide for your specific integration for documentation. Follow the instructions to complete the integration in the specific vendor-related MDM guide.
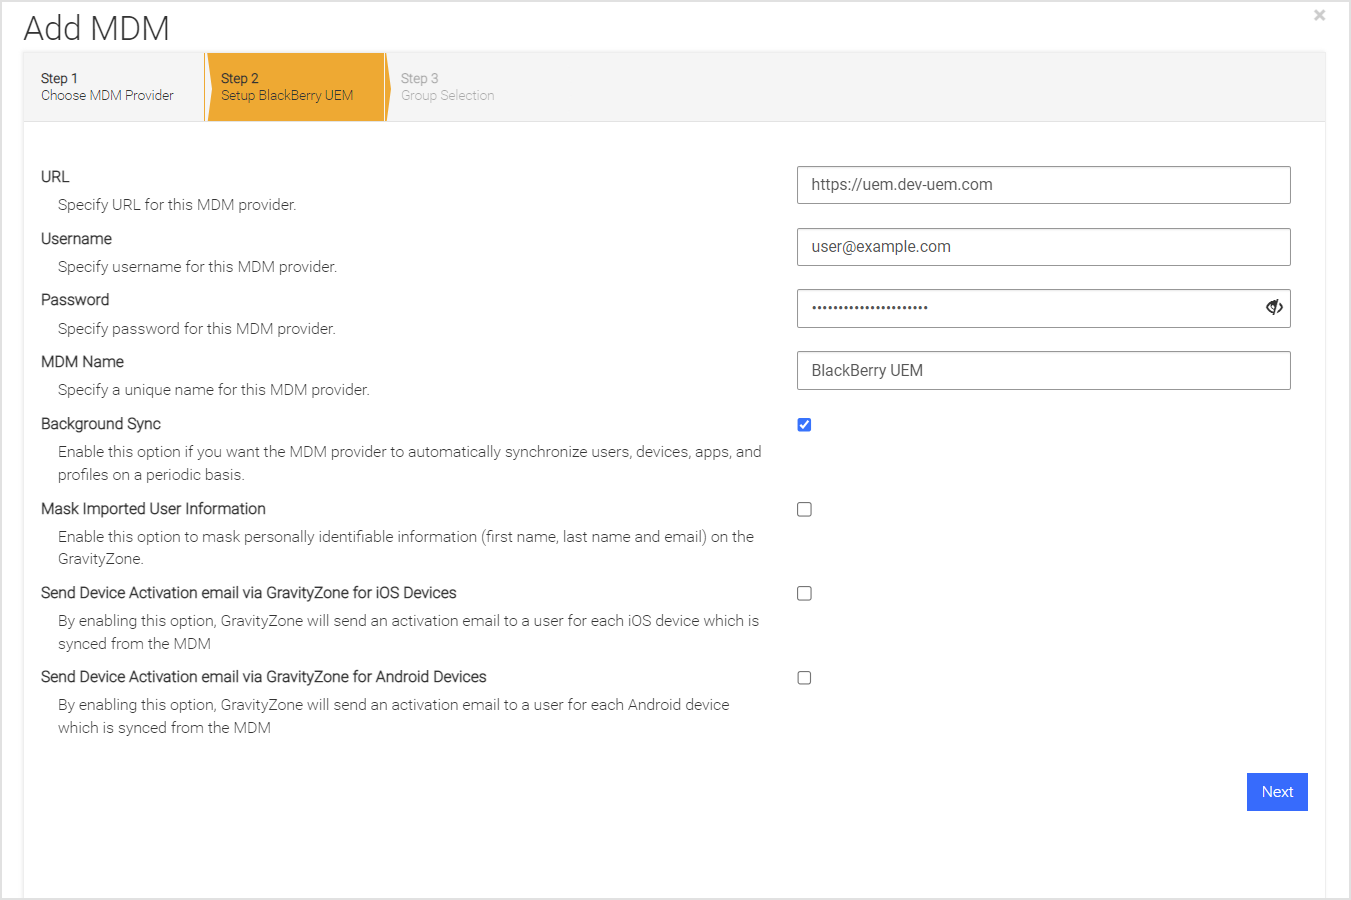
Specifying MDM specific information
Upon addition or modification of MDM Integration, multiple options are presented. The MDM provider's URL, username, and password are mandatory. Furthermore, the user configures the email parameters as outlined in the table provided below. The email options available facilitate the transmission of activation links for the Mobile Security app.
Option | Description |
|---|---|
Send Device Activation Email for iOS Devices | Upon enabling this feature, the Mobile Security console will automatically dispatch an activation email to a user for every iOS device that has been synchronized from the Mobile Device Management (MDM) system. |
Send Device Activation Email for Android Devices | Upon enabling this feature, the Mobile Security console will automatically dispatch an activation email to a user for every Android device that has been synchronized from the Mobile Device Management (MDM) system. |
Specifying MDM groups
To choose a group for synchronization, locate the green plus icon in the column on the left adjacent to the desired group and click on it. This action transfers the specified group to the list of selected console groups. The removal process involves clicking on the red minus sign. To set the priority order of multiple groups, users can drag and drop the groups in the desired order from highest to lowest priority. In the Mobile Security console, when a user is a member of multiple groups, the group with the higher priority is associated with the user for policy and privacy settings. The presented image depicts a screenshot that displays a list of MDM groups that are currently available. One of the groups in the list has been selected.
Additional MDM integrations
To integrate another MDM, select the Add MDM button and input the corresponding parameters. The integration groups are displayed with the addition of the vendor name to the group name utilized for synchronization. Upon successful addition of the MDM integration, the summary will be displayed in the MDM integration list.
Edit MDM
To make changes to the synchronization groups or other parameters, follow these steps:
Access the primary Integrations window and choose the relevant vendor
Click on the Edit button associated with that particular vendor integration
The current settings for the vendor integration are displayed on the window.
You can enter a matching prefix value in the Group Filter field to query the list of groups to display in the Available Device Groups list.
After you complete your changes and want to perform a manual synchronization, click Sync Now for the specific MDM integration.
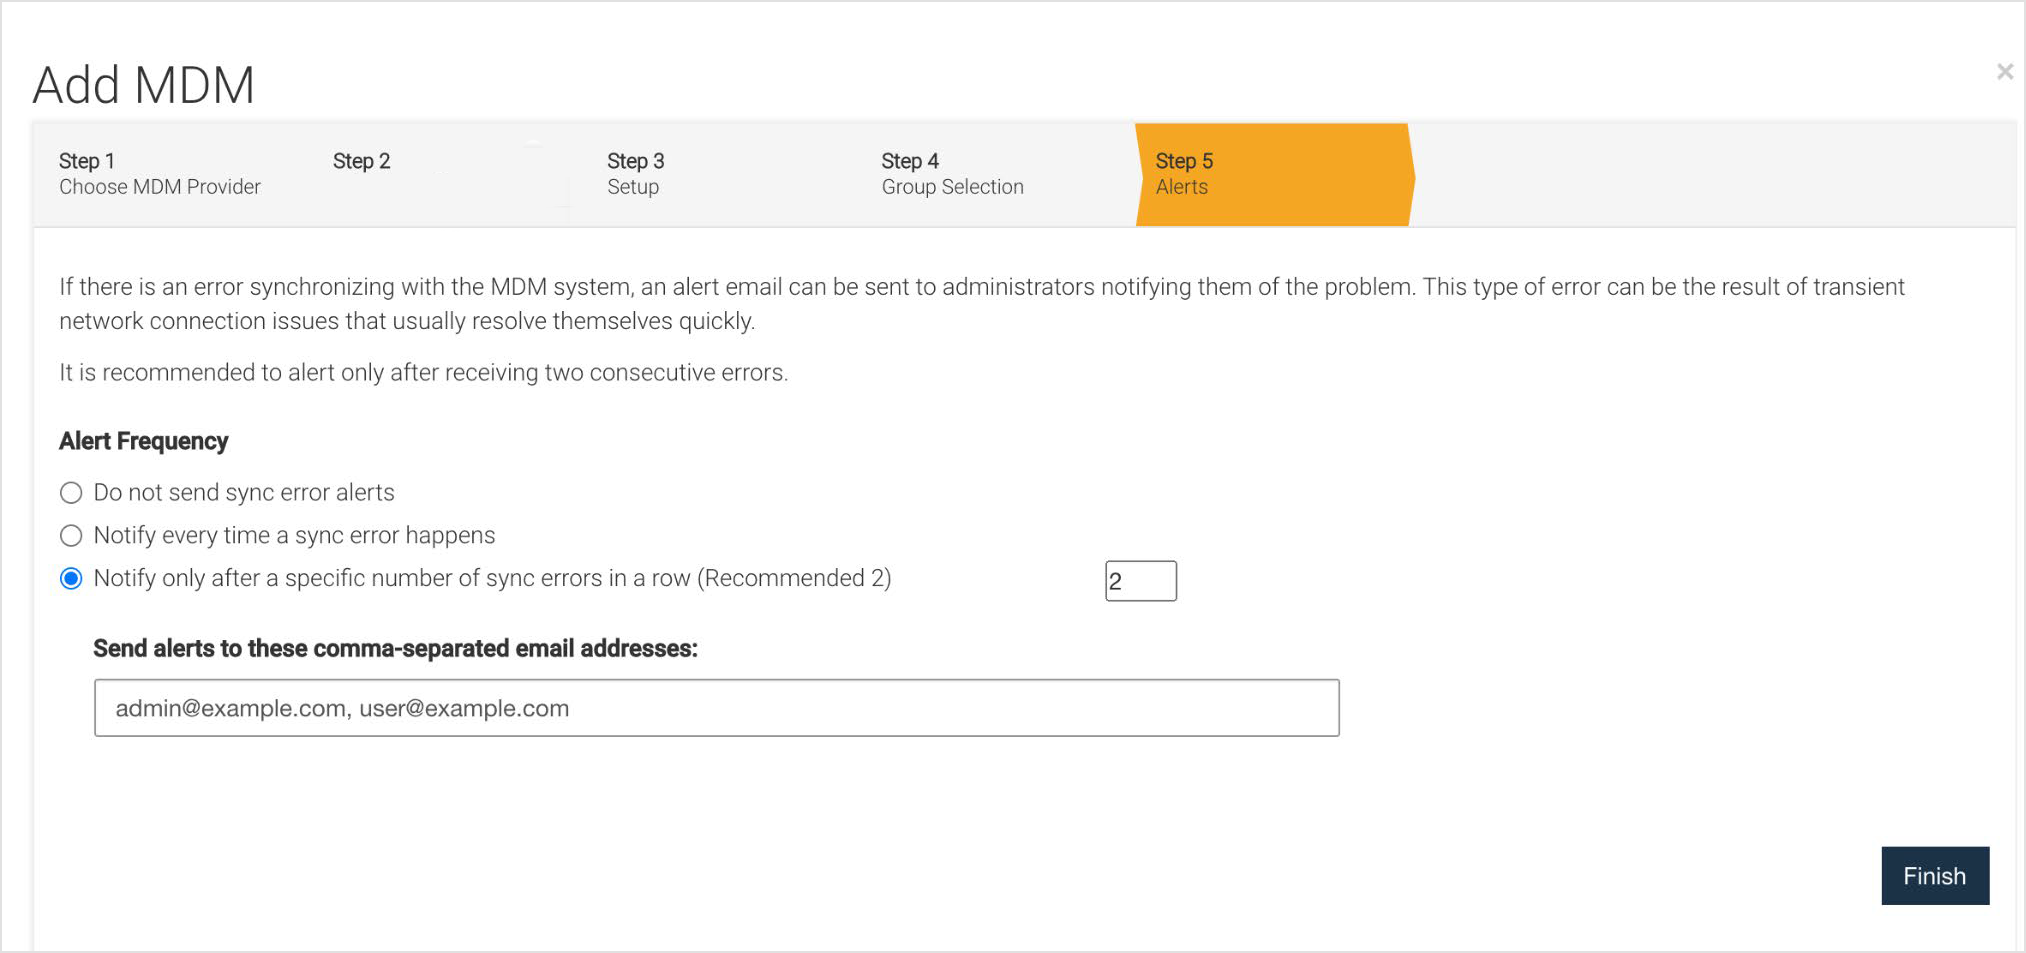
Test MDM
To verify an MDM synchronization, click the Test MDM button for that integration on the MDM tab. This test performs a set of verifications and displays the success or problem for each topic tested. If an issue is found a recommendation is given as a possible resolution.
The following areas are tested when they apply:
Login Credentials
Groups
Devices
Users
Apps
Profiles
VPN settings
The VPN Settings tab provides information related to local and remote VPN settings.
Local VPN
The addition of a customizable DNS server list for SSIDs or Wi-Fi networks is a capability that can be performed by a console administrator. The list generated by the GravityZone MTD is utilized by the local VPN upon connection to a particular Wi-Fi network. The DNS server definitions facilitate broader access to enterprise intranet pages in the presence of anti-phishing measures and a local VPN.
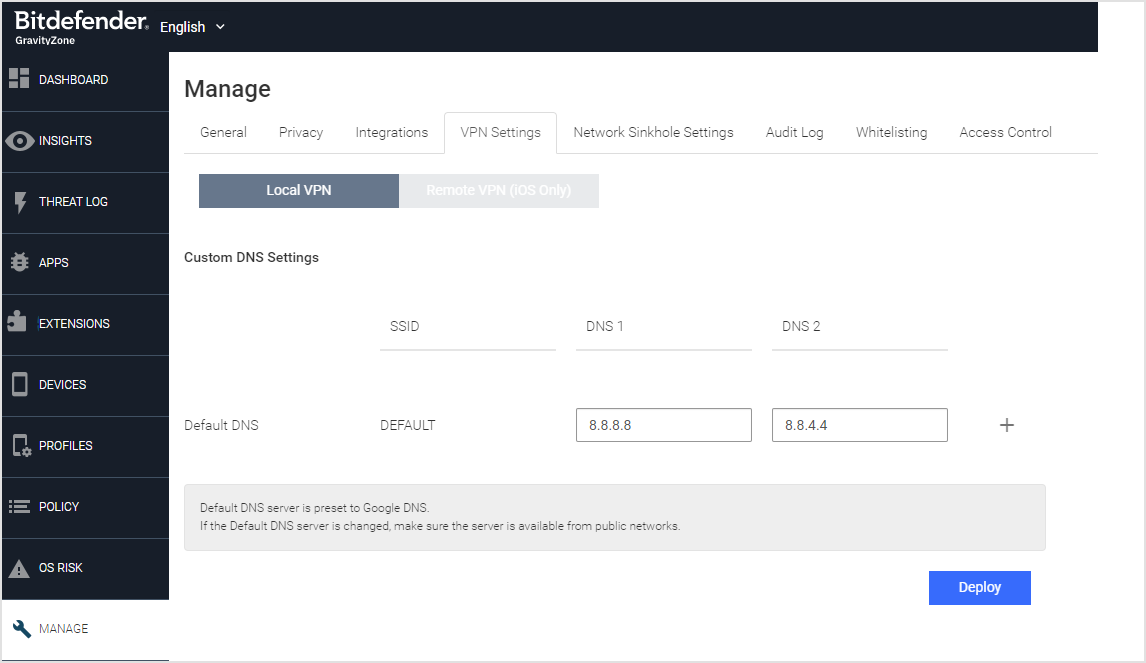
You can add multiple SSID rows and include two DNS values for each. You can include a port with the IP address and separate them with a colon.
Remote VPN (iOS Only)
The Mobile Security application running on iOS devices can define VPN configurations. The (VPN) can be activated upon the occurrence of an event, thereby providing protection to the device against all potential network-based security threats.
To properly configure the VPN, it is necessary to input the following information on the designated page:
username
password
server adress
shared secret
group name
short descripton
Note
The only currently supported VPN type is IPSEC.
When the VPN is configured, the action shows on the Policy page > Threat Policy > Device Action.
Network sinkhole settings
For iOS and Android devices, an action can be enabled in the Threat Policy to sinkhole network routes or domains.
This is configured on the Manage page by choosing the Network Sinkhole Settings tab.
Choose one of two options:
Block network access except ALLOW the IP Address ranges/domains below.
Allow network access except for the BLOCK the IP Address ranges/domains below.
Choose the category for the user's use case and add the following:
IP Addresses.
Domains.
Countries.
About audit logs
Activity is monitored and logged in the Audit Log under the Manage page.
To search and filter data by columns, simply click on the triangle icon displayed on the column. Sorting can be achieved by clicking on the title of the respective column.
Additional information can be obtained for certain log entries by selecting the More link or button associated with a particular row. During an MDM synchronization, the Mobile Security console logs statistics and any potential issues that may have occurred. The audit information is consolidated into a unified list of events that can be conveniently sorted and filtered.
Whitelisting
The Mobile Security console provides a way for the administrator to whitelist SSL certificates, Wi-Fi access points to suppress specific threats, and App Developer.
Certificates
The process of whitelisting certificates enables an administrator to mitigate particular threats by suppressing them.
The function of the whitelisting tab is to enable the user to upload SSL certificate files that have either PEM or CRT file extensions.
These files serve to authenticate a website's identity and subsequently exempt it from being affected by certain types of threats:
MITM - Fake SSL Certificate
MITM - SSL Strip
Note
The certificates can be leaf, intermediate, or root certificates, but using leaf certificates is recommended. The certificates need to be RSA 2K or 4K key for proxy whitelist.
Wi-Fi access points
Wi-Fi access points can be configured by an administrator to mitigate particular security risks. In order to keep administrators informed about users connecting to hazardous Wi-Fi access points, it may be necessary to suppress internal enterprise Wi-Fi networks from the list of access point threats. This is because such networks are already known and trusted.
You can whitelist these known networks and then these threats are not generated for them:
Unsecured Wi-Fi Network
Captive Portal
Danger Zone Connected
Danger Zone Nearby
Note
The list of internal networks is defined with SSIDs, BSSIDs, and access point IP addresses. The list is provided by uploading a CSV file with this network information.
App developer
When the user needs to whitelist the app, there are two ways to do this:
Whitelisting through the Threat Log
If a Sideloaded App event is generated from an iOS or Android OS and the device is still connected to the Mobile Security console, the user has the option to designate the event as permissible by selecting the Whitelist App Developer button.
This feature enables the use of a developer certificate to verify and authorize all corresponding applications, thereby designating them as permissible and authorized.
Enterprise sideloaded apps are not identified as threats by these applications.
Whitelisting through the Manage Page
The second method to whitelist an app is from the Mobile Security console under the Manage navigation option.
Click the Manage in the navigation panel.
Click the Whitelisting tab.
Click the App Developer tab.
Click the Upload App button to upload the app, either an .ipa or .apk file.
Note
In order to whitelist the app developer, the app must be uploaded.
Navigate and select the app.
Click the Open button to select the app to whitelist.
Click Deploy.
To remove an app follow these steps:
Click the checkbox to the left of the app.
Click the drop-down menu on the Actions bar.
Select Remove from Whitelist.
To apply additions or removals, ensure you click Deploy to push all changes to the devices.
Access Control
An administrator can set up a custom category list and they are also called Access Control Lists. This list allows an administrator to override the categorization defaults and actions for a category. An administrator can also add more websites to the list and assign a category and define the desired actions. One or more groups can reference a custom categorization list.
Managing an Access Control list
To manage these lists, click on the Manage page and then the Access Control tab. On this tab, you can:
Provide a URL and check its categorization.
See which groups are using a custom categorization list.
Download a sample CSV file to import a custom categorization list.
Import or Export a custom categorization list in a CSV file format.
Navigate to the Phishing and Content Filter Policy settings.
Create, rename, modify or delete a custom categorization list.
Note
The file size maximum for the CSV file is 1 MB or 1000 entries. The maximum number of characters to describe a domain or URL is 256. If you get errors in your import request, download a sample CSV file.
To describe a site, enter a complete URL or a domain name. You cannot use wildcards or special characters in the site URL or domain value. If you do use wildcards or special characters, the value is ignored.
To detect any sites using HTTPS/TLS, the site must only contain the domain name. A site complete URL is only applicable for HTTPS/non-TLS sites.
On the right-hand side of the page, under the Site Category Checker box, type in a URL or domain name and click the Check button. The display updates and shows the category for that site. It also shows the other lists that the URL is referenced. The Groups Using this List section displays the groups that reference this list. The link Go to Phishing Protection and Content Filtering Feature takes you back to the Policy page and the Phishing & Content Filter tab to manage the group details.
You can only delete an Access Control List when it is no longer referenced by any groups. The Groups Using this List section displays the groups that reference this list. The list must be disassociated from all groups before a delete is allowed.