Synchronization of Kaseya inventory and Bitdefender agents
The integration mirrors your managed Kaseya VSA inventory structure to GravityZone Control Center through a synchronization task.
Following the synchronization, an endpoint management system continuously monitors both inventories to identify and solve synchronization issues.
Automatic synchronization settings
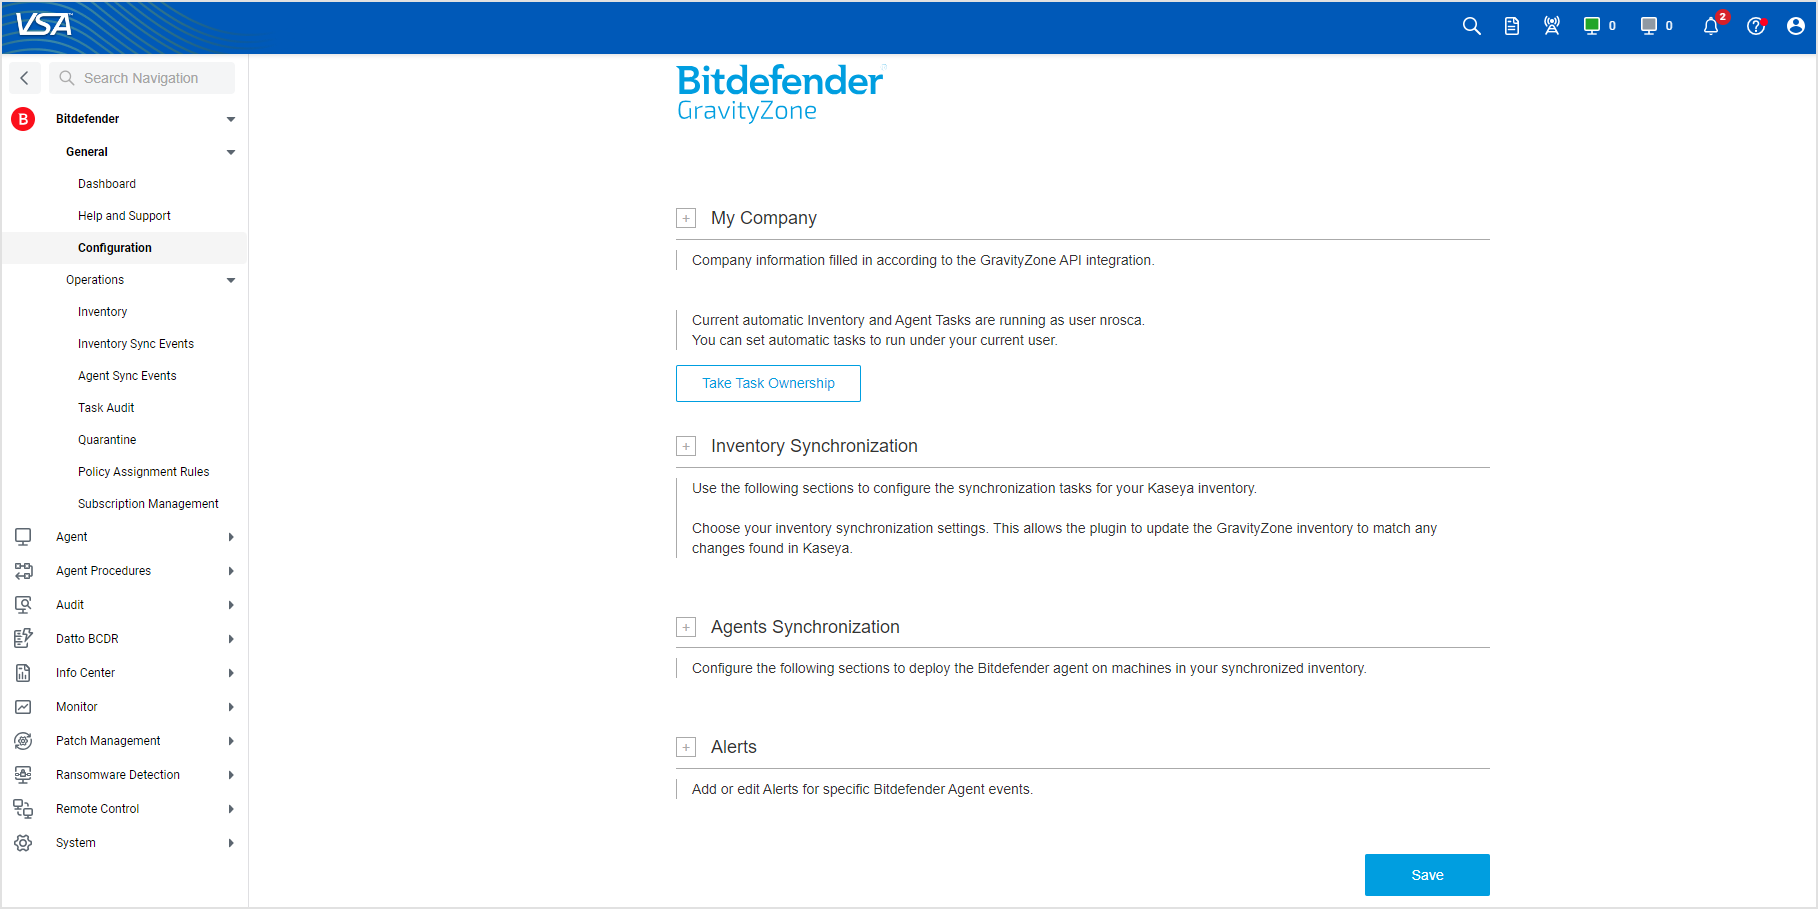
The Bitdefender Plugin allows you to control the automatic synchronization process by using specific options. These options are available in the Bitdefender > General > Configuration page. After making the desired changes, click Save at the bottom of the page to start synchronization. The process may take a few minutes.
Note
In the Configuration page, click the  Plus button to expand each section.
The synchronization settings in the Configuration page are grouped into the following sections:
My Company - manage the integration's API key and access URL and take ownership of the sync tasks ran by other users.
Inventory Synchronization - manage synchronization events related to Kaseya VSA and GravityZone inventories. For example, automatically create a new company in GravityZone after a new organization has been created in Kaseya VSA.
Agents Synchronization - manage synchronization events related to the Bitdefender security agent installed on endpoints in the Kaseya VSA inventory. For example, automatically deploy Bitdefender agent on machines that are missing it.
Alerts - configure how to receive alerts when Bitdefender detects threats in your synchronized inventory.
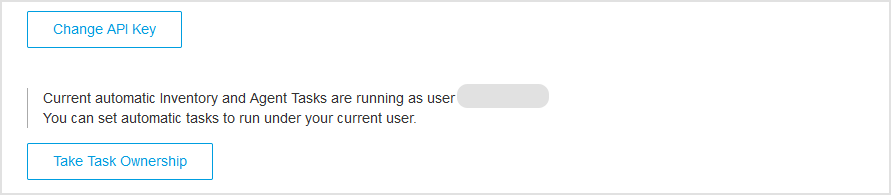
My Company
Enter the generated API key and API Access URL in the Bitdefender Settings section.
You can change the API details later by clicking the Change API Key button under this section.
To change the user under automatic inventory and agent tasks run, click the Take Task Ownership button. This option is useful later on, for example when the user who configured the integration becomes invalid and the sync tasks cannot run anymore. The button is visible if you have system or master role in Kaseya VSA. For details, refer to Fixing the token refresh issue with automatic sync tasks in Kaseya integration.
Inventory Synchronization
In this section you can configure settings regarding the inventory synchronization between Kaseya VSA and GravityZone and the handling of issues that may occur during the process.
To configure the inventory synchronization, follow these steps:
Select an Inventory Synchronization level:
Monitor & report synchronized inventory status to run without automatic event handling. This sync level is the default state.
Monitor & handle synchronized inventory status to run and perform automatic event handling.
Automatic inventory synchronization to run across the entire inventory and perform automatic event handling.
Note
The inventory synchronization levels run only on associated and non-excluded entities.
You can configure the Automatic Handling settings for the Monitor & handle synchronized inventory status and the Automatic inventory synchronization levels.
Choose the Default Synchronization Mode to include or exclude the entire inventory from the synchronization task.
Note
You can use this option to synchronize the entire inventory and exclude individual organizations and groups from this task. Alternatively, the option to exclude the entire inventory from synchronization and include specific entities is available.
Synchronizing and excluding individual organizations and groups is available in the Inventory page.
Configure Synchronization Event Handling settings.
During the synchronization task, the differences between inventories generate synchronization events. Choose to handle these events either automatically or manually.
The automatic actions taken on the synchronization events are described below:
Event type
Automatic action
Destination Moved
Move an item in destination inventory (GravityZone) to match the source inventory location (Kaseya).
Destination Deleted
Copy an item from the source inventory (Kaseya) to the destination inventory (GravityZone).
Association Missing
Create a link between items that have the same name and location in both inventories.
Prefix-based Association Missing
Create the link between items with the same name and location in both inventories, taking into account the destination contains the prefix set in Prefix Settings.
Note
For manual actions taken on synchronization events, refer to Fix Unhandled Events.
Configure a prefix for creating new organizations or associating existing organizations during the synchronization:
Enter your prefix name in the field.
Select one or both options for prefix usage during synchronization.
Note
For prefix creation, you can choose Only if the name already exists to use the source organization name for the destination organization name. If the name is already taken, the plugin will use the prefix name you have entered.
Agents Synchronization
In this section, you can configure the settings for deploying the Bitdefender security agent (named Bitdefender Endpoint Security Tools) through the plugin on the machines in the Kaseya inventory. Every time the Bitdefender Plugin identifies an issue with Bitdefender Endpoint Security Tools from a GravityZone integration perspective, it creates an event in Kaseya VSA that should be handled.
To configure the Bitdefender Endpoint Security Tools synchronization and deployment, follow these steps:
Select an Agents Synchronization level option:
Monitor & report synchronized agent status - to run without automatic event handling. This sync level is the default state.
Monitor & handle synchronized agent status - to run and perform automatic event handling.
Automatic agent synchronization - to run across all agents and perform automatic event handling.
Note
The agents synchronization levels run only on associated and non-excluded entities.
You can configure the Automatic Handling settings for the Monitor & handle synchronized agent status and the Automatic agent synchronization levels.
You can configure the Deployment Window settings for the Monitor & handle synchronized agent status and the Automatic agent synchronization levels.
Configure the Deployment Window for automatic and manual agent synchronization:
Start at > End at
Runs the deployment within the specified time interval. Keep at least one hour between the start and the end of the time interval.
Deployment slots per hour
Set the number of deployments per hour.
Skip if offline
Skip deployment if the machine is offline.
Power up if offline
Powers up any unprotected offline machine during the automatic agent synchronization task. Available only for Windows systems.
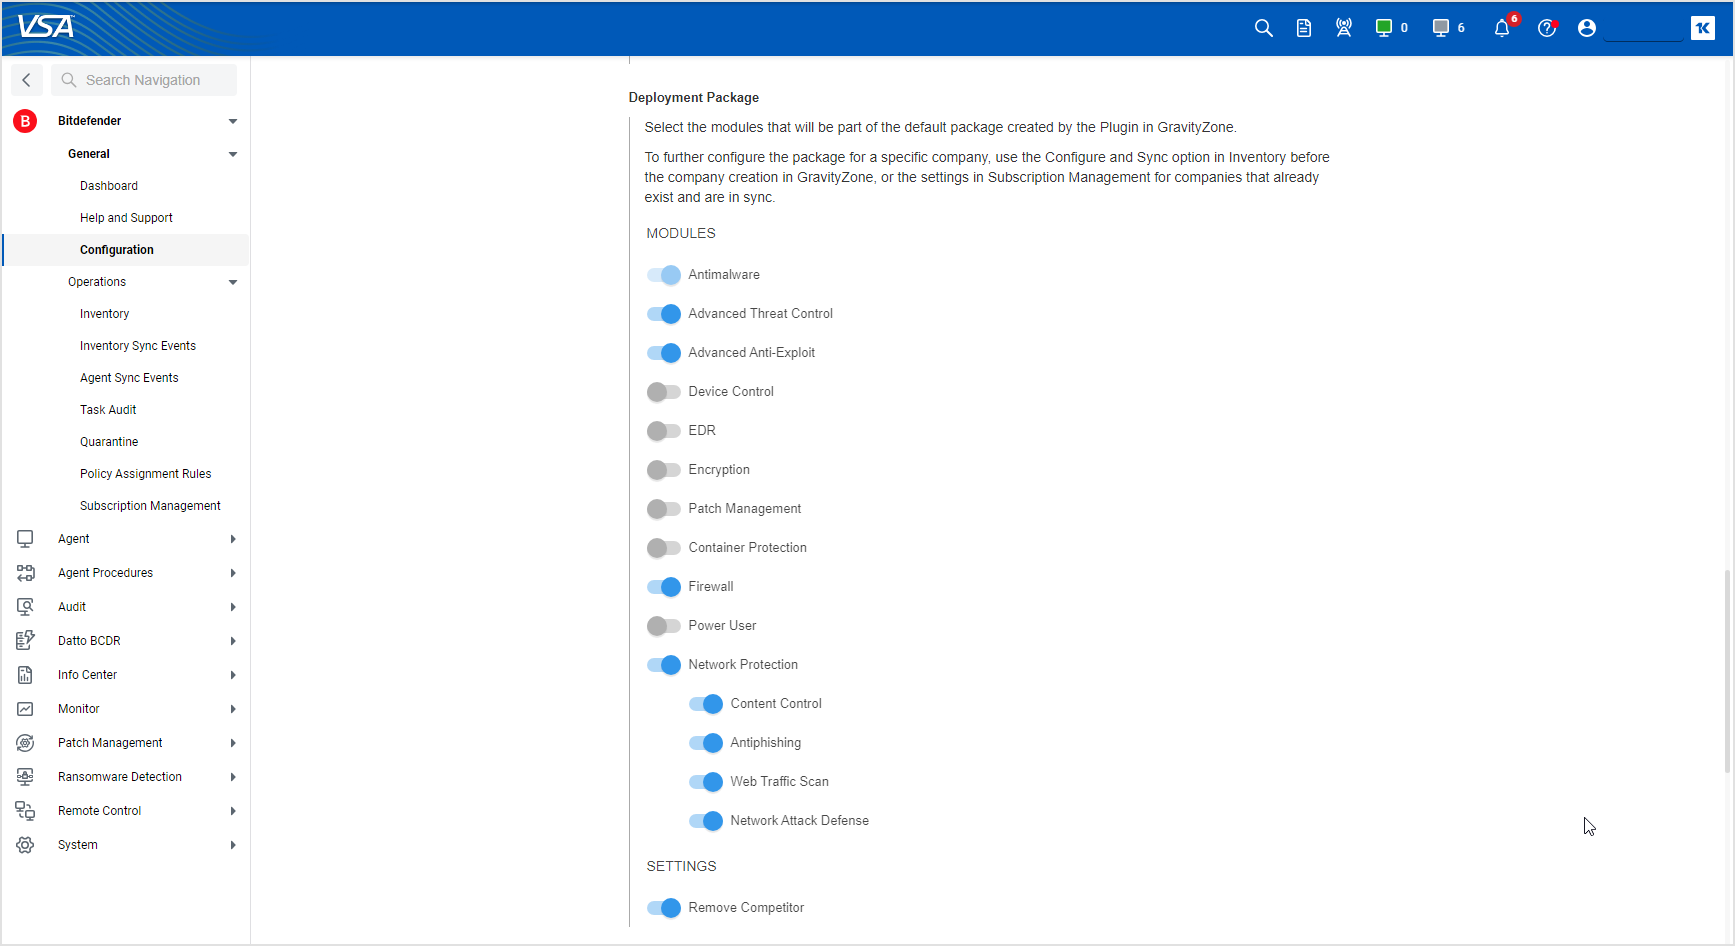
Under Deployment Package, configure the default list of modules to install with the Bitdefender agent on all machines in organizations that do not have specific packages applied on yet, or are not in sync.
While the package defined here applies to the entire inventory, you can override it by editing the existing packages for specific companies in the Subscription Management page.
You can also override the default package settings by using the Configure and Sync option of the contextual menu in the Inventory page.
Important
Changes in the default deployment package apply to subsequent Bitdefender agent installations. They do not result in reconfiguring existing installations.
Configure Custom Action Handling settings to run an agent procedure when a reboot is required. For more information, refer to Kaseya Agent Procedures.
Configure Synchronization Event Handling settings.
During the synchronization task, the differences between the Bitdefender agent locations in the source (Kaseya VSA) and destination (GravityZone) inventories generate synchronization events. Choose to handle these events either automatically or manually.
The automatic actions taken on the synchronization events are described below:
Event type
Automatic action
Destination Moved
Moves the Bitdefender security agent in destination inventory (GravityZone) to match the source inventory location (Kaseya), inside the same organization or between organizations.
Rogue Bitdefender Endpoint Found
Moves the Bitdefender security agent in destination inventory (GravityZone) to match the source inventory location (Kaseya) and force the uninstallation/reinstallation of the Bitdefender security agent.
Destination Deleted
Reinstalls the Bitdefender security agent.
Install Bitdefender Agent
Installs the Bitdefender security agent according to the Kaseya agent location.
For manual actions taken on deployment events, refer to Fixing unhandled events.
Choose download preferences for the Bitdefender security agent:
Setup Downloader
Use a small-sized file to download and run Bitdefender agent installation files. You can use the Relay role to the Setup Downloader when you configure the installation package in GravityZone. For more information, refer to the GravityZone documentation.
Full Kit
Use a large-sized file to run Bitdefender agent installation files. Configure Kaseya LAN Cache settings to use this full installation kit as the file source.
Note
Aside from deploying Bitdefender Endpoint Security Tools through the plugin, you can also install the security agent manually. This situation may occur when the target machine runs an operating system supported by the agent, but not by the Bitdefender Plugin. Such machines display OS version not supported as status in the agents table in the Inventory page.
To manually install Bitdefender Endpoint Security Tools, log in to GravityZone console and use the installation package named KASEYA_Connector_Default for the company you aim to deploy to. This package was created by the Bitdefender Plugin. If no such package exists for the company, you must create a new one with the correct name and the Bitdefender Plugin will also be able to use it in the future.
Alerts
In this section, you configure alerts for security events generated after Bitdefender detecting threats in your synchronized inventory. For details, refer to Using alerts.
Manual synchronization operations
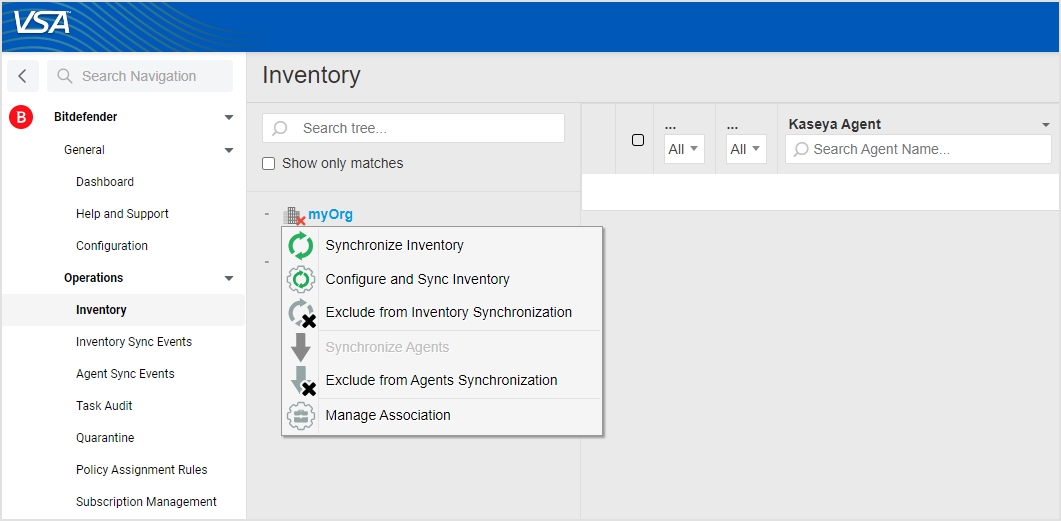
You can run various operations, such a synchronization task, deploy the security agent, configure exclusions, and manage company associations manually, by using the contextual menu in the Inventory page.
To access the manual synchronization options, follow these steps:
In the navigation panel, select Bitdefender.
Go to Operations > Inventory.
Right-click any organization tree and select one of the following operations:
Each of these operations is explained below.
Synchronize Inventory
Click  Synchronize Inventory to synchronize your Kaseya VSA inventory with GravityZone.
Following this operation you can view and manage your inventory in GravityZone.
Configure and Sync Inventory
Click  Configure and Sync Inventory to configure the product type for the selected organization and synchronize it in GravityZone. When using this option to synchronize an organization for the first time, a corresponding company will be created in GravityZone.
Note
You can synchronize a child company only if the parent company is also synchronized.
After clicking Configure and Sync Inventory, a succession of windows will guide you through the configuration process. After each step, click Next.
In the introduction window, click Start to begin.
Select the product type. Depending on the product type, the Bitdefender security agent installed on machines belonging to that organization will have certain features enabled.
The following options are available:
Endpoint Security, the fully-featured security solution, with all modules available for deployment on machines running Windows, Linux or macOS.
Bitdefender EDR, a lightweight Endpoint Detection and Response (EDR) solution for Windows-based systems that can run alongside third-party protection platforms.
Select what add-ons will be available with the product type.
Configure the installation package:
Select what protection modules to install with the Bitdefender security agent on machines under that organization.
Configure your preferences for installing and updating the Bitdefender security agent.
Click Save and Sync.
Important
Changes in the deployment package apply to subsequent Bitdefender agent installations. They do not result in reconfiguring existing installations.
Exclude from Inventory Synchronization
Click  Exclude from Inventory Synchronization to exclude the selected entity from synchronization.
Note
Excluded entities are marked with the following icon and do not generate inventory sync events. Excluded entities do not show up in GravityZone inventory. To include back the entity for synchronization, right-click it and select  Include for inventory synchronization.
Synchronize Agents
Click  Synchronize Agents and configure the deployment time:
Immediate deployment to install Bitdefender agent across your inventory.
Deployment in window to schedule Bitdefender agent installation using the settings from the Configuration > Agents Synchronization section.
Deployment in custom window to schedule Bitdefender agent installation regardless of the settings from the Configuration > Agents Synchronization section.
You can configure these options:
Set time to start the deployment (machine time by default) and distribution window (deployment interval) configurable in hours and minutes.
Use server time instead of machine time.
Skip deployment if machines are offline.
Power up the machines that are offline so you can deploy the agent.
Unlike the settings in the Configuration > Agents Synchronization section, you are not required to specify a number of deployment slots. That means the deployment will take place on all selected machines, in the same deployment window.
Once the options configured, click Synchronize to start the synchronization task.
Note
The option to remove competitor is available when configuring the installation package in the Subscription Management section.
Exclude from Agents Synchronization
Click  Exclude from Agents Synchronization to exclude the selected entity from deployment.
Excluded entities are marked with the following icon and do not generate agent sync events. To include the entity in the agent sync task, right-click it and select Include for agents synchronization.
Note
For an excluded entity, synchronization and deployment can run only manually, by selecting
Synchronize inventory and Synchronize agents from the contextual menu for that entity. If you select these options from a parent node, they will not affect the excluded entity.If an entity is deleted from the Kaseya inventory, the exclusions will be ignored and there will be generated Source Deleted events instead.
If there are unhandled events from the last synchronization, a pop-up window will inform you about them each time you access the Inventory page.
Manage Association
Click the  Manage Association option in the contextual menu to create custom associations, and to view and delete existing company associations. Custom associations are useful when the Bitdefender plugin is unable to make particular associations between Kaseya VSA and GravityZone inventories that you would want.
Note
The Manage Association option is available only to Kaseya VSA users with System or Master roles.
To create a custom association, follow these steps:
In the Manage Association window, go to Name.
Select in the drop-down list the GravityZone company you want to associate with the current Kaseya organization.
The list contains only companies that do not have other associations in Kaseya VSA.
Once you make a selection, the Type, Address, and Phone fields are filled-in with details specified in GravityZone. Additional information indicate if the company has security managed by a partner or the company is suspended.
Note
Custom association between two organizations is only possible if their parent organizations are associated as well.
Click Save.
To delete an association, follow these steps:
Next to Name, click the
 Delete icon.
In the expanded area, a warning message informs you that the association will be deleted along all other associations under it. However, future synchronizations may restore some or all associations. To prevent this, select the Exclude the organization from synchronization option.
Click Save.
Note
You cannot delete an association when inventory or agent tasks are running.