IBM QRadar
Note
The article provides information about the GravityZone Cloud integration with IBM QRadar. For the GravityZone On-premises integration, refer to IBM QRadar.
Overview
This integration provides you with the possibility to better monitor GravityZone events using IBM QRadar. Bitdefender DSM for QRadar is a device support module that provides the categorization of events according to QRadar high and low-level threat categories, allowing a QRadar administrator to perform complex searches, cross-correlations across multiple event types and sources, and perform threat-hunting activities that include in-depth information reported by GravityZone technology layers.
Prerequisites
IBM QRadar version 7.3.3 (Patch 6) or IBM QRadar Cloud
Deploy the application in QRadar
To install the Bitdefender DSM for QRadar in IBM QRadar:
Log in to IBM QRadar.
Click the Admin tab.
Under the System Configuration section, click Extensions Management. A new window will open.
Click the Add button on the right side and then Browse for the installation kit.
Select Install immediately, and then click Add.
Click Install.
You can find the application in the Extensions Management window after the installation is complete.

Configure the HTTP Receiver
The following configuration steps may differ for QRadar versions up to 7.5.0 Update Package 3. For more information, refer to the official IBM documentation.
To configure the HTTP Receiver in QRadar:
Log in to IBM QRadar.
Go to Admin and click the QRadar Log Source Management application icon.
Select Log Sources.
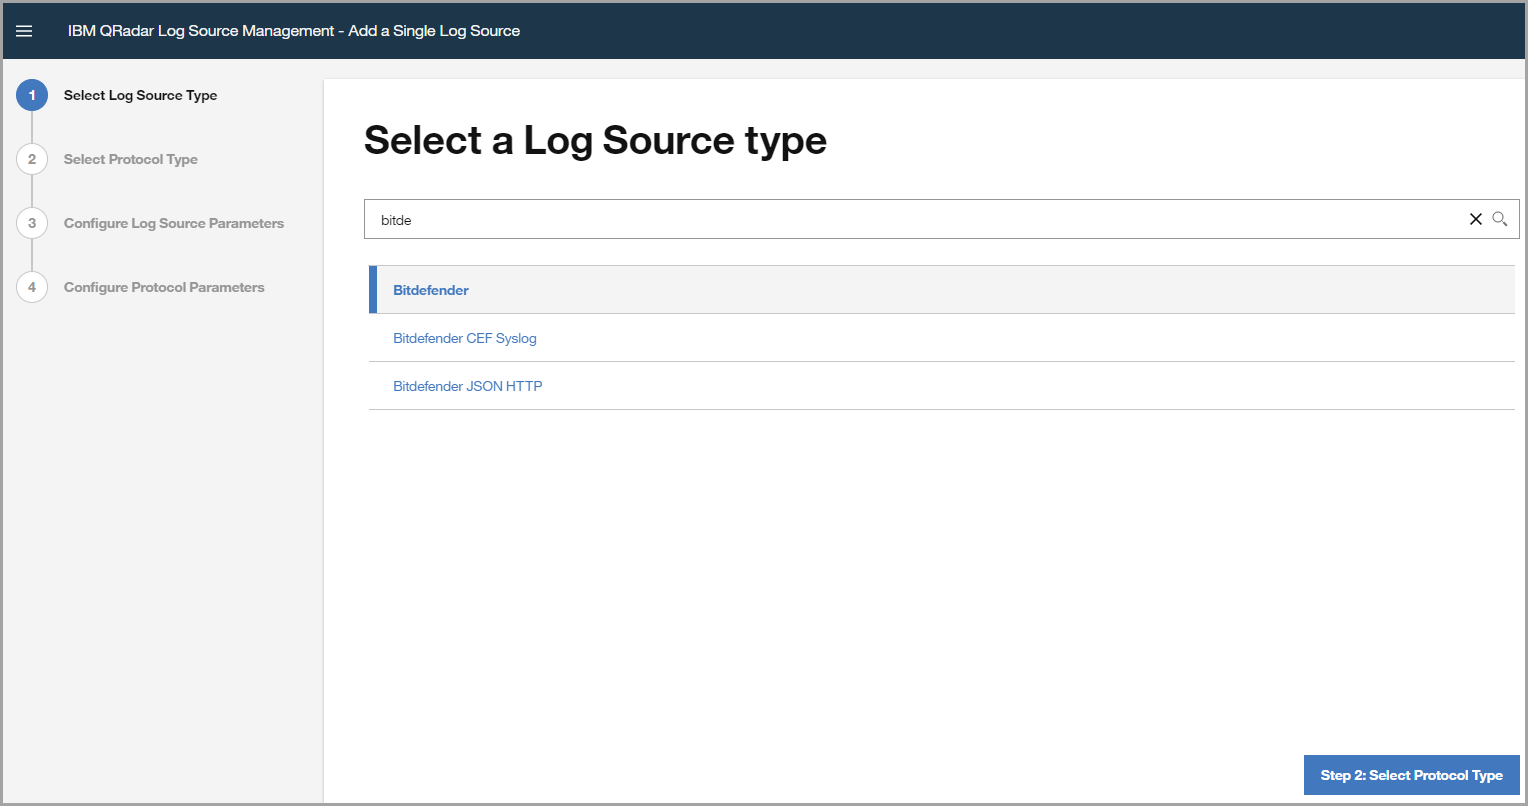
Create a new log source using the +New Log Source button.
Select between Single Log Source or Multiple Log Sources.
Search and select Bitdefender JSON HTTP log source type. Click the Step 2: Select Protocol Type button to proceed.
Search and select HTTP Receiver protocol type. Click the Step 3: Configure Log Source Parameters button to proceed.
Configure the log source parameters as desired. A few settings are already configured; you can maintain their default values or change them according to your needs. Click the Step 3: Configure Protocol Parameters button to proceed.
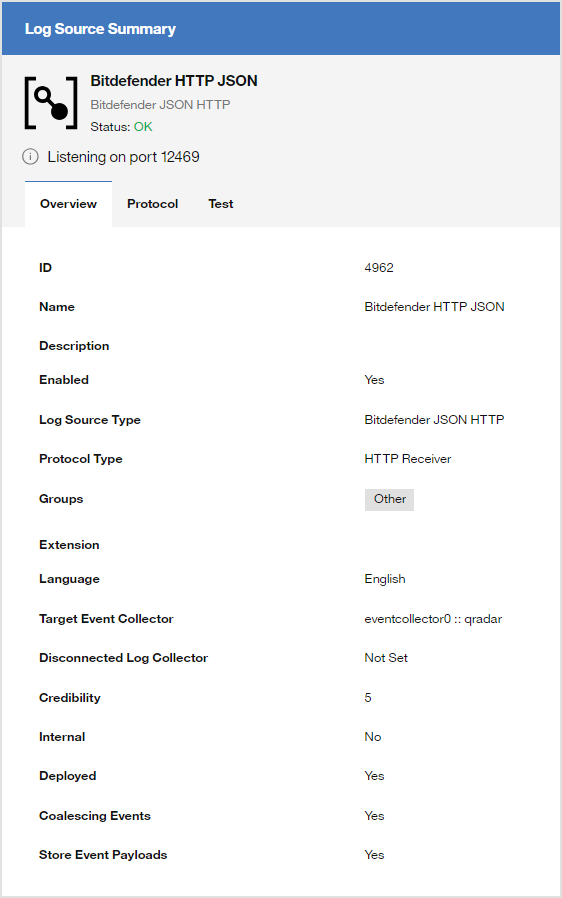
Configure the protocol parameters. The log source identifier is your GravityZone console web address.
Note
Make sure the communication type is HTTPs, the TLS version is TLSv1.2, and the listen port is correctly set.
Test the parameters and finish the setup.
Subscribe the HTTP Receiver to the GravityZone Event Push API Service
To use the HTTP Receiver, you have to configure the GravityZone Event Push API Service to send events to the QRadar instance.
You can start by generating an API key in GravityZone Control Center using the steps below:
Log in to GravityZone Control Center.
Go to My Account.
Under the API keys section, click Add.
Select the Event Push Service check box and click Generate. A new window displays the API key. Make sure to store the key in a secure location.
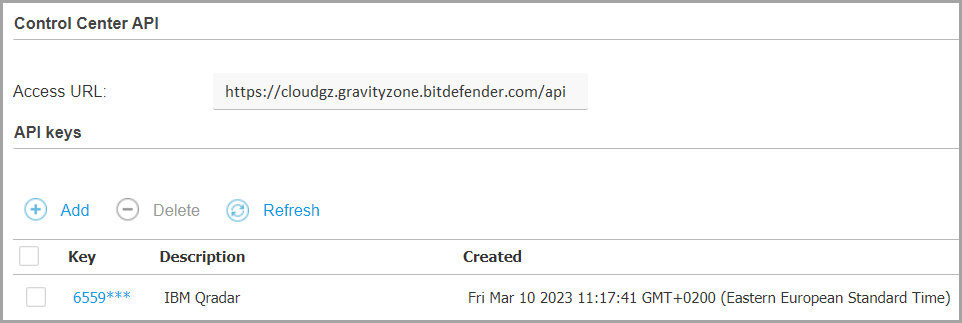
Click Save to preserve the changes.
Remember the API key and the Access URL.
Now, using Postman or another API testing tool of your choice, you can start sending events through GravityZone Event Push API Service. For more information about the general API functionality, refer to our Public API documentation.
In the API testing tool, you can configure your request using the setPushEventSettings method and the following guidelines:
The required URL has the format CONTROL_CENTER_APIs_ACCESS_URL/v1.0/jsonrpc/push, where you must replace the CONTROL_CENTER_APIs_ACCESS_URL with your GravityZone Access URL.
The authorization type should be basic.
The username is the API key you have previously retrieved.
You can use this request example and configure it as follows:
The value for service type is
qradar.The value for URL is the QRadar instance address followed by the port previously configured in the HTTP Receiver.
By default, multiple event types are included in the request however, you can choose which to add or exclude by setting that event type value to
trueorfalse.
A successful response to your request should have the value true. After a few minutes, you can view the requested events in the QRadar instance.
Saved searches
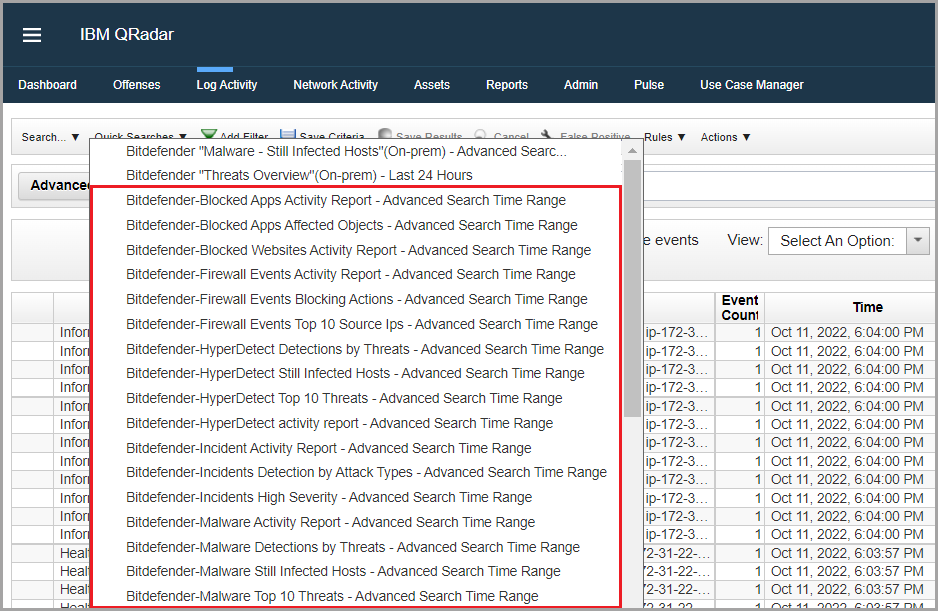
To help you identify the security events Bitdefender DSM for QRadar stores multiple saved searches defined below, depending on the module that provides the events:
Content Control
Bitdefender-Blocked Apps Activity Report – Advanced Search Time Range centralizes events about blocked applications and provides you with details like the last blocked date, computer IP, and application path.
Bitdefender-Blocked Apps Affected Objects – Advanced Search Time Range centralizes aggregated events about blocked applications. This quick search provides details like the Top 10 users along with the corresponding IP addresses, last blocked date and the total number of detections for a particular application. Double-clicking on any line item will show the events that build up this line item.
Bitdefender-Blocked Websites Activity Report – Advanced Search Time Range centralizes events where the specific websites are blocked. You can view the last blocked date, computer IP, and URL.
Firewall
Bitdefender-Firewall Events Activity Report – Advanced Search Time Range centralizes blocked traffic events. You can view the last blocked date, computer IP, Source IP, and Protocol ID of the blocked traffic.
Bitdefender-Firewall Events Blocking Actions – Advanced Search Time Range centralizes events in which traffic was blocked. The quick search provides you with more details about the event such as the last application path, TCP/IP protocol ID, and status.
Bitdefender-Firewall Events Top 10 Source Ips – Advanced Search Time Range centralizes aggregated events in which traffic was blocked. The quick search provides you with the top 10 hosts and the blocking event counts.
HyperDetect
Bitdefender-HyperDetected activity report – Advanced Search Time Range centralizes events in which a threat was detected and provides detailed information such as the timestamp of the detection, malware name, file path, and IP of the endpoint.
Bitdefender-HyperDetected Detections by Threats – Advanced Search Time Range centralizes aggregated threat events in which you can view the most detected threats by the HyperDetect module as well as the number of detections.
Bitdefender-HyperDetected Still Infected Hosts – Advanced Search Time Range centralizes threat events with a focus on hosts that have reported a threat detection where the threat was not removed (and might still be present on the endpoint).
Bitdefender-HyperDetected Top 10 Threats– Advanced Search Time Range centralizes aggregated threat events. This search provides information about the top 10 detected threats HyperDetect module as well as the number of detections.
Incident Sensor
Bitdefender-Incident Activity Report – Advanced Search Time Range centralizes events about incidents generated by the GravityZone platform. You can view the incident ID of such events, incident severity, and detection names if malware was indeed detected in the incident.
Bitdefender-Incidents Detection by Attack Types – Advanced Search Time Range centralizes aggregated events about incidents generated by the GravityZone platform. The quick search helps you have a view of all incidents based on the attack types detected.
Bitdefender- Incidents High Severity – Advanced Search Time Range centralizes events about the high-severity incidents generated by the GravityZone platform. The quick search helps you focus on high-severity cases and understand the total amount of events generated through such cases quickly.
Antimalware
Bitdefender-Malware Activity Report – Advanced Search Time Range centralizes events in which malware was detected. You can view information such as the timestamp of the detection, malware name, file path, and IP of the endpoint.
Bitdefender- Malware Detections by Threats – Advanced Search Time Range centralizes aggregated events in which malware was detected. The quick search provides you with details about the number of detections reported on a single malware across your protected endpoints.
Bitdefender-Malware Still Infected Hosts– Advanced Search Time Range centralizes events in which the scanned item is ignored, restored, or still present. You can view details like the IP address, username, computer name, malware type, malware name, and action state.
Bitdefender-Malware Top 10 Threats – Advanced Search Time Range centralizes aggregated events in which malware was detected. The quick search provides you with the top 10 threats detected by the Antimalware module and the number of detections.
Note
The saved searches specific to GravityZone On-premises console are available in IBM QRadar.
To use these searches follow the steps below:
Click the Log Activity tab.
Click Quick Searches from the upper left side of the page. You should see a list with all the saved searches, custom and predefined.
If the searches are unlisted, follow these steps:
Click the Search button from the upper left side of the page and select New Search.
Type the name of the search in the text box or select it from the Available Saved Searches.
Click the Load button.
Once loaded, select the Include in my Quick Searches checkbox.
Click the Search button from the lower right side of the page. Once completed you can view the search in the Quick Searches list.
Select the search of interest to list out all the matching events.
View and explore events
The integration provides you with the possibility to view events in real time and investigate them properly using customizable queries.
To investigate an event:
Access the Log Activity tab.
Click Quick Searches.
Select a predefined search.
Customize or use the corresponding default query.
Click Search.
Double click the event of your interest. You can view the details in the Event Information widow.
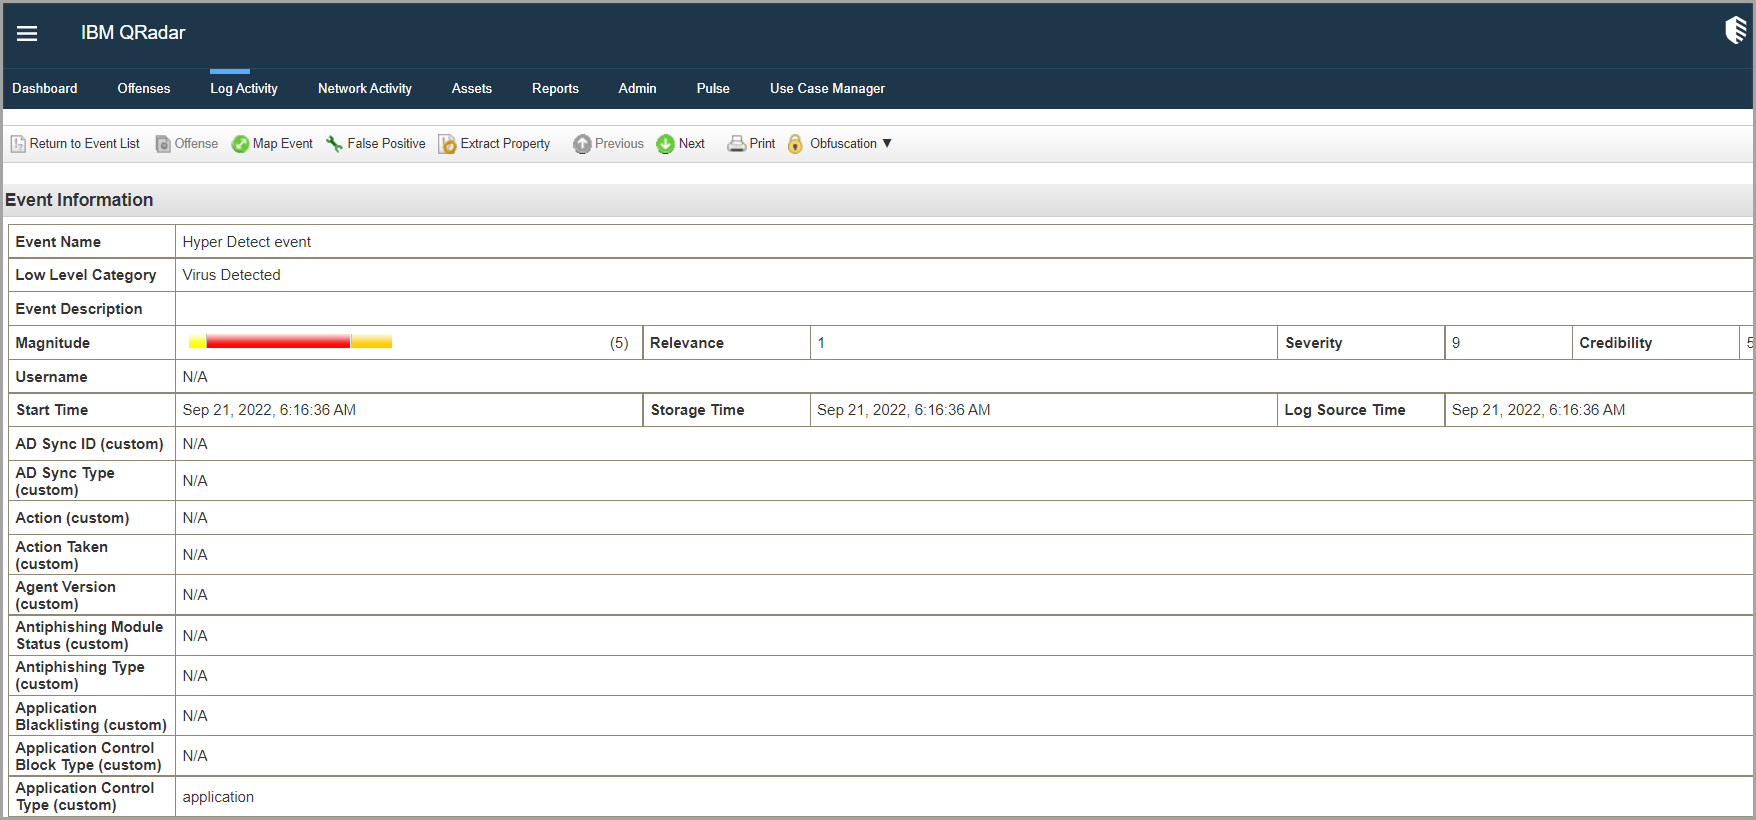
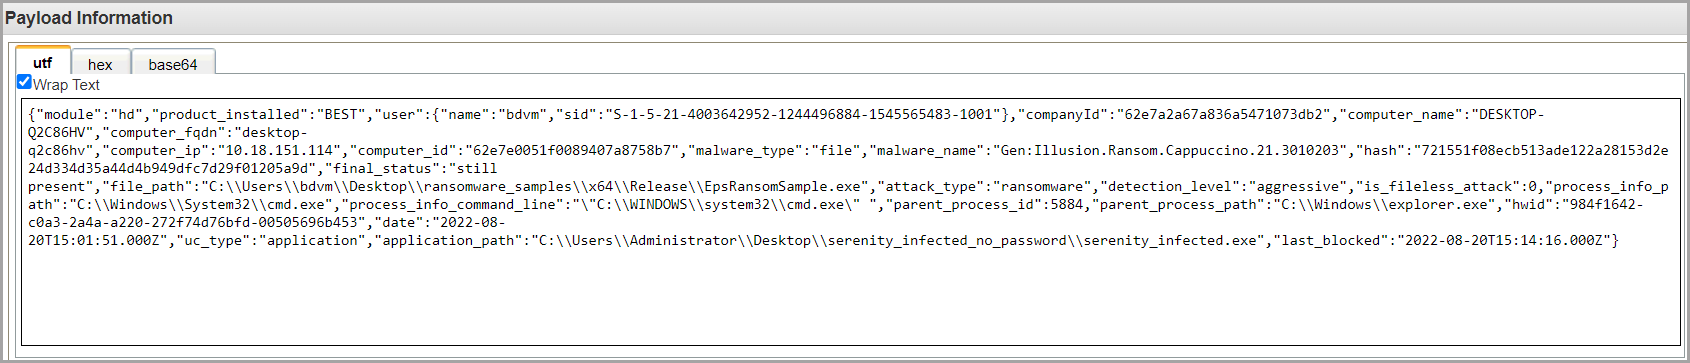
In the same window, you can also view the event in JSON format.
To find more information about the GravityZone events, refer to Event Types.