Container protection (deployed through a Security Container)
The Container Protection feature offers protection for Linux container workloads and their host, by extending and augmenting the security layers the host operating system. It makes use of offering server workload Endpoint Detection and Response, Advanced Anti-Exploit, Linux-specific anti-exploit technologies, and Antimalware scanning services and threat prevention. You can selectively enable or disable each security module.
Important
This feature can be deployed through two components:
A BEST agent with the Container Protection module included that has been installed on the Linux host that has Docker installed.
A Security Container deployed under the Linux host endpoint. A Security Container is a dedicated Docker container running an Ubuntu 20.04 base image and the official Debian package of BEST for Linux. It runs as a privilege container on a container host.
This guide provides you information for how to deploy the feature using a Security Container.
Tip
For the purpose of this guide, we shall refer to the Security Container as a BSC (Bitdefender Security Container).
The Security Container currently offers access to a limited set of the features:
Antimalware
EDR Sensor
Advanced Anti-Exploit
Container Protection
When deployed on a Linux host, the Security Container has the capability to protect the host and also other containers that are running on the host.
Components
Container Protection uses the following components:
GravityZone Control Center
A Security Container.
A Linux host with no security agent installed.
Install and configure Container Protection
For the purpose of this guide, we will show how to deploy a Security Container on a Kubernetes cluster.
There are three possible scenarios for installing this feature on your endpoints:
Log in to GravityZone Control Center.
Go to Network > Installation Packages from the left side menu.
Select the package you want to use for the installation process.

The package must have the Container Protection module enabled.
Tip
For information on how to edit or create a new package, refer to Create installation packages.
Click Download and select Security Container:
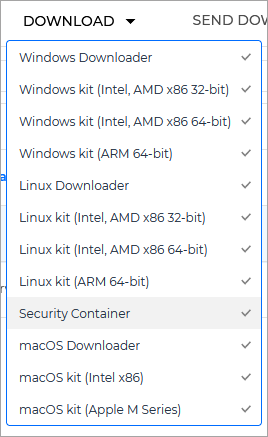
This opens the Download Security Container screen. The screen provides scripts for installing Security Container on all supported Kubernetes environments.

Important
Currently, Openshift environments are compatible only with Azure Kubernetes Service (AKS) and VMware.
Select the
 Copy button next to the environment on which you want to install the Security Container.
Go to your environment and run the script:
curl -s https://download.bitdefender.com/business/k8s/bitdefender-security-container | bash -s -- --server cloudirl-ecs.gravityzone.bitdefender.com:443 --company <COMPANY_ID>
configmap/bitdefender-security-container-config configured
daemonset.apps/bitdefender-security-container created
Note
This will deploy an instance of Security Container on every host in your designated cluster.
The resources will be created in the namespace called
bitdefender-security-container.Check if all your pods are running:
root@tcor-temp-workspace:~# kubectl get pods -n bitdefender-security-container -o wide
NAME                                   READY   STATUS    RESTARTS   AGE    IP             NODE    NOMINATED NODE   READINESS GATES
bitdefender-security-container-6kzg7   1/1     Running   0          109s   10.17.13.92    node1   <none>           <none>
bitdefender-security-container-9m6bg   1/1     Running   0          109s   10.17.13.94    node4   <none>           <none>
bitdefender-security-container-fv7qc   1/1     Running   0          109s   10.17.13.123   node2   <none>           <none>
bitdefender-security-container-txnd6   1/1     Running   0          109s   10.17.13.93    node3   <none>           <none>
The pods are deployed using a DaemonSet object. This ensures that a single pod always runs on each cluster node. If an error occurs and the pod exits, the DaemonSet will create another pod automatically.
root@tcor-temp-workspace:~# kubectl get daemonsets -n bitdefender-security-container
NAME                             DESIRED   CURRENT   READY   UP-TO-DATE   AVAILABLE   NODE SELECTOR   AGE
bitdefender-security-container   4         4         4       4            4           <none>          5m24s
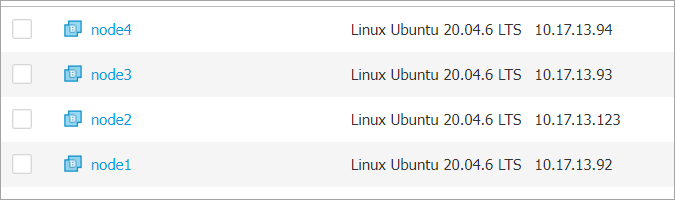
Go to GravityZone console and navigate to the Network page from the left side menu. Check that the cluster nodes appear as container hosts.
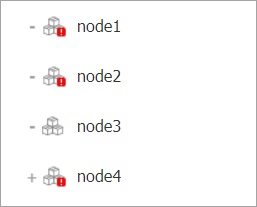
While still on the Network page, go to Containers > Custom Container Groups, and check that there is a container group shown for each cluster node.
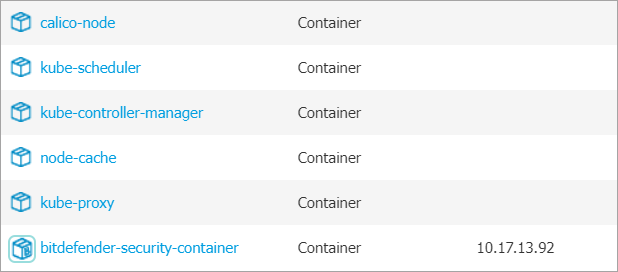
Click on each of the container group to open them and make sure that all are containers shown in Gravity Zone, along with the Security Container which has a distinctive icon.
Note
There may be other Kubernetes infrastructure containers already running on the node.
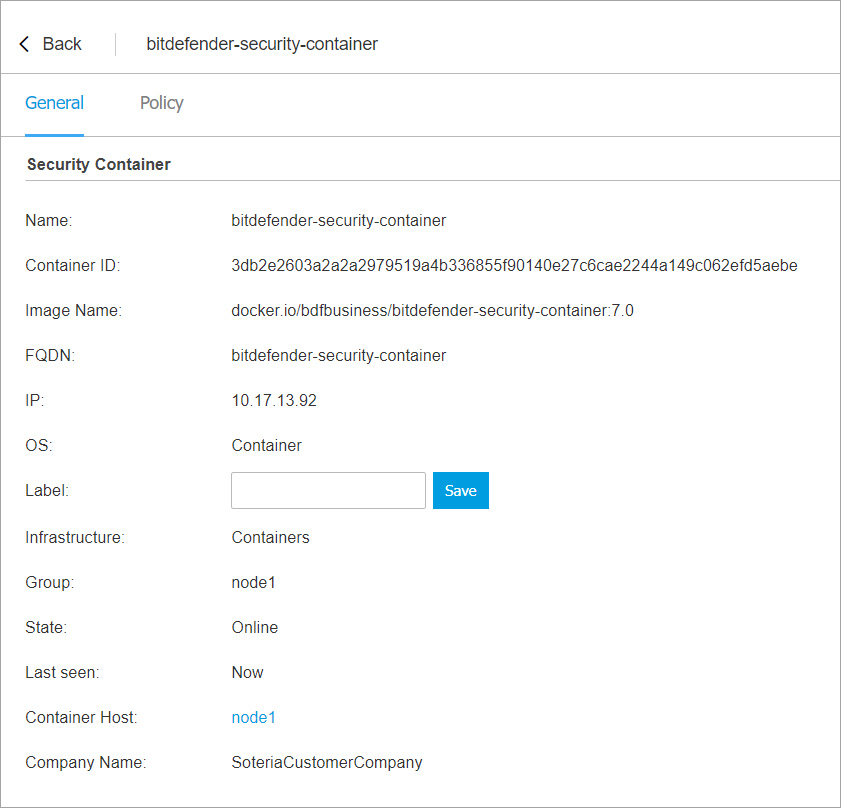
You can click on the Security Container to display additional information.
Verify the deployment using either of these options:
In your Kubernetes environment, use the
kubectl get pods -n bitdefender-security-containerentry.In the GravityZone console, go to the Network page from the left side menu.
Test out the new feature
Test the deployment
To make sure the deployment was successful on a specific node, follow the steps below.
In order to interact with the Security Container that was deployed on that node, it is necessary to open a shell inside the container residing in the pod. Once there is an open shell, we can interact with all the product files (binaries, logs and others) as if the product was installed on a regular machine.
Note
The container logs do not contain the product logs, they need to be accessed from inside the container.
Open a shell inside one of the running pods and check that the product exists.
root@tcor-temp-workspace:~# kubectl exec -it bitdefender-security-container-6kzg7 -n bitdefender-security-container -- bash
root@node1:~# /opt/bitdefender-security-tools/bin/bdsecd -V
Bitdefender Security Tools version 7.0.5.200049 (d0fd7aa8)
Check that the BEST processes are running.
root@node1:~# ps afx | grep bitdef
  27820 ?        S      0:00  |       \_ /bin/sh -c cd /; "/opt/bitdefender-security-tools/bin/bdwatchdogd" -c "/opt/bitdefender-security-tools/etc/bdwatchdogd.json"
  27821 ?        S      0:00  |           \_ /opt/bitdefender-security-tools/bin/bdwatchdogd -c /opt/bitdefender-security-tools/etc/bdwatchdogd.json
  27822 ?        Sl     0:43  |               \_ /opt/bitdefender-security-tools/bin/bdsecd -c /opt/bitdefender-security-tools/etc/bdsecd.json
  27920 ?        Sl     0:33  |               |   \_ /opt/bitdefender-security-tools/bin/bdsecd -c /opt/bitdefender-security-tools/etc/bdsecd.json -m fanotify -M
  27932 ?        S      0:00  |               |   |   \_ /opt/bitdefender-security-tools/bin/bdsecd -c /opt/bitdefender-security-tools/etc/bdsecd.json -m fanotify -M
  27936 ?        S      0:00  |               |   |   |   \_ /opt/bitdefender-security-tools/bin/bdsecd -c /opt/bitdefender-security-tools/etc/bdsecd.json -m fanotify -M
  33967 ?        S      0:00  |               |   |   \_ /opt/bitdefender-security-tools/bin/bdsecd -c /opt/bitdefender-security-tools/etc/bdsecd.json -m fanotify -M
  33968 ?        S      0:00  |               |   |   |   \_ /opt/bitdefender-security-tools/bin/bdsecd -c /opt/bitdefender-security-tools/etc/bdsecd.json -m fanotify -M
  33977 ?        S      0:00  |               |   |   \_ /opt/bitdefender-security-tools/bin/bdsecd -c /opt/bitdefender-security-tools/etc/bdsecd.json -m fanotify -M
  33978 ?        S      0:00  |               |   |   |   \_ /opt/bitdefender-security-tools/bin/bdsecd -c /opt/bitdefender-security-tools/etc/bdsecd.json -m fanotify -M
  33995 ?        S      0:00  |               |   |   \_ /opt/bitdefender-security-tools/bin/bdsecd -c /opt/bitdefender-security-tools/etc/bdsecd.json -m fanotify -M
  33996 ?        S      0:00  |               |   |   |   \_ /opt/bitdefender-security-tools/bin/bdsecd -c /opt/bitdefender-security-tools/etc/bdsecd.json -m fanotify -M
  34005 ?        S      0:00  |               |   |   \_ /opt/bitdefender-security-tools/bin/bdsecd -c /opt/bitdefender-security-tools/etc/bdsecd.json -m fanotify -M
  34006 ?        S      0:00  |               |   |   |   \_ /opt/bitdefender-security-tools/bin/bdsecd -c /opt/bitdefender-security-tools/etc/bdsecd.json -m fanotify -M
  34015 ?        S      0:00  |               |   |   \_ /opt/bitdefender-security-tools/bin/bdsecd -c /opt/bitdefender-security-tools/etc/bdsecd.json -m fanotify -M
  34016 ?        S      0:00  |               |   |   |   \_ /opt/bitdefender-security-tools/bin/bdsecd -c /opt/bitdefender-security-tools/etc/bdsecd.json -m fanotify -M
  34025 ?        S      0:00  |               |   |   \_ /opt/bitdefender-security-tools/bin/bdsecd -c /opt/bitdefender-security-tools/etc/bdsecd.json -m fanotify -M
  34066 ?        S      0:00  |               |   |       \_ /opt/bitdefender-security-tools/bin/bdsecd -c /opt/bitdefender-security-tools/etc/bdsecd.json -m fanotify -M
  28649 ?        Sl     0:11  |               |   \_ /opt/bitdefender-security-tools/bin/bdsecd -c /opt/bitdefender-security-tools/etc/bdsecd.json -m antimalware -M config=/opt/bitdefender-security-tools/var/lib/modules/antimalware/update.jso.temp
  29354 ?        Sl     1:31  |               |   \_ /opt/bitdefender-security-tools/bin/bdsecd -c /opt/bitdefender-security-tools/etc/bdsecd.json -m ctc -M config=/opt/bitdefender-security-tools/var/lib/modules/ctc/update.jso.temp
  27823 ?        Sl     0:04  |               \_ /opt/bitdefender-security-tools/bin/updated -c /opt/bitdefender-security-tools/etc/bdsecd.json
  27824 ?        Sl     0:04  |               \_ /opt/bitdefender-security-tools/bin/epagngd -c /opt/bitdefender-security-tools/etc/bdsecd.json
Note
There are multiple fanotify processes as multiple containers that were already running on the node.
Go to the Network page from the left side menu of GravityZone Control Center.
Select the Container host you want to verify to display additional details.
Go to the Protection tab and check the following information:
Under the Agent section make sure the Primary scan engine is
Central Scanand Fallback scan engine isHybrid Scan.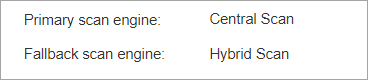
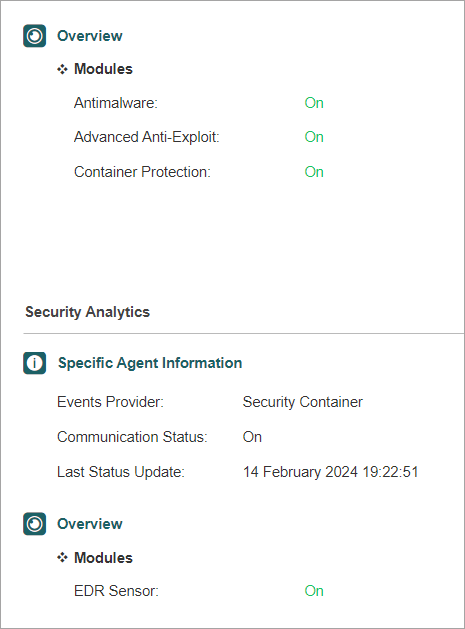
Under the Overview section, make sure the Antimalware, Advanced Anti-Exploit, Container Protection, and EDR Sensor features are enabled.
If all checks are passed, you have confirmed that the deployment was successful. You can repeat the steps for all the nodes in the cluster.
Test out On-Access protection
To run a basic test for Antimalware On-Access scanning on a BSC and verify that the protection covers both the container host and all managed running containers follow the steps below.
As the environment is a Kubernetes cluster, in order to create other pods in the same way as BSC was deployed (one pod for each cluster node), a DaemonSet definition is needed. The following definition describes a DaemonSet of CentOS 7 containers that are running for 50000 seconds.
apiVersion: apps/v1
kind: DaemonSet
metadata:
  name: centos-temp
  namespace: default
  labels:
    name: centos-temp
spec:
  selector:
    matchLabels:
      name: centos-temp
  template:
    metadata:
      name: centos-temp
      labels:
        name: centos-temp
    spec:
      tolerations:
      - key: node-role.kubernetes.io/master
        operator: Exists
        effect: NoSchedule
      - key: node-role.kubernetes.io/control-plane
        operator: Exists
        effect: NoSchedule
      containers:
      - name: centos-temp
        image: centos:7
        command: ["sleep", "50000"]
Save this definition in a file named
centos.yaml, outside of the cluster.Run this command that also slightly alters the file in order to create multiple DaemonSets.
for i in {1..5}; do sed "s/centos-temp/centos-temp$i/g" centos.yaml > /tmp/centos-tmp.yaml && kubectl apply -f /tmp/centos-tmp.yaml; done
daemonset.apps/centos-temp1 created
daemonset.apps/centos-temp2 created
daemonset.apps/centos-temp3 created
daemonset.apps/centos-temp4 created
daemonset.apps/centos-temp5 created
Wait until the objects are created and all the pods are running.
root@tcor-temp-workspace:~# kubectl get pods -o wide
NAME                 READY   STATUS    RESTARTS   AGE   IP               NODE    NOMINATED NODE   READINESS GATES
centos-temp1-4krnb   1/1     Running   0          51s   10.233.71.61     node3   <none>           <none>
centos-temp1-6fq8v   1/1     Running   0          51s   10.233.75.61     node2   <none>           <none>
centos-temp1-7fhqp   1/1     Running   0          51s   10.233.102.135   node1   <none>           <none>
centos-temp1-s2985   1/1     Running   0          51s   10.233.74.65     node4   <none>           <none>
centos-temp2-kv7sz   1/1     Running   0          51s   10.233.71.28     node3   <none>           <none>
centos-temp2-m48hx   1/1     Running   0          51s   10.233.75.4      node2   <none>           <none>
centos-temp2-n2z9c   1/1     Running   0          51s   10.233.74.127    node4   <none>           <none>
centos-temp2-pwc69   1/1     Running   0          51s   10.233.102.133   node1   <none>           <none>
centos-temp3-b8vdm   1/1     Running   0          50s   10.233.75.26     node2   <none>           <none>
centos-temp3-cxjrz   1/1     Running   0          50s   10.233.74.66     node4   <none>           <none>
centos-temp3-p8qxs   1/1     Running   0          50s   10.233.71.26     node3   <none>           <none>
centos-temp3-ztqrb   1/1     Running   0          50s   10.233.102.157   node1   <none>           <none>
centos-temp4-4chdk   1/1     Running   0          50s   10.233.75.21     node2   <none>           <none>
centos-temp4-8fqtx   1/1     Running   0          50s   10.233.74.121    node4   <none>           <none>
centos-temp4-cqchs   1/1     Running   0          50s   10.233.71.21     node3   <none>           <none>
centos-temp4-lptjt   1/1     Running   0          50s   10.233.102.136   node1   <none>           <none>
centos-temp5-8xx8z   1/1     Running   0          50s   10.233.75.62     node2   <none>           <none>
centos-temp5-hbdtk   1/1     Running   0          49s   10.233.102.139   node1   <none>           <none>
centos-temp5-kfx7t   1/1     Running   0          50s   10.233.74.92     node4   <none>           <none>
centos-temp5-lzq44   1/1     Running   0          50s   10.233.71.60     node3   <none>           <none>
Test the feature on the on a single cluster node:
Go to the Network page from the left side menu in GravityZone, check that 5 new containers were added to the node’s container group.

Create a malware sample file (e.g. EICAR string file) inside a protected path on the container host.
root@node3:~# echo 'X5O!P%@AP[4\PZX54(P^)7CC)7}$EICAR-STANDARD-ANTIVIRUS-TEST-FILE!$H+H*' > /home/test1.txt
The Antimalware On-Access protection feature will automatically detect the EICAR file and move it to quarantine.
Create a malware sample inside a protected path, inside one of the previously deployed containers.
root@tcor-temp-workspace:~# kubectl exec -it centos-temp5-lzq44 -- bash
[root@centos-temp5-lzq44 /]# echo 'X5O!P%@AP[4\PZX54(P^)7CC)7}$EICAR-STANDARD-ANTIVIRUS-TEST-FILE!$H+H*' > /home/test2.txt
The Antimalware On-Access protection feature will automatically detect the EICAR file and move it to quarantine.
Go to the Incidents page from the left side menu in GravityZone, and check that there are 2 incidents originating from the Antimalware feature, one for
test1.txt, one fortest2.txt.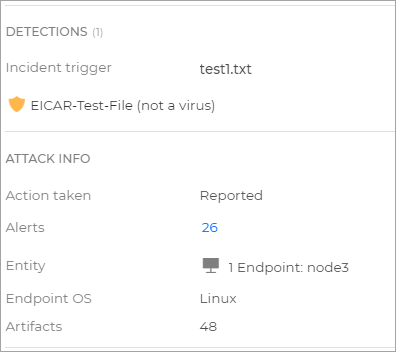

You can now remove the pods you created for this test.
Product updates
Unlike the package version of BEST Linux v7, the Security Container does not support product updates. When a new image version is released, the Security Container needs to be redeployed.
Security content updates
You can perform security content updates using one of these procedures:
Set up automatic signature updates, by enabling them in the Gravity Zone policy that is applied on the container host.
Manually perform the update from Gravity Zone by creating an Update task on the container host.