Antimalware
The Antimalware module protects Exchange mail servers against all kinds of malware threats (viruses, Trojans, spyware, rootkits, adware, etc.), by detecting infected or suspect items and attempting to disinfect them or isolating the infection, according to the specified actions.
Antimalware scanning is performed at two levels:
Transport-level scanning
Bitdefender Endpoint Security Tools integrates with the mail transport agents to scan all email traffic.
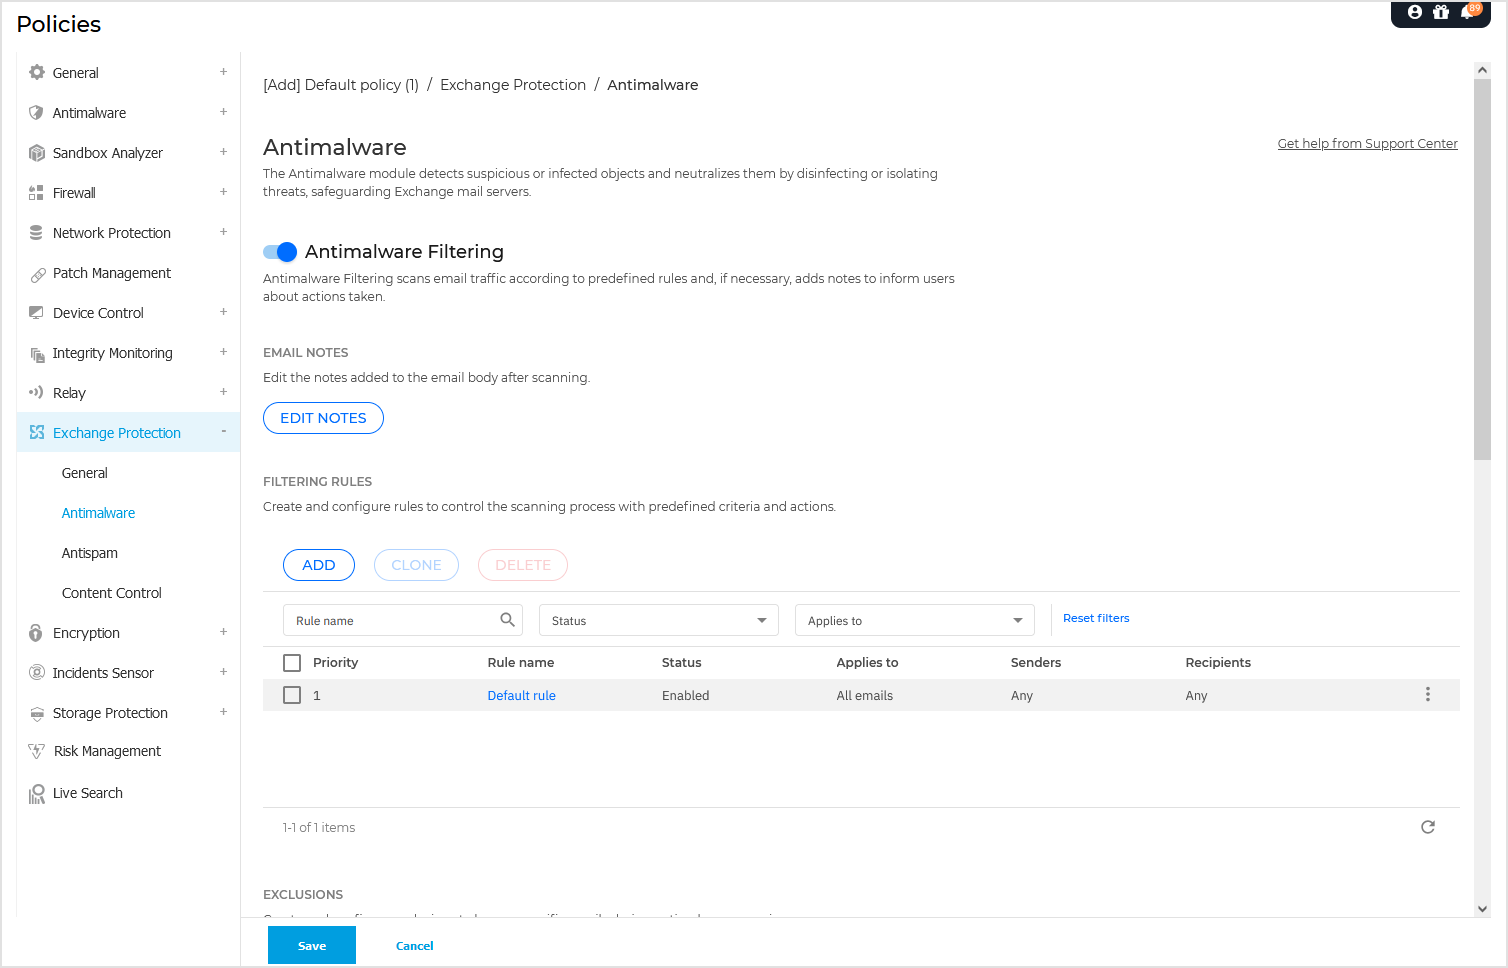
By default, transport level scanning is enabled. Bitdefender Endpoint Security Tools is filtering the email traffic and, if required, informs the users of the taken actions by adding a text in the email body.
Click the toggle to enable Antimalware Filtering.
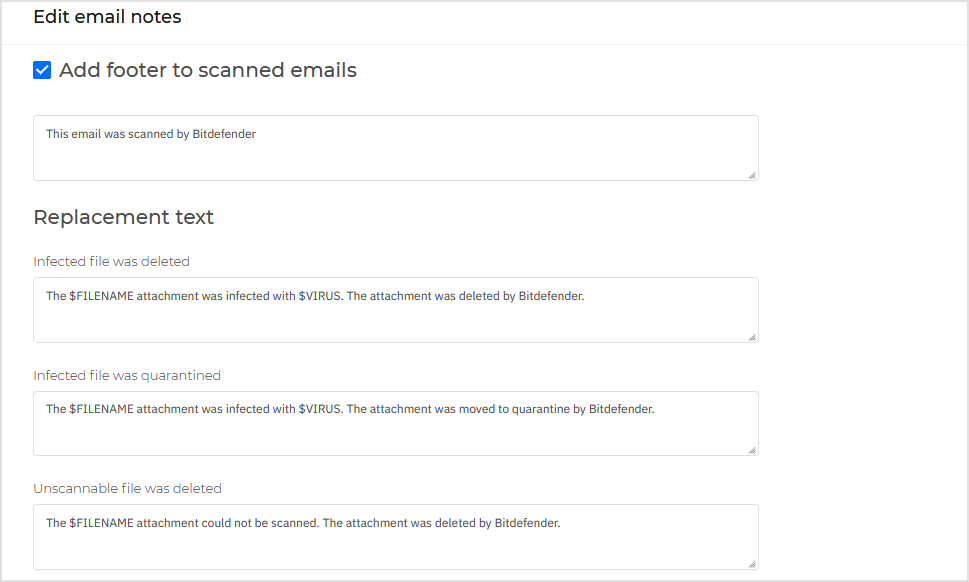
To configure the notification text after scanning, click Edit notes. On the configuration page, the following options are available:
Add footer to scanned emails. Select this check box to add a sentence at the bottom of the scanned emails. To change the default text, enter your message in the text box below.
Replacement text. For emails whose attachments have been deleted or quarantined, a notification file can be attached. To modify the default notification texts, enter your message in the corresponding text boxes.
The antimalware filtering relies on rules. Each email that reaches the mail server is checked against the antimalware filtering rules, by order of priority, until it matches a rule. The email is then processed according to the options specified by that rule.
Managing filtering rules
You can view all existing rules listed in the table, together with information on their priority, status and scope. The rules are ordered by priority with the first rule having the highest priority.
Any antimalware policy has a default rule that becomes active once the antimalware filtering is enabled. What you need to know about the default rule:
You cannot copy, disable or delete the rule.
You can modify only the scanning settings and actions.
The default rule priority is always the lowest.
Creating rules
You have two alternatives for creating filtering rules:
Start from the default settings, by following these steps:
Click Add button at the upper side of the table to open the configuration page.
Configure the rule settings. For details regarding the options, refer to Rule options.
Click Add. The rule is listed first in the table.
Use a clone of a custom rule as a template, by following these steps:
Select the rule that you want from the table.
Click the Clone button at the upper side of the table to open the configuration page.
Adjust the rule options according to your needs.
Click Add. The rule is listed first in the table.
Editing rules
To edit an existing rule:
Click the rule name to open the configuration window.
Enter the new values for the options you want to modify.
Click Save. The changes take effect after the policy is saved.
Setting rule priority
To change a rule’s priority:
Go to the rule to be moved, click the
 More menu and select Edit priority.
Use the arrows to change the priority.
Click the
 OK icon to confirm the changes.
To set a rule to be first in the list, click the corresponding More button and select Move to top.
Removing rules
You can delete one or several custom rules at once. All you need to do is:
Select the checkbox of the rules to be deleted.
Click the Delete button at the upper side of the table. Once a rule is deleted, you cannot recover it.
To delete a single rule, click the corresponding More menu and select Delete.
Rule options
The following options are available:
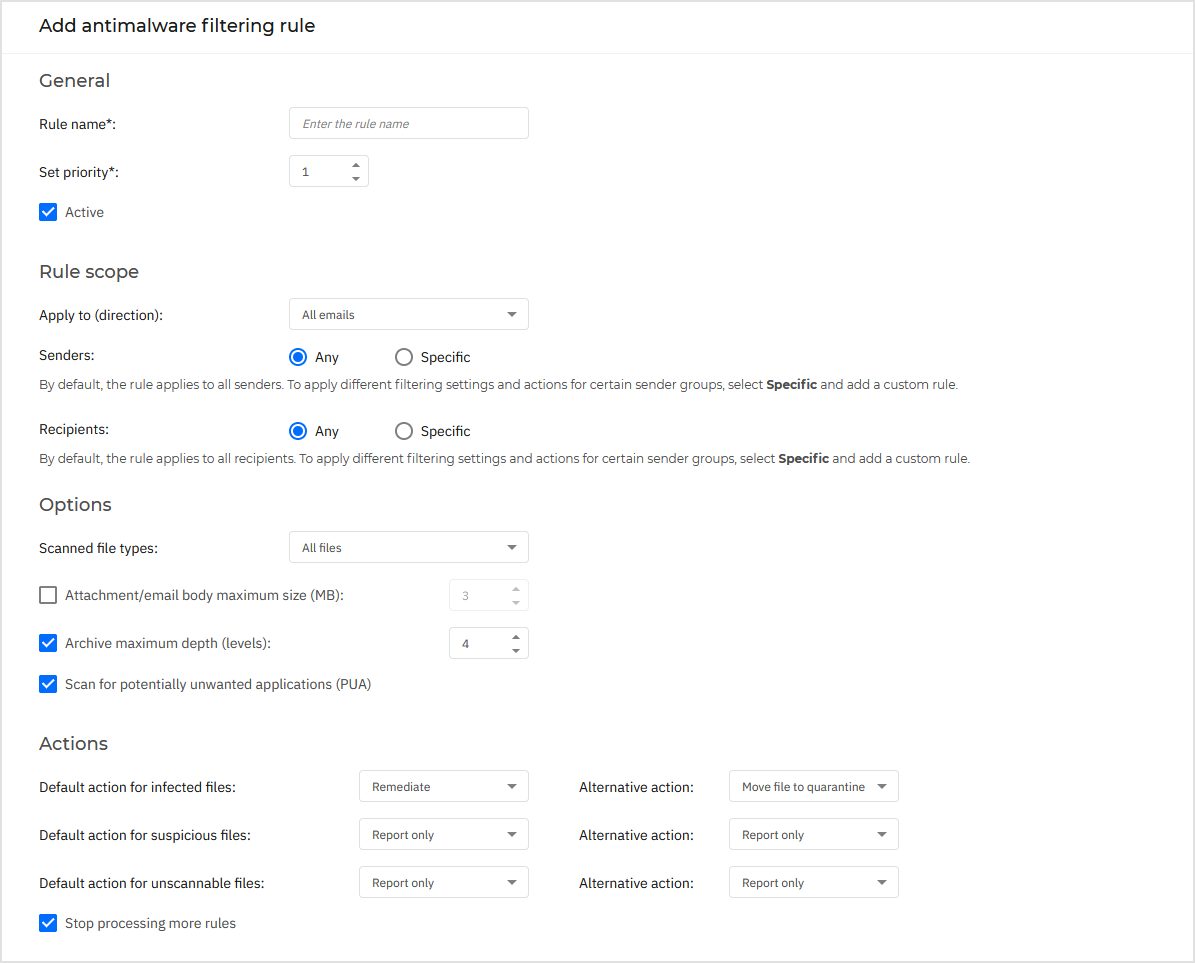
General. In this section you must set a name for the rule, otherwise you cannot save it. Select the Active check box if you want the rule to be effective after the policy is saved.
Rule scope. You can restrict the rule to apply only to a subset of emails, by setting the following cumulative scope options:
Apply to (direction). Select the email traffic direction to which the rule applies.
Senders. You can decide whether the rule applies for any sender or only for specific senders. To narrow the senders range, click the Specific button and select the desired groups from the table on the left. View the selected groups in the table on the right.
Recipients. You can decide whether the rule applies for any recipient or only for specific recipients. To narrow the recipients range, click the Specific button and select the desired groups from the table on the left. You can view the selected groups in the table on the right.
The rule applies if any of the recipients matches your selection. If you want to apply the rule only if all recipients are in the selected groups, select Match all recipients.
Note
The addresses in the Cc and Bcc fields also count as recipients.
Important
The rules based on user groups apply only to Hub Transport and Mailbox roles.
Options. Configure the scan options for emails matching the rule:
Scanned file types. Use this option to specify which file types you want to be scanned. You can choose to scan all files (regardless of their file extension), application files only, or specific file extensions you consider to be dangerous. Scanning all files provides the best protection, while scanning only applications is recommended for a quicker scan.
Note
Application files are far more vulnerable to malware attacks than other types of files. For more information, refer to appendices.extensions.app.
If you want to scan only files with specific extensions, you have two alternatives:
User defined extensions, where you must provide only the extensions to be scanned.
All files, except specific extensions, where you must enter only the extensions to be skipped from scanning.
Attachment / email body maximum size (MB). Select this check box and enter a value in the corresponding field to set the maximum accepted size of an attached file or of the email body to be scanned.
Archive maximum depth (levels). Select the check box and choose the maximum archive depth from the corresponding field. The lower the depth level is, the higher the performance and the lower the protection grade.
Scan for potentially unwanted applications (PUA). Select this check box to scan for possibly malicious or unwanted applications, such as adware, which may install on systems without user’s consent, change the behavior of various software products and lower the system performance.
Actions. You can specify different actions for the security agent to automatically take on files, based on the detection type.
The detection type separates the files into three categories:
Infected files. Bitdefender detects files as infected through various advanced mechanisms, which include malware signatures, machine learning and artificial intelligence (AI) based technologies.
Suspicious files. These files are detected as suspicious by the heuristic analysis and other Bitdefender technologies. These provide a high detection rate, but the users must be aware of certain false positives (clean files detected as suspicious) in some cases.
Unscannable files. These files cannot be scanned. Unscannable files include but are not limited to password-protected, encrypted or over-compressed files.
For each detection type, you have a default or main action and an alternative action in case the main one fails. Though not recommended, you can change these actions from the corresponding menus. Choose the action to be taken:
Remediate. Move the infected files to quarantine, denies access to them, and disinfect them by removing the malware code and reconstructing the original files. For particular types of malware, disinfection is not possible because the detected file is entirely malicious. It is recommended to always keep this as the first action to be taken on infected files. Suspicious files cannot be disinfected, because no disinfection routine is available.
Reject / Delete email. On servers with Edge Transport role, the detected email is rejected with a 550 SMTP error code. In all other cases, the email is deleted without any warning. It is advisable to avoid using this action.
Delete file. Deletes the attachments with issues without any warning. It is advisable to avoid using this action.
Replace file. Deletes the files with issues and inserts a text file that notifies the user of the actions taken.
Move file to quarantine. Moves detected files to the quarantine folder and inserts a text file that notifies the user of the actions taken. Quarantined files cannot be executed or opened; therefore, the risk of getting infected disappears. You can manage quarantine files from the Quarantine page.
Note
The quarantine for Exchange Servers requires additional hard-disk space on the partition where the security agent is installed. The quarantine size depends on the number of items stored and their size.
Report only. No action will be taken on detected files. These files will only appear in the scan log. Scan tasks are configured by default to ignore suspect files. You may want to change the default action in order to move suspect files to quarantine.
By default, when an email matches the rule scope, it is processed exclusively in accordance with the rule, without being checked against any other remaining rule. If you want to continue checking against the other rules, clear the checkbox Stop processing more rules.
Creating and configuring exclusions
If you want certain email traffic to be ignored by any filtering rule, you can define scan exclusions.
To create an exclusion:
Click Add to open the configuration page.
Configure the exclusion settings. For details on the options, refer to Rule options.
Click Add. The exclusion is added to the table.
Exchange store scanning
Exchange Protection uses Exchange Web Services (EWS) from Microsoft to allow scanning the Exchange mailbox and public folder databases. You can configure the antimalware module to run on-demand scan tasks regularly on the target databases, according to the schedule you specify.
Note
On-demand scanning is available only for Exchange Servers with the Mailbox role installed.
On-demand scanning increases resource consumption and, depending on the scanning options and the number of objects to be scanned, can take considerable time to complete.
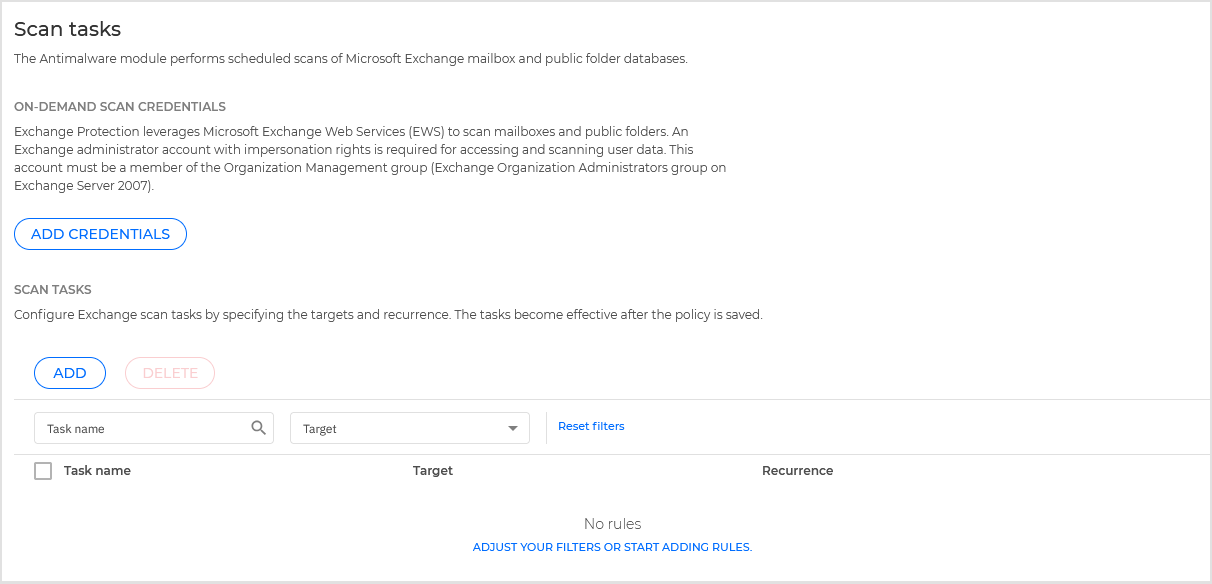
On-demand scanning requires an Exchange administrator account (service account) to impersonate Exchange users and to retrieve the target objects to be scanned from the user mailboxes and public folders. It is recommended to create a dedicated account for this purpose.
The Exchange administrator account must meet the following requirements:
It is a member of the Organization Management group (Exchange 2016, 2013 and 2010)
It is a member of the Exchange Organization Administrators group (Exchange 2007)
It has a mailbox attached.
Enabling on-demand scanning
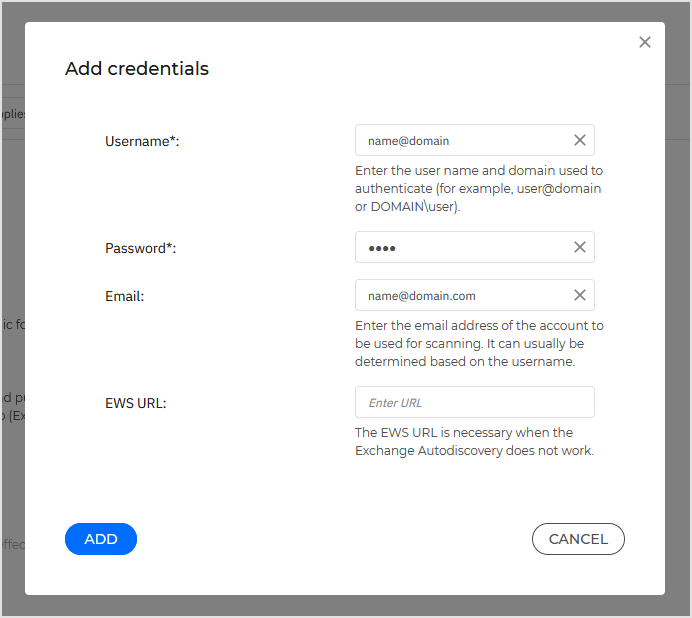
In the Scan tasks section, click Add credentials.
Enter the service account username and password.
If the email differ from the username, you need to also provide the email address of the service account.
Enter the Exchange Web Services (EWS) URL, necessary when the Exchange Autodiscovery does not work.
Click Add.
Note
The username must include the domain name, as in
user@domainordomain\user.Do not forget to update the credentials in Control Center, whenever they have changed.
Managing scan tasks
The scan tasks table shows all scheduled tasks and provides information on their targets and recurrence.
To create tasks for scanning the Exchange Store:
In the Scan tasks section, click the Add button at the upper side of the table to open the settings.
Configure the task settings as described in the following section.
Click Add. The task is added to the list and it becomes effective when the policy is saved.
You can edit a task at any time by clicking the task name.
To remove tasks from the list, select them and click the Delete button at the upper side of the table.
To edit and delete a task, you can also click the corresponding More button and select any option.
Scan task settings
Tasks have a series of settings which you can find described herein:
General. Enter a suggestive name for the task.
Note
You can view the task name in Bitdefender Endpoint Security Tools timeline.
Scheduler. Use the scheduling options to configure the scan schedule. You can set the scan to run every few hours, days or weeks, starting with a specified date and time. For large databases, the scan task may take a long time and may impact the server performance. In such cases, you can configure the task to stop after a specified time.
Note
The antimalware tasks for mailboxes are scheduled on the Exchange server where the Bitdefender Endpoint Security Tools with Security for Exchange module is installed. This means:
The task scheduler is local to the server.
All scheduled scan times are interpreted based on the time zone of that server.
For example, if you schedule a mailbox scan for 03:00 AM, it will run at 03:00 AM server time, regardless of where the mailbox owner (end user) is located geographically.
The Exchange server must be online for the task to run as scheduled. If the scheduled time is missed, the scan will execute at the next recurrence.
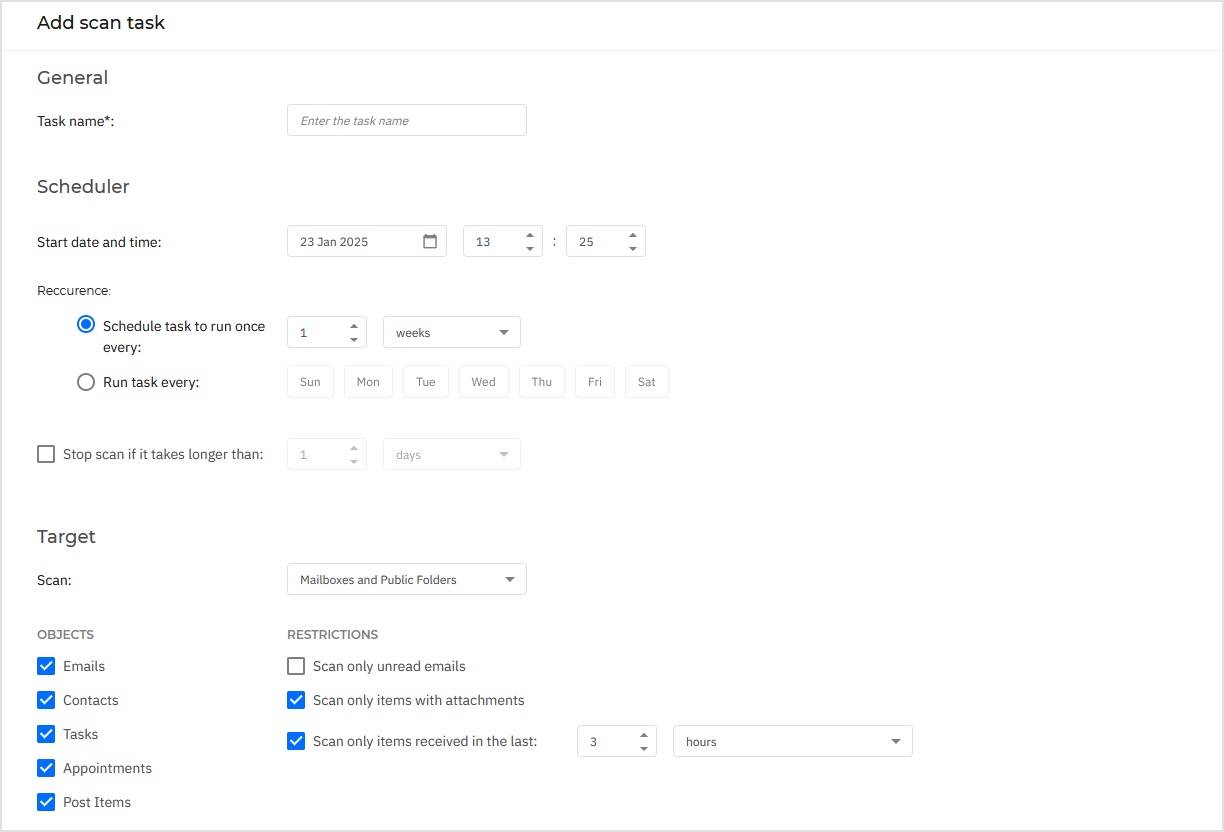
Target. Select the containers and objects to be scanned. You can choose to scan mailboxes, public folders or both. Beside emails, you can choose to scan other objects such as Contacts, Tasks, Appointments and Post items. You can furthermore set the following restrictions to the content to be scanned:
Only unread messages
Only items with attachments
Only new items, received in a specified time interval
For example, you can choose to scan only emails from user mailboxes, received in the last seven days.
Click the toggle to enable Exclusions.
To create an exception, use the fields from the table header as follows:
Select the repository type from the menu.
Depending on the repository type, specify the object to be excluded:
Repository type
Object format
Mailbox
Email address
Public Folder
Folder path, starting from the root
Database
The database identity
Note
To obtain the database identity, use the Exchange shell command:
Get-MailboxDatabase | fl name,identityYou can enter only one item at a time. If you have several items of the same type, you must define as many rules as the number of items.
Click the Add button at the upper side of the table to save the exclusion and add it to the list.
To remove an exception rule from the list, click the corresponding Delete button.
Options. Configure the scan options for emails matching the rule:
Scanned file types. Use this option to specify which file types you want to be scanned. You can choose to scan all files (regardless of their file extension), application files only, or specific file extensions you consider to be dangerous. Scanning all files provides the best protection, while scanning only applications is recommended for a quicker scan.
Note
Application files are far more vulnerable to malware attacks than other types of files. For more information, refer to Application file types.
If you want to scan only files with specific extensions, you have two alternatives:
User defined extensions, where you must provide only the extensions to be scanned.
All files, except specific extensions, where you must enter only the extensions to be skipped from scanning.
Attachment / email body maximum size (MB). Select this check box and enter a value in the corresponding field to set the maximum accepted size of an attached file or of the email body to be scanned.
Archive maximum depth (levels). Select the check box and choose the maximum archive depth from the corresponding field. The lower the depth level is, the higher the performance and the lower the protection grade.
Scan for potentially unwanted applications (PUA). Select this check box to scan for possibly malicious or unwanted applications, such as adware, which may install on systems without user’s consent, change the behavior of various software products and lower the system performance.
Actions. You can specify different actions for the security agent to automatically take on files, based on the detection type.
The detection type separates the files into three categories:
Infected files. Bitdefender detects files as infected through various advanced mechanisms, which include malware signatures, machine learning and artificial intelligence (AI) based technologies.
Suspicious files. These files are detected as suspicious by the heuristic analysis and other Bitdefender technologies. These provide a high detection rate, but the users must be aware of certain false positives (clean files detected as suspicious) in some cases.
Unscannable files. These files cannot be scanned. Unscannable files include but are not limited to password-protected, encrypted or over-compressed files.
For each detection type, you have a default or main action and an alternative action in case the main one fails. Though not recommended, you can change these actions from the corresponding menus. Choose the action to be taken:
Remediate. Deny access to the infected objects and move them to quarantine. Then make an attempt to disinfect the system by removing the malware code and any artifacts created by the malware. For particular types of malware, disinfection is not possible because the detected file is entirely malicious. It is recommended to always keep this as the first action to be taken on infected files. Suspicious files cannot be disinfected, because no disinfection routine is available.
Reject / Delete email. The email is deleted without any warning. It is advisable to avoid using this action.
Delete file. Deletes the attachments with issues without any warning. It is advisable to avoid using this action.
Replace file. Deletes the files with issues and inserts a text file that notifies the user of the actions taken.
Move file to quarantine. Moves detected files to the quarantine folder and inserts a text file that notifies the user of the actions taken. Quarantined files cannot be executed or opened; therefore, the risk of getting infected disappears. You can manage quarantine files from the Quarantine page.
Note
Please note that the quarantine for Exchange Servers requires additional hard-disk space on the partition where the security agent is installed. The quarantine size depends on the number and size of the emails stored.
Report only. No action will be taken on detected files. These files will only appear in the scan log. Scan tasks are configured by default to ignore suspect files. You may want to change the default action in order to move suspect files to quarantine.
By default, when an email matches the rule scope, it is processed exclusively in accordance with the rule, without being checked against any other remaining rule. If you want to continue checking against the other rules, clear the check box If the rule conditions are matched, stop processing more rules.