Install security agents - use cases
Preparing workstations for Bitdefender Endpoint Security Tools remote deployment
To successfully deploy Bitdefender Endpoint Security Tools on target systems, you need to comply with the following prerequisites:
OS requirements
Target endpoints must meet the minimum system requirements.
For some endpoints, you may need to install the latest operating system service pack available, or free up disk space.
Compile a list of endpoints that do not meet the necessary requirements so that you can exclude them from management.
When deploying the agent through a Linux relay, the following additional conditions must be met:
The Relay endpoint must have installed the Samba package (
smbclient) version 4.1.0 or above, along with thesamba-clientdependencies andsamba-commonpackage, and thenetbinary/command to deploy Windows agents.Note
The
netbinary/command is usually delivered with the samba-client and / or samba-common packages. On some Linux distributions (such as CentOS 7.4), thenetcommand is only being installed when installing the full Samba suite (Common + Client + Server). Make sure that your Relay endpoint has thenetcommand available.Target Windows endpoints must have Administrative Share and Network Share enabled.
Target Linux and macOS endpoints must have SSH enabled and firewall disabled.
Administrative privileges
Installation requires administrative privileges. Make sure you have the necessary credentials at hand for all endpoints.
For target endpoints part of a Workgroup, use the credentials of a user with administrative privileges.
For target machines that are joined to an Active Directory domain, use the credentials of a user who belongs to the Domain Users group and is also a member of the local Administrators group on the target machine, or an account that is member of the Domain Admins group. Also, make sure that the user is not member of the Protected Users group.
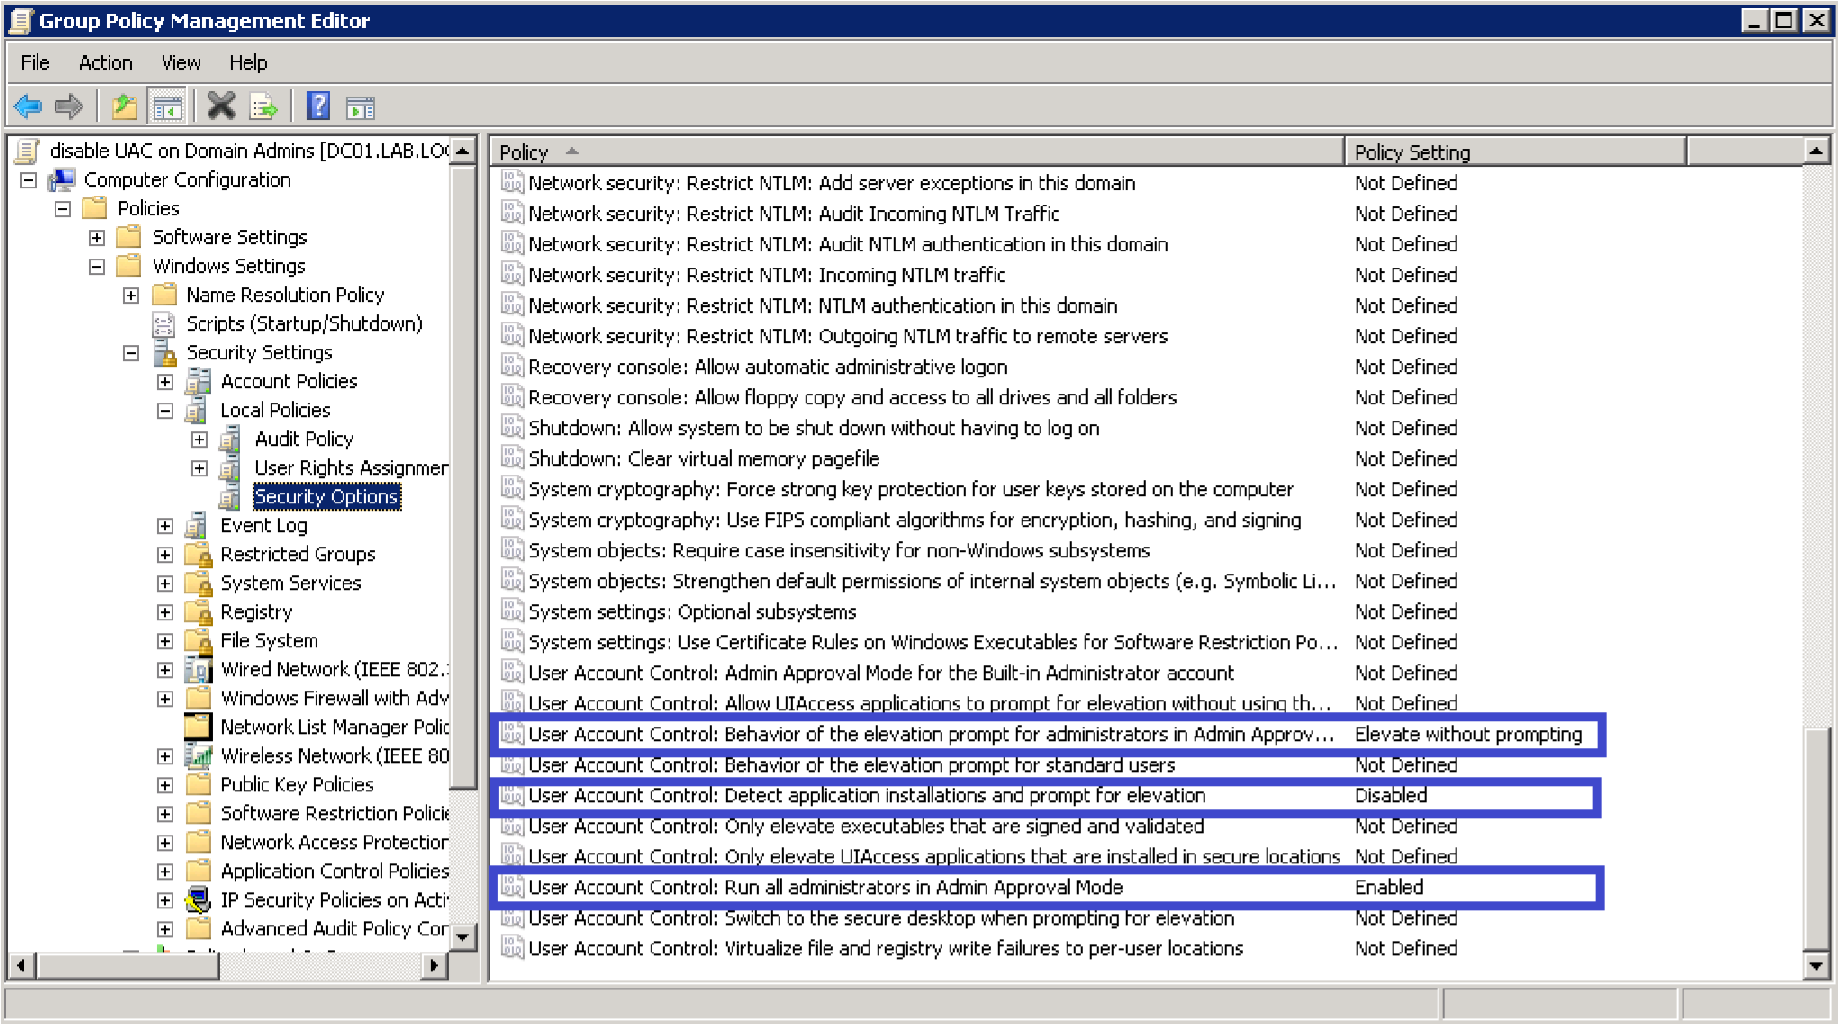
If the administrator wants to configure the task and provide the deployment credentials of users that are members of the Domain Admins security group, a GPO can be configured to apply this security group with the following settings:
[Computer Configuration -> Policies -> Windows Settings -> Security Settings -> Local Policies -> Security Options]Policy
Setting
User Account Control: Behavior of the elevation prompt for administrators in Admin Approval Mode
Elevate without prompting
User Account Control: Detect application installations and prompt for elevation
Disable
User Account Control: Run all administrators in Admin Approval Mode
Enable
Note
As security best practice, after the deployment cycle is completed, revert the settings to their defaults. For the User Access Control (UAC) default configurations, refer to this Microsoft article.
For Windows deployer and target, when the deployment uses a local user account from the target, the user must be a member of the local Administrators group on the target. In addition, any UAC settings that restrict remote actions on the target must be disabled.
To disable remote restrictions, set the
HKEY_LOCAL_MACHINE\SOFTWARE\Microsoft\Windows\CurrentVersion\Policies\System\LocalAccountTokenFilterPolicyregistry key to 1.For Linux or macOS targets, the user account used for deployment must be present in the
sudoersfile.
Connectivity requirements
You have to configure the firewall to allow the following communication ports, used by the security components, on all workstations and servers that you want to manage, which need to have network connectivity to GravityZone console:
443: the communication port between the GravityZone console and Bitdefender Endpoint Security Tools. This port must be allowed on all network computers.
7074: the communication port used for deployment and update via a Bitdefender Endpoint Security Tools Relay.
Note
These ports must not be used by any other application installed in the network.
It is recommended to use a static IP address for the relay server. If you do not set a static IP, use the machine's hostname.
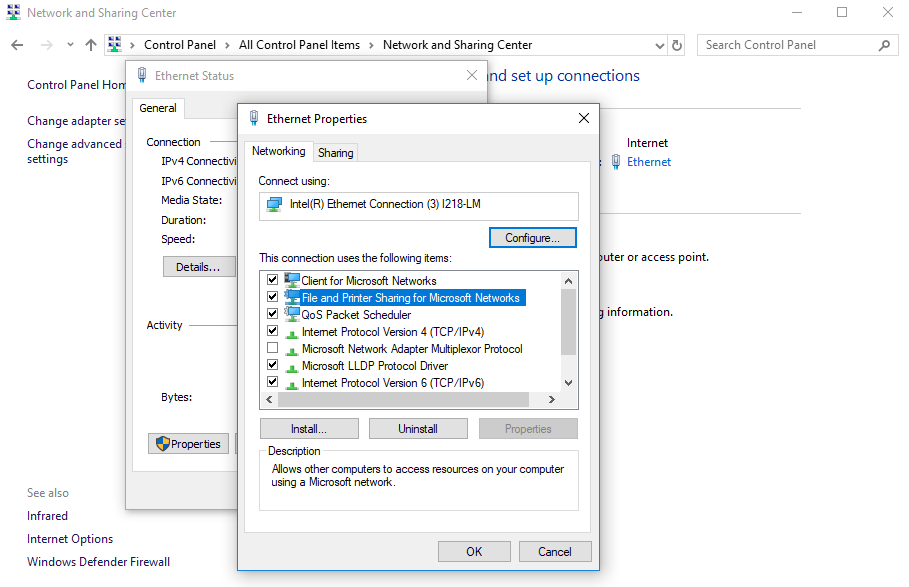
Make sure that the File and Printer Sharing protocol is enabled. This service is using TCP ports 139, 445 and UDP ports 137, 138. To verify if the File and Printer Sharing protocol is enabled you must:
Go to Start > Control Panel > Network and Sharing Center.
Identify which network connection is established and click it.
Click Properties.
Note
For the connection to be successful:
Disable the Windows Firewall, or configure it to allow traffic through the File and Printer Sharing protocol. To disable Windows Firewall, open Control Panel > Windows Firewal and click Off.
Allow ICMP traffic (so you can successfully PING the workstation).
To check that the workstations are correctly configured you must:
Ping the respective workstation.
Try to log on to the administrative share.
Third-party security software removal
Uninstall (not just disable) any existing antimalware, firewall or Internet security software from computers. Running the security agent simultaneously with other security software on an endpoint may affect their operation and cause major problems with the system.
Many of the incompatible security programs are automatically detected and removed at installation time.
To learn more and to check the list of the security software detected by Bitdefender Endpoint Security Tools for Windows operating systems (Windows 7 / Windows Server 2008 R2 and later), refer to Software incompatible with Bitdefender Endpoint Security Tools.
If you want to deploy the security agent on a computer with Bitdefender Antivirus for Mac, you first must remove the latter manually. For the guiding steps, refer to Deploying Bitdefender Endpoint Security Tools on a machine with Bitdefender Antivirus for Mac.
Remote deployment of BEST for Linux on Oracle - SAP
This section provides steps on how to remotely deploy BEST Linux on Oracle - SAP.
On Linux Oracle, remote deployment via SSH is not possible due to the SFTP service. The same issue occurs on Unbreakable Oracle systems.
Resolution:
Edit
sshd_configSearch for the line starting with:
SubsystemComment and add the following line:
Subsystem sftp internal-sftp
Create an uninstall password for Bitdefender Endpoint Security Tools
Overview
In some situations users with administrative privileges can uninstall Bitdefender Endpoint Security Tools (BEST), leaving the system unprotected.
You can help prevent such unauthorized actions by setting up an uninstall password from the GravityZone Control Center.
Warning
BEST for Linux v7 does not support uninstall passwords at this time.
Set up a password
You must set up an uninstall password for:
New deployments
To protect future endpoints, set up the uninstall password before the deployment, from the installation package.
To set the uninstall password from the installation package:
Log in to GravityZone Control Center.
Go to the Network page from the left side menu.
Click on the Installation Packages section.
Click the package that you want to install or create a new one.
Under Settings, select the Set uninstall password check box.
Enter a password considering the complexity requirements.
Click Save
Use this package to install BEST on endpoints. The password will prevent users from uninstalling the agent afterwards.
Existing installation
You can protect the existing endpoints in your network through policy. Edit the policy applied on the endpoints to set up the uninstall password.
To use multiple passwords for groups of endpoints sharing the same policy across your environment, use the uninstall password setting of the installation package.
To configure the uninstall password from policy:
Log in to GravityZone Control Center.
Go to the Policies page from the left side menu.
Choose the policy that you applied on your endpoints.
If the applied policy is the Default one, you must create and assign a new policy.
Go to the General > Settings page.
Under Uninstall Password Configuration, select the Set uninstall password check box.
Enter a password considering the complexity requirements.
Click Save.
Ensure that you apply the policy to your target endpoints.
Note
The uninstall password is managed exclusively by device-type policies. It cannot be managed by rule-based policies.
Install BEST Windows on KMV or Proxmox
If you use BEST on a Windows 11 virtual machine running on KVM or Proxmox, network transfer performance might degrade. This issue occurs only when BEST is installed with the Firewall module.
If you encounter this issue, uninstall the following Windows features:
Virtual Machine Platform
Windows Hypervisor Platform
Windows Docker Desktop and Windows Subsystem for Linux (WSL) require the Windows features listed above to work correctly.
If Docker Desktop is needed on the affected virtual machine, you can install Docker by using Moby as an alternative.
If WSL is needed, you can uninstall the Firewall module from BEST through the policy or through a Reconfigure agent task in GravityZone. However, this completely removes Firewall functionality.
Deploying Bitdefender Endpoint Security Tools on a machine with Bitdefender Antivirus for Mac
This article explains how to deploy the Bitdefender Endpoint Security Tools business product to a machine that has the Bitdefender Antivirus for Mac consumer product installed.
If you choose to replace Bitdefender Antivirus for Mac with Bitdefender Endpoint Security Tools, keep in mind that you can deploy the latter only after you manually remove the consumer product.
This is because Bitdefender Antivirus for Mac has a Tamper protection module, a component that denies any external action over the integrity of the product, making impossible the uninstalling process via silent deployment or manual installation.
To deploy Bitdefender Endpoint Security Tools on a machine that has Bitdefender Antivirus for Mac, follow these steps:
Remove manually Bitdefender Antivirus for Mac using Bitdefender Uninstaller.
Sometimes, the standard Bitdefender Uninstaller may fail or Bitdefender Antivirus for Mac does not exist at its location. In such a situation, you must use Disk Utility.
Restart your Mac.
Deploy Bitdefender Endpoint Security Tools as usual, following the instructions described here.
Installing Bitdefender Endpoint Security Tools through Jamf Pro
Jamf Pro (formerly Casper Suite) is a macOS and iOS management software developed exclusively for Apple platforms. It offers a breadth of functionality in package building, inventory, image management, remote imaging, remote updates, iOS mobile device management and a powerful framework for automated support.
This article describes how to install Bitdefender Endpoint Security Tools on macOS computers through Jamf Pro.
Bitdefender Endpoint Security Tools installation through Jamf Pro 10.x
This section describes how to remotely deploy Bitdefender Endpoint Security Tools through Jamf Pro 10.x.
Before you begin
After installing Bitdefender Endpoint Security Tools, users must approve the Bitdefender system extensions on their Mac. Until users approve the Bitdefender extensions, some features do not work. For details, refer to Bitdefender system extension blocked in macOS.
As administrator, you can pre-approve the Bitdefender extensions and thus eliminate user intervention by whitelisting them in a Mobile Device Management tool such as Jamf Pro. For details, refer to Whitelisting Bitdefender extensions in Jamf Pro 10.x.
To install through Jamf Pro, you have the following options:
Use macOS Downloader, which detects the processor architecture and automatically downloads and installs the appropriate kit for either Intel or Apple M1.
This option is recommended for mixed environments with both processors to save time and effort on your side.
Download and install the full macOS kit manually, paying attention to choose the right package for your processor architecture, be it Intel or Apple.
Note
The steps described below follow the Jamf Pro version 10.5 interface. The Jamf Pro interface may differ in later versions.
Screenshots in this section are indicative and they may be different from your actual experience, based on Jamf Pro version and settings.
You can use macOS Downloader to install Bitdefender Endpoint Security Tools on computers with Intel or Apple processors. In this scenario, macOS Downloader automatically downloads the full kit during the installation process.
Note
The target computers must have access to GravityZone or to a relay to be able to download the macOS kit.
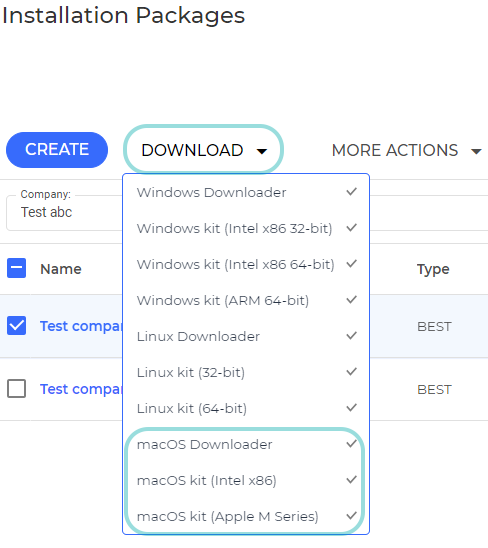
In GravityZone Control Center, make sure you have an installation package configured in Network > Installation Packages
Click Download in the upper-side of the page.
From the drop-down menu, select macOS Downloader and save the
setup_downloader.dmgfile locally.Double-click
setup_downloader.dmgto view the content.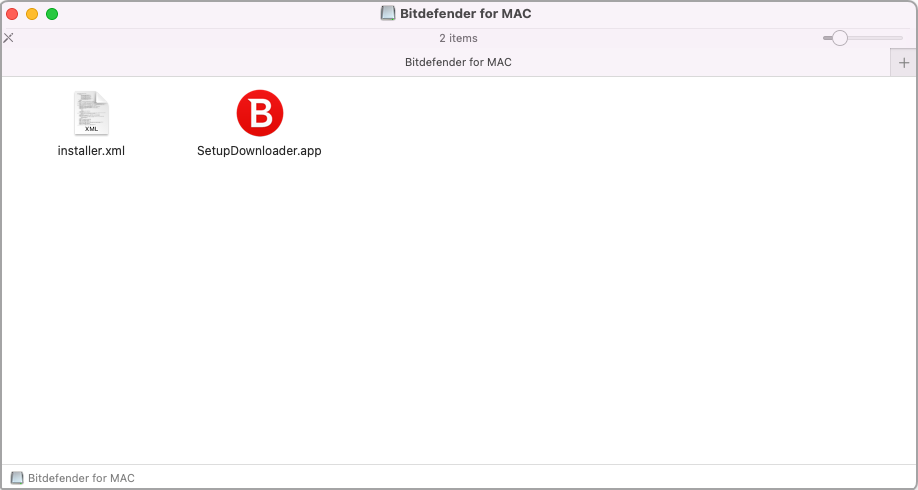
Drag both
SetupDownloader.appandinstaller.xmlto a folder. Example:/Users/Shared.Drag the folder containing the files into Jamf Composer and create an installation file that can be in DMG or PKG format.
Log in to Jamf Pro.
In the top-right corner of the console, click Settings. Make sure that the computers have the User Approved MDM status.
Click Computer Management, then Packages.
In the General tab, you can edit the Display name field.
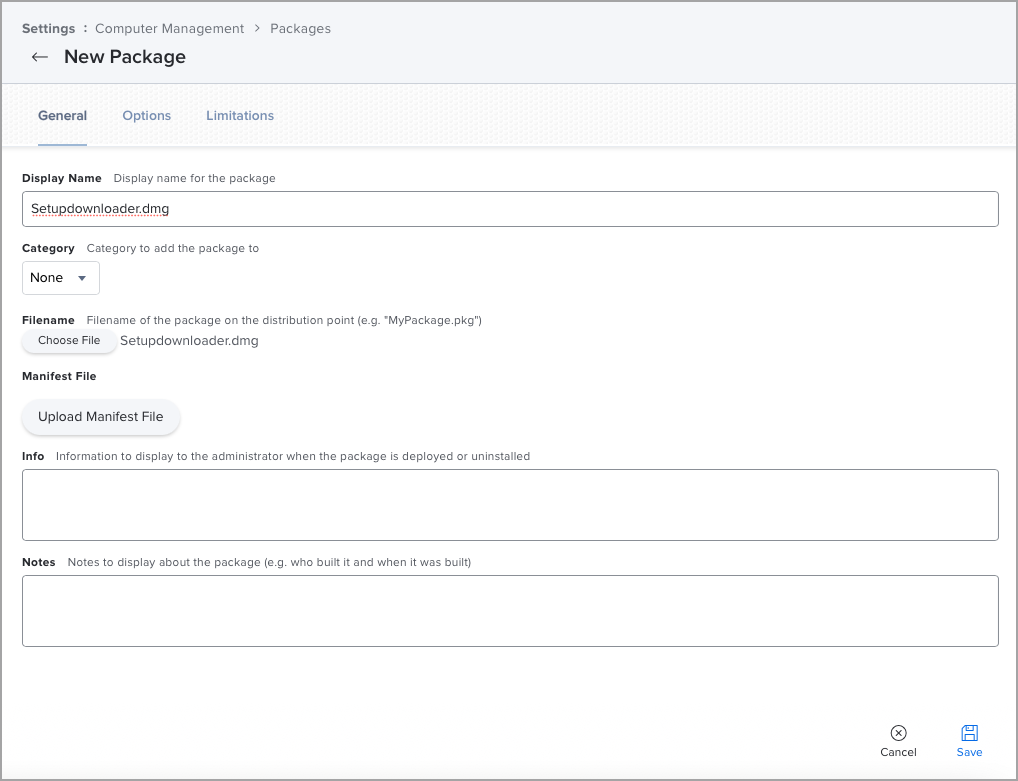
Upload the installation file into Jamf Pro.
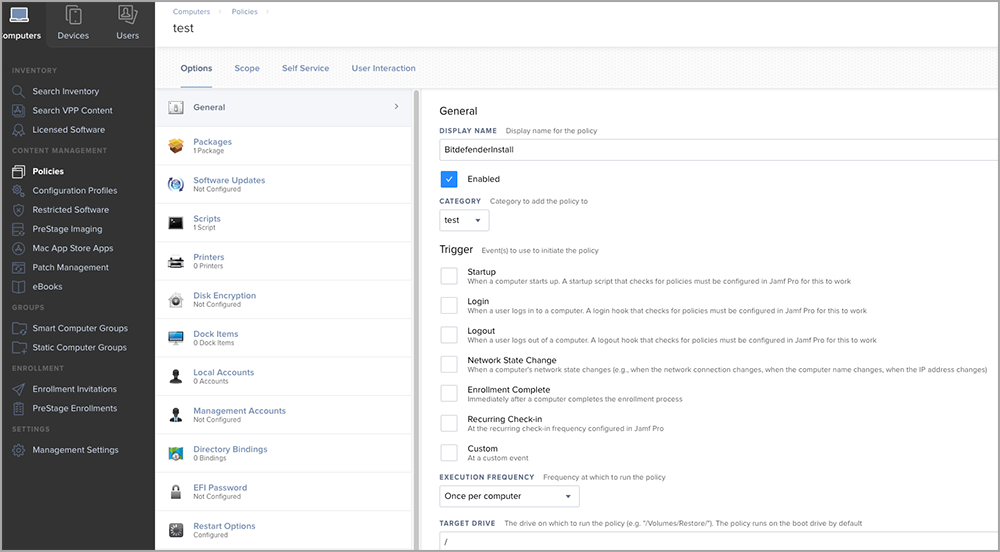
In the left-side menu, go to Policies and create a policy for the installation file.
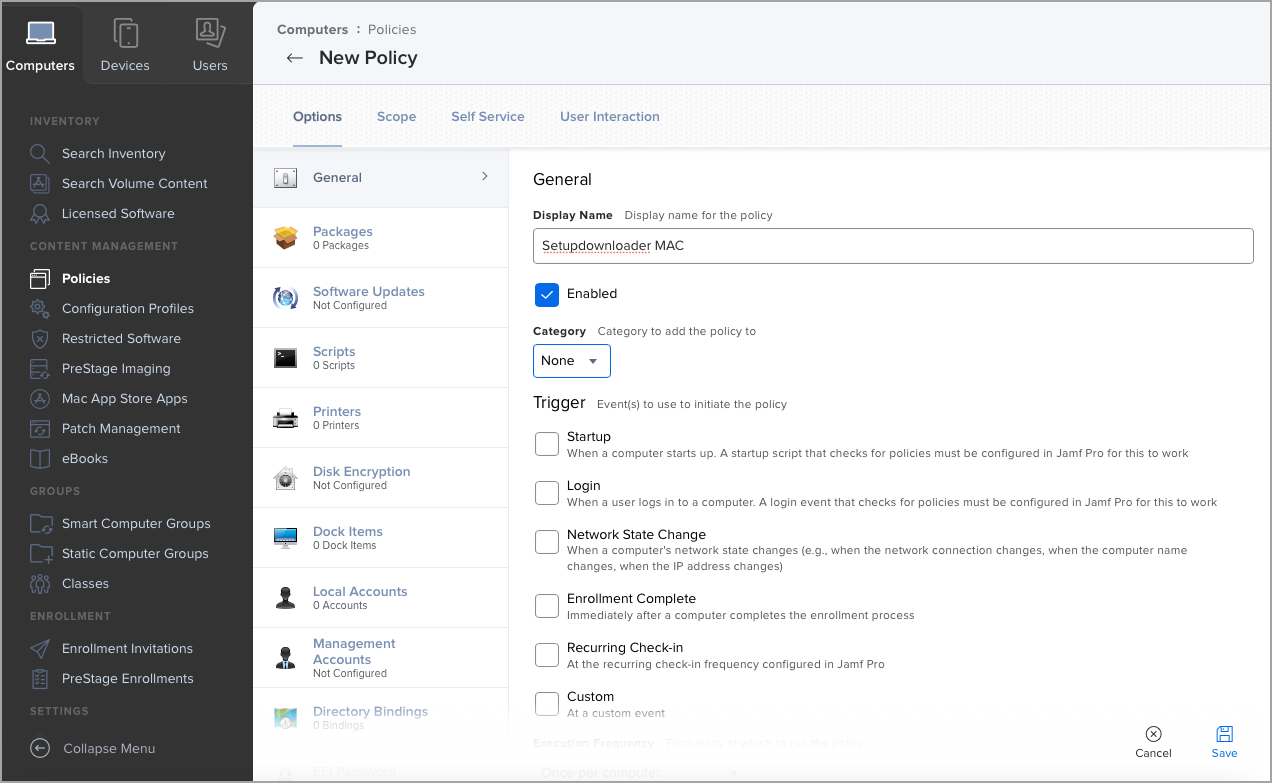
Go to Packages > Configure and select the package previously uploaded.
Set the Action to Install.
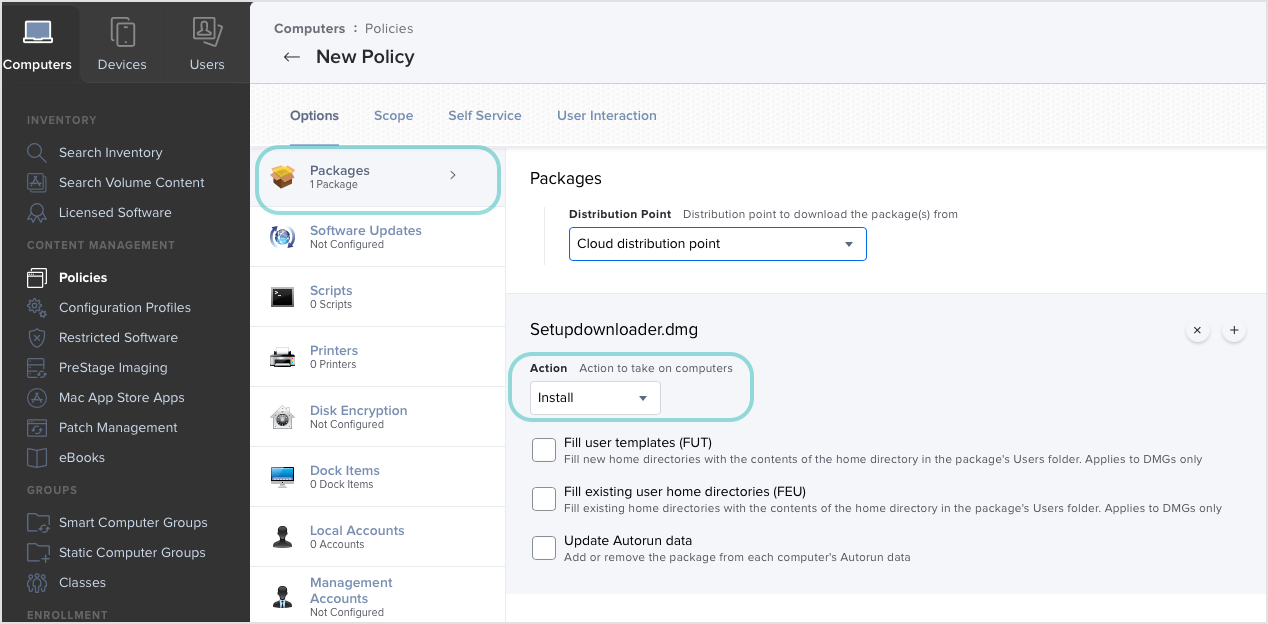
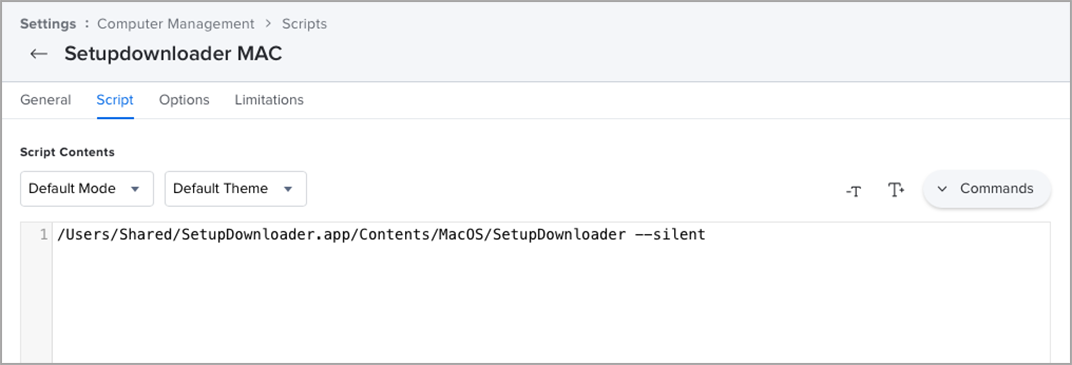
Click Scripts and configure the Files and Processes payload.
Type in the Script tab the following command:
/Users/Shared/SetupDownloader.app/Contents/MacOS/SetupDownloader --silent
Assign the policy to computers and click Save.
When installing Bitdefender Endpoint Security Tools using the full kit, you must pay attention to the version you choose. You cannot install a macOS kit for Intel on a Mac with Apple silicon or vice versa.
In GravityZone Control Center, make sure you have an installation package configured in Network > Installation Packages
Click Download in the upper-side of the page.
In the drop-down menu, select macOS kit (Intel x86) or macOS kit (Apple M1).
Downloading the corresponding file takes longer than macOS Downloader due to its bigger size.
Double-click the
Bitdefender_for_MAC.dmg(Intel file) orBitdefender_for_MAC_ARM.dmg(Apple M1 file) to view the content.
Drag both
antivirus_for_mac.pkgandinstaller.xmlto a folder. Example:/Users/Shared.Drag the folder containing the files into Jamf Composer and create an installation file that can be in DMG or PKG format.
Log in to Jamf Pro.
In the top-right corner of the console, click Settings. Make sure that the computers have the User Approved MDM status.
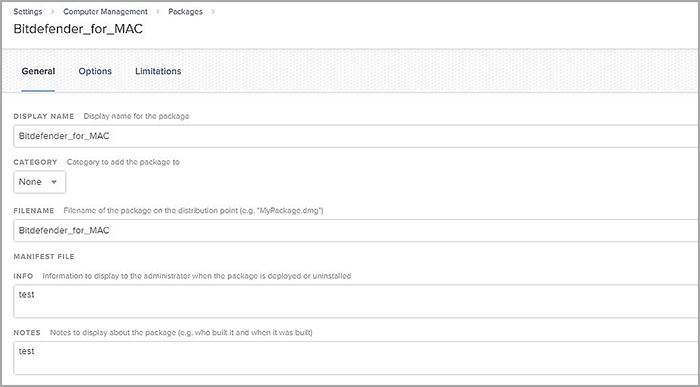
Click Computer Management, then Packages.
In the General tab, you can edit the Display name and Filename fields.
Upload the installation file into Jamf Pro.
In the left-side menu, go to Policies and create a policy for the installation file.
Select the installation file in Policies > Packages and set Action to Install.

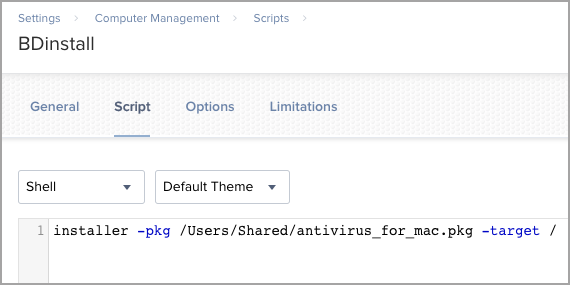
Click Scripts and configure the Files and Processes payload.
Type in the Script tab the following command:
installer -pkg /Users/Shared/antivirus_for_mac.pkg -target /
Assign the policy to computers and click Save.
Note
During the Jamf Pro deployment procedures, if SSL certificate deployment fails using the Jamf Pro script, this process is fully managed by Jamf. If manually deploying or trusting the SSL certificate through the Bitdefender agent GUI succeeds, the issue is likely related to the Jamf Pro SSL deployment script. In such cases, please contact the Jamf support team for further assistance.
Configuring Jamf Pro to deploy BEST on macOS Big Sur 11.0 or later
Bitdefender Endpoint Security Tools (BEST) requires a configuration profile in Jamf Pro when using this tool to deploy on machines running macOS Big Sur 11.0 or later. In the configuration profile, pre-approve the following:
Bitdefender system extension
Traffic proxy
Full Disk Access
All approvals are necessary for Bitdefender Endpoint Security Tools to work properly, without asking endpoint users for interaction.
First, you have to create a configuration profile where you pre-approve the Bitdefender system extension.
To create the profile, follow these steps:
Log in to Jamf Pro.
Go to Computers > Configuration Profiles and click New.
In the left-side menu of the new profile, scroll down to System Extensions.
Click Configure.
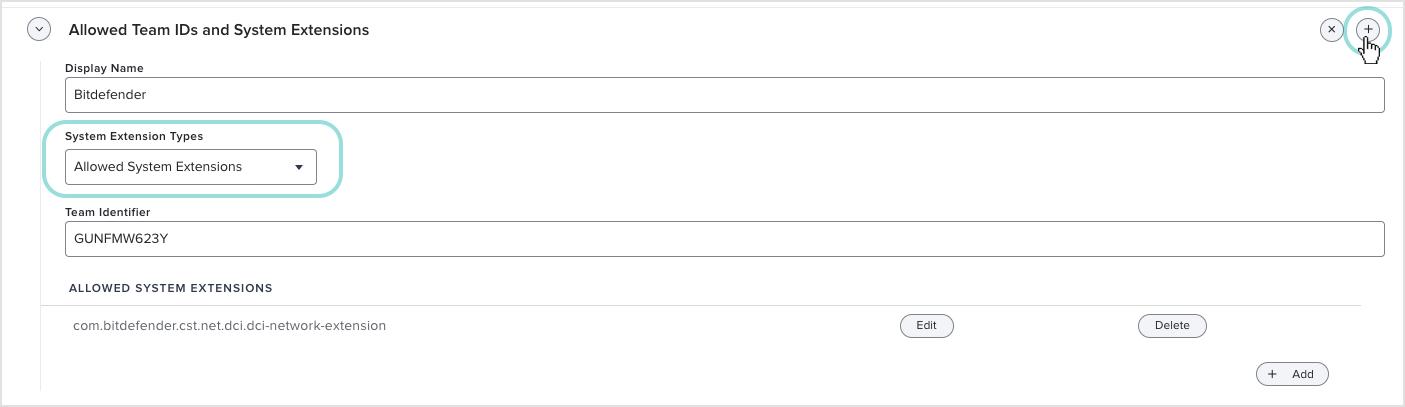
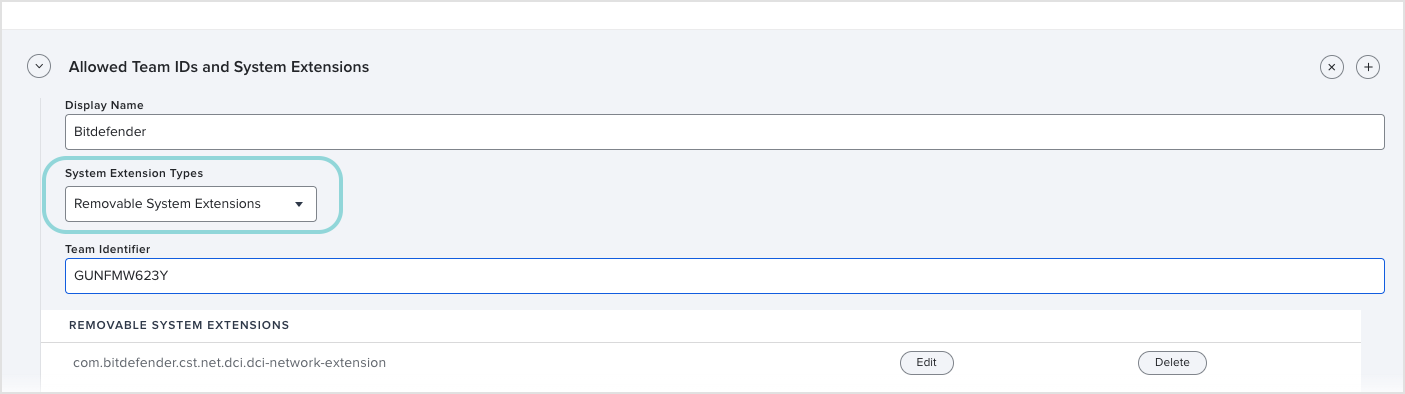
Under Allowed Team IDs and System Extensions, configure these settings:
Under Display Name, enter
BitdefenderIn the System Extension Types drop-down list, select Allowed System Extensions.
Under Team Identifier, enter
GUNFMW623YUnder Allowed System Extensions, enter the following string:
com.bitdefender.cst.net.dci.dci-network-extension
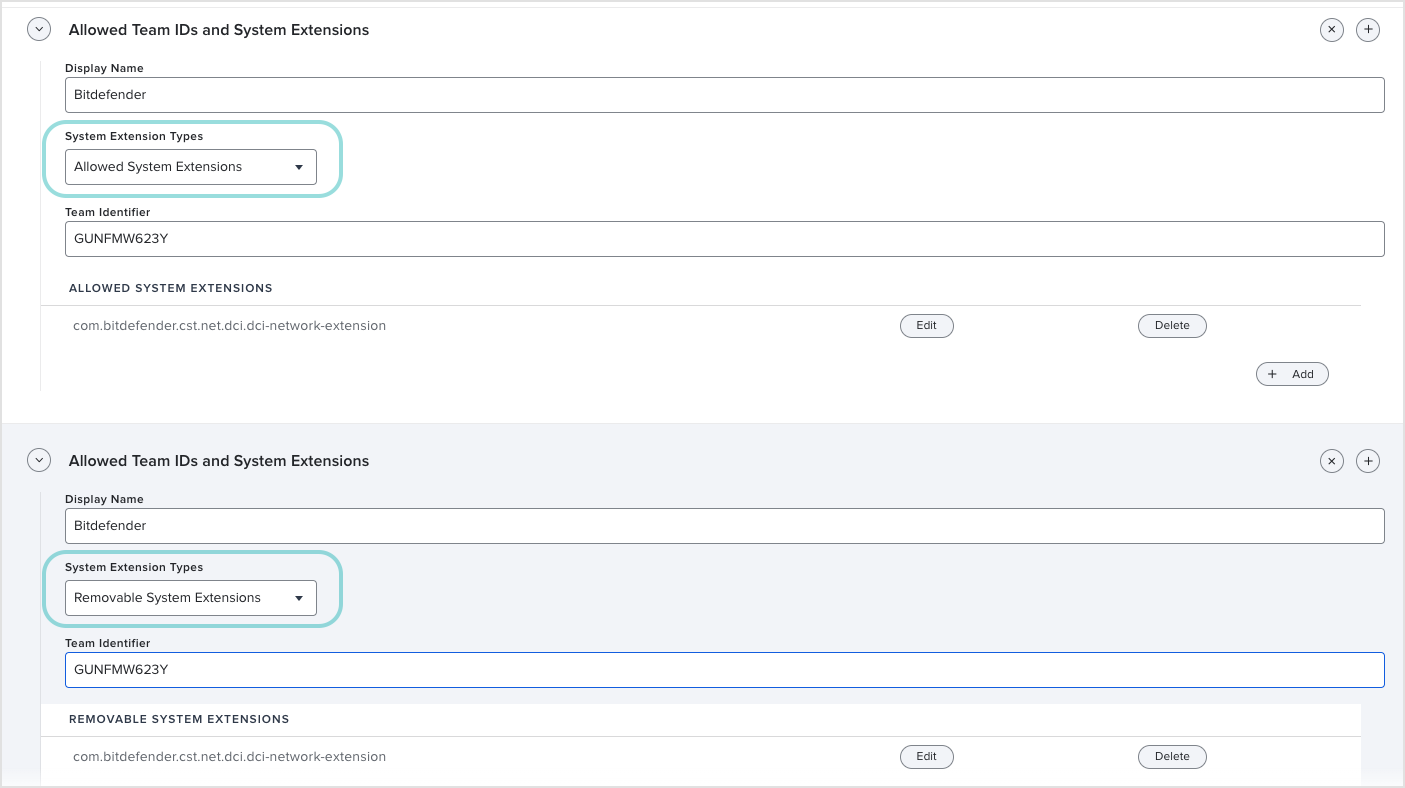
Click the + (plus) button in the upper-right corner to configure settings that allow uninstalling the Bitdefender security agent if necessary.
In the new Allowed Team IDs and System Extensions form, configure these settings:
Under Display Name, enter
BitdefenderIn the System Extension Types drop-down list, select Removable System Extensions.
Under Team Identifier, enter
GUNFMW623YUnder Removable System Extensions, enter the following string:
com.bitdefender.cst.net.dci.dci-network-extension
Click Save.
The complete configuration profile should look like in the image below.
BEST uses a tunneling application (like a VPN) to filter the traffic.
To pre-approve this application, follow these steps:
In the left-side menu of the profile, go to Content Filter.
Under Filter Name, enter
Bitdefender.Under Identifier, enter
com.bitdefender.epsecurity.BDLDaemonApp.Under Network Filter, enter these strings:
For Network Filter Bundle Identifier:
com.bitdefender.cst.net.dci.dci-network-extensionFor Network Filter Designated Requirement:
anchor apple generic and identifier "com.bitdefender.cst.net.dci.dci-network-extension" and (certificate leaf[field.1.2.840.113635.100.6.1.9] /* exists */ or certificate 1[field.1.2.840.113635.100.6.2.6] /* exists */ and certificate leaf[field.1.2.840.113635.100.6.1.13] /* exists */ and certificate leaf[subject.OU] = GUNFMW623Y)
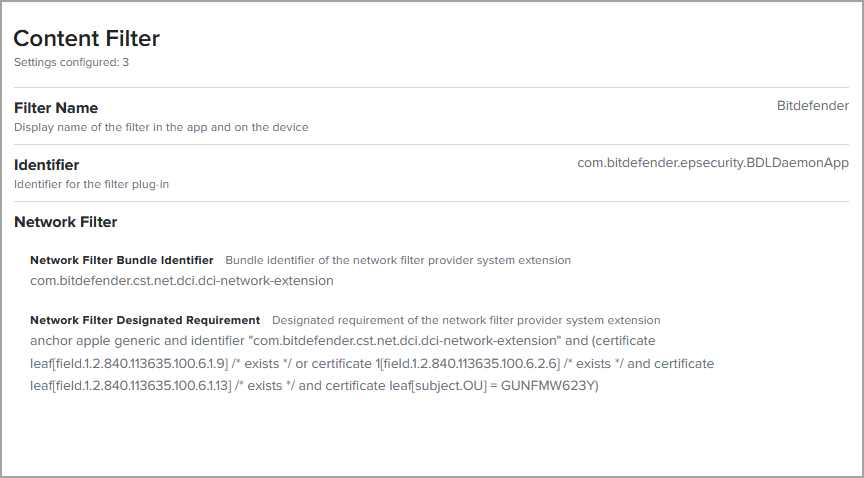
Click Save.
To allow Full Disk Access for Bitdefender Endpoint Security Tools, follow these steps:
In the left-side menu of the profile, go to Privacy Preferences Policy Control.
You need to allow full access for the following applications:
BDLDaemon.app
Under Identifier, enter:
com.bitdefender.epsecurity.BDLDaemonAppUnder Identifier Type, select Bundle ID.
Under Code Requirement, enter:
anchor apple generic and identifier "com.bitdefender.epsecurity.BDLDaemonApp" and (certificate leaf[field.1.2.840.113635.100.6.1.9] /* exists */ or certificate 1[field.1.2.840.113635.100.6.2.6] /* exists */ and certificate leaf[field.1.2.840.113635.100.6.1.13] /* exists */ and certificate leaf[subject.OU] = GUNFMW623Y).Click the Add button on the right side of the screen.
Under App or Service, select SystemPolicyAllFiles from the drop-down list. Make sure Access is set to Allow.
Click Save.
EndpointSecurityforMac.app
Important
Starting with version 7.16.42.200020, the agent no longer requires Full Disk Access for the
EndpointSecurityforMacprocess.Click the + button on the right side of the screen to add another template.
Under Identifier Type, select Bundle ID.
Under Identifier, enter:
com.bitdefender.EndpointSecurityforMacUnder Code Requirement, enter:
identifier "com.bitdefender.EndpointSecurityforMac" and anchor apple generic and certificate 1[field.1.2.840.113635.100.6.2.6] /* exists */ and certificate leaf[field.1.2.840.113635.100.6.1.13] /* exists */ and certificate leaf[subject.OU] = GUNFMW623YClick the Add button on the right side of the screen.
Under App or Service, select SystemPolicyAllFiles from the drop-down list. Make sure Access is set to Allow.
Click Save.
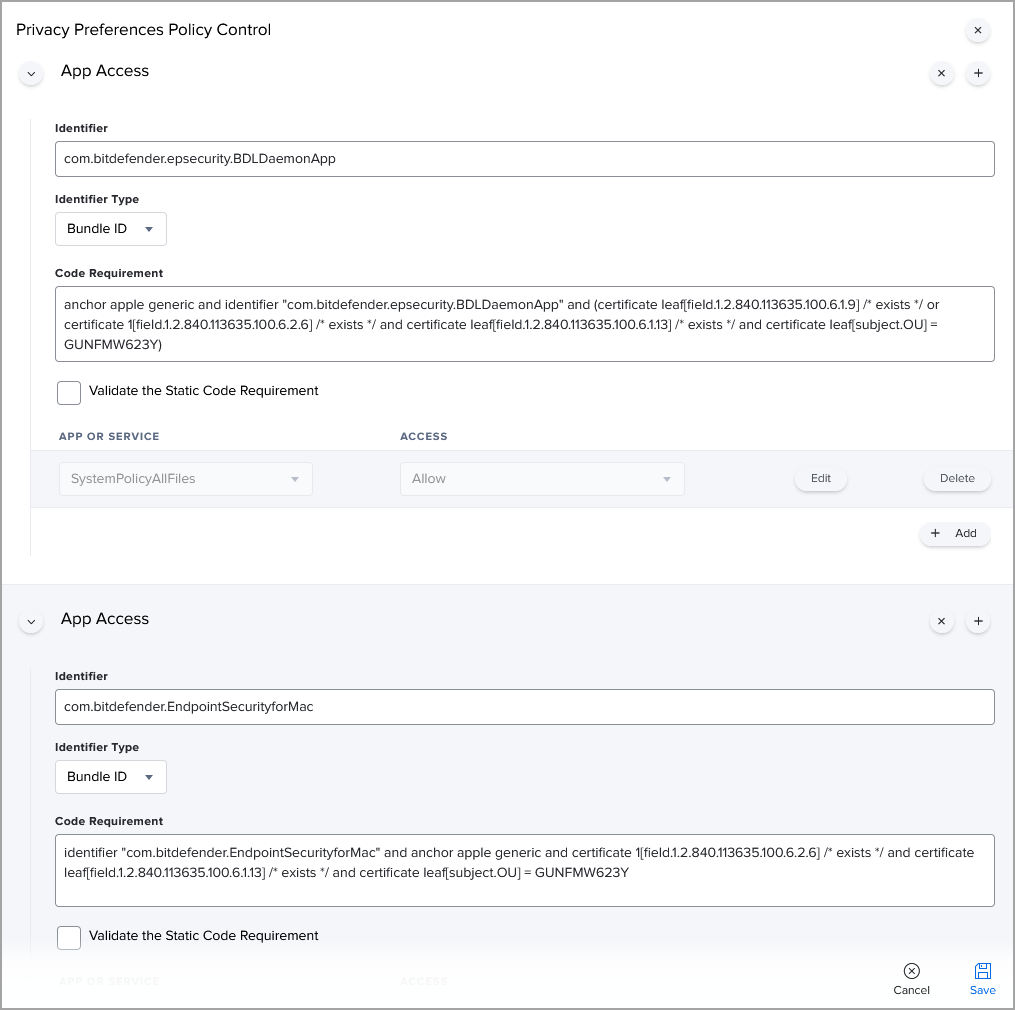
Click Save.
For details on Bitdefender Endpoint Security Tools approvals required in macOS Big Sur, refer to Changes to Endpoint Security for Mac in macOS Big Sur and later: network extension, proxy configurations and SSL certificate.
To install Bitdefender Endpoint Security Tools through Jamf Pro 10.x, after creating the configuration profile, refer to Installing Bitdefender Endpoint Security Tools through Jamf Pro.
Whitelisting Bitdefender extensions in Jamf Pro 10.x
This article explains how to whitelist Bitdefender extensions in Jamf Pro 10.x.
After installing Bitdefender Endpoint Security Tools (BEST) manually or remotely in macOS, users are prompted to approve the Bitdefender extensions on their computers. Until users approve the Bitdefender extensions, some BEST features do not work. For details, refer to Bitdefender system extension blocked in macOS.
You can pre-approve the Bitdefender extensions and thus eliminate the need for user intervention by whitelisting the Bitdefender extensions using a Mobile Device Management tool such as Jamf Pro. This feature is supported starting with macOS 10.13.2 and Jamf Pro version 10.3.0.
The procedure of whitelisting Bitdefender extensions implies creating and applying an MDM configuration profile in Jamf Pro 10.x.
Note
The target computers must have User Approved MDM status.
For details about User Approved MDM, refer to these articles:
To create the MDM configuration profile for whitelisting Bitdefender extensions, follow these steps:
Log in to Jamf Pro.
Go to Computers > Configuration Profiles > New.
Scroll down to Approved Kernel Extensions.
Enter a Display name and the Team ID.
The Bitdefender Team ID is GUNFMW623Y.
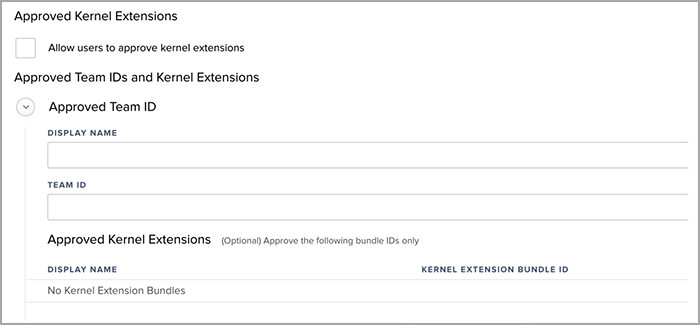
Note
Specifying individual extensions to be approved is not required.
Save the changes.
Deploy the profile to the computers.
Important
If deploying to macOS Big Sur (version 11) or later, do not include kernel extensions in the same configuration profile. Doing so will result in the following error when attempting to install the profile:
"The current system configuration does not allow the requested operation."
To avoid this issue:
Remove kernel extensions from the current configuration profile if you are deploying to Macs running macOS Big Sur or later.
Create a separate configuration profile specifically for kernel extensions.
Deploying the SSL certificate for Bitdefender Endpoint Security Tools through Jamf Pro
After installation on Mac, Bitdefender Endpoint Security Tools (BEST) requires an SSL certificate to properly work. For the Bitdefender agent to load and use the certificate, this is what you need to know when you deploy it through Jamf Pro:
The Bitdefender Endpoint Security Tools installation package must have an uninstall password configured.
The uninstall password must be specified in the policy active on macOS endpoints. Otherwise, the certificate deployment may be unsuccessful.
You need to create a PFX certificate (using PEM and KEY files) with the MD5 hash of the uninstall password.
You must install the PFX certificate on the target computers with a Configuration Profile from Jamf Pro.
You must deploy the same PFX certificate to the target computers in the path
/Library/DeployCertthrough a policy from Jamf Pro. We advise that the certificate deployed to path/Library/DeployCertonly has read and write permissions forrootuser.
After the PFX certificate is installed, trusted in Keychain and deployed to /Library/DeployCert, BEST uses it for MITM and the local user will no longer be prompted to install the SSL certificate.
The certificate deployed to /Library/DeployCert using Jamf Pro has priority over the Bitdefender CA SSL certificate that has been previously installed and trusted in Keychain. Following this procedure, BEST stops using Bitdefender CA SSL and it loads the new certificate instead.
You can do the following steps for existing BEST installations, as well as before starting a new agent deployment.
In GravityZone Control Center, set an uninstall password in the policy applied to the endpoints on which you want to deploy the certificate.
To set the uninstall password, go to the General > Settings section in the policy. Learn more.
Generate a PEM certificate with an associated private key.
Example of the command line to create the PEM certificate:
/usr/bin/openssl req -new -days 1825 -nodes -x509 -subj '/C=RO/ST=Bucharest/L=Bucharest/O=Endpoint/CN=NewName
CA SSL' -keyout rootCA.key -out rootCA.pem
Note
When creating a certificate, you must use a unique Common Name (CN). Do not use or reuse the default name, B
itdefender CA SSL. This name is reserved for the default certificate generated by Bitdefender.Using
Bitdefender CA SSLfor a custom certificate can make it difficult to distinguish between the Bitdefender-generated certificate and your own certificate, which may lead to administrative confusion. To avoid this, specify a unique CN for every custom certificate.For example:
CN=MyCertificate CA SSL.Generate a PFX certificate named
certificate.pfxusing the PEM and KEY files from the previous step.Note
The certificate's name must be
certificate.pfx. Deployment will fail if the certificate has a different name.This certificate needs to be always trusted and password protected with the MD5 hash of the uninstall password set through GravityZone.
You can calculate MD5 using the command
md5 -s 'password'in Terminal or with other MD5 calculator tool. For example, MD5 for string1234will be81dc9bdb52d04dc20036dbd8313ed055.Example of command line to create the
certificate.pfxfile:openssl pkcs12 -inkey rootCA.key -in rootCA.pem -export -out certificate.pfx
At this moment, you need to provide an export password, which is the MD5 hash of the uninstall password.

In Jamf, create a Configuration Profile and upload the
certificate.pfxfile previously configured.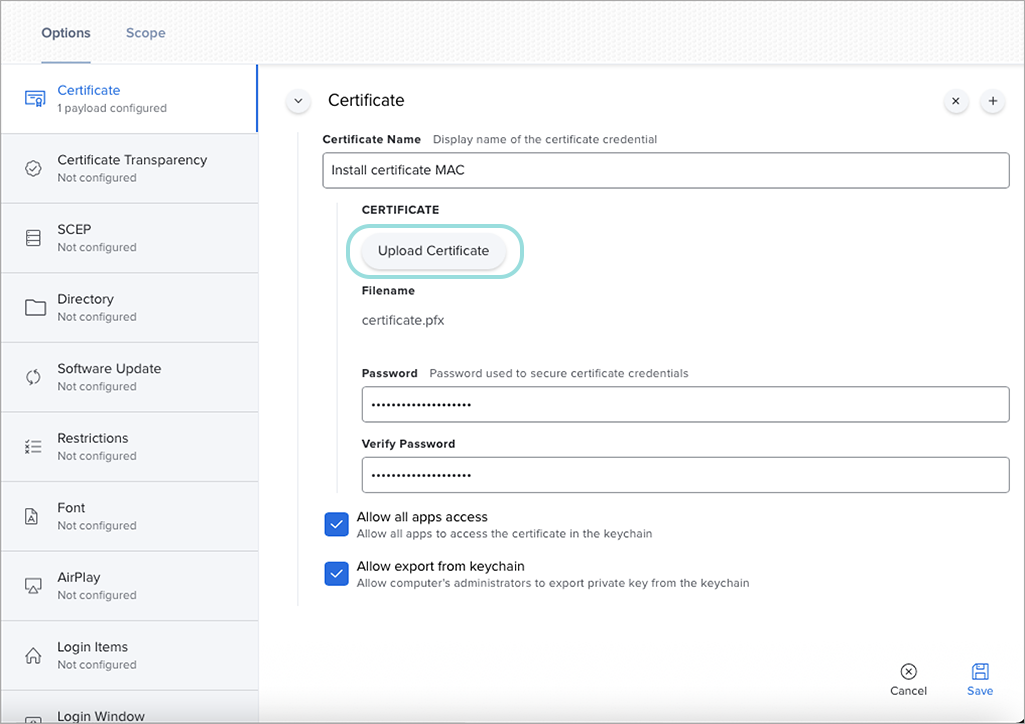
Assign the policy to the target computers. The certificate will be installed in Keychain, always trusted.
Create the /Library/DeployCert folder and copy the
certificate.pfxfile to/Library/DeployCert.Use Jamf Composer to create to a PKG file with
/Library/DeployCert/certificate.pfx.In Jamf, go to Computer Management > Packages and upload the PKG file from the previous step.

Also in Jamf, go to Policies and create a new policy.
Configure the package previously uploaded. Set the Action to Install and assign the policy.
The
certificate.pfxfile will be deployed to the target computers.
Deploying the SSL certificate for Bitdefender Endpoint Security Tools through Kandji
After installation on Mac, Bitdefender Endpoint Security Tools requires an SSL certificate to work properly. In this situation, the Bitdefender agent prompts the local user to install the certificate to enable SSL protection.
This is what you need to consider when using the Kandji platform to install the certificate:
The installation package used for deployment has an uninstall password set in GravityZone.
You create a PFX certificate with the MD5 hash of the uninstall password and install it on machines with a configuration profile in Kandji.
You deploy the same PFX certificate on the machine in the path:
/Library/DeployCert.
To install the SSL certificate, follow these steps:
Create an installation package for Bitdefender Endpoint Security Tools in GravityZone that has an uninstall password. For details, refer to Install security agents - standard procedure.
In Terminal, create a PEM certificate with the associated private key.
Example of command line to create the PEM certificate:
/usr/bin/openssl req -new -days 1825 -nodes -x509 -subj
'/C=RO/ST=Bucharest/L=Bucharest/O=Endpoint/CN=YourCertName CA SSL' -keyout
rootCA.key -out rootCA.pem
Note
Make sure the name of the certificate that you create (the value for CN in the command line) is different from “Bitdefender CA SSL”, which is the name of the default certificate. Example:
CN=MyCertificate CA SSLIn Terminal, create the PFX certificate named
certificate.pfxusing the PEM and KEY files from the previous step.This certificate needs to be always trusted and password protected with the MD5 hash of the uninstall password set through GravityZone.
Example of command line to create the
certificate.pfxfile:openssl pkcs12 -inkey rootCA.key -in rootCA.pem -export -out certificate.pfx
At this step, you are prompted in Terminal for a password. Make sure you enter the MD5 hash of the uninstall password set in the Bitdefender Endpoint Security Tools installation package.
You can calculate MD5 using the command
md5 -s 'password'in Terminal or with other MD5 calculator tool. For example, MD5 for string1234will be81dc9bdb52d04dc20036dbd8313ed055.In Kandji, go to Library > Add New > Certificate.
Click Add & Configure to create a certificate profile to push the PFX certificate on computers.
Select the Blueprints to which the certificate is assigned.
Specify the certificate details:
For Certificate type, select PKCS #12-formated certificate.
Add a certificate name.
Enter the certificate password, which is the same MD5 hash of the Bitdefender uninstall password.
The PFX certificate must also be deployed on the local machine to the path:
/Library/DeployCertTo achieve this, add this certificate in a ZIP archive to the Bitdefender Endpoint Security Tools installation kit.
You can slightly adjust the Kandji post-install script to include the steps needed to have the certificated placed in the correct location.
Example:
# Create the DeployCert folder

mkdir -p /Library/DeployCert


# Move the certificates in the DeployCert folder

mv /var/tmp/certificate.pfx /Library/DeployCert/


# Adjust permissions

chmod -x /Library/DeployCert

chmod +w /Library/DeployCert
After the PFX certificate is installed, trusted in keychain, and deployed to /Library/DeployCert, Bitdefender Endpoint Security Tools will use it for MITM and the local user will no longer be prompted to install the SSL certificate.
The certificate deployed to /Library/DeployCert using Kandji will have priority over the Bitdefender CA SSL certificate that has been previously installed and trusted in keychain. Following this procedure, Bitdefender Endpoint Security Tools will stop using Bitdefender CA SSL and will load instead the new certificate.
Install Bitdefender Endpoint Security Tools through an MSI package
Bitdefender Endpoint Security Tools (BEST), the GravityZone security agent, uses one installation package for any environment (physical or virtual). On Windows, GravityZone delivers the installation packages as executable kits, only in .EXE format. This may be inconvenient if you want to deploy the agent via Windows Group Policy or any other third-party application that supports MSI packages.
The solution implies applying an MSI wrapper over Windows Downloader, the standard lite installer for BEST. This section provides the guidelines for downloading the installer and a few methods on how to deploy BEST using the MSI package.
Get Windows Downloader
Warning
Do not alter the Windows Downloader file name. Otherwise, the installation files will not download from the Bitdefender servers.
Because Microsoft Edge may trim long file names such as the one of Windows Downloader, we recommend using another browser.
To download BEST installer you must:
Log in to GravityZone Control Center.
Navigate to the Network > Installation Packages page.
Select the installation package you want to download.
Important
This procedure currently does not support installation packages with proxy settings.
Click Download at the upper side of the table and select Windows Downloader.
The installation package is saved to your default download location as an
.EXEfile.
Deploy BEST using Microsoft Endpoint Configuration Manager (SCCM)
Important
This procedure does not support installation packages with proxy settings.
To deploy BEST through SCCM follow these steps:
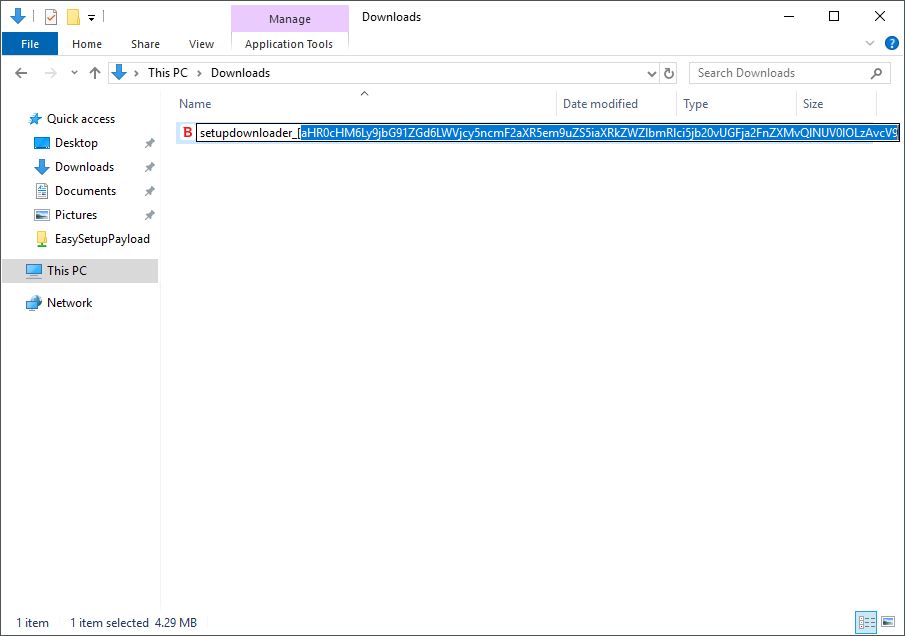
1. Get the installer hash
This can be done through one of these methods:
Log in to GravityZone Control Center.
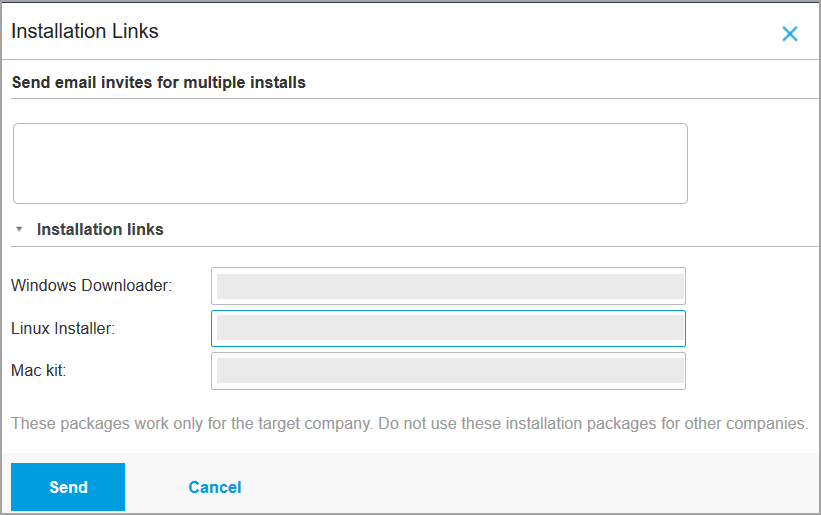
Go to the Network > Installation Packages page.
Expand the Installation links area.
Extract the installer hash from between the square brackets [ ] and save it.
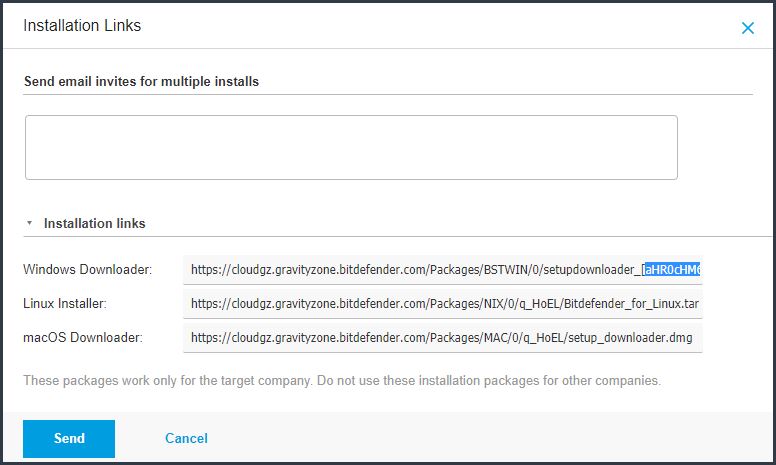
Select the installation package you want to deploy.
Click on the Send download links.
Warning
Do not alter the Windows Downloader file name. Otherwise, the installation files will not download from the Bitdefender servers.
Because Microsoft Edge may trim long file names such as the one of Windows Downloader, we recommend using another browser.
To download BEST installer you must:
Log in to GravityZone Control Center.
Go to the Network > Installation Packages page.
Select the installation package you want to deploy.
Click Download at the upper side of the table and select Windows Downloader.
Extract the installer hash from between the square brackets [ ] and save it.
2. Create the installation MSI package
Download the MSI Wrapper.

Copy the MSI file to the Software Library share from your Configuration Manager.
Go to Configuration Manager > Software Library > Applications
Click on the Create Application button.
Locate the MSI wrapper and click Next.
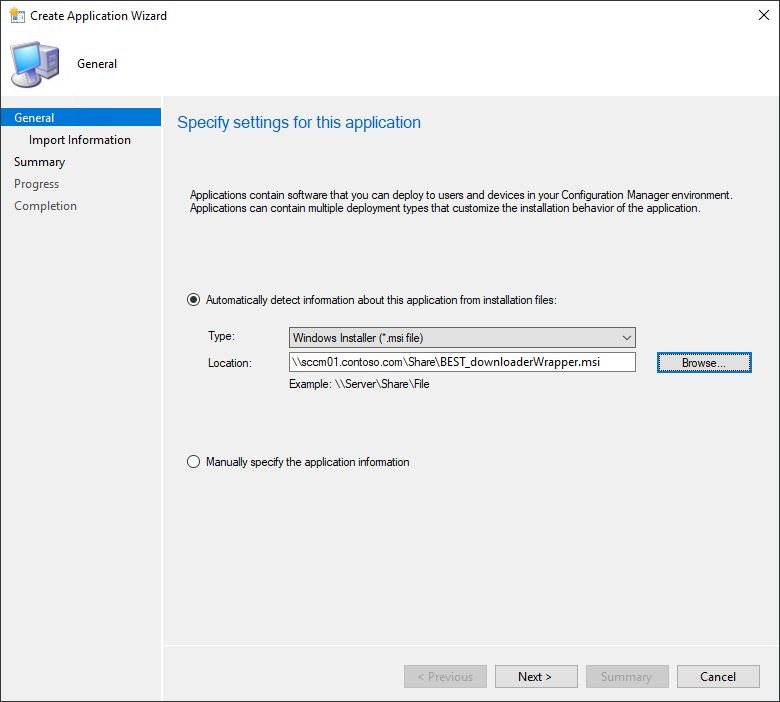
Wait for the information to be imported and click Next.
On the General Information page add the following parameters to the Installation program command line:
msiexec /i "BEST_downloaderWrapper.msi" /qn GZ_PACKAGE_ID=installerhash REBOOT_IF_NEEDED=1
The edited line should look like this:
msiexec /i "BEST_downloaderWrapper.msi" /qn GZ_PACKAGE_ID=aHR0cHM6Ly9jbG91ZGd6LWVjcy5ncmF2aXR5em9ucS5iaXRkZWZlbmRlci5jb20vUGFja2FnZXMvQlNUV0lOLzAvcV9Ib0VML2luc3RhbGxlci54bWw-bGFuZz1lbi1VUw== REBOOT_IF_NEEDED=1Under Install behavior, select Install for system if resource is device; otherwise install for user.
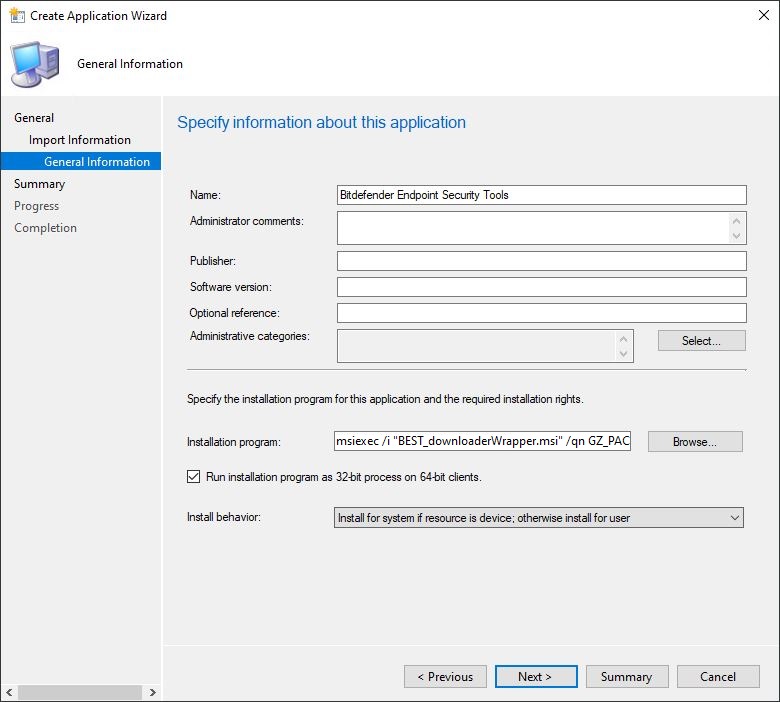
Click Next to apply the settings.
Review the information and click Next to create the application.
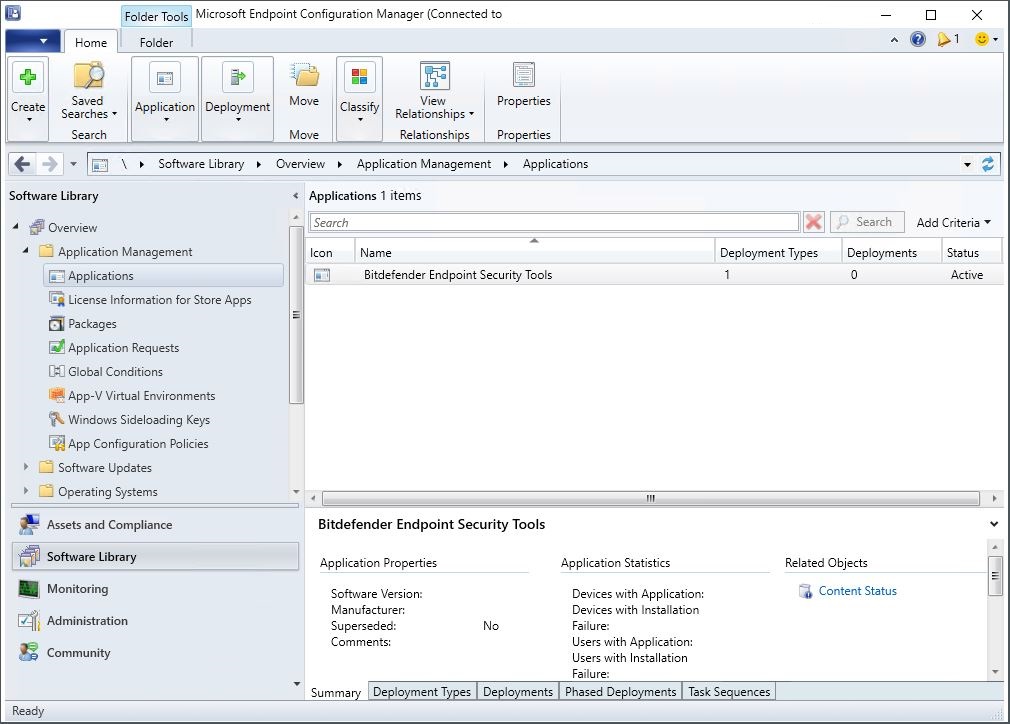
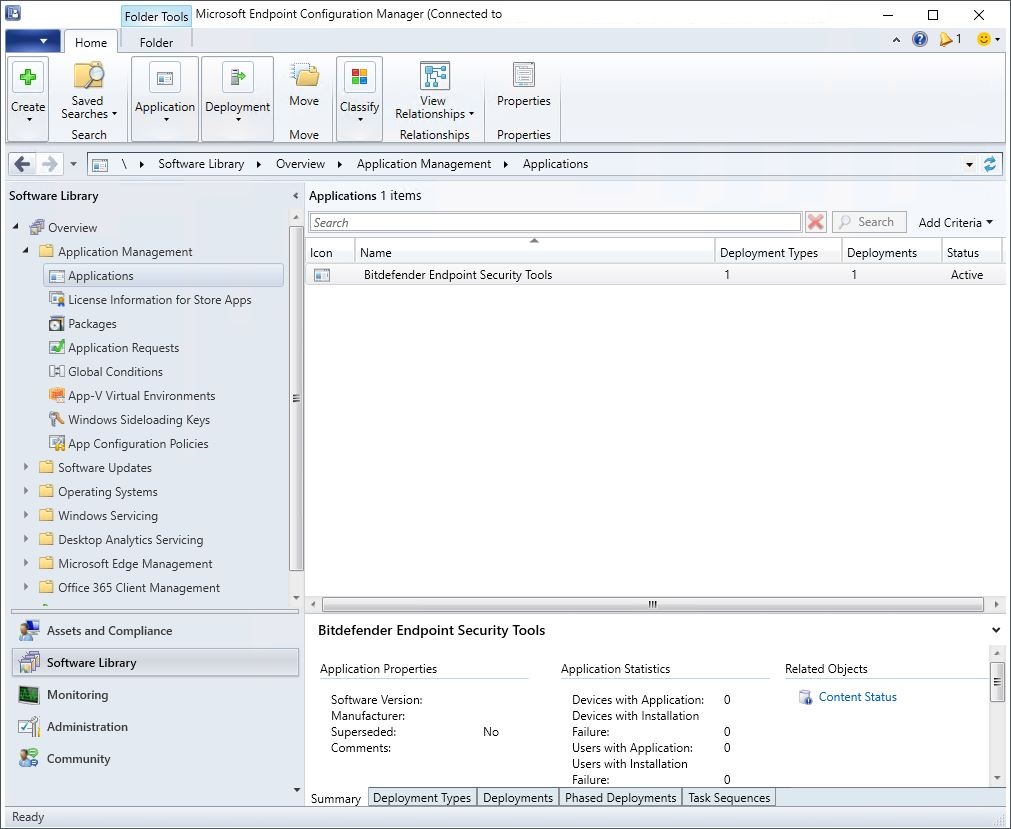
Bitdefender Endpoint Security Tools will be displayed in the Applications list.
3. Deploy the installation package
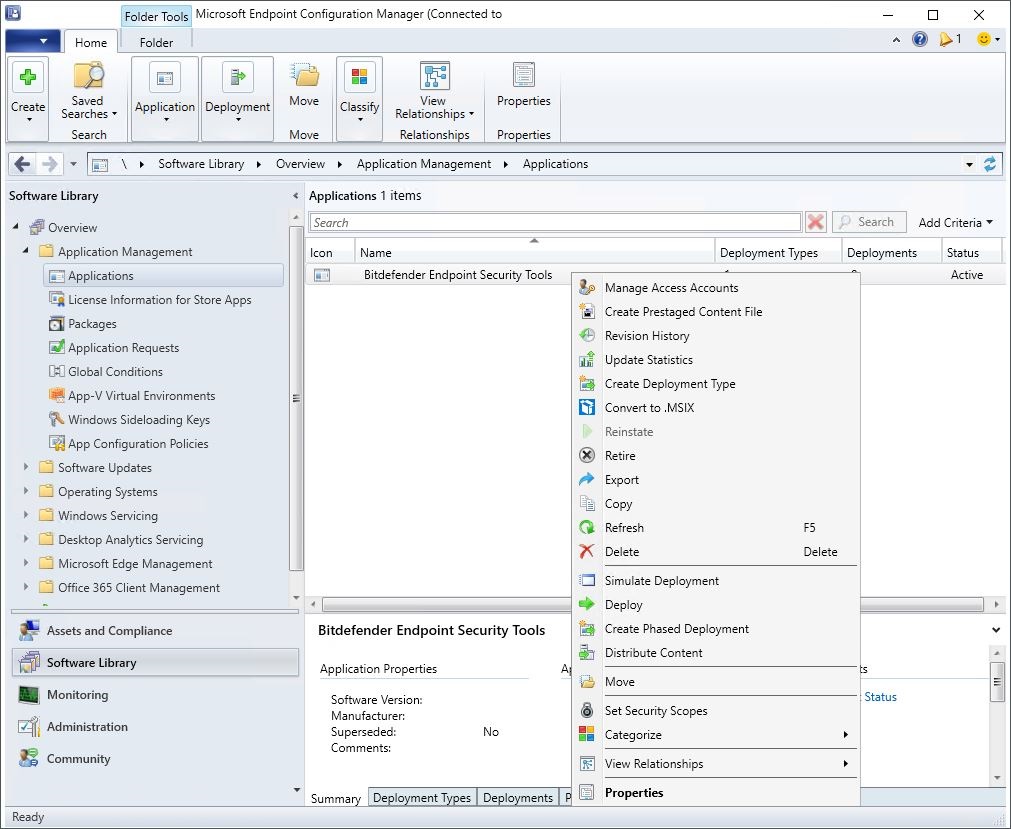
Right-click the application and select Deploy.
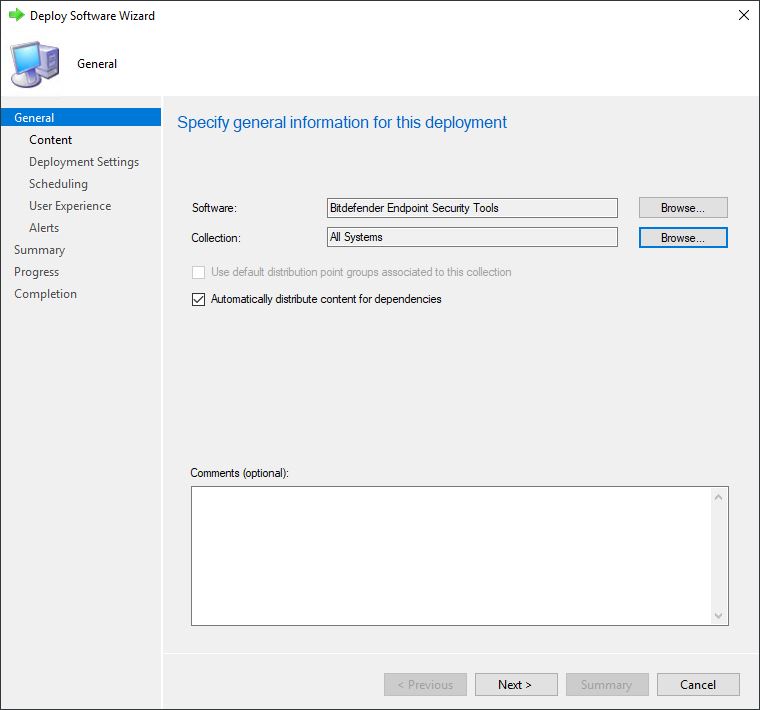
Click Browse and specify the collection as All Systems. Click Next.
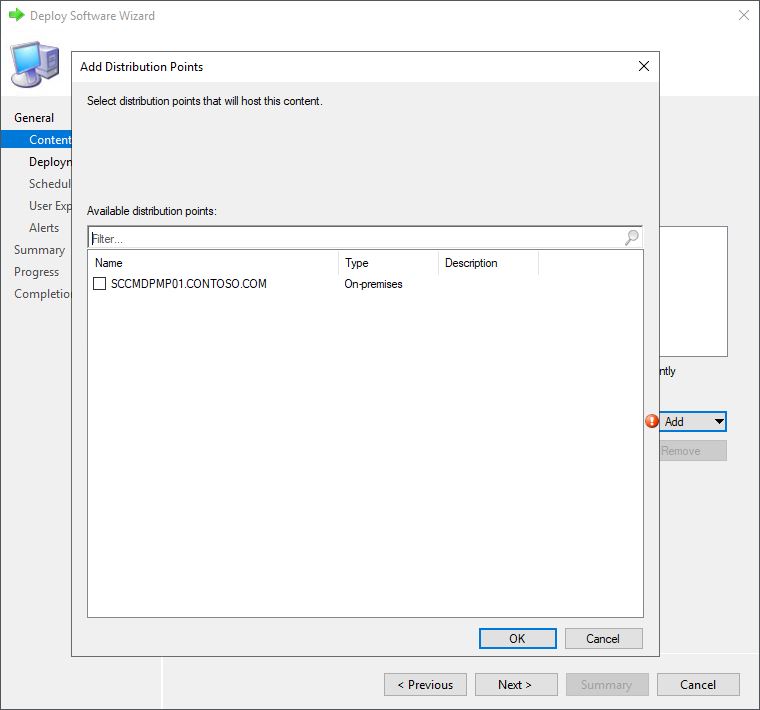
To add the Distribution Points, click in Add and select your distribution point.
Under Action, select Install. Under Purpose, select Required.
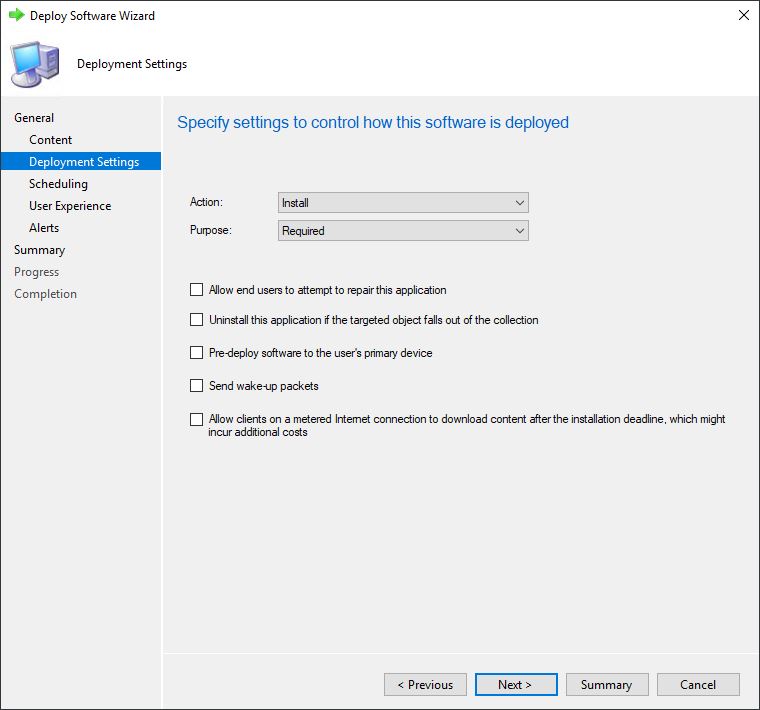
Click Next
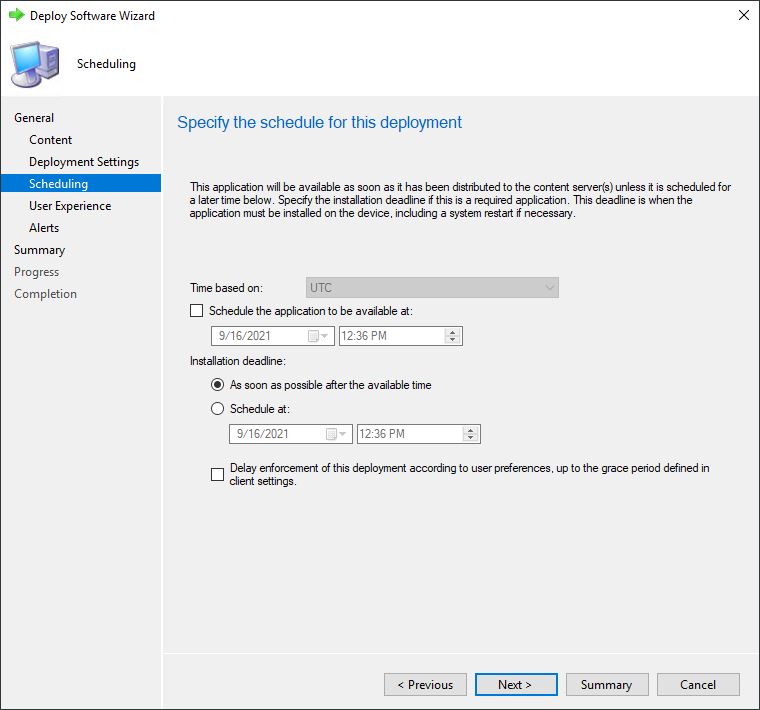
Schedule the deployment and click Next.
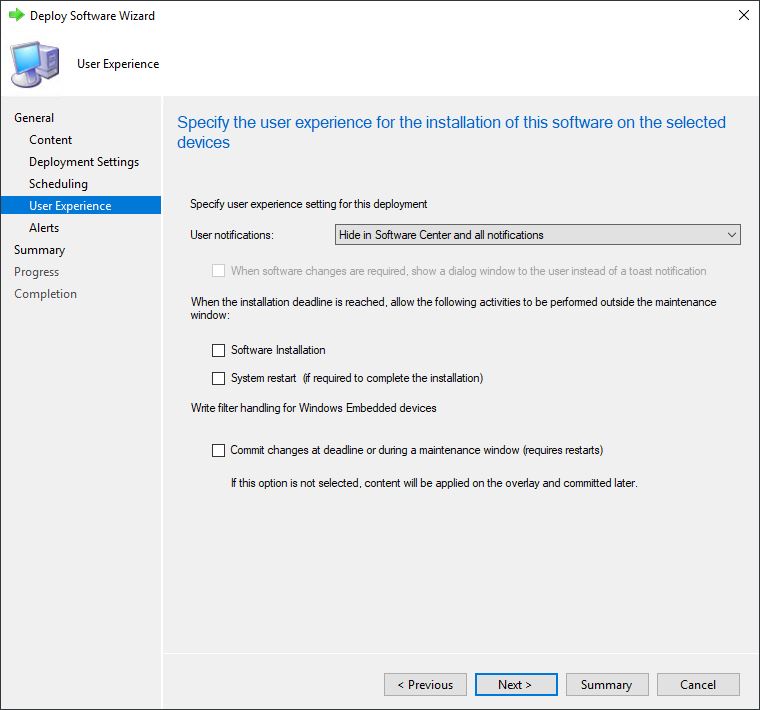
Configure the User notifications and click Next.
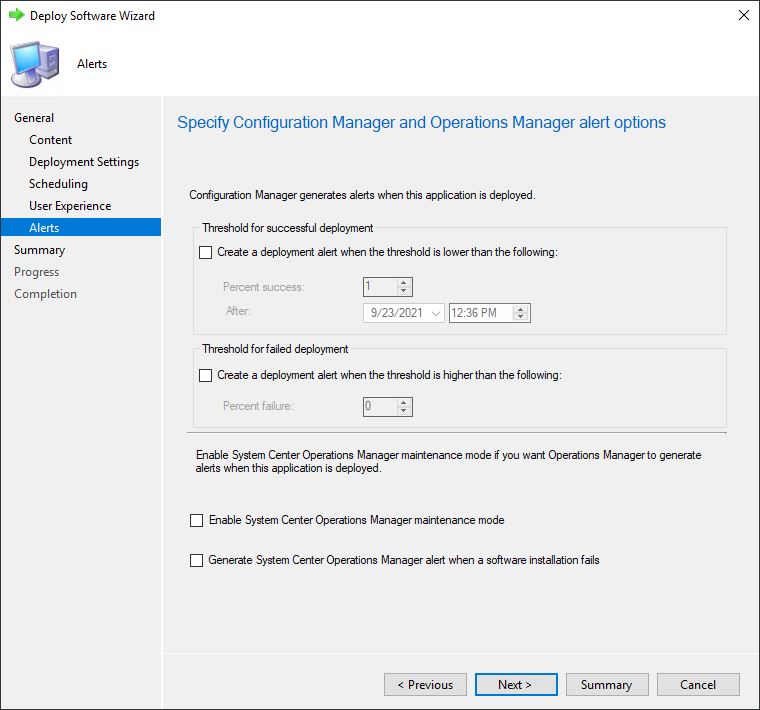
Specify alert options and click Next.
Confirm the settings and click Next.
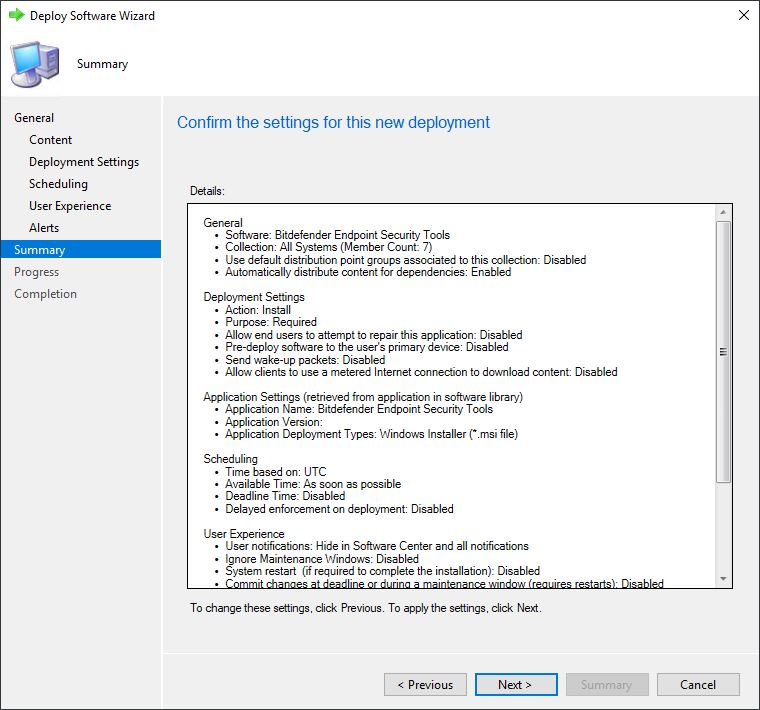
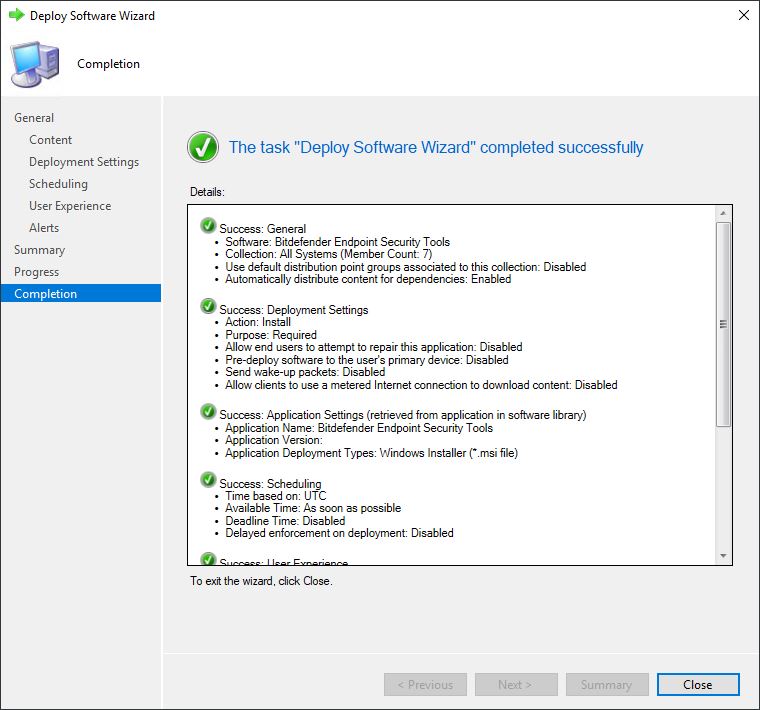
Wait for the operation to complete and click Close.
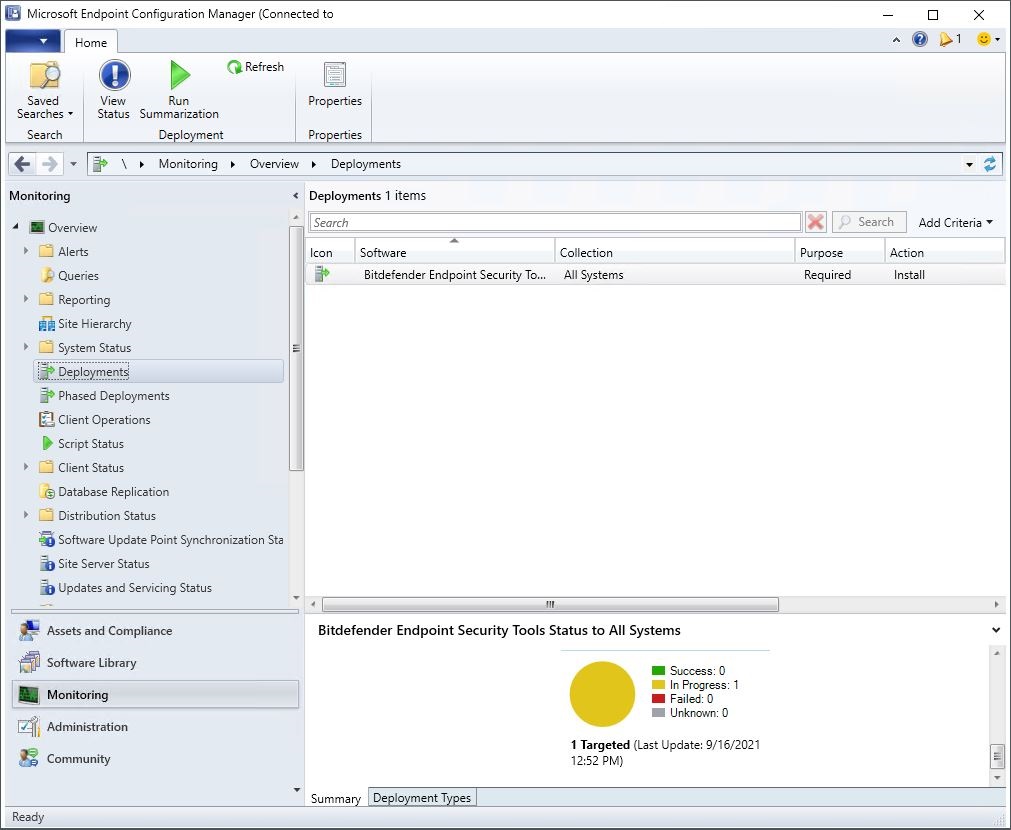
You can view deployments incremented with the number of devices under SCCM:
If you want to see information about the application that was deployed, go to Monitoring > Deployments on the left-hand side of the console:
Deploy BEST via the msiexec.exe command line
This method is suitable for command-line deployment tools that accept instructions with parameters. The method uses the msiexec command, having the MSI wrapper and the installer ID as parameters. The MSI wrapper is digitally signed by Bitdefender.
Note
This procedure currently does not support installation packages with proxy settings.
Log in to GravityZone Control Center.
Select the installation package you want to download.
Click Download at the upper side of the table and select Windows Downloader.
The installation package is saved to your default download location as an
.EXEfile.Download the MSI Wrapper.
Open Command Prompt as Administrator.
Run the following command to deploy BEST:
msiexec /i "full_path\BEST_downloaderWrapper.msi" /qn GZ_PACKAGE_ID=stringREBOOT_IF_NEEDED=1parameterWhere:
full_path- is the actual path to the MSI Wrapper.string- is same encrypted string that is part of the Windows Downloader name.parameter(optional) - reboots the machine when you deploy BEST over a competitor's product.1 = TRUE
A notification prompts the user with a 10-minute time frame before restarting the machine.
For example:
msiexec /i C:\My Downloads\BEST_downloaderWrapper.msi /qn GZ_PACKAGE_ID=aHR0cH-bGFuZz1lbi1VUw== REBOOT_IF_NEEDED=1In this case, the value of
GZ_PACKAGE_IDis:aHR0cH-bGFuZz1lbi1VUw==.Note
The string in the example is only for illustration purposes only. The actual string is different and much longer.
Jamf Pro Terminal installation of Bitdefender Endpoint Security Tools for macOS
To remotely install Bitdefender Endpoint Security Tools using Jamf Pro, follow these steps:
Copy the PKG file to the target machine.
In Terminal, run this command:
path/to/Installer.app/Contents/MacOS/InstallationDeployer --install installer -pkg /path/to/the_package_to_be_installed.pkg -target /
Installer.app/Contents/MacOS/InstallationDeployer is an application used in Jamf Pro to install PKG files.
Install Bitdefender Endpoint Security Tools manually on Linux virtual machines
This section describes how to install manually the GravityZone security agent on Linux virtual machines from a GravityZone cloud environment.
Requirements and prerequisites
Before installation, check the security agent requirements on Linux.
Licensing
Linux endpoints use license seats from the pool of licenses for server operating systems.
Installation
The procedure includes how to download the appropriate installation package to the machine, unpack the archive and manually install it via a terminal session.
In GravityZone Control Center, go to Network > Packages.
Select the installation package you want to use. If there is no package available, create one and select it.
Click the Send download links button at the upper side of the page.
Type the email address you want to use for downloading the package in the appropriate field, and then press
Enter. You will have to access this email account from the virtual machine where you want to install the security agent.Click Send. A predefined email containing the security agent download links will be sent to the specified address in a few minutes.
Connect to the Linux virtual machine where you want to install the security agent, and access the email account previously used.
Open the email from Bitdefender and click the Linux installer link, to download the Linux installation package to the virtual machine.
Note
The installer first downloads the full installation package from the Bitdefender cloud servers. It is small-sized and it can be run both on 32-bit and 64-bit systems.
Open a terminal session on the Linux virtual machine using an account with administrative privileges.
Run the following commands to unpack and run the installer:
cd /roottar –xvf fullKit_unix64.tarchmod +x installer./installerNote
The
cd /rootcommand is an example for specifying the virtual machine folder where you have transferred the downloaded installation archive. The package name mentioned above is also an example. You must enter the name of the specific package you have downloaded.Bitdefender Endpoint Security Tools for Linux will be installed in a few moments. To check that the agent has been installed on the endpoint, run this command:
/opt/bitdefender-security-tools/bin/bd status
In a few minutes after the security agent has been installed, the endpoint will show up as managed in the GravityZone network inventory.
Install Bitdefender Endpoint Security Tools using the credentials of a non-root user
In environments integrated with Control Center, you can remotely install Bitdefender Endpoint Security Tools on systems by using installation tasks. These tasks require administrative privileges on the target systems. On Linux systems, you can provide the credentials of either a root or a non-root user with administrative access.
To install BEST with a non-root user, follow these steps:
On each target system:
Run the next command as root to open the /etc/sudoers configuration file for safe editing:
#visudoType I to enable editing.
Ensure that your user can perform packages installations with the sudo command:
Locate the following line:
root ALL = (ALL) ALLA similar line with the one above but with the user name should be present in the next lines.
If you cannot find the line for your user, add it as follows:
username ALL = (ALL) ALLThis setting grants the user the right to use sudo for all commands that require root privileges.
Comment the following lines:
Defaults requirettyDefaults targetpwDefaults runaspwDefaults rootpwDefaults !visiblepwSave the file and exit: press ESC and type :wq .
From Control Center, follow the deployment steps described in Install Bitdefender Endpoint Security Tools manually on Linux virtual machines.
When asked for credentials, provide the authentication details of the non-root user.
Configure Faronics Deep Freeze to work with Bitdefender Endpoint Security Tools
This article explains how to configure Faronics Deep Freeze Enterprise to allow the installation of Bitdefender Endpoint Security Tools.
Faronics Deep Freeze helps eliminate computer damage and downtime by making computer configurations indestructible. Once Deep Freeze is installed on a computer, any changes made to the computer - regardless of whether they are accidental or malicious - are never permanent. Deep Freeze provides immediate immunity from many of the problems that plague computers today - inevitable configuration drift, accidental system misconfiguration, malicious software activity, and incidental system degradation.
Overview
Having Faronics Deep Freeze Enterprise installed on a computer causes the signature updates installed by BEST to be deleted at every system reboot.
This section is meant to help you understand how to configure Faronics Deep Freeze Enterprise to work along with BEST without blocking:
Signatures updates after a system reboot
Policy assignment from Control Center
BEST product updates
Install BEST with Faronics Deep Freeze Enterprise
You have two options to install BEST:
manual configuration
script configuration
Manual configuration
Install Faronics Deep Freeze Enterprise version 8 or higher on a server in your network.
Use the Deep Freeze Configuration Administrator utility to configure a password and a new partition (for example: T:\) with minimum of 1.5 GB capacity as thawspace. The thawspace includes the files that will be kept after a system is rebooted with Deep Freeze active.
In Deep Freeze Configuration Administrator utility tool, go to File > Create Workstation Install Program and create an installation package for the systems protected by Deep Freeze.
Install the newly created package on the target machine.
Open Deep Freeze Enterprise and select the Boot Thawed check box in Boot Control tab. This option will disable Deep Freeze on the next reboot, allowing you to install Faronics Data Igloo and BEST.
Reboot the target machine.
Install Faronics Data Igloo.
On the targeted machine, press Win + R to open the Run window.
Type
regeditand press Enter to open the registry editor.Create the following registry key:
HKEY_LOCAL_MACHINE\Software\Bitdefender.Using Faronics Data Igloo, change the target of the
HKEY_LOCAL_MACHINE\Software\Bitdefenderkey to a folder located on the T:\ partition.On the partition containing the operating system, create the following folders:
%ProgramFiles%\Bitdefender\Endpoint Security\Signatures%ProgramFiles%\Bitdefender\Endpoint Security\ThreatScanner%ProgramFiles%\Bitdefender\Endpoint Security\settings%ProgramFiles%\Bitdefender\Endpoint Security\epagng
Using the Folder Redirection tab from Faronics Data Igloo, redirect these three folders to a folder from T:\ partition.
Install BEST on the target machine.
Script configuration
Install Faronics Deep Freeze Enterprise version 8 or higher on a server in your network.
Use the Deep Freeze Configuration Administrator utility to configure a password and a new partition (for example: T:\) with minimum of 1.5 GB capacity as thawspace. The thawspace includes the files that will be kept after a system is rebooted with Deep Freeze active.
In Deep Freeze Configuration Administrator utility tool, go to File > Create Workstation Install Program and create an installation package for the systems protected by Deep Freeze.
Install the newly created package on the target machine. The machine will automatically reboot.
Open Deep Freeze Enterprise and select the Boot Thawed check box in Boot Control tab. This option will disable Deep Freeze on the next reboot, allowing you to install Faronics Data Igloo and BEST.
Reboot the target machine.
Install Faronics Data Igloo.
Download the Bitdefender redirection script from here.
Extract the VBS script file from the archive and run it.
Note
On operating systems with User Account Control enabled, open Command Prompt (cmd.exe) as Administrator and run the script from the command line.
Install BEST on the target machine.
Running a BEST product update
Important
During this process, the target system will reboot two times.
To successfully run a BEST product update:
Switch the target machine to Boot Thawed mode. Deep Freeze will require a reboot in order to boot into Boot Thawed mode.
Run the Update task from the Control Center. Additionally, you can run the update from the local console.
Note
In some situations, BEST may require a reboot of the target machine.
Log in to Control Center to confirm the product update has been installed successfully by generating an Update Status report.
Switch the target machine to Boot Frozen mode. Deep Freeze will require a reboot in order to boot into Boot Frozen mode.
Changes to Endpoint Security for Mac in macOS Big Sur and later: network extension, proxy configurations and SSL certificate
Starting with macOS Big Sur, Apple uses technologies that affect the behavior of the Endpoint Security for Mac agent.
Specifically, Apple has replaced the kernel extensions found in older versions of macOS with system extensions, which run in the user space. Therefore, Bitdefender has switched for Endpoint Security for Mac from kernel extensions to system extensions too. One system extension in particular requires more attention from users: the network extension.
To work properly, some of the Endpoint Security for Mac features or network components (Antiphising, Traffic Scan and Web Access Control in the Content Control module, and the EDR Sensor) require the following approvals from users:
Approval for the network extension
Approval for the tunneling application used to filter the internet traffic
Approval for the SSL certificate
If the network extension, the tunneling application and the SSL certificate are not approved, Endpoint Security for Mac displays warning messages at every three hours.
Important
Starting with version 4.15.127.200127, Endpoint Security for Mac provides full support for Content Control in macOS Big Sur 11.2 (see the release notes). Previously on macOS Big Sur 11.0 and 11.1, Content Control had entered the passthrough mode and stopped any connection filtering when another application with a network extension was installed on the endpoint (for example, Cisco AnyConnect VPN). This happened due to an incompatibility issue of the operating system. In such a situation, the GravityZone console displayed the following error message: "Unknown issue (Product.NetworkExtensionIsDisabled.NetworkExtensionIncompatibility)".
For details about the Endpoint Security for Mac support in macOS Big Sur, refer to Bitdefender support for macOS Big Sur.
Note
This article includes procedures and screenshots available with macOS Big Sur. The procedures are also applicable with later versions of macOS, such as Monterey and Ventura, but the user interface may differ, so please pay attention when following the steps.
In the older macOS versions, kernel extensions required approval only at the first installation of Endpoint Security for Mac. Starting with macOS Big Sur, the network extension requires approval every time the agent or a network component is installed or reinstalled (unless another component is already installed).
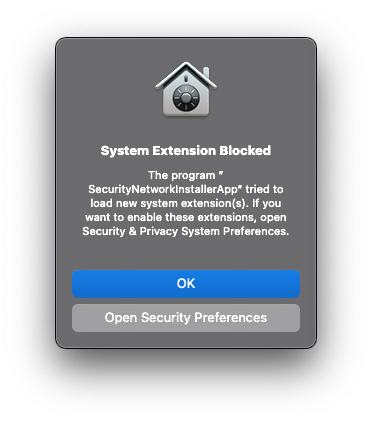
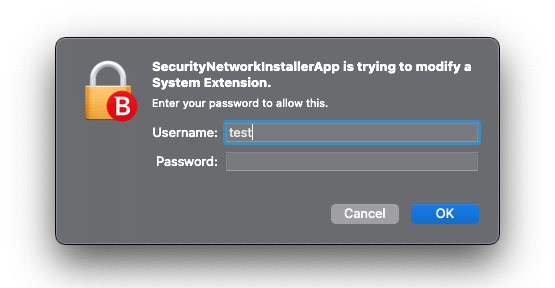
At installation, Mac users receive the following System Extension Blocked warning message for the Network extension:
"The program "SecurityNetworkInstallerApp" tried to load new system extension(s). If you want to enable these extensions, open Security & Privacy System Preferences."
To approve the network extension in macOS Big Sur and other older macOS versions, follow the steps below.
To approve the network extension in macOS Sequoia and later, refer to Bitdefender system extension blocked in macOS.
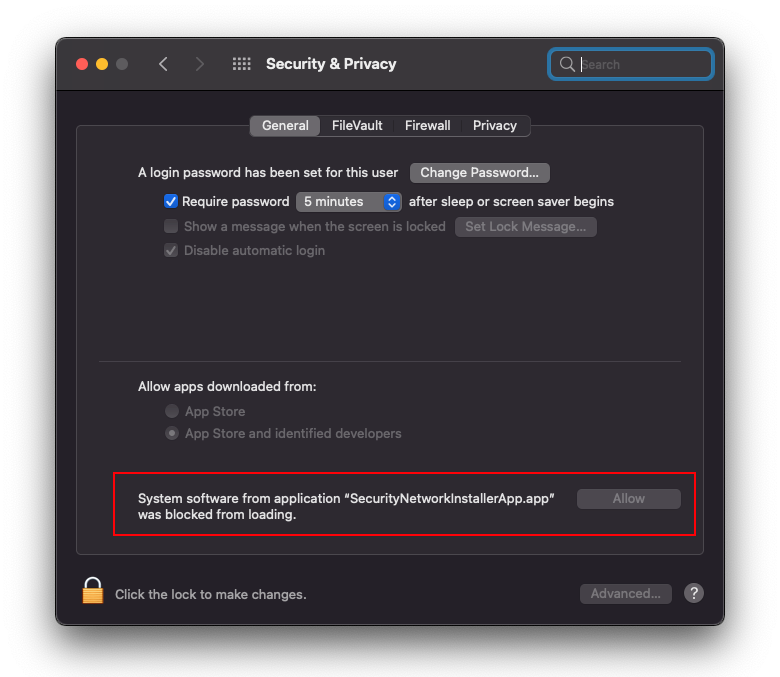
Network extension approval in macOS Big Sur
Click Open Security Preferences.
Go to Security > Privacy > General.
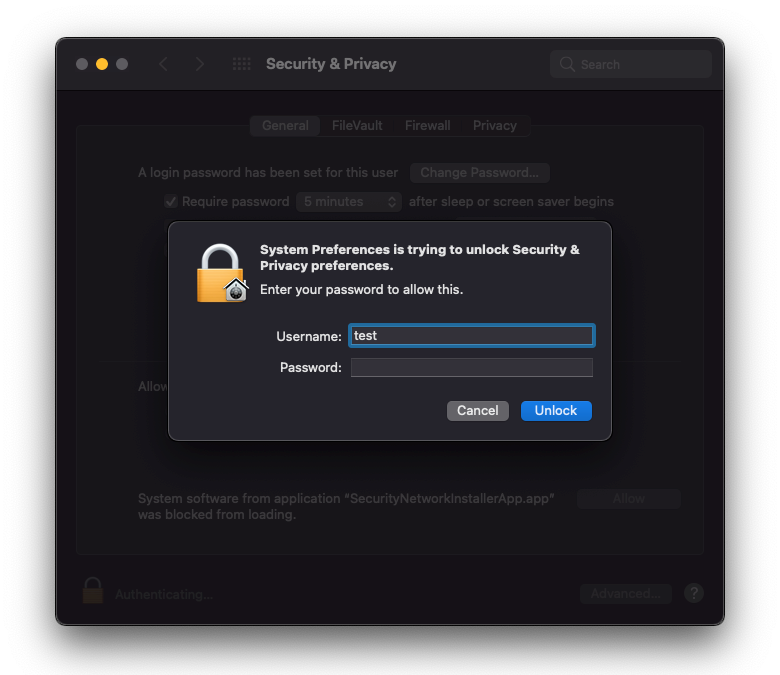
Click the lock at the bottom of the window to make changes.
Enter your system credentials and click Unlock.
Click Allow for the blocked system extension.
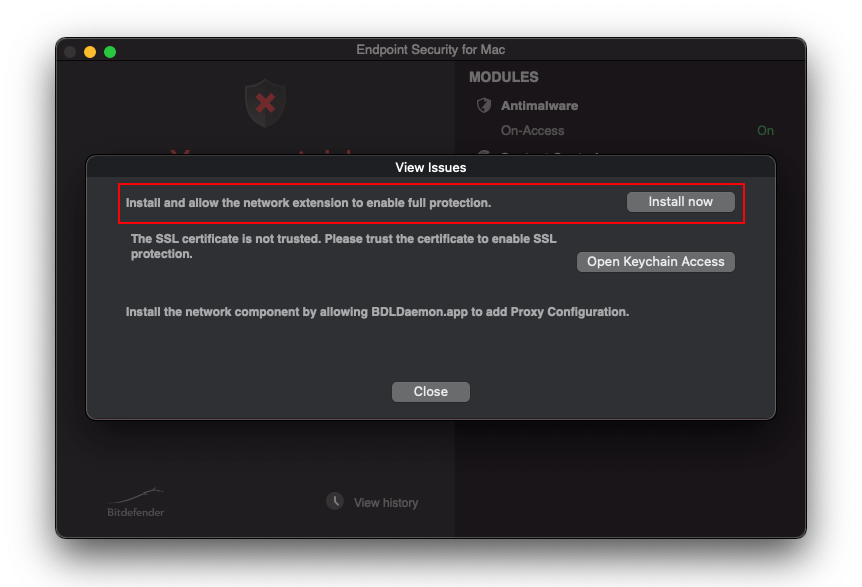
With the Network extension not approved, Endpoint Security for Mac displays a You are at risk warning with the following message in the View Issues window:
"Install and allow the network extension to enable full protection."
To fix the issue:
Click Install now to open the Security > Privacy window.
Click the lock at the bottom of the window to make changes.
Enter your system credentials and click Unlock.
Click Allow for the blocked system extension.
Note
In macOS Ventura these controls are available in the Privacy & Security page.
Starting with macOS Big Sur and later, the network extension requires user approval when the agent or the network components are uninstalled (no other component remains installed).
If the user does not approve the change, the agent or the component will not be uninstalled.
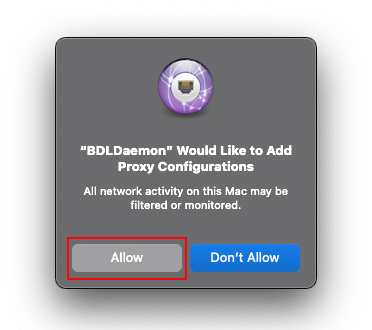
The system extension runs in the user space, so Endpoint Security for Mac uses a tunneling application (like a VPN) to filter the traffic. This application also requires approval.
In the "BDLDaemon" Would Like to Add Proxy Configurations window, click Allow.
With the application not approved, Endpoint Security for Mac displays a You are at risk warning and the following message in the View Issues window:
"Install the network component by allowing BDLDaemon.app to add Proxy Configuration."

The proxy configuration will be added to System Preferences > Network.
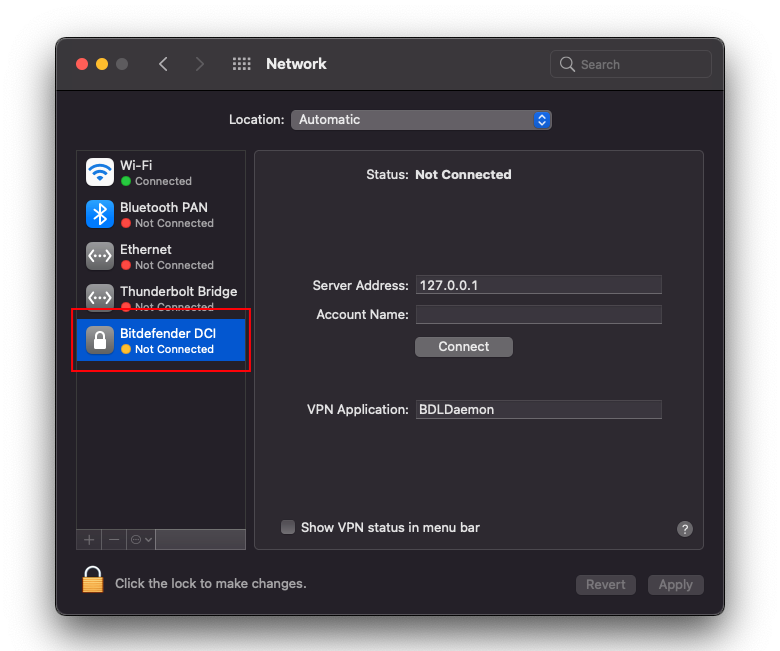
Bitdefender DCI connects only if the network extension was approved.
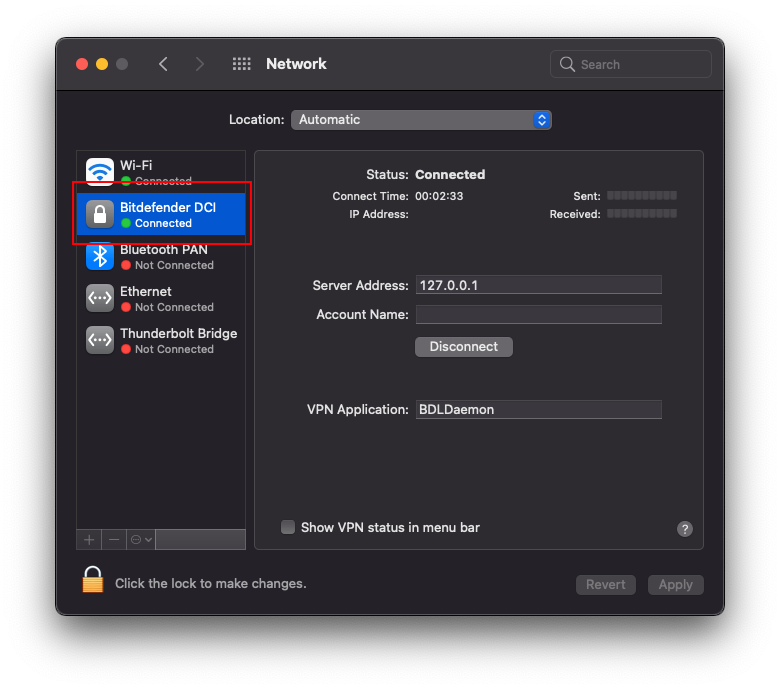
To filter the HTTPS traffic, Endpoint Security for Mac requires the approval of a SSL certificate.
If the Trust Settings are not updated, Endpoint Security for Mac displays a You are at risk warning and the following message in the View Issues window:
"The SSL certificate is not trusted. Please trust the certificate to enable SSL protection."
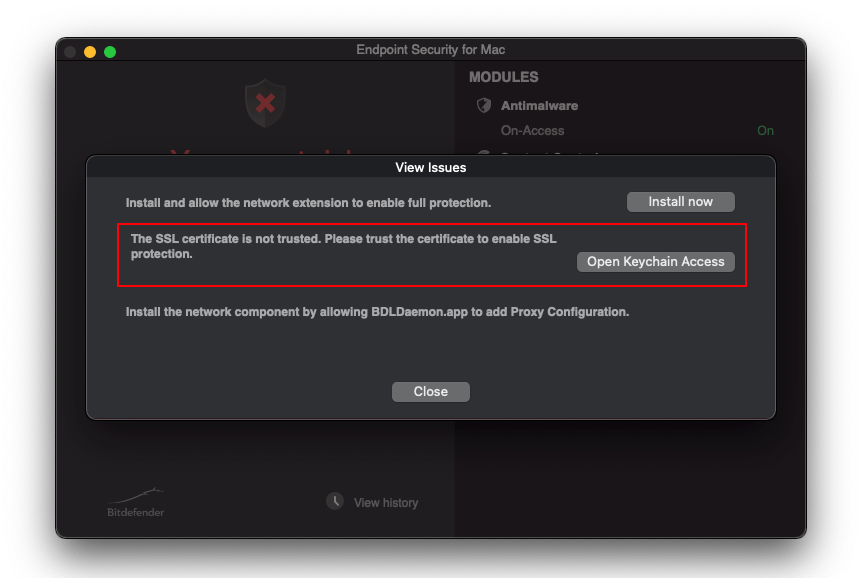
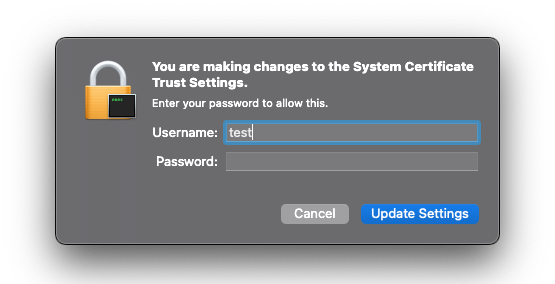
To trust the SSL certificate:
Click Open Keychain Access.
Double-click on Bitdefender CA SSL.
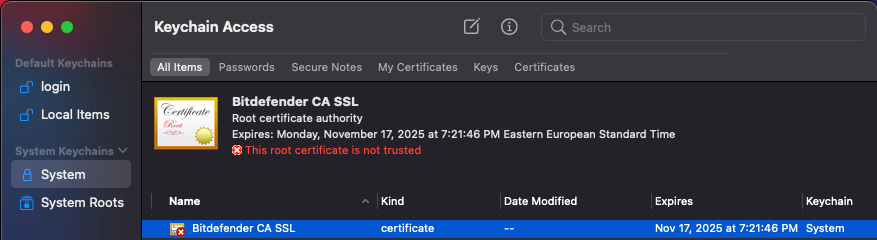
Expand the Trust section.
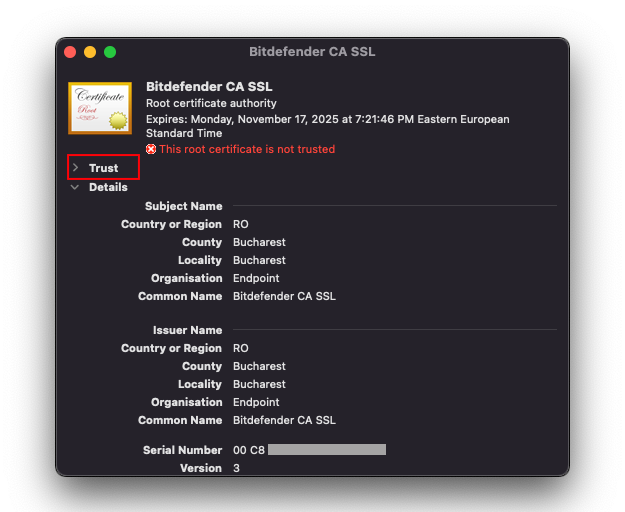
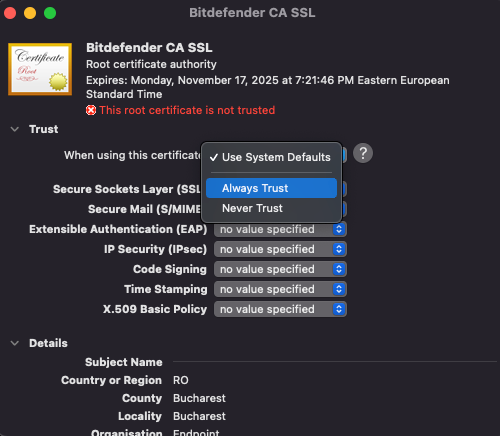
Click When using this certificate and select Always Trust.
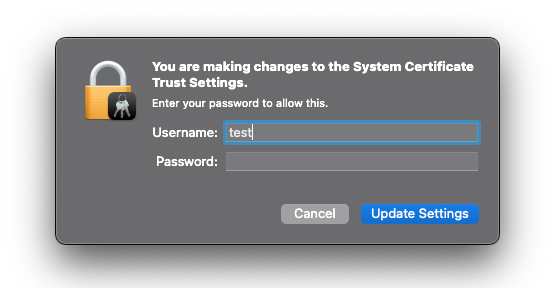
Close the window.
Enter your system credentials and click Update Settings.
Important
In addition to the procedures described above, BEST requires Full Disk Access permissions in macOS Big Sur. For details, refer to Full Disk Access is not granted for Bitdefender Endpoint Security Tools in macOS Mojave (10.14) and later.
Deploy BEST for Linux v7 via Ansible
This article contains basic instructions on how to create the necessary configuration files and deploy BEST Linux using an Ansible playbook.
Create a configuration file to keep track of your inventory:
inventory.yamlvirtualmachines: hosts: ubuntu22.04: ansible_host: 10.17.15.240Note
For more information on how to create an Ansible configuration file, refer to this How to build your inventory.
Create a configuration file to organize the BEST for Linux v7 deployment process:
deploy.yaml- hosts: virtualmachines vars: - WORKDIR: /root/bitdefender - TESTFILE: /home/eicar.com tasks: - name: Create the working directory file: path: "{{ WORKDIR }}" state: directory - name: Download the Bitdefender installer get_url: url: https://cloudgz.gravityzone.bitdefender.com/Packages/NIX/0/3i0Aov/setup_downloader.tar dest: "{{ WORKDIR }}/setup_downloader.tar" - name: Extract the Bitdefender installer unarchive: src: "{{ WORKDIR }}/setup_downloader.tar" dest: "{{ WORKDIR }}" remote_src: yes - name: Adjust the Bitdefender installer permissions file: path: "{{ WORKDIR }}/installer" state: file mode: u+x - name: Launch the Bitdefender installer command: cmd: "{{ WORKDIR }}/installer" chdir: "{{ WORKDIR }}" - name: Wait for the product to initialize pause: seconds: 60 - name: Test that the antimalware functionality is operational copy: dest: "{{ TESTFILE }}" content: | X5O!P%@AP[4\PZX54(P^)7CC)7}$EICAR-STANDARD-ANTIVIRUS-TEST-FILE!$H+H* - name: Check that the EICAR test file has been removed wait_for: path: "{{ TESTFILE }}" state: absent timeout: 5 - name: Remove the working directory file: path: "{{ WORKDIR }}" state: absentRun the following command:
ansible-playbook -i inventory.yaml -u root deploy.yaml
The output should be similar to the example below:
PLAY [virtualmachines] *********************************************************************************************************************************************************************************************************************

TASK [Gathering Facts] *********************************************************************************************************************************************************************************************************************
ok: [ubuntu22.04]

TASK [Create the working directory] ********************************************************************************************************************************************************************************************************
ok: [ubuntu22.04]

TASK [Download the Bitdefender installer] **************************************************************************************************************************************************************************************************
changed: [ubuntu22.04]

TASK [Extract the Bitdefender installer] ***************************************************************************************************************************************************************************************************
changed: [ubuntu22.04]

TASK [Adjust the Bitdefender installer permissions] ****************************************************************************************************************************************************************************************
changed: [ubuntu22.04]

TASK [Launch the Bitdefender installer] ****************************************************************************************************************************************************************************************************
changed: [ubuntu22.04]

TASK [Wait for the product to initialize] **************************************************************************************************************************************************************************************************
Pausing for 60 seconds
(ctrl+C then 'C' = continue early, ctrl+C then 'A' = abort)
ok: [ubuntu22.04]

TASK [Test that the antimalware functionality is operational] ******************************************************************************************************************************************************************************
changed: [ubuntu22.04]

TASK [Check that the EICAR test file has been removed] *************************************************************************************************************************************************************************************
ok: [ubuntu22.04]

TASK [Remove the working directory] ********************************************************************************************************************************************************************************************************
changed: [ubuntu22.04]

PLAY RECAP *********************************************************************************************************************************************************************************************************************************
ubuntu22.04                : ok=10   changed=6    unreachable=0    failed=0    skipped=0    rescued=0    ignored=0
Deploying Bitdefender Endpoint Security Tools for Mac through Microsoft Intune
This article describes how to deploy Bitdefender Endpoint Security Tools (BEST) on macOS computers through Microsoft Intune. To have the security agent fully functional without requiring local user interaction, you must follow these procedures:
You can deploy Bitdefender Endpoint Security Tools on client machines through Microsoft Intune using a custom script. The script connects to GravityZone, downloads and installs the kit, and it does a quick cleanup.
Note
When you use the script, BEST does not show up as an app in Microsoft Intune.
The following example is a proof-of-concept (POC) used during testing which succeeded in installing BEST when deployed through Microsoft Intune.
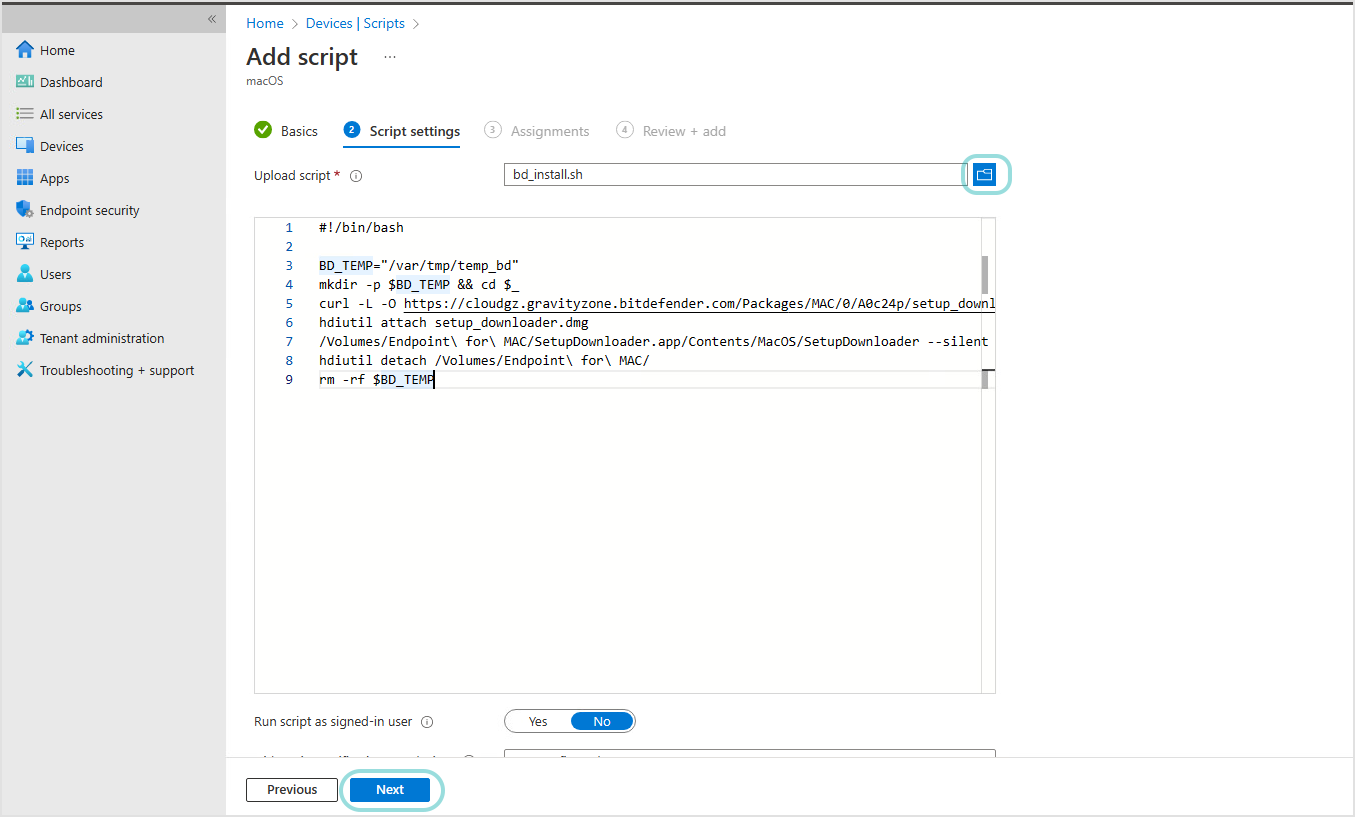
#!/bin/bash

BD_TEMP="/var/tmp/temp_bd"
mkdir -p $BD_TEMP && cd $_
curl -L -O [your_installation_package_url]
hdiutil attach setup_downloader.dmg
/Volumes/Endpoint\ for\ MAC/SetupDownloader.app/Contents/MacOS/SetupDownloader --silent
hdiutil detach /Volumes/Endpoint\ for\ MAC/
rm -rf $BD_TEMP
Important
In the script, replace [your_installation_package_url] with the link corresponding to your company. Therefore, the line would be similar to this format: curl -L -O https://cloudgz.gravityzone.bitdefender.com/Packages/MAC/0/xxxxxx/setup_downloader.dmg.
To obtain your installation package link, log in to GravityZone Control Center, go to Network > Installation packages > Send download links and copy the link for macOS Downloader. For details, refer to Send installation packages download links by email.
Because this script is executed with the highest privileges, it can be easily customized based on user preferences.
To deploy the script through Microsoft Intune, follow these steps:
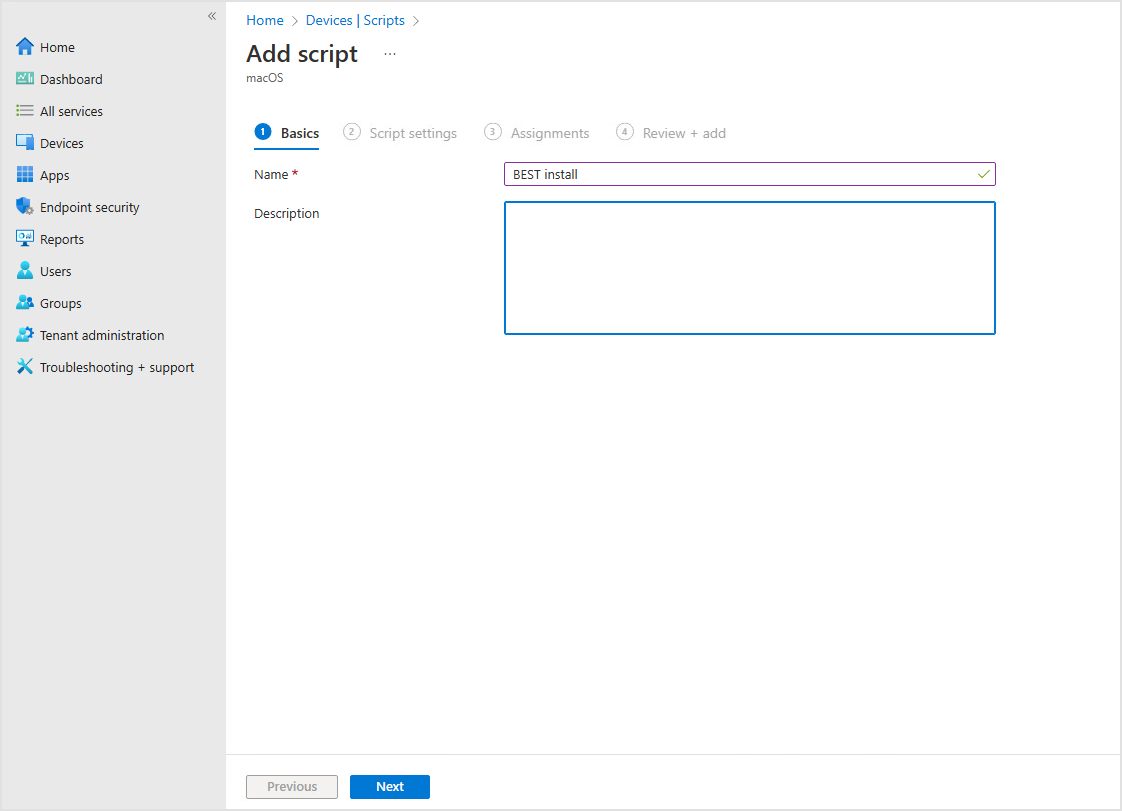
In Microsoft Endpoint Manager, go to Devices > Scripts.
Click Add and select macOS.
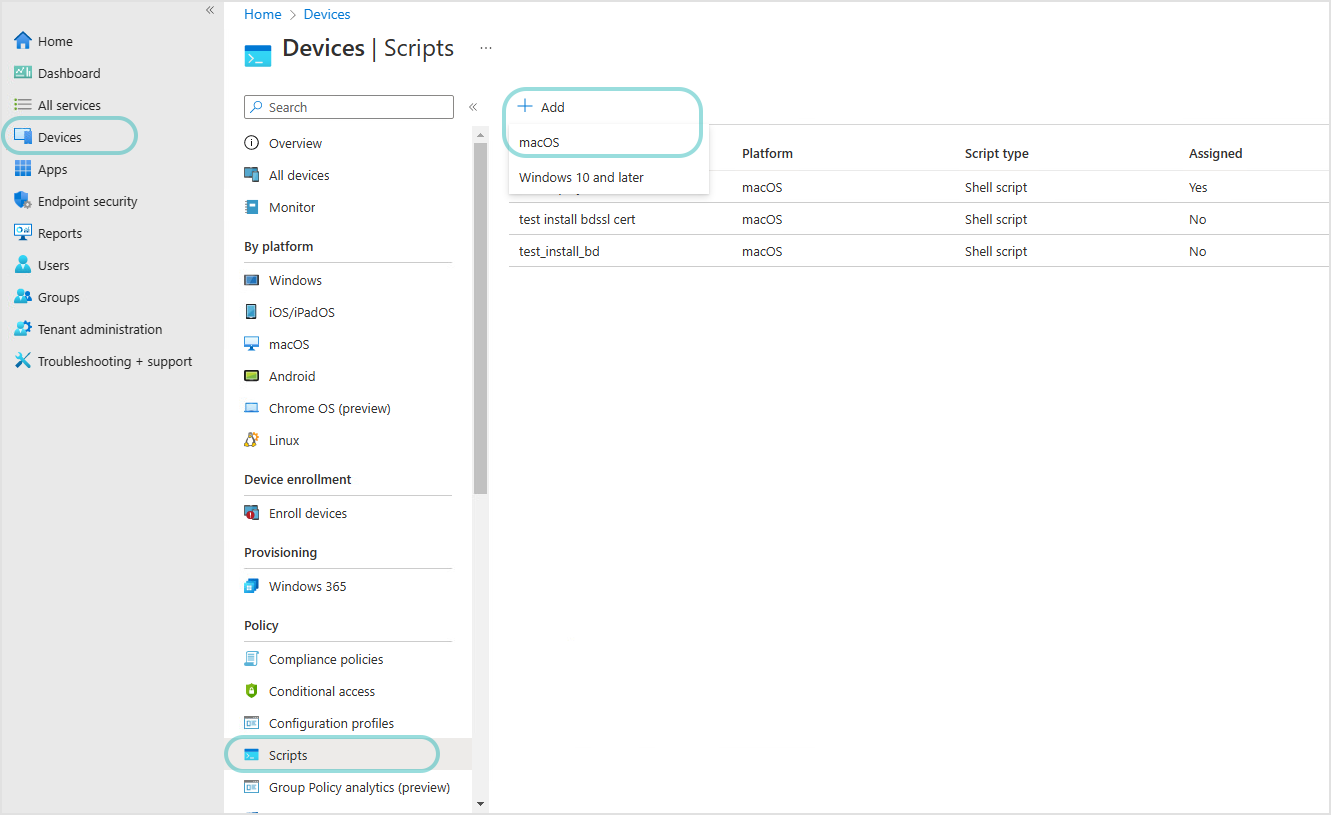
Enter a name for script and click Next.
Upload the script and click Next.
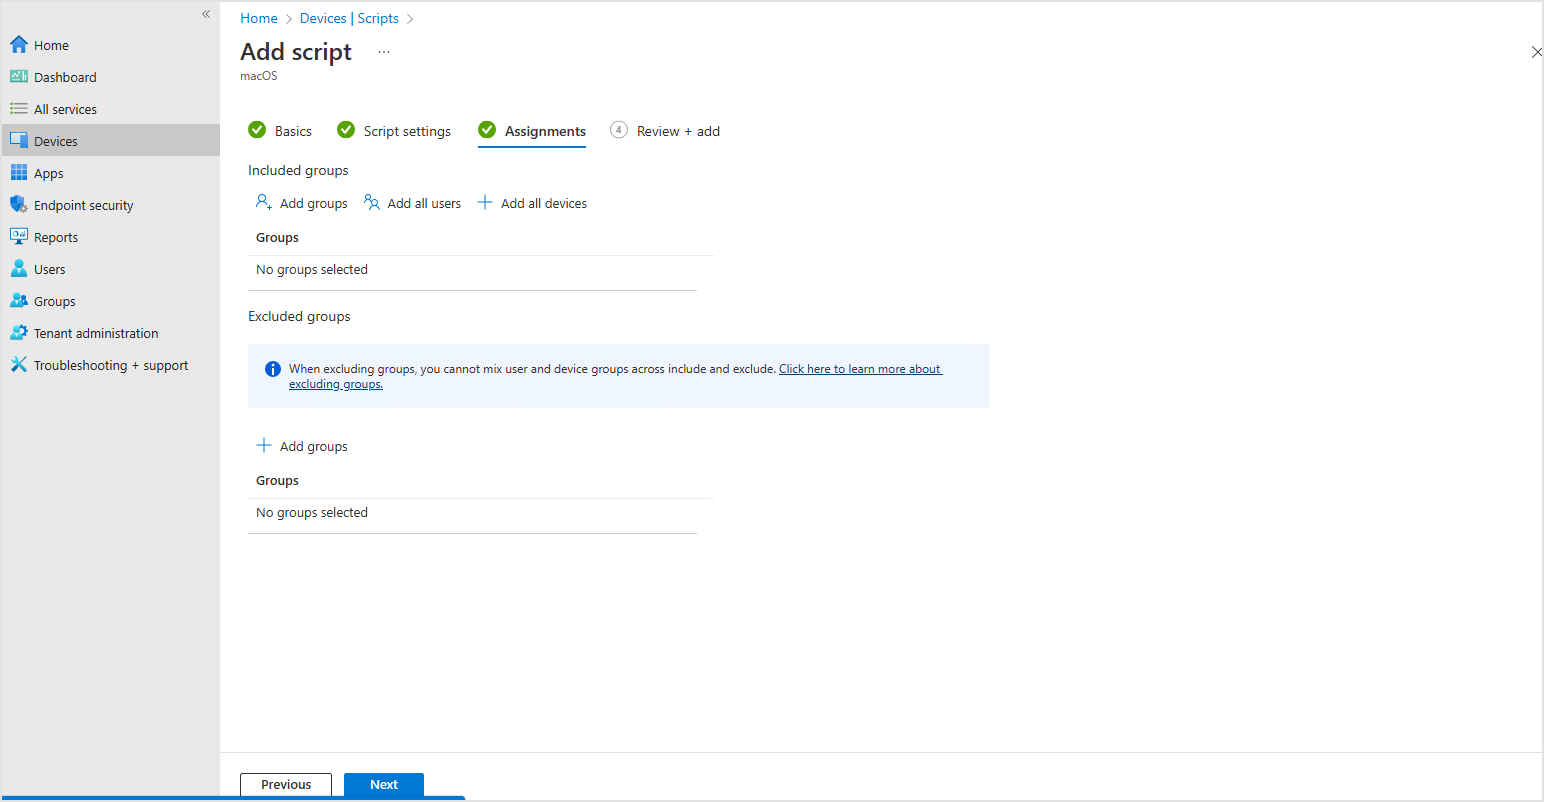
Select the group assignments and click Next.
Review the settings and click Add.
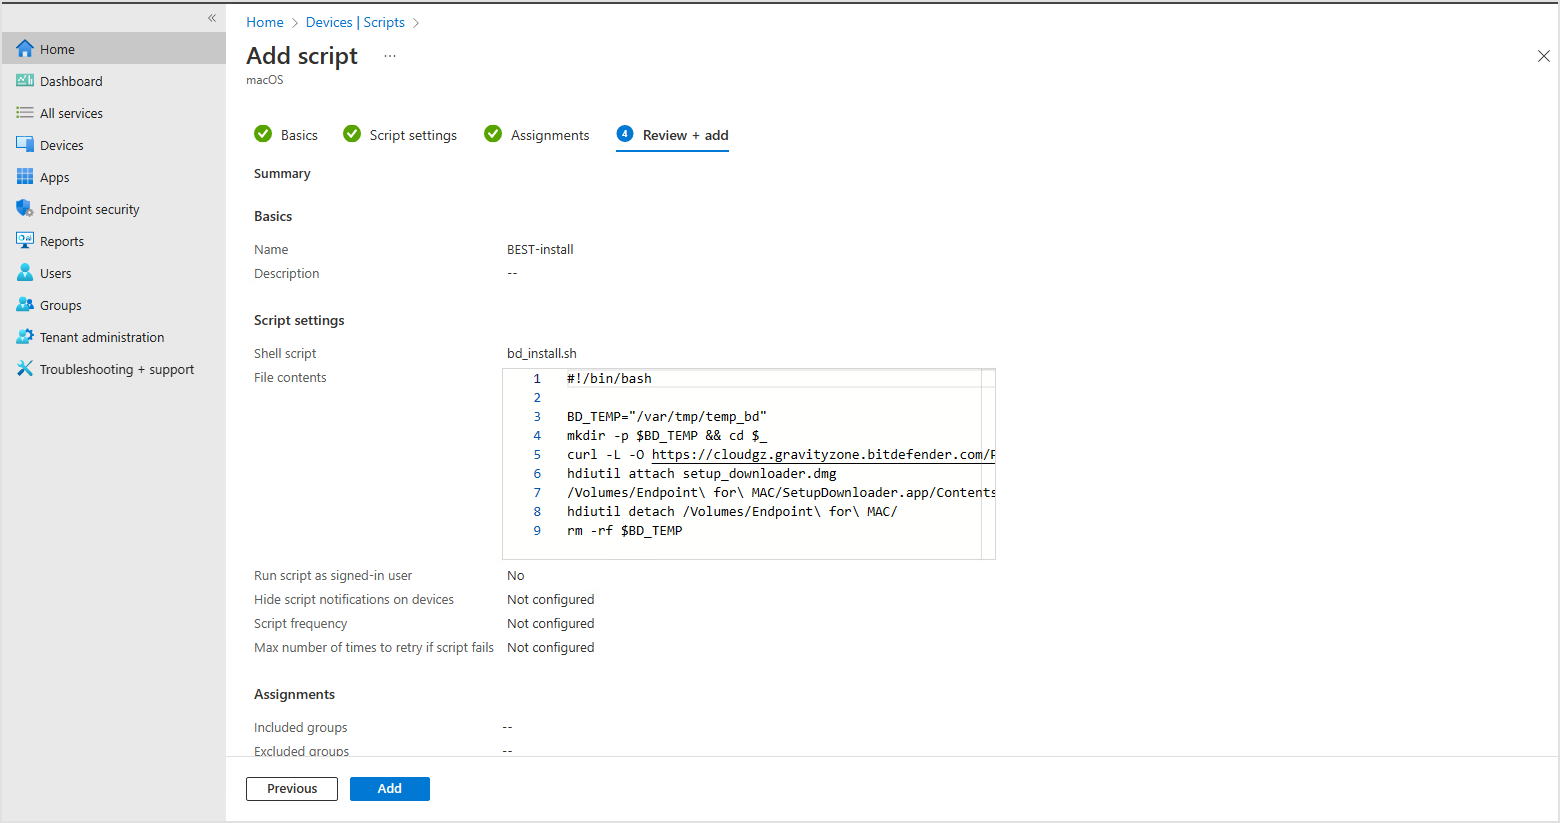
The script is being executed based on groups and users assignments.
This section describes how to deploy the required SSL certificate through Microsoft Intune, to have it automatically approved and ready to use without user interaction.
As of March 2023, Microsoft Intune does not support the deployment of certificates in PFX format, but it does however support regular CER format.
Important
For this procedure to work, the Bitdefender installation package created in GravityZonemust have an uninstall password set up.
To deploy the SSL certificate, follow these steps:
Obtain the MD5 hash of the uninstall password setup in GravityZone for the installation package used.
This can be achieved with various GUI tools or by using the Terminal, where you run the following command:
md5 -s 'YourUninstallPassword'
Generate a PFX certificate using PEM and KEY files.
Example:
# generate the certificate
openssl req -new -days 1825 -nodes -x509 -subj '/C=RO/ST=Bucharest/L=Bucharest/O=Endpoint/CN=NewName CA SSL' -keyout rootCA.key -out rootCA.pem

# create the PFX certificate using the .key and .pem generated previously
openssl pkcs12 -inkey rootCA.key -in rootCA.pem -export -out certificate.pfx
Note
After running this step, you are prompted for a password. Make sure to enter the MD5 hash of the uninstall password set on the BEST installation package obtained in step 1.
Create the certificate in CER format.
Example:
openssl x509 -inform PEM -in rootCA.pem -outform DER -out certificate.cer
Following this step, you have both
certificate.cerandcertificate.pfxavailable.Deploy the CER certificate through Microsoft Intune. Follow these steps:
Go to Devices > Configuration Profiles.
Select Create Profile, then Platform: macOS and Profile Type: Template.
Select Trusted Certificate and click Create.
In the Basics tab, enter a name and click Next.
In the Configuration Settings tab, select the certificate.cer file that was generated previously and click Next.
In the Assignments tab you must assign the appropriate groups and users, and complete the setup.
Deploy the PFX certificate on the target machine.
Note
The PFX certificate needs to be available on the target machine in the path:
/Library/DeployCert.To deploy the PFX certificate, you can have the certificate hosted on a resource accessible by the client and run a script through Microsoft Intune that simply copies it on the machine.
Here is an example of such a script that downloads the certificate from a web server and copies it to the required location.
#!/bin/bash

BD_TEMP="/var/tmp/temp_bd"
mkdir -p $BD_TEMP && cd $_

# assuming that the certificate is hosted on a web server at 10.25.99.228:8000
curl -L -O http://10.25.99.228:8000/certificate.pfx
mkdir -p /Library/DeployCert
mv certificate.pfx /Library/DeployCert
rm -rf $BD_TEMP
Note
The certificate deployed to
/Library/DeployCertusing this procedure has priority over the Bitdefender CA SSL certificate, which has been initially installed and trusted in keychain. After this procedure, Bitdefender Endpoint Security Tools stops using Bitdefender CA SSL and loads the new certificate instead.
This section describes how to create the MDM configuration profile in Microsoft Endpoint Manager, to automatically take these actions:
Enable Full Disk Access for the
BDLDaemonandEndpointSecurityForMacprocessesImportant
Starting with version 7.16.42.200020, the agent no longer requires Full Disk Access for the
EndpointSecurityforMacprocess.Approve the Bitdefender system extension
Approve the Bitdefender DCI extension
This way, BEST has access to all necessary resources on Mac and does not require user interaction to be fully functional.
To create the profile, follow these steps:
In Microsoft Endpoint Manager, go to Devices > Configuration Profiles.
Select Create Profile, followed by Platform: macOS and Profile Type: Templates.
Select Custom and click Create.
In the Basics tab, enter a name and click Next.
In the Configuration Settings tab, enter a name in the Custom configuration profile name, set Deployment channel to Device channel and upload the configuration file available here.
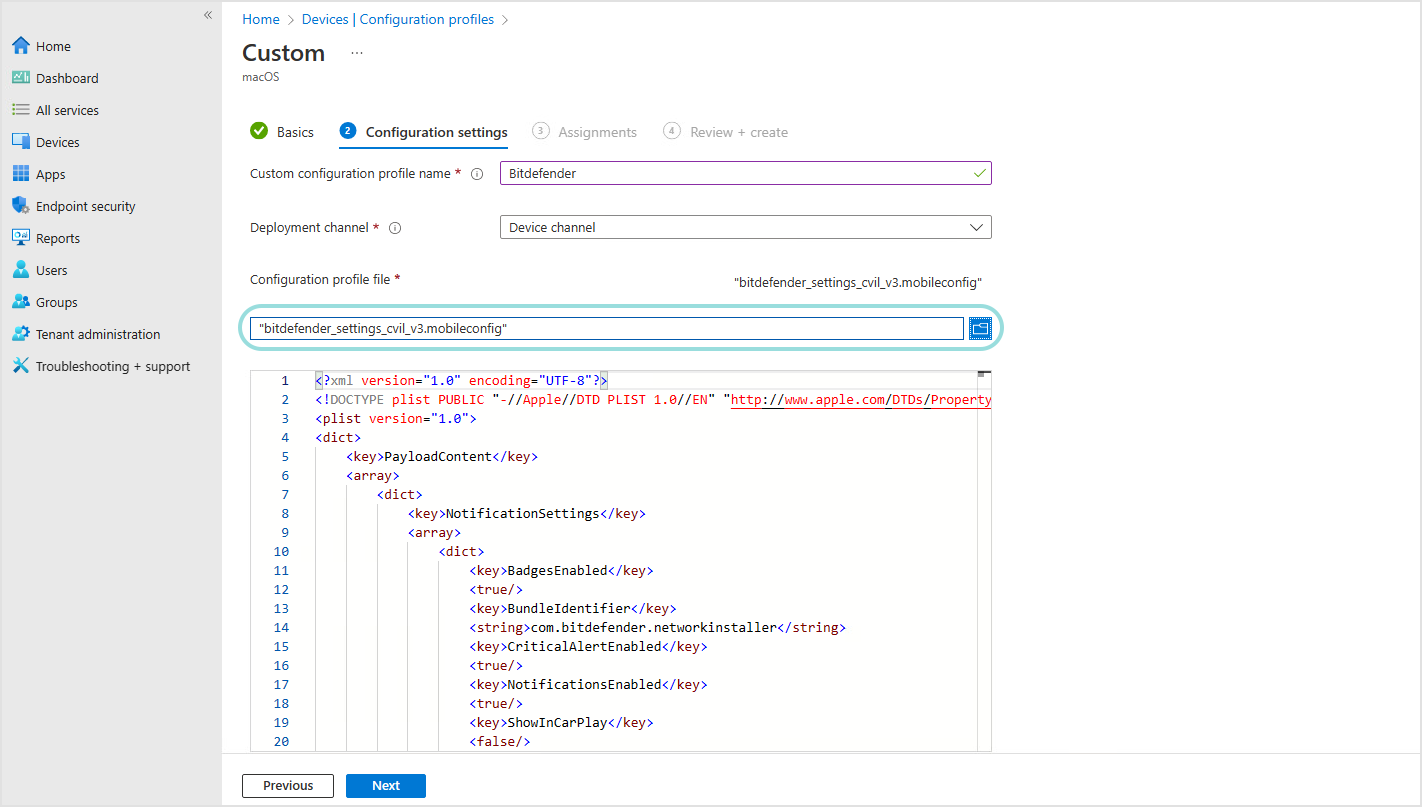
Click Next.
In the Assignments tab, assign the appropriate groups and users and complete the setup.
Deploy Bitdefender Endpoint Security Tools for Windows through Microsoft Intune
This article describes how to deploy Bitdefender Endpoint Security Tools (BEST) on Windows endpoints through Microsoft Intune.
This deployment uses the BEST Windows installer, packed as a Windows application (Win32) with the help of the Microsoft Win32 Content Prep Tool. Afterwards it is deployed through Microsoft Intune.
Important
Make sure the target endpoint is enrolled in Intune and has an active internet connection.
To create the installation package follow these steps:
Create a folder that is going to be used for future operations.
For this example
C:\testis going to be used.Create an installation package in GravityZone.
Download the BEST installer and save it in the previously created folder.
Download the official Microsoft Win32 Content Prep Tool.
Open Command Prompt.
Navigate to the folder where the Microsoft Win32 Content Prep Tool installer was downloaded.
Launch the Microsoft Win32 Content Prep Tool and follow the displayed instructions.
The following table contains a summary for each step, using the folder mentioned in step 1:
Step | Summary |
|---|---|
| The source folder where the installer is located. In this example, it is in |
| The name of the installation package. In this example, the file should be: |
| The output folder where the package created by the Microsoft Win32 Content Prep Tool will be placed. You can use the same source folder for output as well. |
After you create the installation package, a new file is going to be available in the output folder. It will have the same name as the BEST Windows installer, but with .intunewin added as an extension. This will be the package that is going to be uploaded to Intune and used for deployment in the next section.
Note
For more information about preparing and deploying Win32 apps, refer to the official Microsoft documentation.
After the BEST installation package is ready, you must prepare the application in Microsoft Intune by following these steps:
Open the Microsoft Intune Admin Center.
Go to Apps > Windows.
Select Add.
In the Select app type window, select Windows app (Win32).
Click Select.
In the App information tab, click Select app package file.
In the App package file menu, select the
.intunewinfile that was previously created.Click Ok.
The App Information window must be filled in with the following mandatory information about the uploaded package:
Field
Summary
Name
The name of the application: Bitdefender Endpoint Security Tools.
Description
A small description that you can add for this application.
Publisher
The publisher name is: Bitdefender.
After the information is added, click Next.
The Program window contains some mandatory fields that must be filled in:
Field
Summary
Install command
This is the BEST installation command. You must add the regular installation command for the new installer, with the option to run a silent installation:
setupdownloader_[base64_hash].exe /bdparams /silentImportant
Make sure that the
[base64_hash]is the actual string contained in the package you have created and downloaded.This is an example of a command using the
base64encoded string:setupdownloader_[aHR0cHM6Ly9leGFtcGxlLW9mLXRoZS1wYXRoLXRvLWdyYXZpdHl6b25lLWluc3RhbGxlci54bWw=].exe /bdparams /silentUninstall command
The BEST uninstall process must be controlled through GravityZone, but since this field is marked as mandatory you can add:
No.Allow available uninstall
This option must be set to
No. The BEST uninstall process must be controlled through GravityZone.Install behavior
For this field you must select
System.Delete all entries under the Return code section that can indicate the post-installation behavior. This ensures that you can properly control the post-installation status during next steps.
Click Next.
In the Requirements window, the following fields are mandatory:
Field
Summary
Operating system architecture
Since you are using our own installation kit, you can select both
32bitand64bit.Minimum operating system
You must use Windows 10 version 1607, which is the first RS version.
Click Next.
In the Detection rules window, go to Use a custom script > Select File and upload the following script as a
.ps1file:if ((Get-ItemProperty -Path "HKLM:\SOFTWARE\Microsoft\Windows\CurrentVersion\Uninstall\Endpoint Security" -Name "InstallLocation")` -and ((Get-Service EPIntegrationService).status -like "Running")` -and (Get-Service EPSecurityService).status -like "Running" ) { Write-Output "Bitdefender Endpoint Security Tools was succesfully installed" exit 0 } else { Write-Output "Bitdefender Endpoint Security Tools was not installed" exit 1 }It is strongly recommended to code sign the detection script and set the
Enforce script signature check and run script silentlyoption toYes. This assure that the script comes from a trusted source and was not tampered with after it was signed. This option allows the script to run without any additional confirmations or prompts.If you choose not to code sign the detection script, the
Enforce script signature check and run script silentlyoption can be set toNo. While this is not recommended, if the PowerShell execution policy on the target endpoint is set to restricted, you are going to be prompted with a confirmation for the script to run.This script checks if BEST was installed, by verifying the
HKLM:\SOFTWARE\Microsoft\Windows\CurrentVersion\Uninstall\Endpoint Securityregistry key. In addition, it ensures that theEPSecurityServiceandEPIntegrationServiceservices are running.The Dependencies and Supersedence windows can be left with default values.
In the Assignments window you can set up what users or user groups can use the installer.
In the Review + create window, select Create.
The application is going to be installed. Additionally, it is also going to to be displayed in the Intune Management Console and marked as installed in the Managed Apps section on each endpoint.
Preparing macOS machines for Bitdefender Endpoint Security Tools deployment via Relay
In a medium to large macOS environment, you can deploy Bitdefender Endpoint Security Tools (BEST) faster and easier from GravityZone Control Center through a Relay computer. The Relay role is available only for Windows and Linux operating systems.
Follow the steps described below to prepare macOS machines for Bitdefender Endpoint Security Tools deployment through the Relay.
Remote deployment of Bitdefender Endpoint Security Tools requires another machine that runs the Bitdefender agent with the Relay role installed. To add the Relay role, perform a Reconfigure agent task on that machine. Follow these steps:
In GravityZone Control Center, go to the Network page from the left side menu.
In the Network inventory, select the Windows or Linux machine on which you want to install the Relay role.
Click the Tasks button in the action toolbar and select Reconfigure agent.
Alternately, right-click on the machine name and select Tasks > Reconfigure agent.
Run the Reconfigure agent task to add the Relay role to the target machine.
For details on how you use the Reconfigure agent task, refer to Reconfigure agent.
When deploying Bitdefender Endpoint Security Tools to Mac through a Linux relay, you must have the Samba package (smbclient) version 4.1.0 or above installed on the Linux machine, along with samba-client dependencies and samba-common package. For details, refer to Preparing workstations for Bitdefender Endpoint Security Tools remote deployment.
The Relay machine automatically performs a network discovery task every 4 hours and, if the case, adds new entries in the Network inventory in GravityZone Control Center. However, you can manually run the network discovery task to find all the computers in your network, including Macs. Follow these steps:
In GravityZone Control Center, go to the Network page from the left side menu.
In the Network inventory, select the Windows or Linux machine on which you want to install the Relay role.
Click the Tasks button in the action toolbar and select Run network discovery.
Alternately, right-click on the machine name and select Tasks > Run network discovery.
For details on how the network discovery task works, refer to Understanding network discovery.
Regarding the macOS machines on which you intend to deploy Bitdefender Endpoint Security Tools, they need to have the Remote Login option enabled.
You can enable the Remote Login option in System Preferences > General > Sharing.
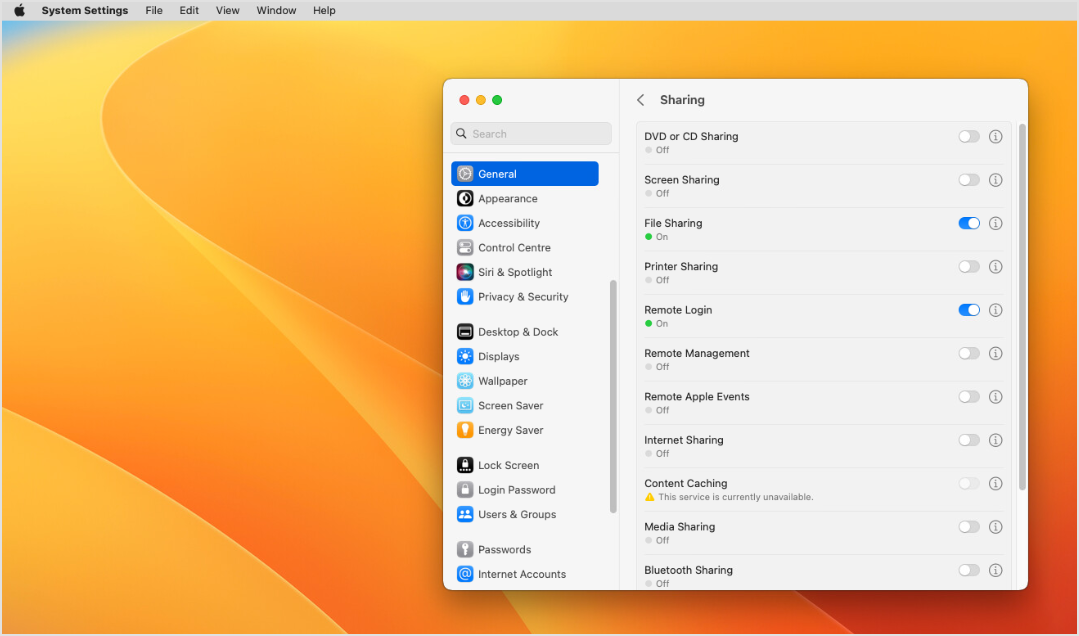
In addition, macOS machines must have firewall disabled in System Preferences > Network.

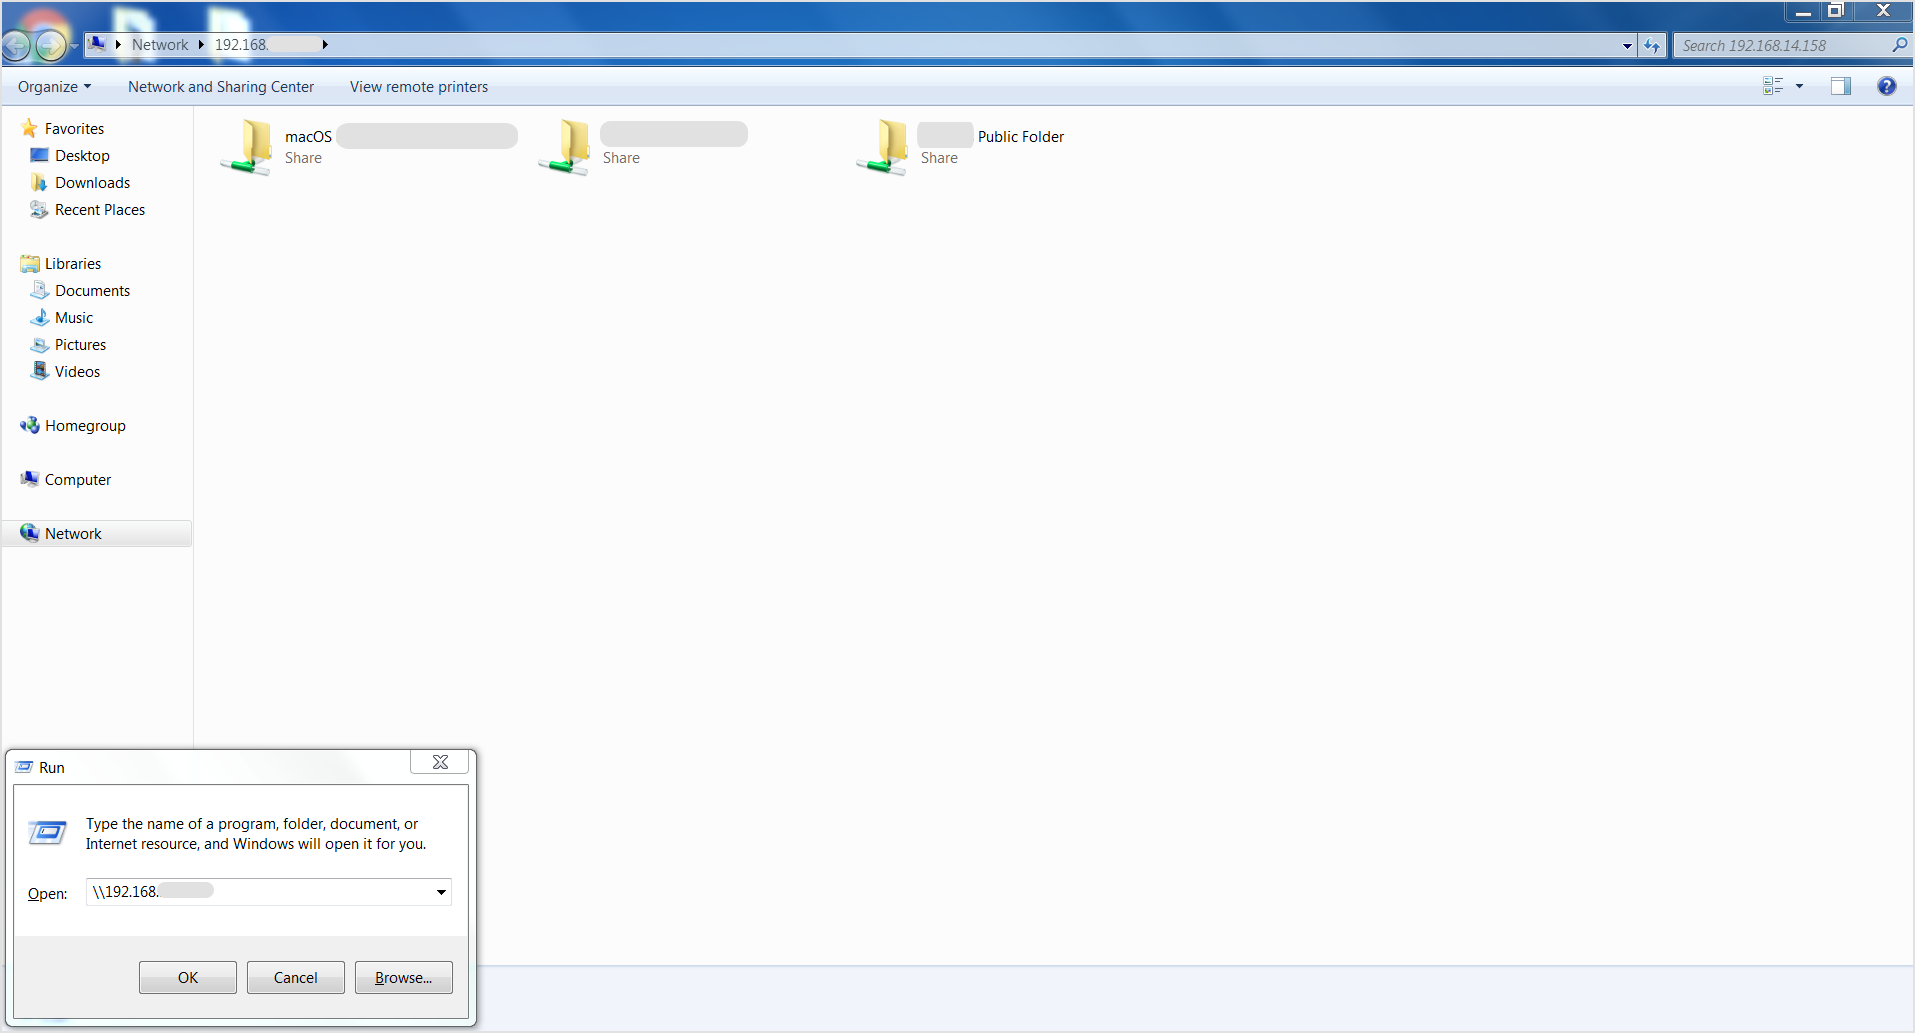
To make sure the deployment of Bitdefender Endpoint Security Tools will take place without issues, verify that you can access the files and folders on Mac from the Relay machine. If it is a Windows machine, follow these steps:
Press the
Windows+Rkeys to open the Run application.Type in the IP address of the macOS machine.
When prompted, enter the macOS credentials.
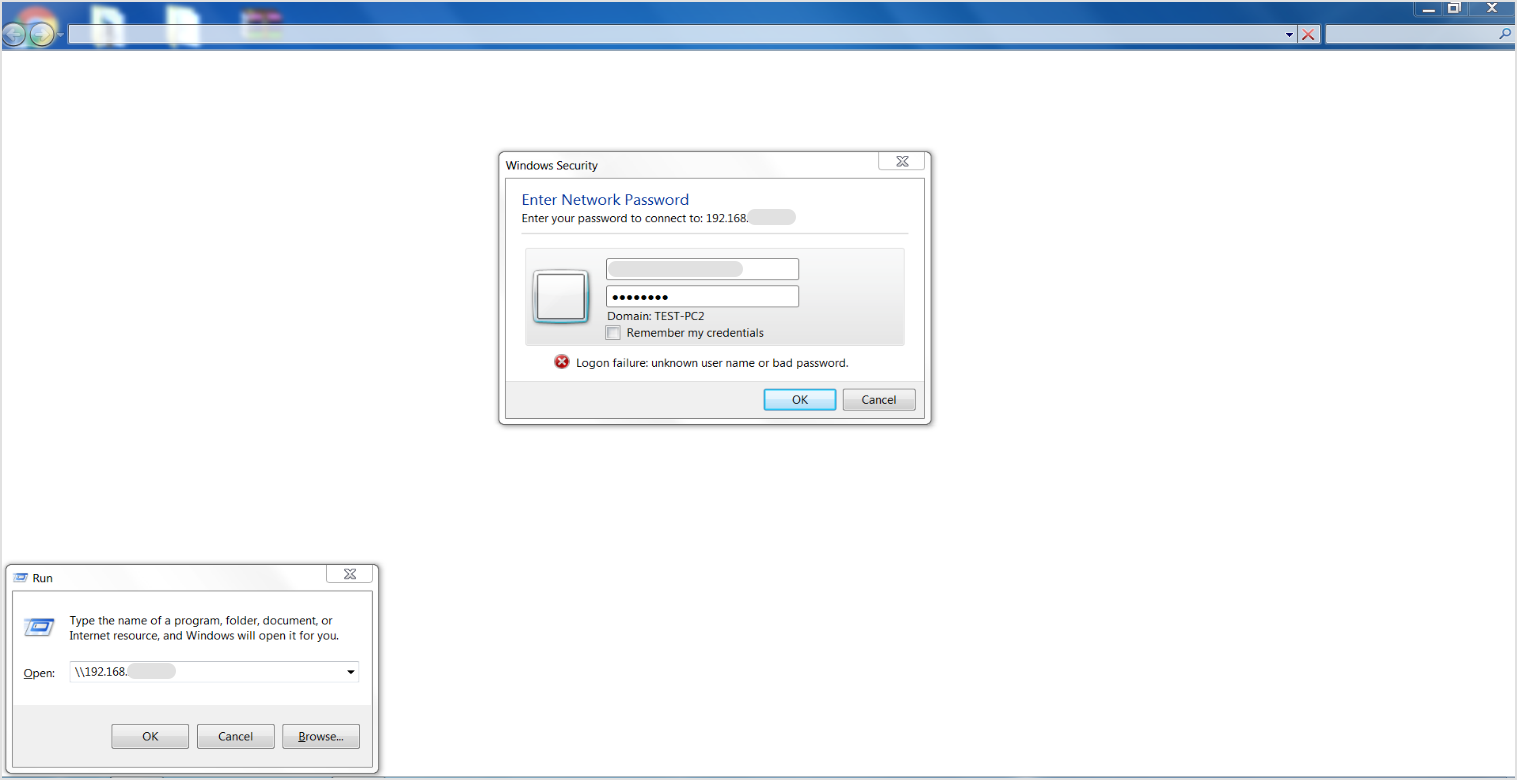
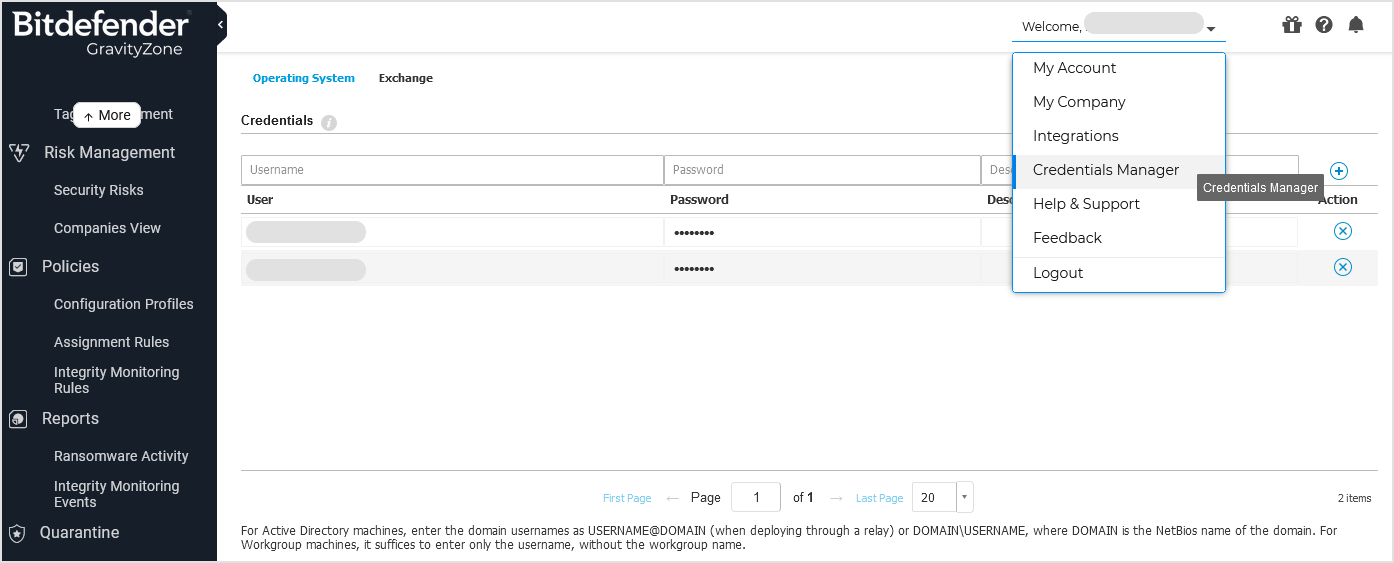
Keep in mind that you also must enter these credentials in Credentials manager in GravityZone Control Center. If you want to deploy BEST on multiple macOS machines, you must enter the user account credentials for all of them.
If the connection is successful, the macOS share is accessible from the Windows machine that serves as relay.
Now you can begin the actual deployment of Bitdefender Endpoint Security Tools on macOS machines. For the necessary steps, refer to Install security agents - standard procedure.