
Settings

In this section you can configure the quarantine settings and the scan exclusion rules.

Quarantine

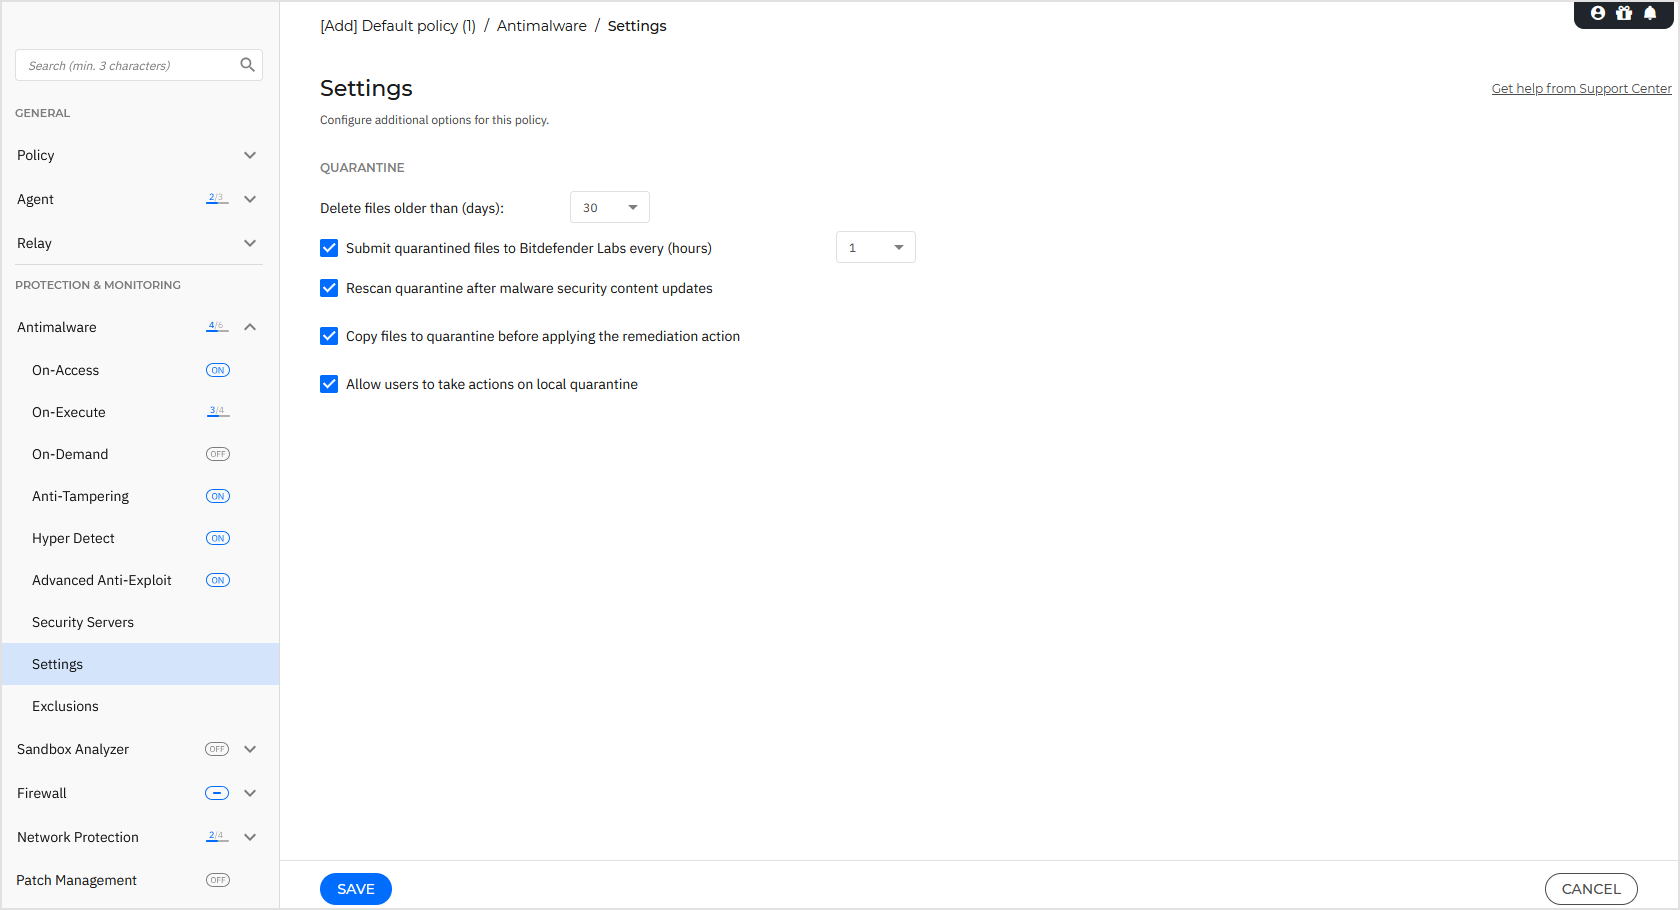
You can configure the following options for the quarantined files from the target endpoints:

  • Delete files older than (days) - By default, quarantined files older than 30 days are automatically deleted. If you want to change this interval, choose a different option from the menu.

  • Submit quarantined files to Bitdefender Labs every (hours) - By default, quarantined files are automatically sent to Bitdefender Labs every hour.

    You can edit the time interval between quarantined files are being sent (one hour by default). The sample files will be analyzed by the Bitdefender malware researchers. If malware presence is confirmed, a signature is released to allow removing the malware.

  • Rescan quarantine after security content updates - Keep this option selected to automatically scan locally quarantined files after each security content update. Clean files are automatically moved back to their original location.

  • Copy files to quarantine before applying the disinfect action - Select this option to prevent data loss in case of false positives and copy each file detected as infected to quarantine before applying the disinfect action. You can afterwards restore legitimate files from the Quarantine page.

  • Allow users to take actions on local quarantine - This option is controlling the actions that endpoint users can take on local quarantined files via the Bitdefender Endpoint Security Tools interface.

    By default, local users can restore or delete quarantined files from their computer using the options available in Bitdefender Endpoint Security Tools.

    By disabling this option, users will not have access anymore to the quarantined files action buttons from the Bitdefender Endpoint Security Tools interface.

Note

Availability and functioning of this feature may differ depending on the license included in your current plan.

Exclusions

Bitdefender security agent can exclude from scanning certain object types. Antimalware exclusions are to be used in special circumstances, or following Microsoft or Bitdefender recommendations. For an updated list of exclusions recommended by Microsoft, please refer to this web article.

In this section, you can configure the use of different types of exclusions available with the Bitdefender security agent.

  1. You can define In-policy exclusions for in-house developed applications or customized tools, according to your specific needs. In-policy exclusions are available only to the policy where the have been defined.

    AM-exclusions-in-policy.png
  2. You can add one or multiple lists of exclusions to the policy from the Configuration Profiles section. The same exclusion lists are available to multiple policies through options in the Configuration Profiles section.

    AM-exclusions-profiles.png
  3. You can customize the list of enabled recommended vendor and product exclusions.

    AM-exclusions-vendors.png

In-policy exclusions

In-policy antimalware exclusions apply to one or more of the following scanning methods:

  • On-access scanning

  • On-execute scanning

  • On-demand scanning

  • Advanced Threat Control (ATC/IDS)

  • Ransomware Mitigation

Important

  • If you have an EICAR test file that you use periodically to test antimalware protection, you should exclude it from on-access scanning.

  • If using VMware Horizon View 7 and App Volumes AppStacks, refer to this VMware document.

To exclude specific items from scanning, select the In-policy exclusions option and then add the rules into the table underneath.

AM-exclusions-in-policy-single.png

To add an exclusion rule:

  1. Select the exclusion type from the menu:

    • File: only the specified file.

    • Folder: all files and processes inside the specified folder and from all of its subfolders.

    • Extension: all items having the specified extension.

    • Process: any object accessed by the excluded process.

    • File Hash: the file with the specified hash. GravityZone supports the SHA-256 hash algorithm.

      Note

      Adding File Hash type exclusions could result in high CPU usage due to the checksum calculations performed.

    • Certificate Hash: all the applications and PowerShell scripts (for Windows endpoints) under the specified certificate hash (thumbprint).

    • Threat Name: any item having the detection name (not available for Linux operating systems).

    • Command Line: the specified command line (available only for Windows operating systems).

    Warning

    In agentless VMware environments integrated with NSX, you can exclude only folders and extensions.

  2. Provide the details specific to the selected exclusion type:

    File, Folder or Process

    Enter the path to the item to be excluded from scanning. You have several helpful options to write the path:

    • Declare the path explicitly:

      For example: C:\temp

      To add exclusions for UNC paths, use any of the following syntaxes:

      \\hostName\shareName\filePath

      \\IPaddress\shareName\filePath

      Note

      To accommodate Linux requirements, GravityZone supports up to 4096 characters when defining paths. To apply this limit on Windows, make sure MAX_PATH is set to support this value on the target machines. Learn more in Microsoft documentation.

    • Use the system variables available in the drop-down menu:

      For process exclusions, you must also add the name of the application's executable file.

      For example:

      %ProgramFiles% - excludes the Program Files folder.

      %WINDIR%\system32 – excludes the system32 folder within the Windows folder.

      %SystemDrive% - excludes the drive where the Windows folder was placed, usually drive C:

      Note

      It is advisable to use system variables (where appropriate) to make sure the path is valid on all target computers.

    • Use wildcards:

      The asterisk (*) substitutes for zero or more characters excepting path delimiters. Double asterisk (**) substitutes for zero or more characters including path delimiters. The question mark (?) substitutes for exactly one character. You can use several question marks to define any combination of a specific number of characters. For example, ??? substitutes for any combination of exactly three characters.

      For example:

      C:\Test\*.* – excludes all files in the Test folder.

      C:\Test\*.png – excludes all PNG files in the Test folder.

      C:\Test\* - excludes all files in the Test folder.

      **\file.txt - excludes all the files that have the name file.txt, regardless where these files are located.

      **\my_folder\*\file.txt - excludes all the folders on all levels above my_folder and all subfolders on a single level under my_folder that contain file.txt.

      **\application*.exe - excludes all the files that have the name application and variations of this name followed by one or more characters, regardless where the files are located.

      C:\MyApp\** - excludes all files and folders in MyApp folder, regardless of the depth level.

      C:\Program Files\WindowsApps\Microsoft.Not??.exe – excludes the Microsoft Notes processes.

    Note

    • The double asterisk (**) can lead to undesired exclusions when misused, therefore we recommend caution.

    • The double asterisk (**) is not available on macOS and Linux. On these operating systems you can only use the asterisk (*) and the question mark (?) as wildcards.

    • Process exclusions do not support wildcards on Linux operating systems.

    Extension

    Enter one or more file extensions to be excluded from scanning, separating them with a semicolon ";". You can enter extensions with or without the preceding dot. For example, enter txt to exclude text files.

    Note

    On Linux-based systems, file extensions are case sensitive and the files with the same name but with different extension are considered distinct objects. For example, file.txt is different from file.TXT.

    File hash, Certificate hash, Threat name, or Command line

    Enter the file hash, certificate thumbprint (hash), the exact name of the threat or the command line depending on the exclusion rule. You can use one item per exclusion.

  3. Select the scanning methods to which the rule applies. Some exclusions may be relevant for just one of the scanning modules (On-access scanning, On-demand scanning, ATC/IDS, Ransomware Mitigation), while others may be recommended for all of the modules.

  4. Optionally, click the Show remarks button to add a note in the Remarks column about the rule.

  5. Click the add_inline.png Add button.

    The new rule will be added to the policy.

To remove a rule from the policy, click the corresponding delete_inline.png Delete button.

Important

On-demand scanning exclusions do NOT apply to contextual scanning. Contextual scanning is initiated by right-clicking a file or folder and selecting Scan with Bitdefender Endpoint Security Tools.

Importing exclusions

You can reuse the exclusion rules in more policies by importing them.

To import custom exclusions:

  1. Click Import. The Import Policy Exclusions window opens.

  2. Click Add and then select the CSV file.

  3. Click Save.

    The table is populated with the valid rules.

    Note

    If the CSV file contains invalid rules, a warning informs you of the corresponding row numbers.

Each row in the CSV file corresponds to a single rule, having the fields in the following order:

<exclusion type>, <object to be excluded>, <modules>

These are the available values for the CSV fields:

Exclusion type:

  • 1, for file exclusions

    2, for folder exclusions

    3, for extension exclusions

    4, for process exclusions

    5, for file hash exclusions

    6, for certificate hash exclusions

    7, for threat name exclusions

    8, for command line exclusions

  • Object to be excluded:

    A path or a file extension

  • Modules:

    1, for on-demand scanning

    2, for on-access scanning

    3, for all modules

    4, for ATC/IDS

    6, for Ransomware Mitigation

For example, a CSV file containing antimalware exclusions may look like this:

1,"d:\\temp",1
2,%WinDir%,3
4,"%WINDIR%\\system32",4

Note

The Windows paths must have the backslash (\) character doubled. For example, %WinDir%\\System32\\LogFiles.

Vendor and product exclusions

Vendor and product exclusions refer to all recommended exclusions included in Bitdefender security agent. This option is enabled by default.

AM-vendor-exclusions-default.png

Caution

You can choose to disable vendor and product exclusions, if you want to scan all types of objects, but this option will considerably impact the machine performance and will increase the scan time.

With the vendor and product exclusions option enabled:

  • If you disable the Custom button, all the recommended vendor and product exclusions are added by default to the policy.

  • If you enable the Custom button, from the drop-down menu you can select which vendor and product exclusions to apply to the policy.

    AM-exclusions-vendors-single.png

Adding exclusion lists from configuration profiles to policy

To add exclusion lists from configuration profiles to the policy:

  1. From the drop-down menu, select the lists you want to add to the policy.

    AM-exclusions-profiles-single.png

    Each list selected from the drop-down will populate the grid area, where you can see how many endpoints will be impacted by the added exclusion list.

  2. After assessing which lists to include, click Save to complete the process.

Note

For more details on how to create and manage exclusion lists, refer to Configuration profiles .

Overriding exclusions

You can run scan tasks with another set of exclusions than the general ones in the Antimalware > Settings policy section. These exclusions apply only to on-demand scanning.

  1. Open the custom scan task configuration window:

    • For instant scan tasks (runs once)

      1. Log in to GravityZone Control Center.

      2. Go to the Network page from the left side menu.

      3. Select the target endpoints.

      4. Click the Tasks button in the Action Toolbar and select Scan.

      5. In the General tab, select Custom scan.

    • For scheduled scan tasks

      1. Log in to GravityZone Control Center.

      2. Go to the Policies page from the left side menu.

      3. Open the policy template assigned to your target endpoint.

      4. Go to the Antimalware > On-demand section.

      5. Click Add, and then select Custom. If you already have a task created, select the task from the list.

  2. Configure the other available settings. For details, refer to Managing Network Objects > Computers > Running Tasks > Scan section of the GravityZone Administrator's Guide.

  3. In the Target tab > Exclusions section, choose the option Define custom exclusions for this scan.

  4. Add the exclusion rules. For more info, refer to In-policy exclusions.

  5. Click Save to add the exclusion rule.

  6. Click Save once more to save the policy.