ConnectWise PSA
Bitdefender GravityZone and ConnectWise PSA
Bitdefender GravityZone is an enterprise security solution that helps organizations to achieve the best protection and performance for their business needs. Control Center, a centralized security management console, allows administrators to remotely install and manage security for any endpoint, in any location and environment. A local application called Bitdefender Endpoint Security Tools is installed on each endpoint.
ConnectWise Manage is a business management solution (Professional Services Automation - abbreviated as PSA), assisting vendors and partners to bring together products, services and people. The two solutions work together through the available GravityZone and ConnectWise Automate integration. MSPs can automatically create billing procedures for their customer companies, based on security services delivered by Bitdefender.
This documentation aims to explain how to configure the ConnectWise PSA and Bidefender GravityZone integration via the Bitdefender plugin for ConnectWise Automate in order to administrate billing services. The integration is applicable only for MSPs that use both ConnectWise Automate as well as ConnectWise PSA, for which the Bitdefender plugin is installed and configured in ConnectWise Automate.
The ConnectWise PSA integration is achieved by extending the current Bitdefender ConnectWise Automate plugin to include an additional ConnectWise PSA section.
This new integration approach allows MSPs partners to organize their business around one system, enabling one unified and fully integrated operational platform from within ConnectWise Automate.
The ConnectWise PSA integration allows the following actions:
Connect your existing ConnectWise Automate integration with Bitdefender GravityZone to an ConnectWise PSA account. Configure a new integration within ConnectWise PSA and provide your ConnectWise account details (URL, company name, public and private keys).
Setup the billing service. This functionality is reporting to ConnectWise PSA the number of active protected endpoints for each managed company with a monthly subscription. Based on these figures, ConnectWise PSA can calculate a price (based on the pricing model and quantity) and issue an invoice for each managed company, at the end of the month. For this functionality to work, a pricing model has to be defined in ConnectWise PSA for each managed company.
Import ConnectWise PSA companies to GravityZone Control Center. You can easily import your ConnectWise PSA companies to Bitdefender Control Center by first importing them as clients in ConnectWise Automate. Afterwards the Bidefender plugin can add (or map to existing ones) the ConnectWise PSA companies in GravityZone Control Center:
Automatically via the advanced inventory synchronization features in ConnectWise Automate.
On-demand by mapping the new ConnectWise Automate clients to GravityZone companies.
Setting up the ConnectWise PSA API key
Before configuring the actual integration, you need to generate API keys for authentication. These authentication parameters are unique to ConnectWise Members, granting them access to company resources. You can reuse the API Key generated to enable the ConnectWise Automate - ConnectWise PSA integration, but we strongly recommend creating a new one.
To generate API keys, follow these steps:
Log in to ConnectWise PSA.
Go to System > Security Roles.
Click New Item to create a Security Role and type a name in the Role ID field.
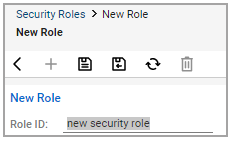
Click Save.
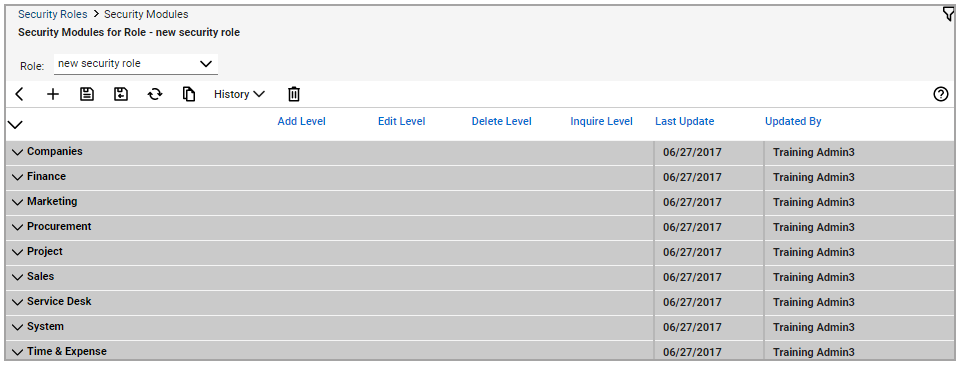
Edit the Security Role to add the following permissions:
Companies > Company Maintenance: Inquire level set to All
Finance > Agreements: Add Level, Edit Level and Inquire level set to All
Notice
This feature is unavailable for Basic Plan accounts.
Procurement > Products: Inquire level set to All
Procurement > Product Catalog: Inquire level set to All
Project > Project Ticket Tasks: Inquire level set to All
Project > Project Tickets: Inquire level set to All
Service Desk > Service Tickets: Add Level and Inquire level set to All
System > Table Setup (customize): Inquire Level set to All
Notice
Product Catalog is displayed as Product Entry in all versions prior to 2017.5.
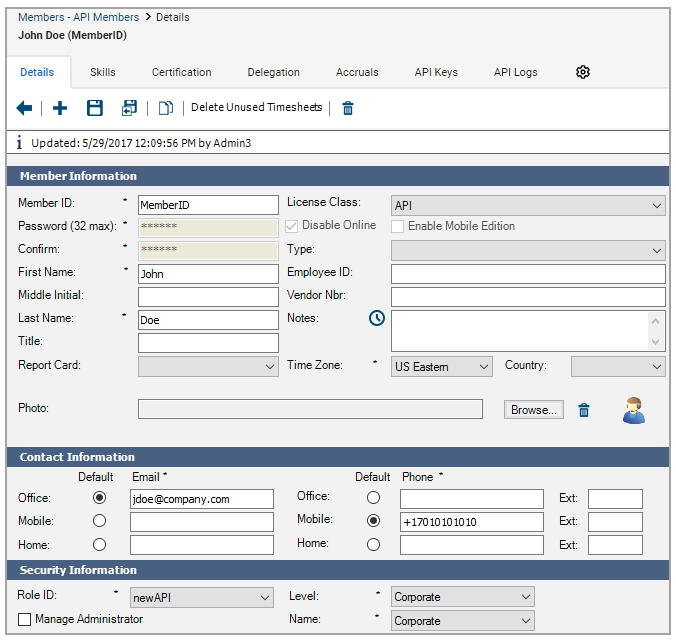
Create an API Member as follows:
Go to System > Members.
Go to the API Members tab.
Click New Item to add a new entry.
Fill in the mandatory fields and assign the previously created Security Role.
Click Save to apply changes.
Go to the API Keys tab.
Click New Item to add a new entry.
Write down the name in the Description field.
Click Save to generate Public and Private API Keys.
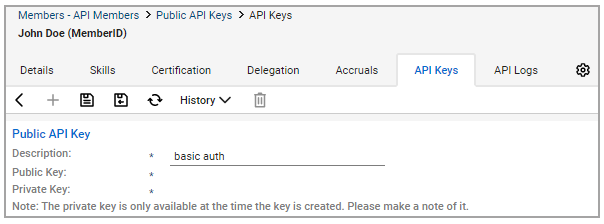
Important
The Private Key is only available the first time you create it. Please make a note of it to be later used in the Bitdefender GravityZone section in ConnectWise Automate.
Managing the ConnectWise PSA integration with Bitdefender ConnectWise Automate Plugin
After generating the required API keys, you need to go the Bitdefender GravityZone section in ConnectWise Automate to configure and manage the integration. If the Bitdefender plugin is not installed and enabled, please refer to Installing the Bitdefender Plugin.
Configuring the integration
To configure the integration, follow these steps:
Log in to ConnectWise Automate Control Center.
Go to Tools > Bitdefender GravityZone.
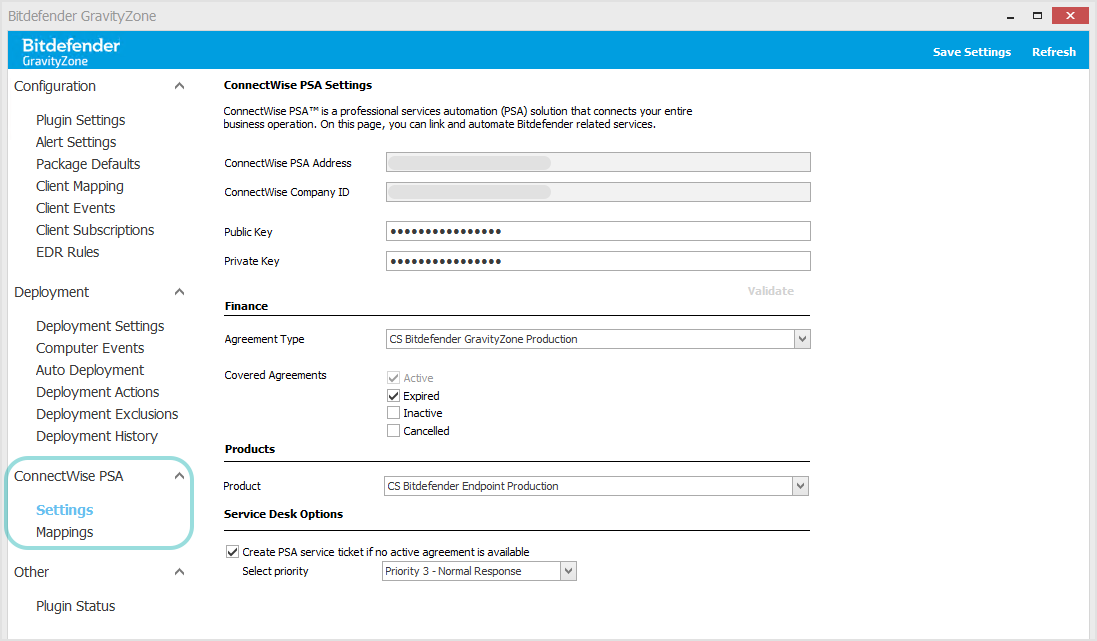
Under ConnectWise PSA, go to Settings section.
Important
The ConnectWise PSA integration requires a valid Automate - ConnectWise PSA integration. If the ConnectWise PSA plugin is not installed and enabled in the ConnectWise Automate tenant, all content under the Settings section are disabled.
ConnectWise PSA server address and company ID are automatically detected and retrieved.
Enter the required ConnectWise PSA Public and Private Keys (generated after creating an API Member in ConnectWise PSA):
Public Key
Private Key
Click Validate.
Wait until Bitdefender GravityZone plugin connects to ConnectWise PSA with the provided credentials.
If the ConnectWise PSA credentials are valid, select the Agreement Type and Product to enable Bitdefender to report the number of active protected endpoints for each managed company. For more details regarding the billing workflow, refer to Billing setup.
Under Covered Agreements, select which additional agreement statuses should be taken into consideration for creating additions:
Active - it cannot be unchecked, it represents the default agreement type status with the highest priority.
Expired
Inactive
Canceled.
Note
The priority order for covered agreements cannot be changed. For example, if no Active agreements are available and the Inactive status is checked, but Expired is unchecked, additions will be added to available agreements with Expired status.
Under Service Desk Options, select if a PSA service ticket should be created if no Agreements with Active status are found for PSA companies. If a selected priority level is no longer available, the Service Desk Option will remain active and priority will fallback to the default priority available in PSA > Setup Tables > Priority List.
Click Save Settings in the upper-right corner to save the configuration.
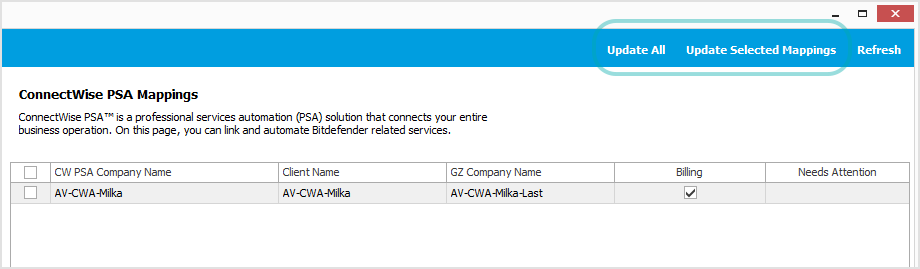
Managing ConnectWise PSA mappings
After the connection with ConnectWise PSA has been established, the Mappings section is enabled and automatically displays all ConnectWise PSA companies that are mapped to ConnectWise Automate clients.
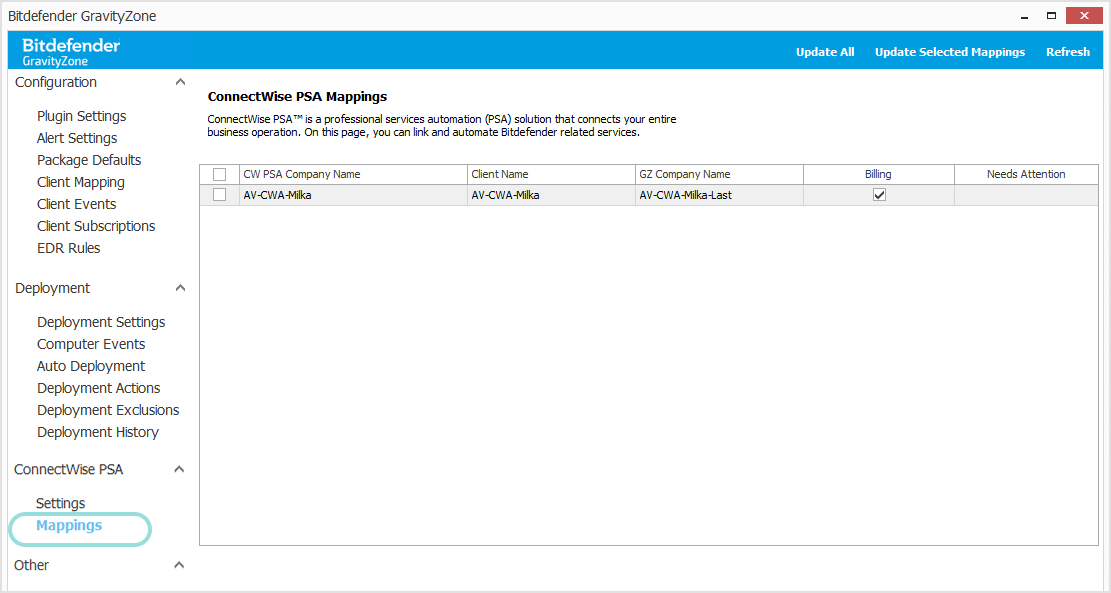
All details are displayed in a table with the following columns:
CW PSA Company Name - the ConnectWise PSA company that is mapped to the corresponding Automate client.
Client Name - the ConnectWise Automate client that is mapped to the corresponding ConnectWise PSA and GravityZone company.
GZ Company Name - the GravityZone company that is associated to corresponding Automate client and ConnectWise PSA company.
Billing - click the check box to activate or deactivate the billing information for the corresponding ConnectWise PSA company.
Needs Attention - indicates mapping and billing issues that prevent GravityZone from reporting monthly usage. All affected mappings are marked in red and the issues require action from the administrator. Click the Read more button for additional information.
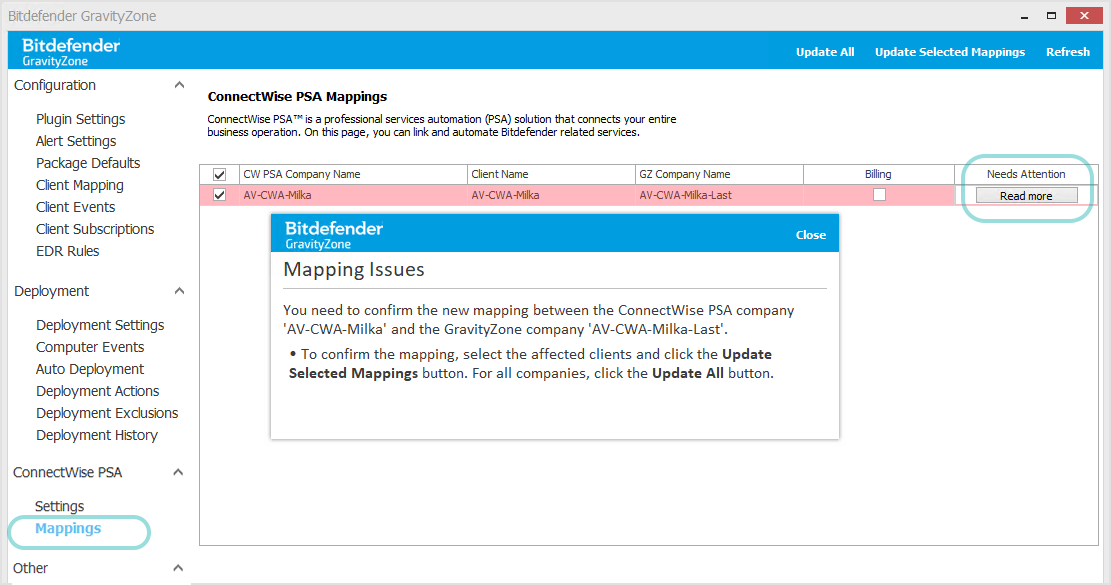
Possible Mapping issues:
The ConnectWise Automate and GravityZone association has changed.
The ConnectWise Automate and GravityZone association no longer exists.
The ConnectWise Automate and ConnectWise PSA association has changed.
ConnectWise PSA company no longer exists.
GravityZone company no longer exists.
Possible Billing issues:
The agreement type no longer exists.
The product type no longer exists.
ConnectWise PSA companies do not have any agreement of the given agreement type.
Possible Service Desk Ticket issue:
The company status for the ConnectWise PSA company has the option Disallow Saving enabled.
Notice
A mapping that is no longer valid could present several issues that need to be resolved.
To update mappings and save changes when needed, use these options at the upper side of the window:
Update All - click this button to update all associations for all ConnectWise PSA mappings in the table with the detected GravityZone Company Name/Automate Client.
You can use this option when mapping issues require confirmation for association changes and after you select or deselect the check boxes in the Billing column.
Update Selected Mappings - click this button to update associations for the selected ConnectWise PSA mappings with the detected GravityZone Company Name/Automate Client.
You can use this option when mapping issues require confirmation for association changes and after you select or deselect the check boxes in the Billing column.
To recompile all mappings and to re-check billing issues, click the Refresh button.
To review the Bitdfender Plugin ConnectWise PSA status, in ConnectWise Automate Control Center, go to Tools > Bitdefender GravityZone > Other > Plugin Status. The “Bitdefender PSA Integrations Server” displays status of communication between all systems of the ConnectWise PSA integration.
Billing setup
The billing integration allows you to receive GravityZone Control Center usage reports for each managed company in ConnectWise.
Once the billing integration has been enabled, Bitdefender Control Center sends out the number of active computers protected with Bitdefender Endpoint Security Tools at a preset interval of 4 hours to the configured ConnectWise server.
A Bitdefender Endpoint Security Tools client is considered active only if a connection to the the Bitdefender Control Center is established, at least once in a given month.
For the billing service to work, the following conditions must be fulfilled:
A pricing model is defined in ConnectWise for each managed company.
The billing service is enabled and configured as required in the Bitdefender ConnectWise Automate plugin.
Managed companies are licensed with a monthly subscription.
At the beginning of each month, GravityZone Control Center creates a usage record for each managed company in ConnectWise PSA. The usage record remains open during the entire month. When a new client is installed in the same company, the usage record is automatically updated with the new count. New additions will be visible at a preset time interval of 4 hours.
To view the usage records of a company in ConnectWise PSA, follow these steps:
Log in to ConnectWise PSA.
Go to Finance > Agreements.
Search for the previously created Agreement Type.
Go to the Additions tab.
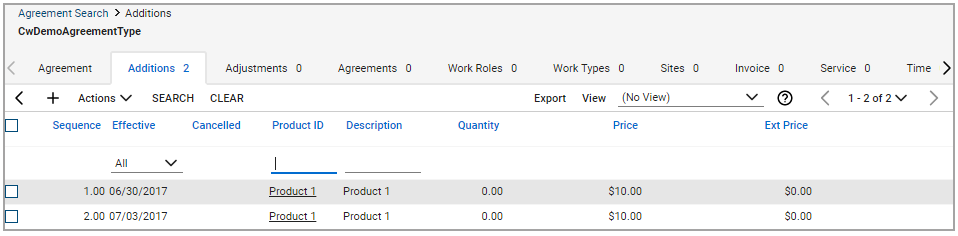
An Addition will be created at the start of the month and updated incrementally. Each Addition will be counted as a new value by the Update Request Processor, allowing the user to know exactly how many endpoints are active in a given month.
Notice
New Additions cannot be added to an upcoming Billing Start Date. This can only be done after the service period start date.