Setting up the integration
You must have an active Security for AWS subscription before you can protect your EC2 instances. For more information, refer to Subscriptions.
To protect your EC2 instances using Security for AWS, you must follow these steps:
Install the security agent on instances
To protect your Amazon EC2 instances, you must install Bitdefender Endpoint Security Tools agent on each one.
The security agent sends scan requests to the closest security server hosted in your AWS regions, which performs the actual scan. Scan servers also communicate with GravityZone Control Center, receiving security settings from the web console and sending back the results of its actions. The Security Server machines are hosted by Bitdefender in several AWS regions, so you do not need to deploy them in your environment.
Bitdefender supports the following AWS regions:
Mandatory regions:
us-east-1: US East (N. Virginia)
us-east-2: US East (Ohio)
us-west-2: US West (Oregon)
us-west-1: US West (N. California)
ca-central-1: Canada (Central)
eu-west-1: EU (Ireland)
eu-central-1: EU (Frankfurt)
eu-west-2: EU (London)
eu-west-3: EU (Paris)
eu-north-1: EU (Stockholm)
ap-southeast-1: Asia Pacific (Singapore)
ap-southeast-2: Asia Pacific (Sydney)
ap-northeast-1: Asia Pacific (Tokyo)
ap-northeast-2: Asia Pacific (Seoul)
ap-south-1: Asia Pacific (Mumbai)
sa-east-1: South America (Sao Paulo)
Opt-in regions:
eu-central-2: Europe (Zurich)
eu-south-1: Europe (Milan)
eu-south-2: Europe (Spain)
ap-south-2: Asia Pacific (Hyderabad)
ap-southeast-3: Asia Pacific (Jakarta)
ap-east-1: Asia Pacific (Hong Kong)
af-south-1: Africa (Cape Town)
For more information, refer to the official Amazon Regions and Zones page.
When configuring the security agent installation packages, the scan mode configuration takes into account the Amazon EC2 instances:
Automatic (default) scan modes for EC2 instances set on Central Scan with Security Server hosted in the corresponding AWS region, with fallback on Hybrid Scan (with Light Engines using in-the-cloud scanning and, partially, the local signatures).
Note
If BEST is installed before configuring the Amazon EC2 integration, Central Scan is going to be set as the primary scan mode after reapplying the policy.
You can also choose to configure the scan mode by selecting the Custom mode and selecting the scan modes that you want.
It is recommended to use the default scan modes for EC2 instances because these are specifically designed for a small footprint and low resource consumption.
For instances with powerful resources, you can also configure the EC2 instances to use Private cloud scanning with Security Server hosted in the corresponding AWS region, with fallback on Local Scanning (Full Engines using signatures and engines stored locally).
Important
For your Amazon EC2 integrations to work correctly, you must ensure that instance metadata is enabled in AWS. By default, this option is enabled.
For more information, refer to the official AWS documentation.
For detailed information about how to install Bitdefender Endpoint Security Tools, please refer to Set up Bitdefender Security for AWS from the AWS Marketplace.
Integrate Amazon EC2 with GravityZone Control Center
Create the Amazon EC2 integration
The Amazon EC2 integration in GravityZone is now based on cross-account access login. This procedure avoids sharing long-term AWS credentials, such as Access Key ID and Secret Access Key.
You must provide an ARN (Amazon Resource Name - unique identifier for AWS resources) associated with a role attached to your AWS user account for the Amazon EC2 integration.
Note
It is recommended to set up the Amazon integration using an IAM user account created specifically for this purpose. The IAM user requires IAMFullAccess permission to be able to create the role required for the AWS integration in GravityZone . For more information, refer to the Security best practices in IAM page.
Before configuring the AWS integration you must:
Make sure you have the appropriate AWS user account credentials at hand.
Open the AWS Console and GravityZone Control Center in two browser tabs, at the same time. You must work on both of them to successfully create the AWS integration.
Important
Before starting the process, make sure that you change the default GravityZone session timeout in Control Center > My Account from 15 minutes to at least 1 hour. If the session expires, you must restart the integration steps.
To create the AWS integration in GravityZone , follow these steps:
Log in to GravityZone Control Center using your company administrator credentials.
Click the user menu at the upper-right corner of the console and select Integrations.
Click the
 Add button.
Select Add Amazon EC2 Integration.
The Amazon EC2 Integration Settings window is displayed, containing the following fields:
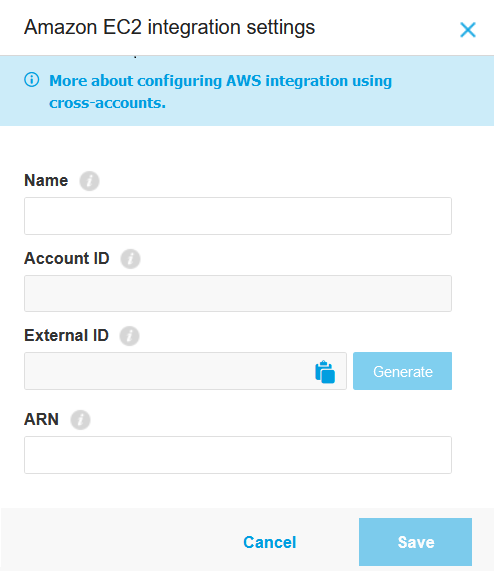
Name: the name of the integration.
Account ID: the unique identifier of the Bitdefender AWS account. The Account ID field is pre-populated and cannot be edited.
External ID: a unique identifier linked to your GravityZone company, required by your AWS user account to generate the GravityZone specific role for cross-account access. Click the corresponding Generate button to obtain the code, and copy it to clipboard. This code is required in the AWS console to obtain the ARN code which is needed to complete the integration (see step 6-g).
Note
You must generate an External ID for each integration.
ARN: the ARN string (Amazon Resource Name) associated with the GravityZone specific role created in AWS.
Obtain the ARN code from AWS console by following these steps:
Switch to the AWS console and sign in using your AWS user account.
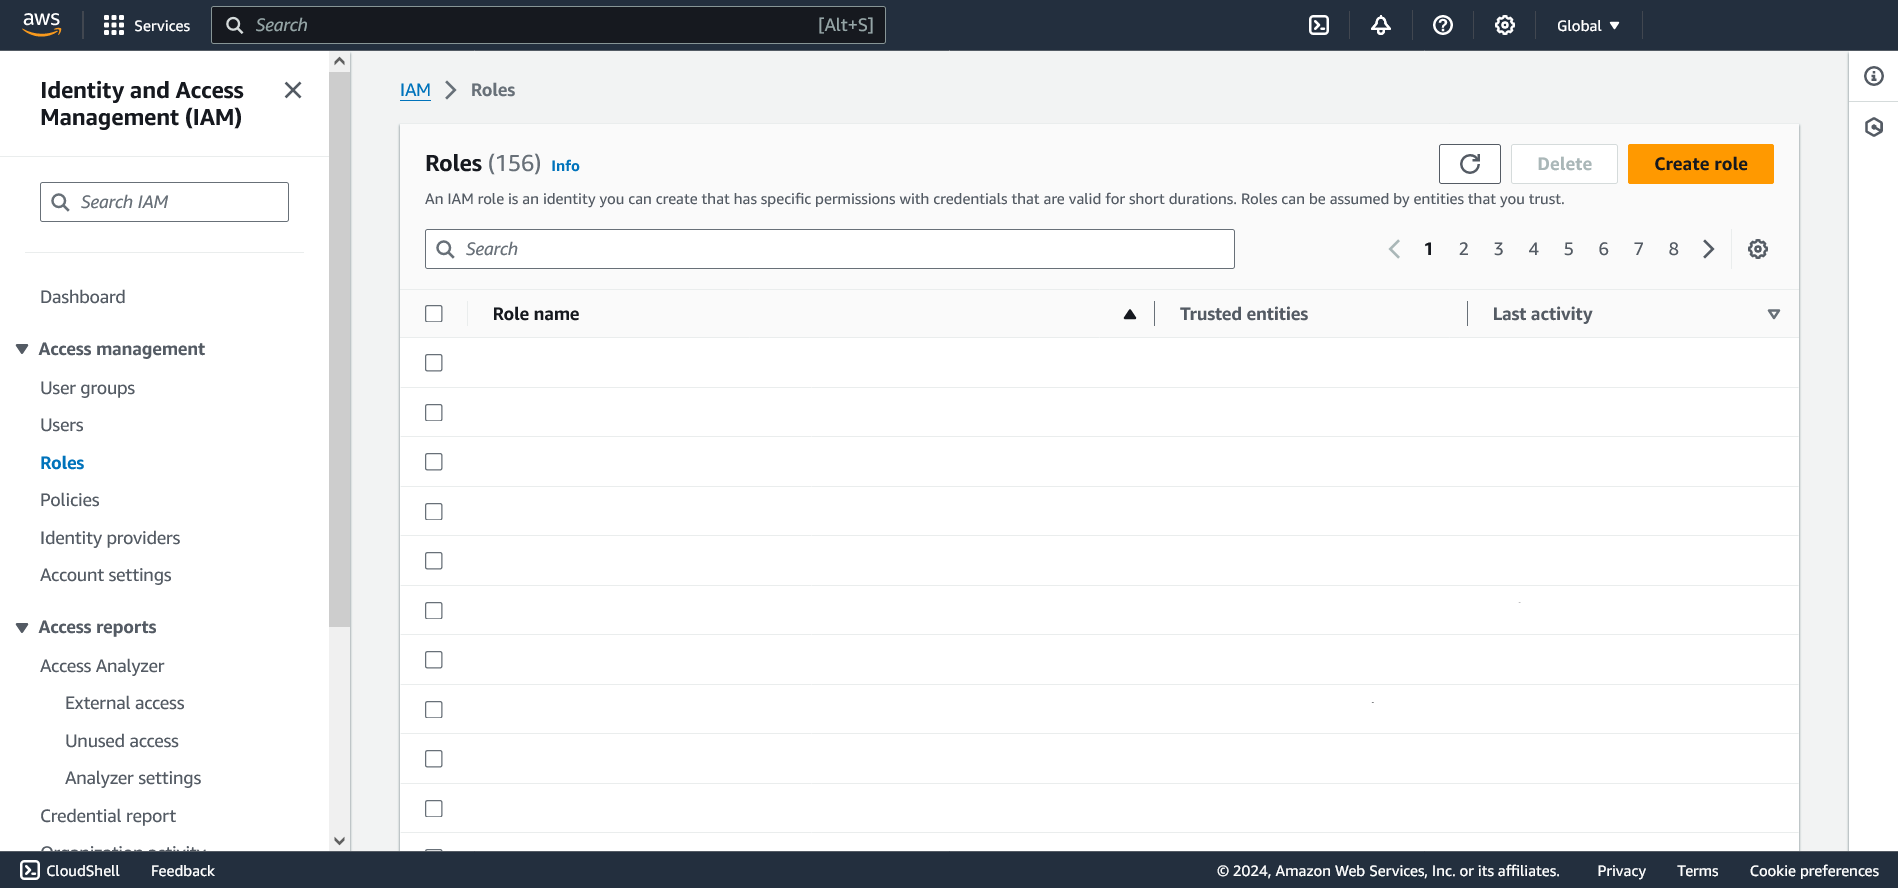
Under AWS Services, search for IAM and select it.
Under Access Management, click Roles.
Click Create Role.
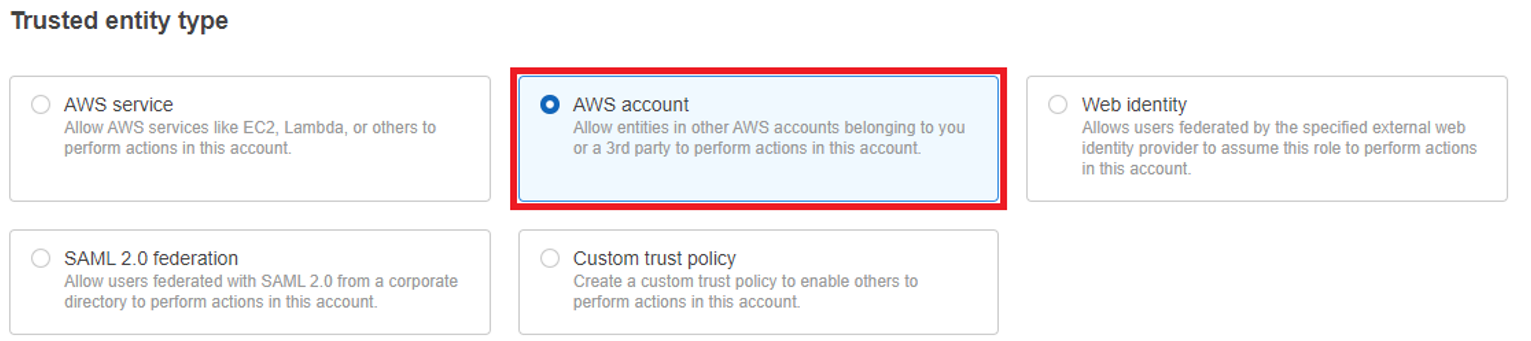
Under Trusted entity type, click AWS Account.
Under An AWS account, select Another AWS account.
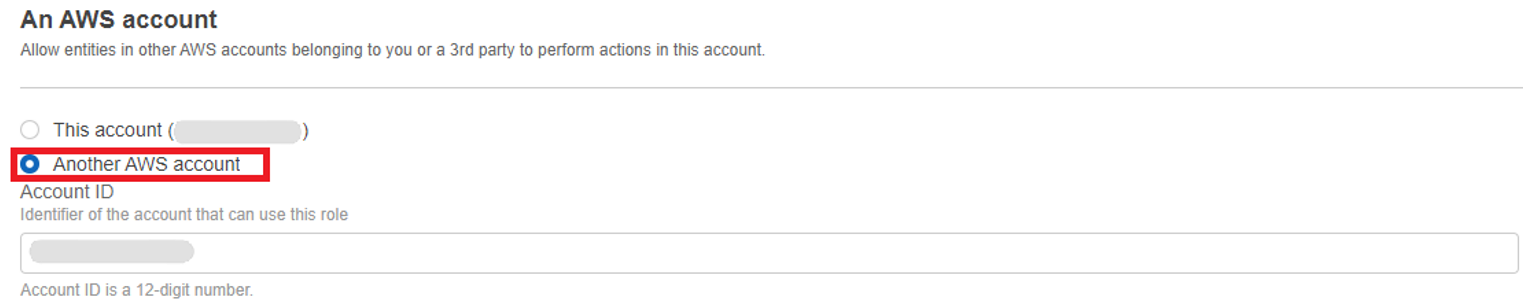
In the Account ID field, enter the Account ID provided by GravityZone integration window (see step 5).
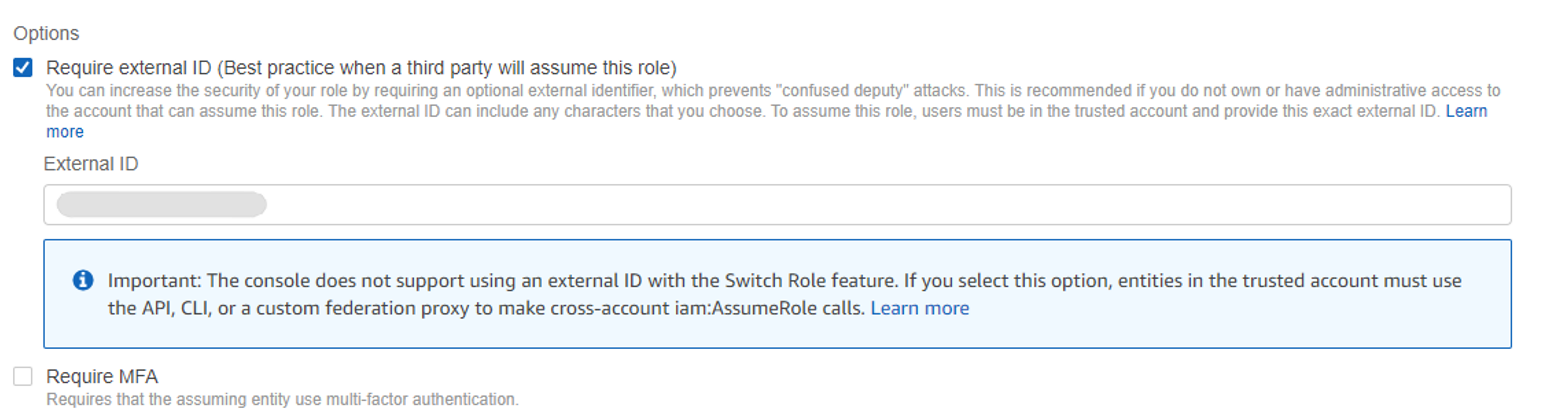
Under Options, click the Require external ID (Best practice when a third party will assume this role) checkbox. A new text area is displayed where you must enter the External ID generated by GravityZone Control Center (see step 4), in the Amazon EC2 Integration Settings window.
Click Next.
In the Add permissions page, you must check the
AmazonEC2ReadOnlyAccesspermission. You can also use the Search field find the permission.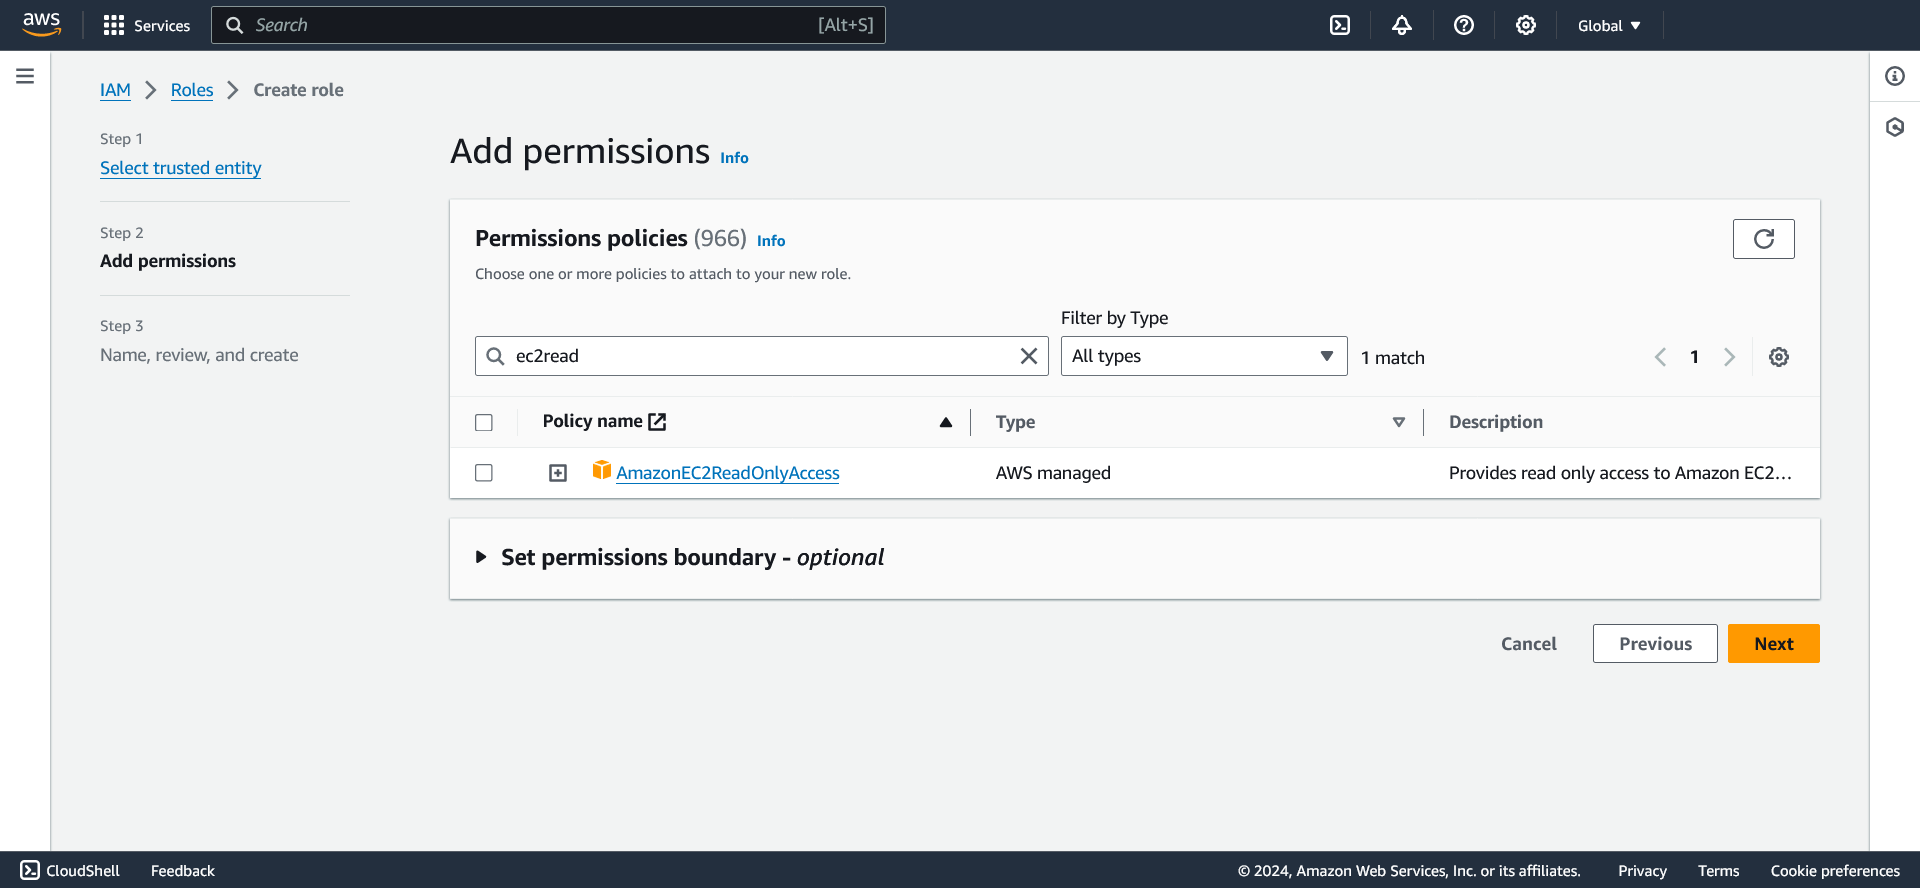
Click Next.
Enter the desired name for the role.
Click Create Role.
The next page displays the list of existing roles. Find the new role you have just created and click on it.
In the role page, you can find the role's ARN, required in the GravityZone Control Center Amazon EC2 Integration Settings window. Copy the ARN code.
Switch to the GravityZone Control Center and paste the ARN code in the ARN field of the integration window.
Important
After the AWS role is created in the console, it will take approximately one minute for this change to propagate to all AWS regions. The integration can be successful only after the new role has propagated all across AWS. Therefore, wait for a minute before making the next step.
Click Save.
Read the AWS License Agreement. To continue, click I Agree.
If the integration was successful, the Amazon EC2 instances are going to be imported in GravityZone and they are going to be visible in Network > Amazon EC2. You can find our Amazon EC2 instances grouped under their Amazon regions and the corresponding Availability Zones.
If the integration has failed, you are going to receive an error message with the possible causes, which may be an invalid External ID, or the integration was created before the AWS new role had propagated to all AWS regions.
From this point, you can view and manage your Amazon instances from the Network page, under Amazon EC2.
Edit the Amazon EC2 integration
You can edit your Amazon EC2 integration at any time by clicking on it in the Integrations page of the GravityZone Control Center .
For example, a new External ID may be required in AWS. In this case, click the Generate button corresponding to the External ID field. Note that this action going to invalidate the External ID used for the current integration and create a new one.
In this case, your integration is going to be invalidated. To restore the integration you must update the corresponding role under your AWS IAM account. For more details about generating a new external ID, refer to Set up the GravityZone integration with Amazon EC2 using a cross-account role.