Configuring Datto RMM single sign-on (SSO) with an identity provider
The Datto RMM integration through Datto RMM App supports single sign-on (SSO) with such 3rd party identity providers such as AD FS, Okta and Microsoft Entra ID.
How single sign-on works
By using single sign-on, you can log in to Datto RMM App by authenticating with an identity provider.
This is how SSO works with Datto RMM App:
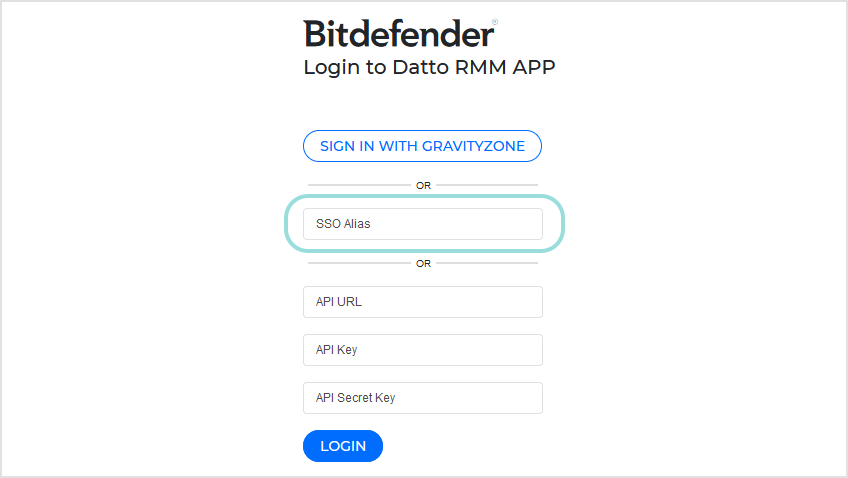
You go to Datto RMM App login page and enter the SSO alias configured for your Datto tenant.
Datto RMM App creates a SAML request and it forwards the request and the user to the identity provider configured for your tenant.
You are redirected to the identity provider page, where you must authenticate.
After successfully authenticating with the identity provider, the user is redirected back to Datto RMM App.
Datto RMM App retrieves the response and validates it with the certificate fingerprint.
Afterwards, Datto RMM App allows you to log in with no other interaction.
With SSO enabled, you are redirected to the Companies page in Datto RMM App when entering your alias on the login page, if there is an active session with the identity provider.
Requirements
To enable SSO in Datto RMM App, the following conditions are required:
You have an active Datto RMM App integration available.
You have an active user account in Okta, Microsoft Entra ID or AD FS with administrative rights that allow you to configure SSO.
You must use certificates signed by a trusted Certificate Authority (CA). Self-signed certificates are not accepted for SSO functionality due to security reasons.
Creating the signature certificate
First, you must configure the signature certificate that you will use later when configuring the identity provider (IdP). This certificate is used only for trusting Datto RMM App in the identity provider.
To create the certificate, follow these steps:
Open a new file in a text editor.
Paste the following string in the text file:
-----BEGIN CERTIFICATE-----
MIIHKjCCBhKgAwIBAgIQDakW4DAZN+D7AGg9Hhx+9zANBgkqhkiG9w0BAQsFADBZMQswCQYDVQQGEwJVUzEVMBMGA1UEChMMRGlnaUNlcnQgSW5jMTMwMQYDVQQDEypEaWdpQ2VydCBHbG9iYWwgRzIgVExTIFJTQSBTSEEyNTYgMjAyMCBDQTEwHhcNMjUwODI1MDAwMDAwWhcNMjYwOTI1MjM1OTU5WjBwMQswCQYDVQQGEwJSTzETMBEGA1UEBwwKQnVjdXJlyJl0aTEYMBYGA1UEChMPQml0ZGVmZW5kZXIgU1JMMTIwMAYDVQQDEylhdXRob3JpemF0aW9uLXNlcnZpY2Uucm1tLmJpdGRlZmVuZGVyLmNvbTCCASIwDQYJKoZIhvcNAQEBBQADggEPADCCAQoCggEBAMHbWePDsBfXdDqYbhBCkfbRsmXKOX06U7mJvIistNWlfy7YKlI6LC/a7CM8zhFvPKd2wAap5broZHAsvIzj+jmSscQWRXXbtoY/bZKluk242CV9NYSmMdwKwDl08VDateaROzxeQiso25qbh8/s+Yf2dFavy7n5RToNpI/ZxNlij6gf8jWFqYMLWJ9n3cYclOnxjxNOX7G/lLPLtTYvUP7oX2VnDwTNIIOyk1BYlhLN5IPE9GapzsPElTY0+02uAppaB4H4PbSZu2l+BxWsKFEBp2ACktx3DKCDbth3ElUxX9AXuld9EbG0O7m0i7QEvj/nUw+K/qEUOBJPS4ypXlECAwEAAaOCA9UwggPRMB8GA1UdIwQYMBaAFHSFgMBmx9833s+9KTeqAx2+7c0XMB0GA1UdDgQWBBTQLM1NJS+hPZkCGEmTrHo/ykjHGTBjBgNVHREEXDBagilhdXRob3JpemF0aW9uLXNlcnZpY2Uucm1tLmJpdGRlZmVuZGVyLmNvbYItd3d3LmF1dGhvcml6YXRpb24tc2VydmljZS5ybW0uYml0ZGVmZW5kZXIuY29tMD4GA1UdIAQ3MDUwMwYGZ4EMAQICMCkwJwYIKwYBBQUHAgEWG2h0dHA6Ly93d3cuZGlnaWNlcnQuY29tL0NQUzAOBgNVHQ8BAf8EBAMCBaAwHQYDVR0lBBYwFAYIKwYBBQUHAwEGCCsGAQUFBwMCMIGfBgNVHR8EgZcwgZQwSKBGoESGQmh0dHA6Ly9jcmwzLmRpZ2ljZXJ0LmNvbS9EaWdpQ2VydEdsb2JhbEcyVExTUlNBU0hBMjU2MjAyMENBMS0xLmNybDBIoEagRIZCaHR0cDovL2NybDQuZGlnaWNlcnQuY29tL0RpZ2lDZXJ0R2xvYmFsRzJUTFNSU0FTSEEyNTYyMDIwQ0ExLTEuY3JsMIGHBggrBgEFBQcBAQR7MHkwJAYIKwYBBQUHMAGGGGh0dHA6Ly9vY3NwLmRpZ2ljZXJ0LmNvbTBRBggrBgEFBQcwAoZFaHR0cDovL2NhY2VydHMuZGlnaWNlcnQuY29tL0RpZ2lDZXJ0R2xvYmFsRzJUTFNSU0FTSEEyNTYyMDIwQ0ExLTEuY3J0MAwGA1UdEwEB/wQCMAAwggF/BgorBgEEAdZ5AgQCBIIBbwSCAWsBaQB3ANdtfRDRp/V3wsfpX9cAv/mCyTNaZeHQswFzF8DIxWl3AAABmOEN8UAAAAQDAEgwRgIhAOvYEyMncIK576q6pzJ/S2q27Ky8ApTnSMT4+9xEu0RaAiEArvW+KsHujIwqig0QO6Tog+QyPmizObm01J3d2+8TLjYAdQDCMX5XRRmjRe5/ON6ykEHrx8IhWiK/f9W1rXaa2Q5SzQAAAZjhDfF7AAAEAwBGMEQCICVDZaGSMtxQ8bmAkrxFQTeLPYGgYZwfll0JzrFlhZhdAiBx7KksvrUZUCs4lxZSVf+X/wV3/7kuLLhHpCP4Kq4hegB3AJROQ4f67MHvgfMZJCaoGGUBx9NfOAIBP3JnfVU3LhnYAAABmOEN8Y8AAAQDAEgwRgIhAMab3KpnJpCQat+7yUEYY6Y1JhAwwZ8ACuo6rRN/zlcrAiEA41Zf7hMNtKiEbLSfkf7b3E8ubzB8DZMyp+/ELU8fTaYwDQYJKoZIhvcNAQELBQADggEBABMFe7hsAlX4oNVbDMjQN50H7hod8z6men5fLGdqJVXJ1jgUS+B5AIqaPGbk+1XemgpSDwGn2NLhXqPgXLrHk/YKZ0GidO5abSY2iWFbhqcorB6zlyGqfMhjZOtUI4UoCOf4G4jEGrvpH3K6h47oIguZXQLzFQJykLsOQgP6tOdZYdPZKSgRc7KmA+Y0poWnf2st932KFGgx/UTUP9zU9nbk6zG30lZjHiYRDKTKoFMb9sFRxuyY2ncshHIt49HeEfjJmYIkytqOkYHXsfKmZpLZ0HW0IrG5rJNtaqG+8RkbmTLg9DHyed3kjH4VFBjLBap7xOP1DfrIcBl+6CIiKc0=
-----END CERTIFICATE-----
Warning
Due to an incompatibility issue, remove
-----BEGIN CERTIFICATE-----and-----END CERTIFICATE-----from the certificate if you use AD FS as identity provider.Other identity providers, such as Okta and Entra ID, accept or even require these tags.
Save the file as
bitdefender_authservice.cer
The certificate has a limited validity period. Return to this article on the expiration date to recreate the certificate.
Warning
On September 30, 2025, Bitdefender has replaced the old signature certificate, which was set to expire on October 1, 2025. The new certificate expires on September 26, 2026.
Update the Datto RMM App SSO settings in your identity provider (IdP) and include the new certificate to continue using the login via SSO alias after October 1, 2025.
Configuring the identity provider
Configuring single sign-on may vary from one identity provider to another. However, identity providers require almost the same elements to integrate with Datto RMM App:
Single Sign-on URL - the location where the SAML assertion is sent with a HTTP POST. Also known as Assertion Consumer Service (ACS) URL.
Required value:
https://authorization-service.rmm.bitdefender.com/api/saml/assertionconsumerserviceService Provider Entity ID - The application unique identifier that is the intended audience of the SAML assertion. Also known as Audience URL.
Required value:
https://authorization-service.rmm.bitdefender.comName ID format - refers to the format supported by the identity provider. Service and identity providers communicate with each other using a name identifier related to a user.
Preferably set to <UserEmail>.
Service Provider Issuer - this is usually the Entity ID and the service provider use this information for verification.
Required value:
https://authorization-service.rmm.bitdefender.com
Note
Datto RMM Appdoes not support single logout.
Configuring AD FS
To configure AD FS as identity provider for single sign-on, follow these steps:
Add a relying party trust
Create claim rules
Update the certificate
Adding a relying party trust
The connection between Datto RMM App and AD FS is defined using a relying party trust. To add it, follow these steps:
Log in to the server where AD FS is installed.
Launch the AD FS Management application.
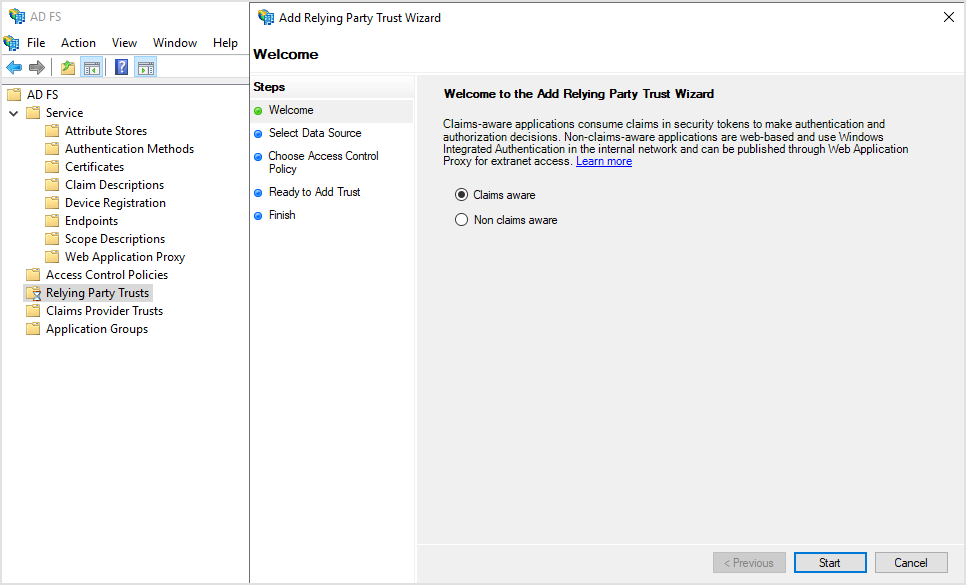
In the application, select Relying Party Trusts > Add Relying Party Trust...
In the Add Relying Party Trust Wizard window, on the Welcome page, select Claims aware and click Start.
On the Select Data Source page, select Enter data about the relying party manually.
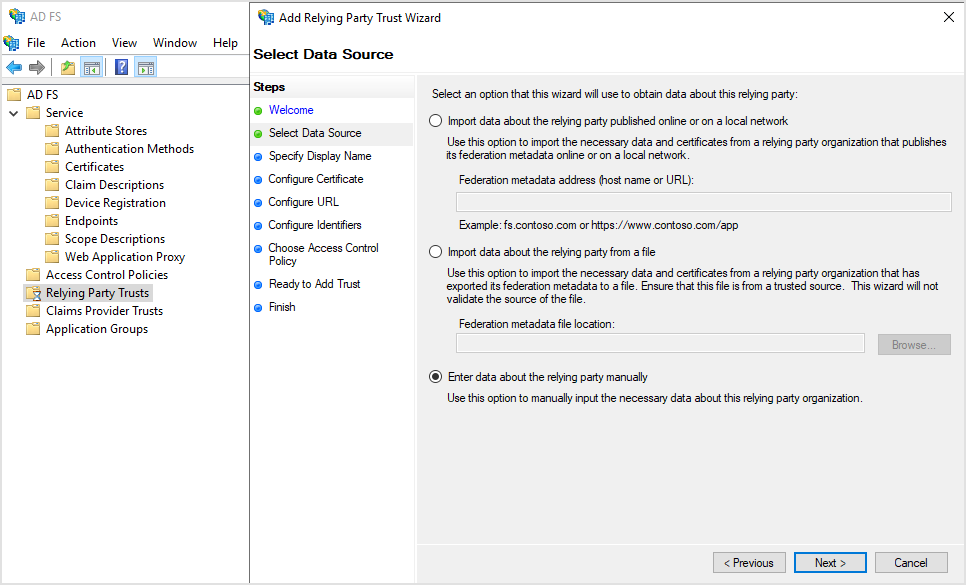
Click Next.
On the Specify Display Name page, enter the name of the service provider. For example,
BitdefenderAuthorizationService.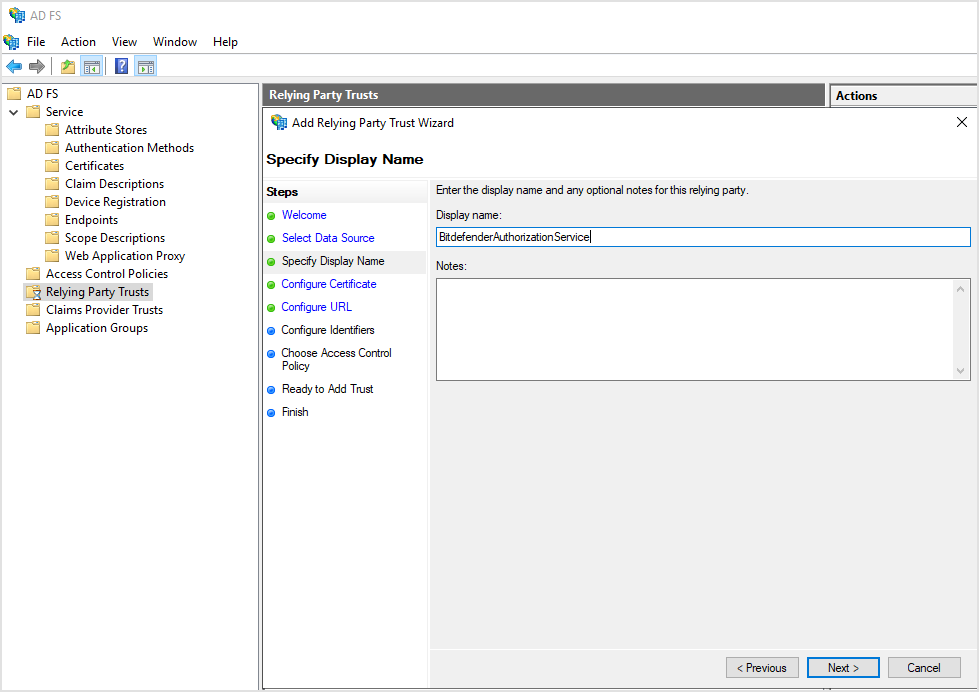
Click Next.
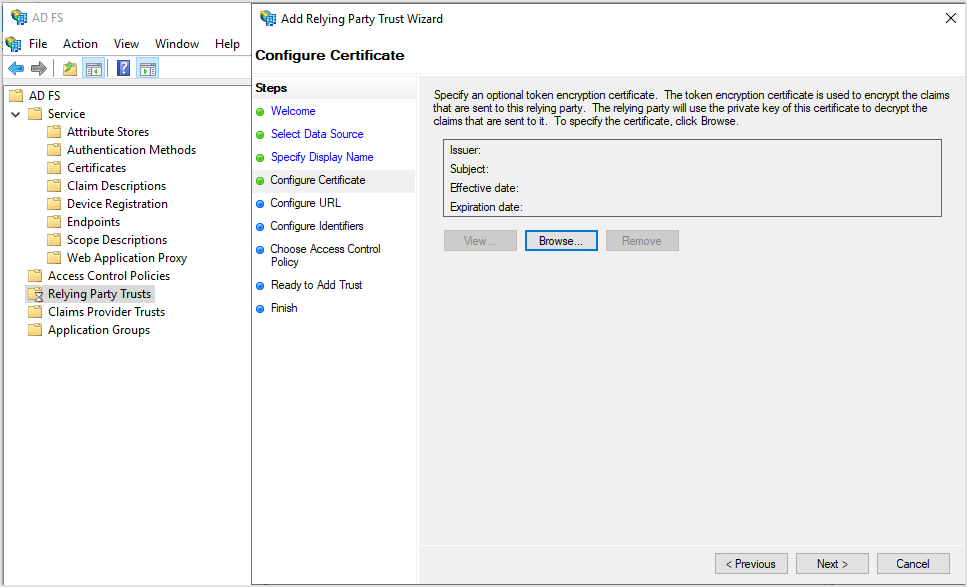
On the Configure Certificate page, click Next.
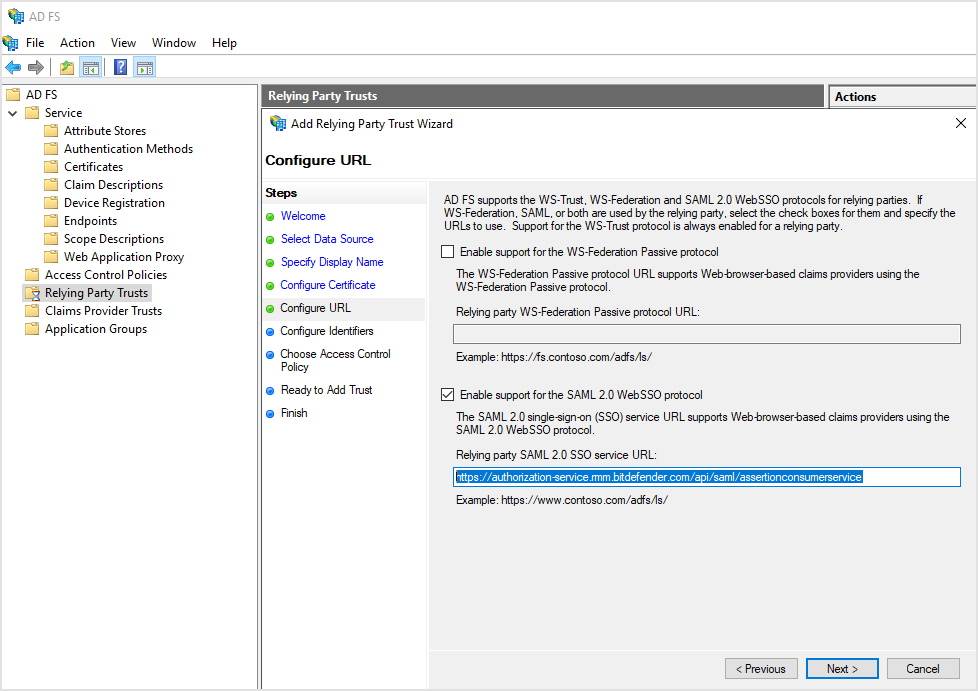
On the Configure URL page, follow these steps:
Select Enable support for the SAML 2.0 WebSSO protocol.
Under Relying party SAML 2.0 SSO service URL, enter the following URL:
https://authorization-service.rmm.bitdefender.com/api/saml/assertionconsumerserviceClick Next.
On the Configure Identifiers page, enter the following URL for relying party trust identifier:
https://authorization-service.rmm.bitdefender.com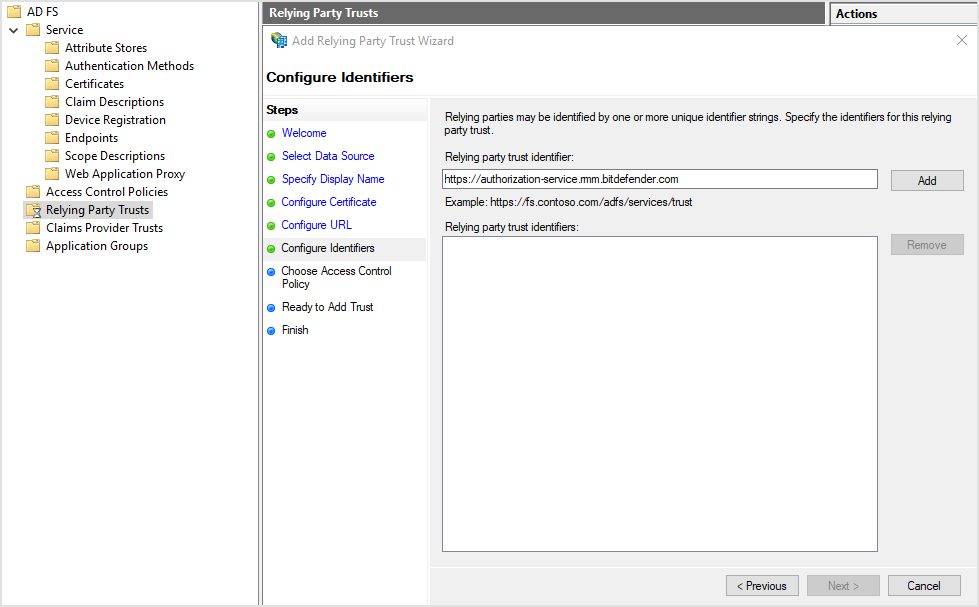
Click Add, then Next.
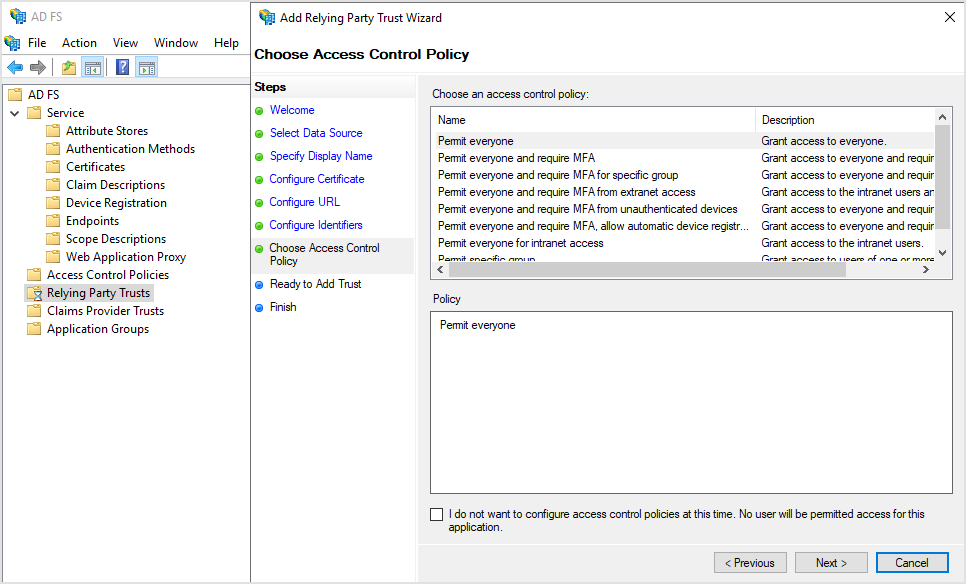
On the Choose Access Control Policy page, select Permit everyone.
On the Ready to Add Trust page, go to the Endpoints tab and verify the following URL has been added under SAML Assertion Consumer Endpoints:
https://authorization-service.rmm.bitdefender.com/api/saml/assertionconsumerservicewith bindingPOST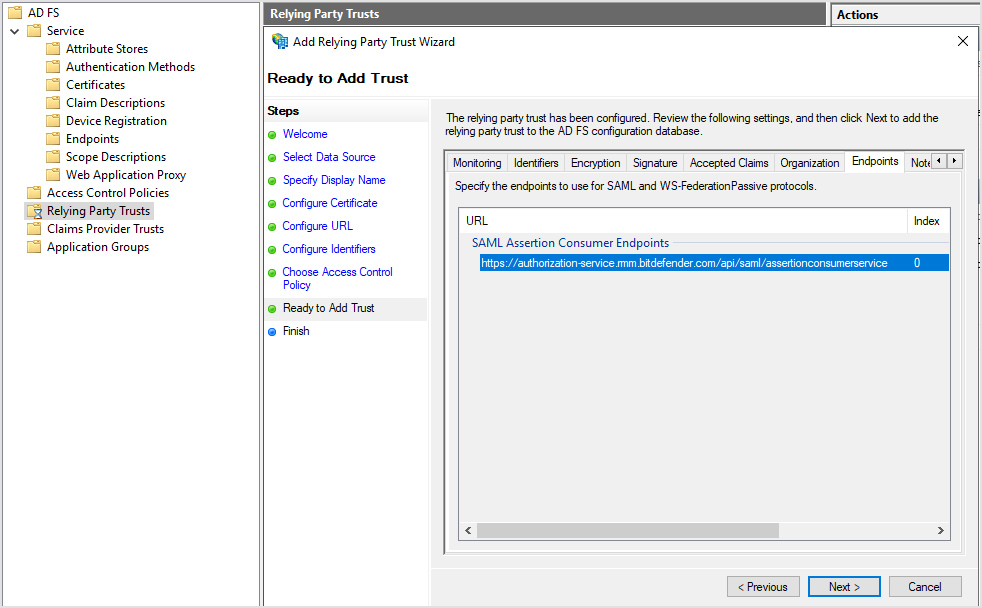
On the Finish page, select Configure claims issuance policy for this application.
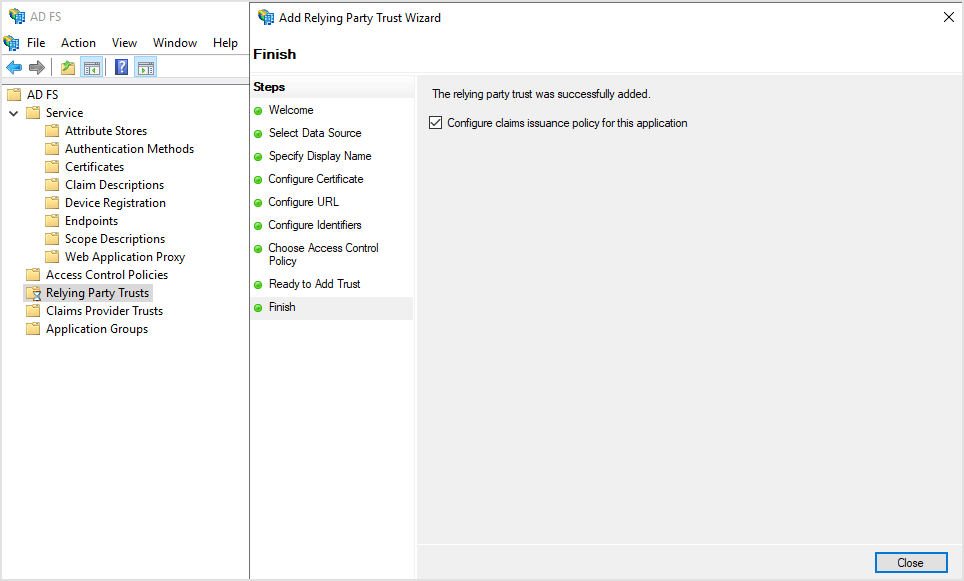
Click Close.
Creating claim rules
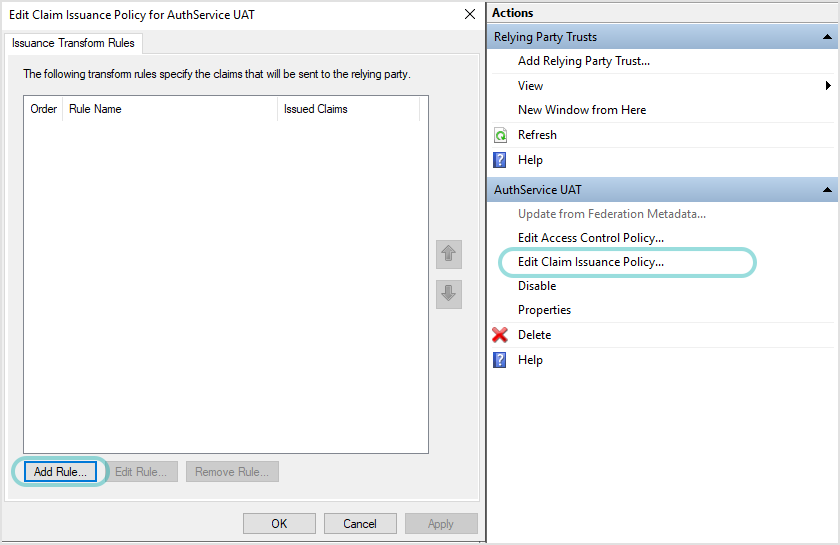
After adding a relying party trust, you need to create claim rules:
In the AD FS Management application, click Edit Claim Issuance Policy...
Click Add Rule to create a new rule.
In Add Transform Claim Rule Wizard, on the Choose Rule Type page, select Send LDAP Attributes as Claims as claim rule template.
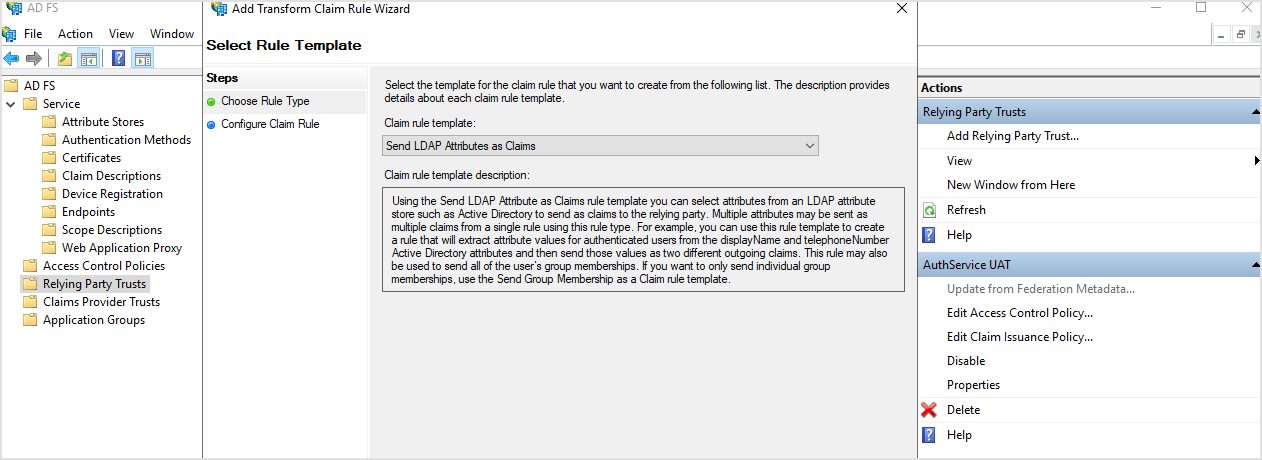
Click Next.
On the Configure Claim Rule page, do this:
In the Claim rule name box, enter a relevant name. For example,
LdapNameID.For Attribute store, select Active Directory.
In the table below, under LDAP Attribute (Select or type to add more), select User-Principal-Name.
Under Outgoing Claim Type (Select or type to add more), select Name ID.
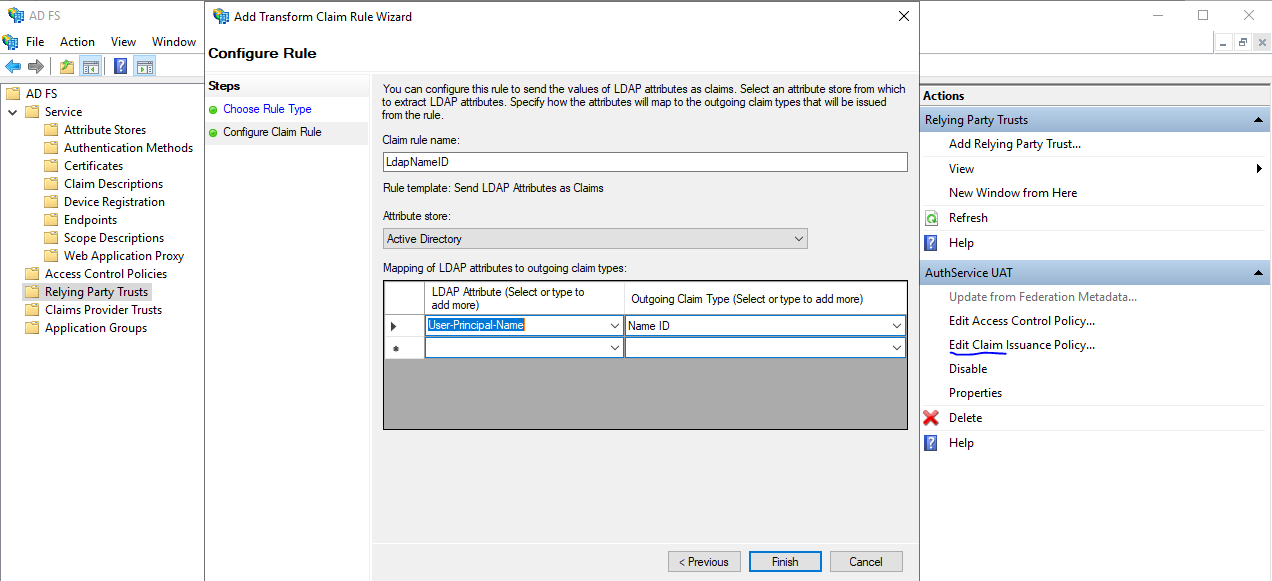
Click OK, then Apply.
Upload the signature certificate
The integration of Datto RMM Appwith AD FS requires a signature certificate. To create the certificate, refer to Creating the signature certificate.
Note
For the certificate to be valid with AD FS, make sure you removed -----BEGIN CERTIFICATE----- and ----END CERTIFICATE----- from it.
To upload the signature certificate, follow these steps:
In the left-side menu of AD FS Management application, go to Relying Party Trusts.
In the central panel, select the relying party trust you created.
In the Properties window, go to the Signature tab.
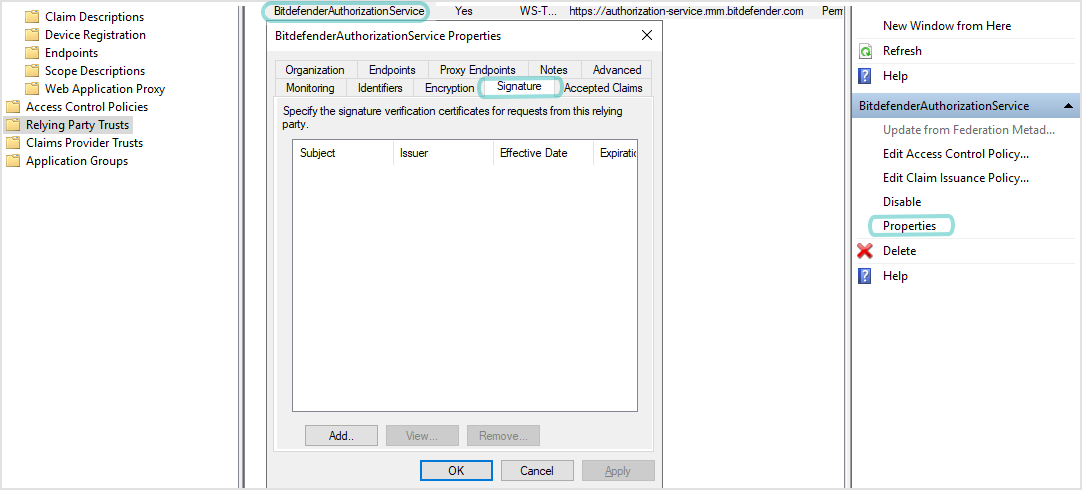
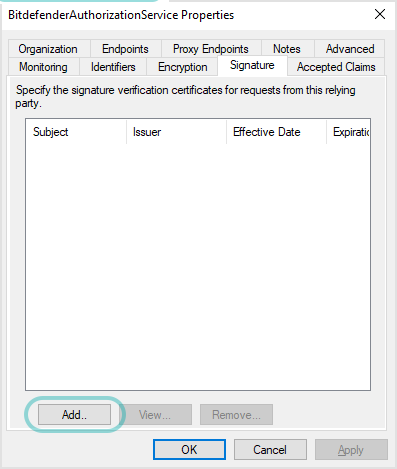
Click Add.
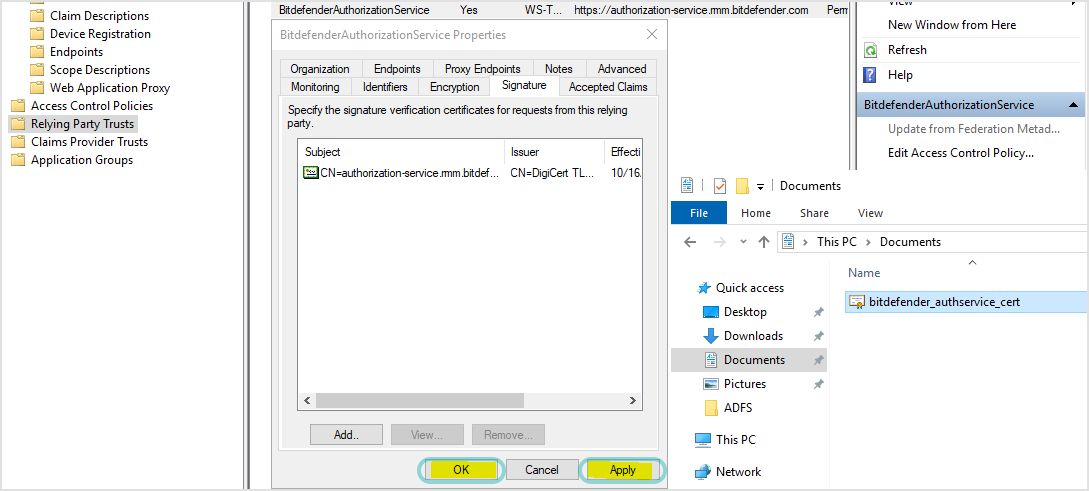
In the new window, select All Files (*.*) in the drop-down menu and upload the certificate.
In the Properties window, click Add and OK.
Configuring Okta
You must configure an Okta application that will connect Okta platform to Datto RMM App.
To configure an application, follow these steps:
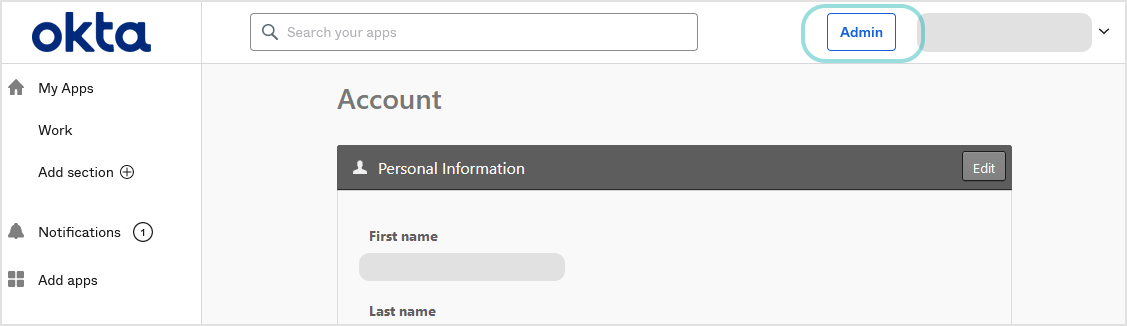
Log in to Okta Admin Console.
If not already selected, click Admin next to your username to access the settings that allow you to configure applications.
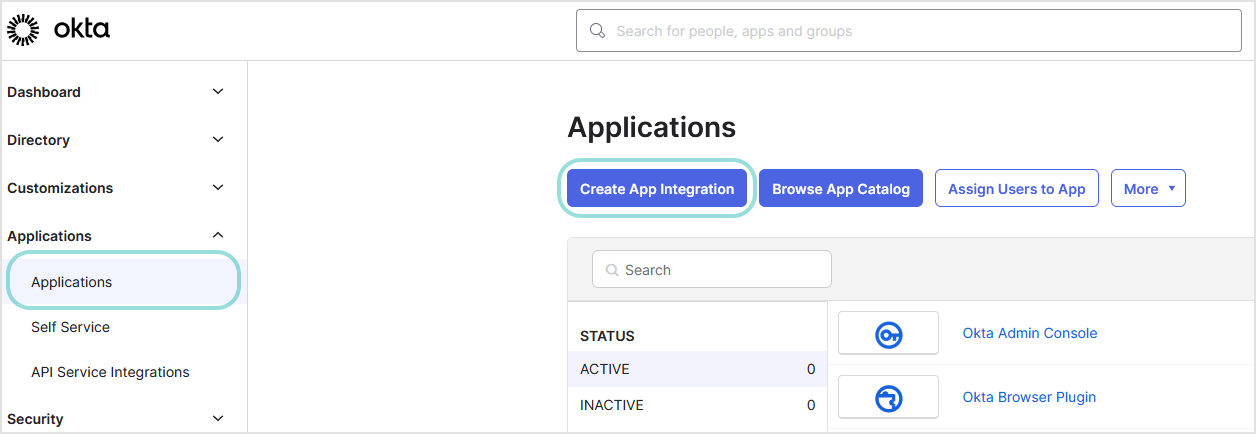
In the left-side menu, go to the Applications section and click Create App Integration.
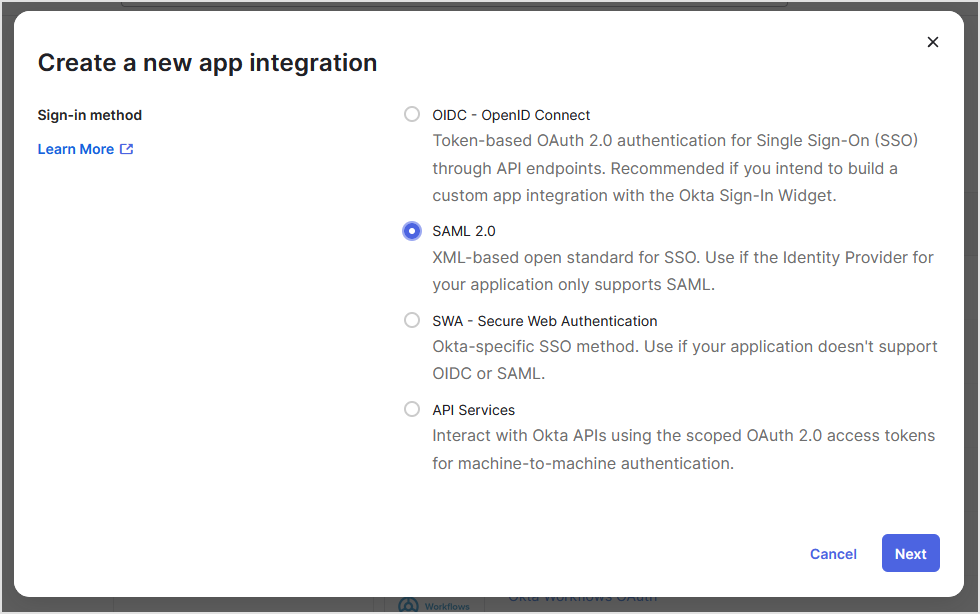
In the Create a new app integration window, select SAML 2.0 as sign-in method and click Next.
On the Create SAML Integration page, under the General Settings tab, follow these steps:
Enter an app name (for example, Datto App).
Optionally, upload a logo image and set your app’s visibility.
Click Next.

On the Configure SAML page, follow these steps:
Under Single sign on URL, enter
https://authorization-service.rmm.bitdefender.com/api/saml/assertionconsumerserviceAlso select the check box for Use this for Recipient URL and Destination URL.
Under Audience URL (SP Entity ID), enter
https://authorization-service.rmm.bitdefender.comFor Name ID format, select EmailAddress.
Click the Show Advanced Settings link to add more configuration details.

For Response, select Signed.
For Assertion Signature, select Signed.
For Signature Algorithm, select RSA-SHA256.
For Digest Algorithm, select SHA256.
For Assertion Encryption, select Unencrypted.
For Signature Certificate, click Browse files... to upload the signature certificate that you have previously created in Creating the signature certificate.
After you upload the certificate, the options for Enable Single Logout and Signed Requests become active. Do not select neither Allow application to initiate Single Logout nor Validate SAML requests with signature certificates.
Under SP Issuer, enter
https://authorization-service.rmm.bitdefender.comFor Authentication context class, select PasswordProtectedTransport.
For Honor Force Authentication, select Yes.
For SAML Issuer ID, leave the default value:
http://www.okta.com/${org.externalKey}Leave the rest of the fields blank, including Attribute Statements (optional) and Group Attribute Statements (optional).

Click Next.
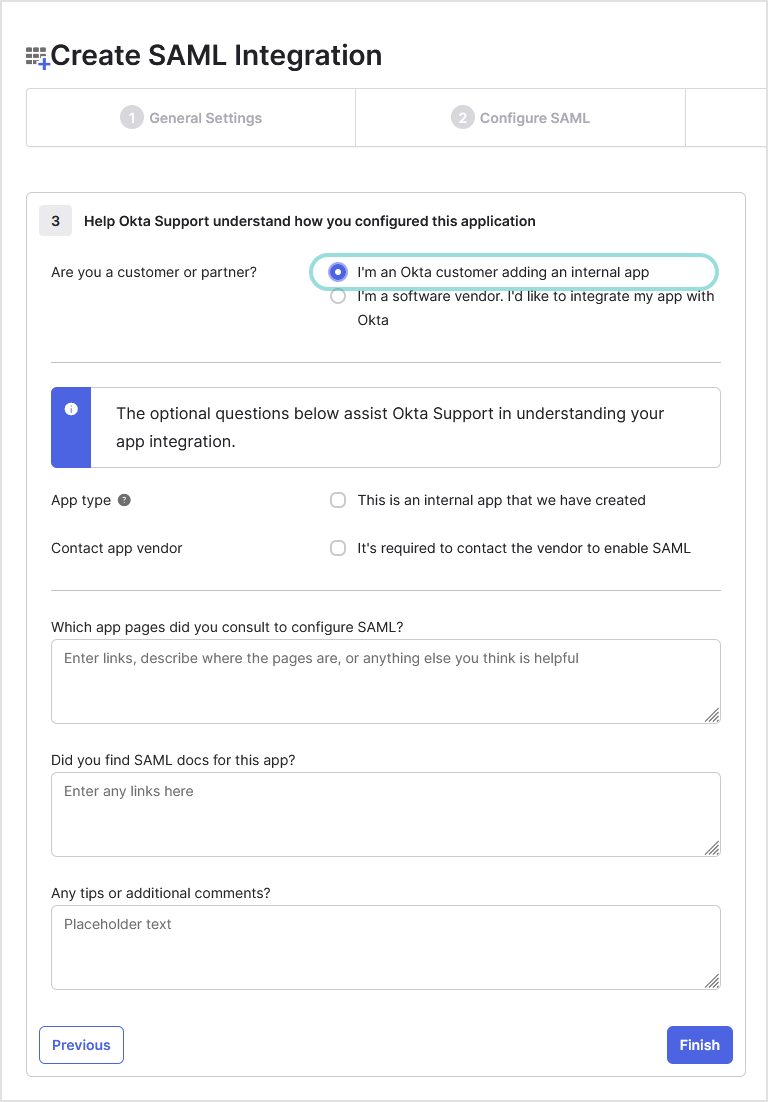
On the Feedback page, select I'm an Okta customer adding an internal app.
Click Finish.
After finishing the configuration, Okta will redirect you to a page containing details about the application you have created. Follow these additional steps:
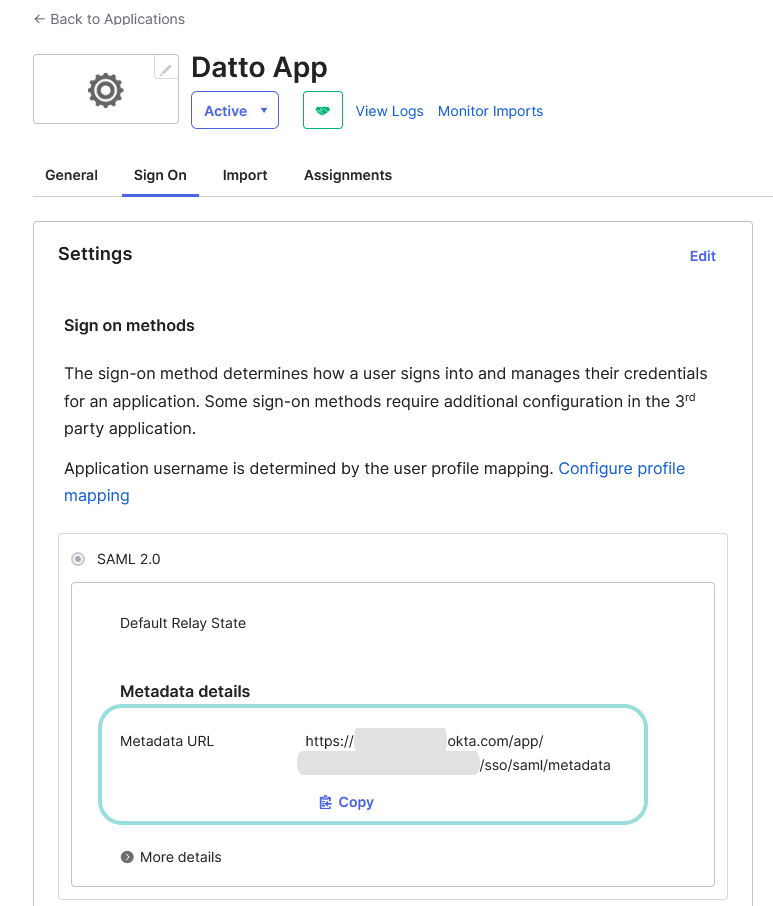
In the Sign On tab, click the Copy button under the Metadata details section.
This will copy a URL of the XML file which contains the metadata details that you have to paste in Datto RMM App to enable SSO. Keep it at hand for future use.
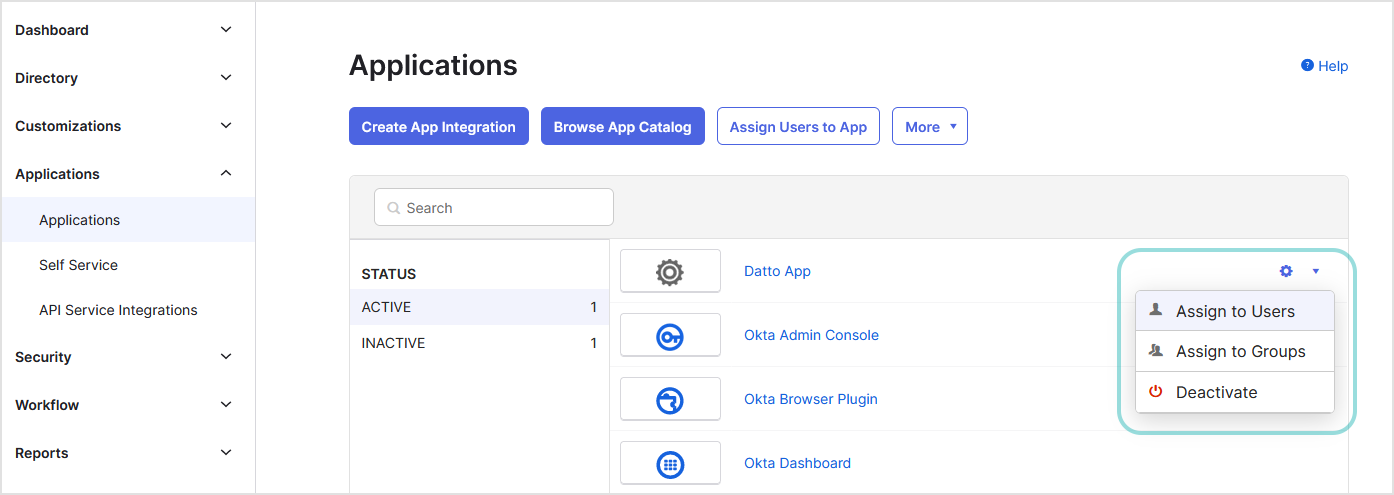
Go to the Applications page in Okta to view the status of your application. The application must be active.
Click the configuration button to assign the application to users, to user groups, or to deactivate it.
Configuring Microsoft Entra ID
You must configure a non-gallery application that will connect Entra ID to Datto RMM App. To configure a non-gallery application, follow these steps:
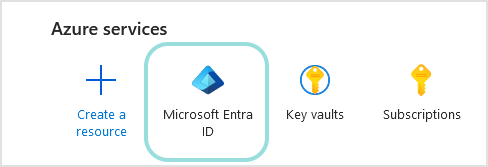
Log in to Azure portal.
On the welcome page, go to Microsoft Entra ID.
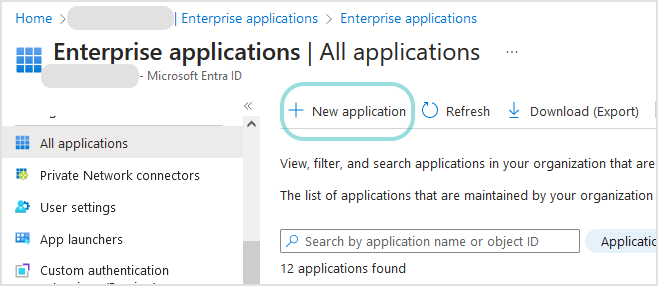
In the left-side menu, go to Enterprise applications.
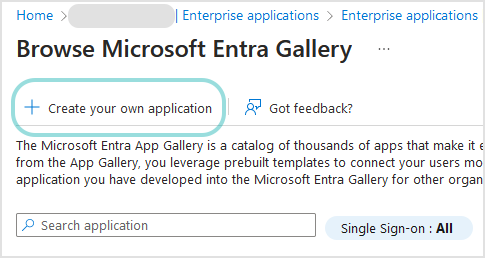
At the upper-side of the page, click + New application.
In the Browse Microsoft Entra Gallery section, click + Create your own application.
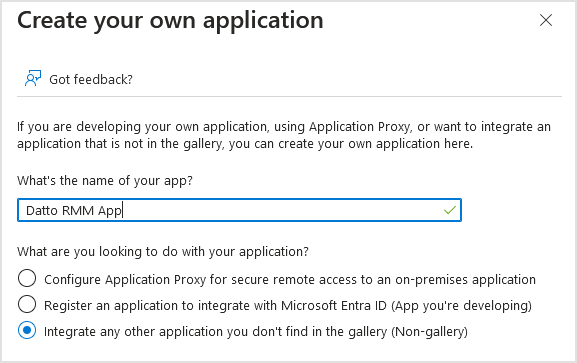
In the Create your own application section, follow these steps:
Enter a relevant name (for example, Datto RMM App).
Select Integrate any other application your don't find in the gallery (Non-gallery).
Click Create.
On the Overview page of your application, go to Users and groups.
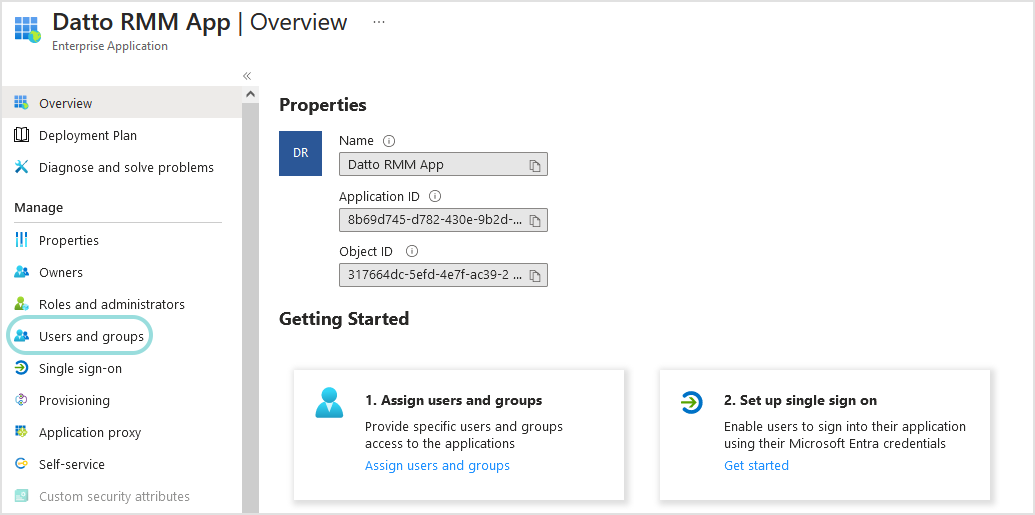
Click + Add user/group user to assign users or user groups to your application.
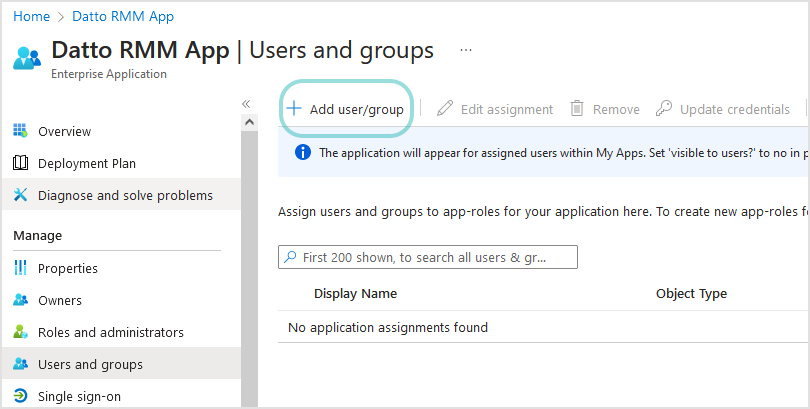
On the Add Assignment page, go to Users and groups and click None Selected.
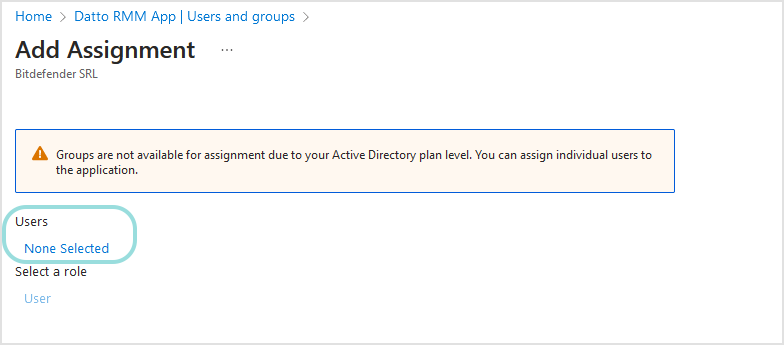
In the right-side panel, select users to assign to the application and click Select.
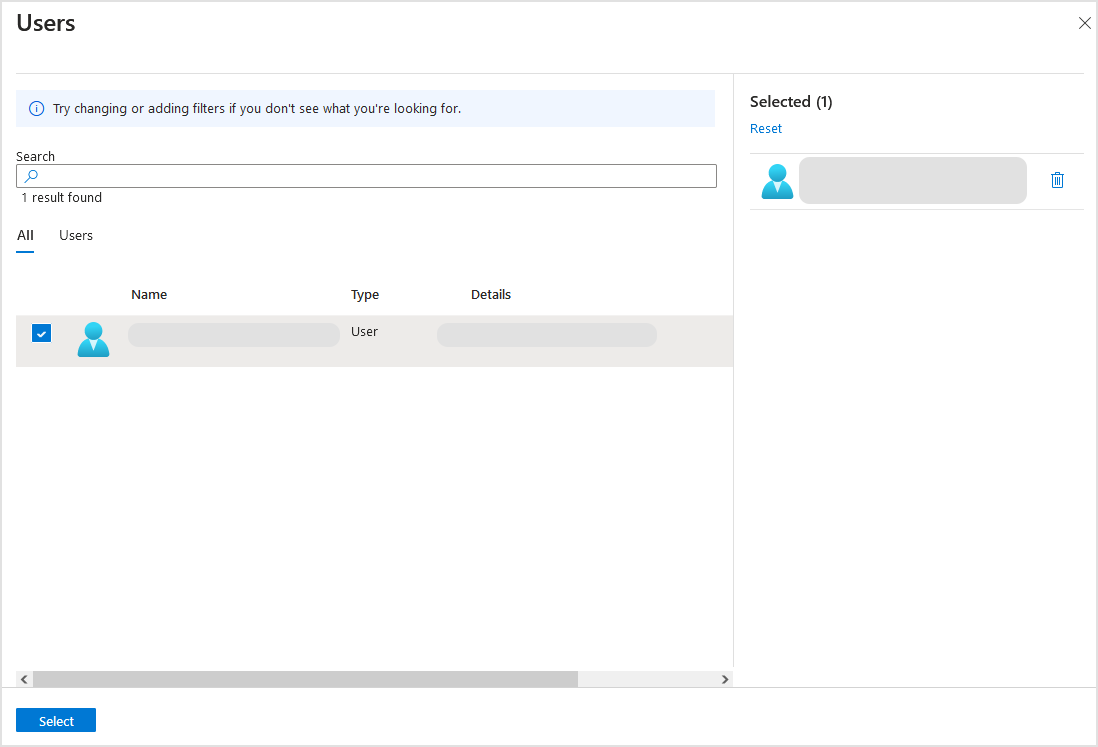
Back in the Add Assignment page, click Assign to confirm the users attached to your application.
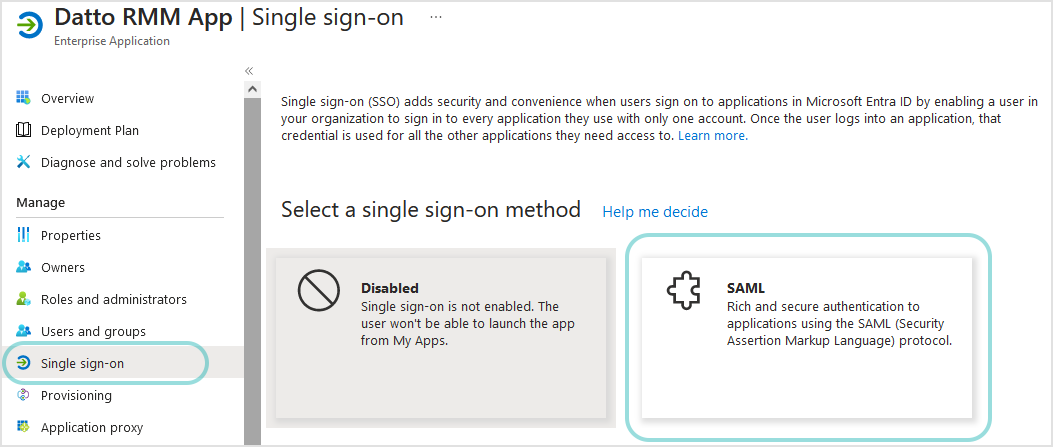
Go to the Single sign-on section and click SAML.
On the Set up Single Sign-On with SAML page, complete the following sections:
Basic SAML Configuration
Users Attributes & Claims
SAML Signing Certificate
The options for these sections are detailed below.
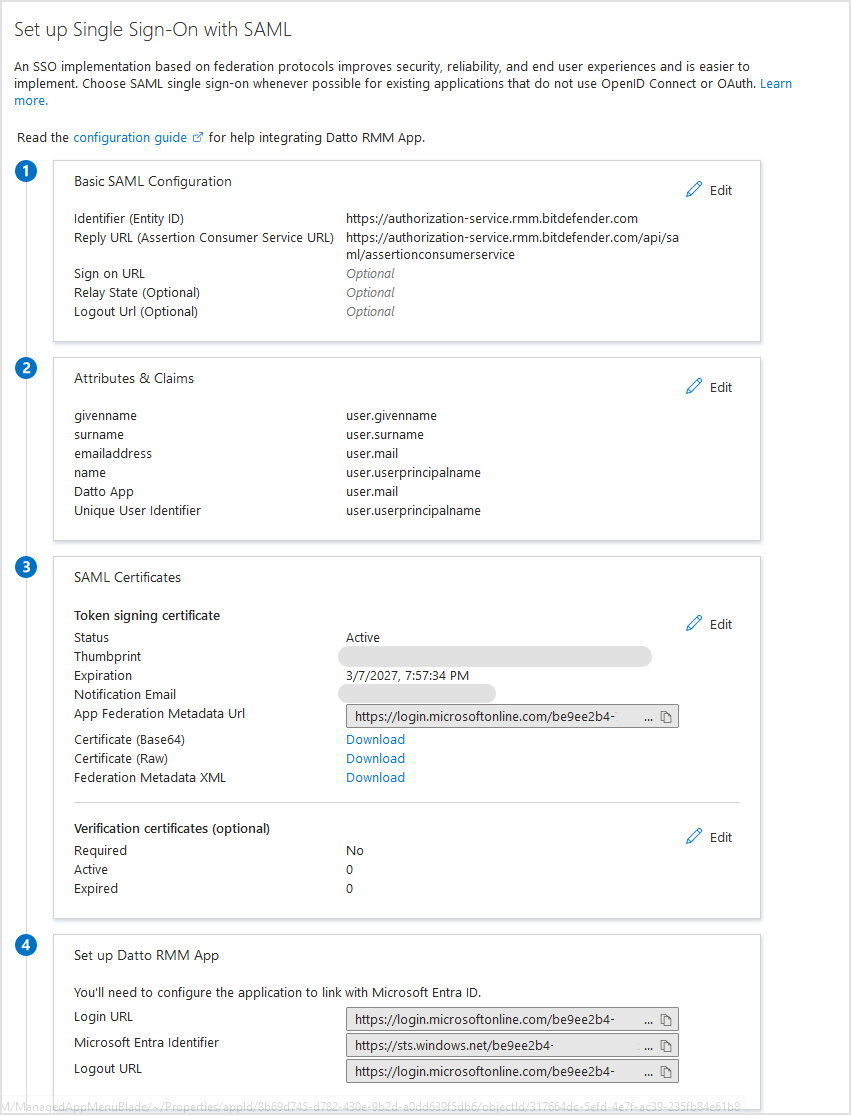
Basic SAML Configuration
In the Basic SAML Configuration section, follow these steps:
Click the pencil icon to edit.
Configure the following fields:
Identifier (Entity ID). Enter
https://authorization-service.rmm.bitdefender.comReply URL (Assertion Consumer Service URL). Enter
https://authorization-service.rmm.bitdefender.com/api/saml/assertionconsumerservice

Click Save.
Return to the setup page.
User Attributes & Claims
In the Attributes & Claims section, follow these steps:
Click the pencil icon to edit.
On the new page, click the + Add new claim option.
Configure the following fields:
Name. Enter a name for this claim.
Source. Select Attribute.
Source attribute. From the drop-down menu, select user.mail.
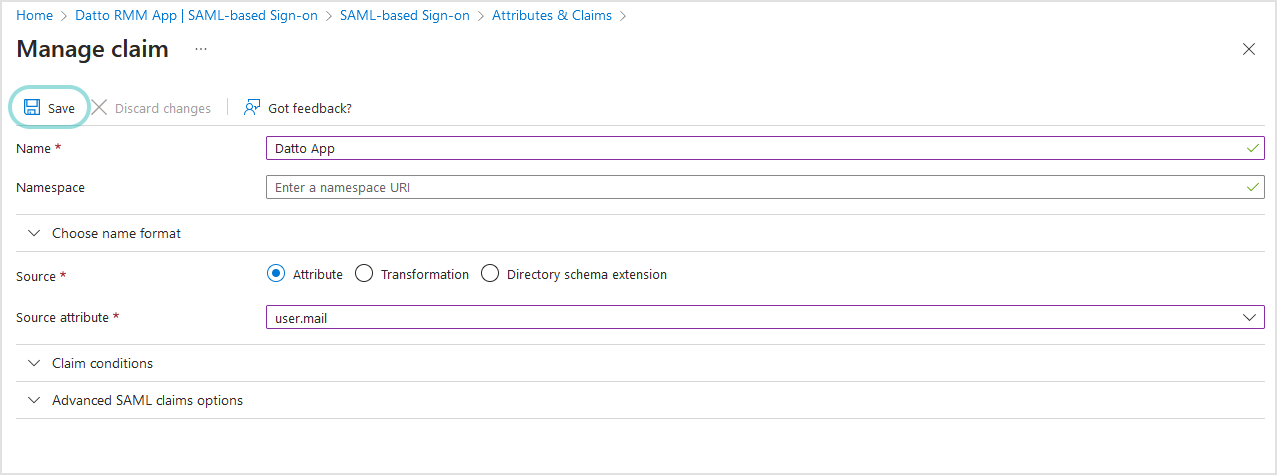
Click Save.
Return to the setup page.
SAML Certificates
Make sure Microsoft Entra ID has a trusted SAML certificate. A self-signed certificate cannot be used with the Datto RMM App integration.
In the SAML Certificates section, follow these steps:
For Token signing certificate, click the pencil icon to edit.

In the configuration page, enter an email address for certificate expiry reminders.
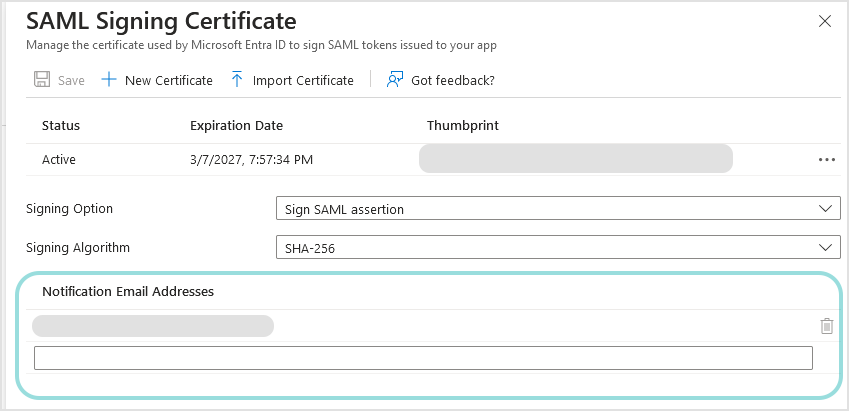
Click Save.
Back in the setup page, go to Verification certificates (optional) and click the pencil icon to edit.
In the configuration page, select Require verification certificates and click to upload the certificate that you have previously created in Creating the signature certificate.
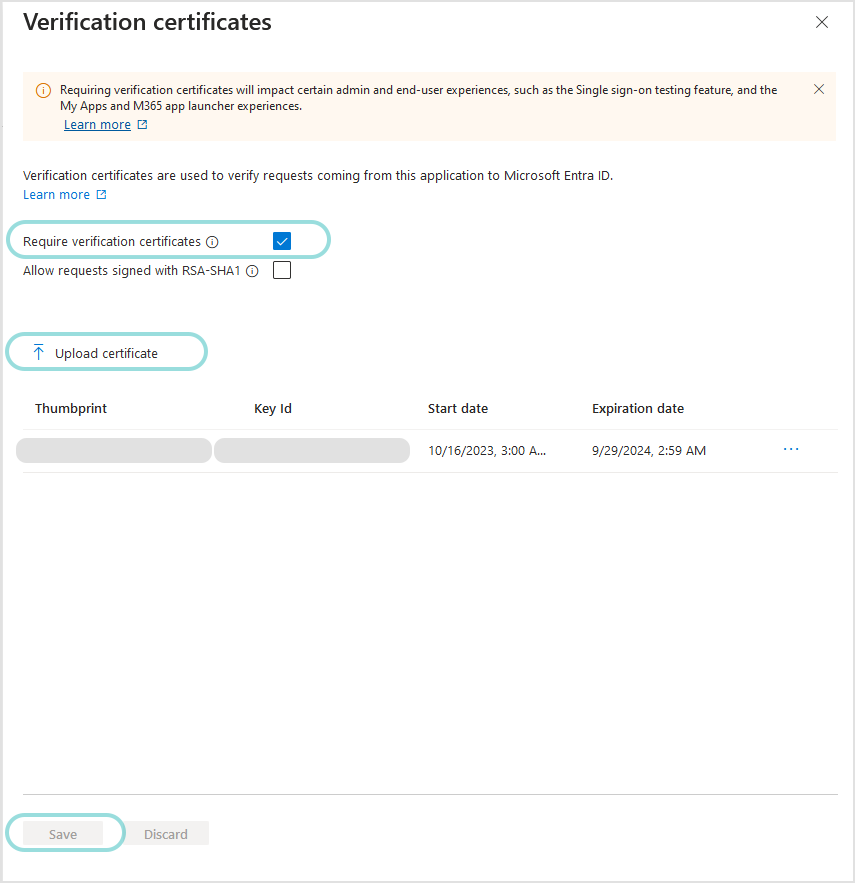
Click Save.
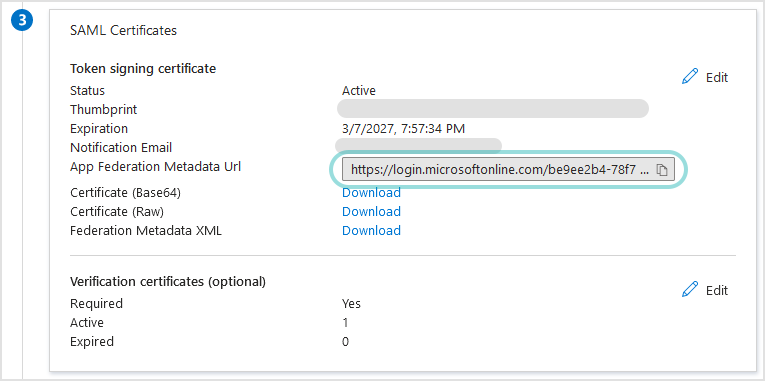
Return to the setup page.
The SAML Signing Certificate section also displays the App Federation Metadata URL.
This is the metadata URL, which you need to add in Datto RMM App when configuring single sign-on.
Click the Copy to clipboard button to copy and paste the URL somewhere at hand or keep this window open in your browser for future use in Datto RMM App.
Configuring Datto RMM App
After you have configured the identify provider, you must enable single sign-on in Datto RMM App. Follow these steps:
In Datto RMM App, go to System > Authentication.
Under Manage Single Sign-On, enter the the following details:
For alias, enter a name.
The name must be unique (not used by other Datto tenants) and can contain at least five alphanumeric characters. You can use the hyphen (-) as a character.
For metadata URL, enter the link you have previously saved when finished configuring the corresponding application in the identity provider.
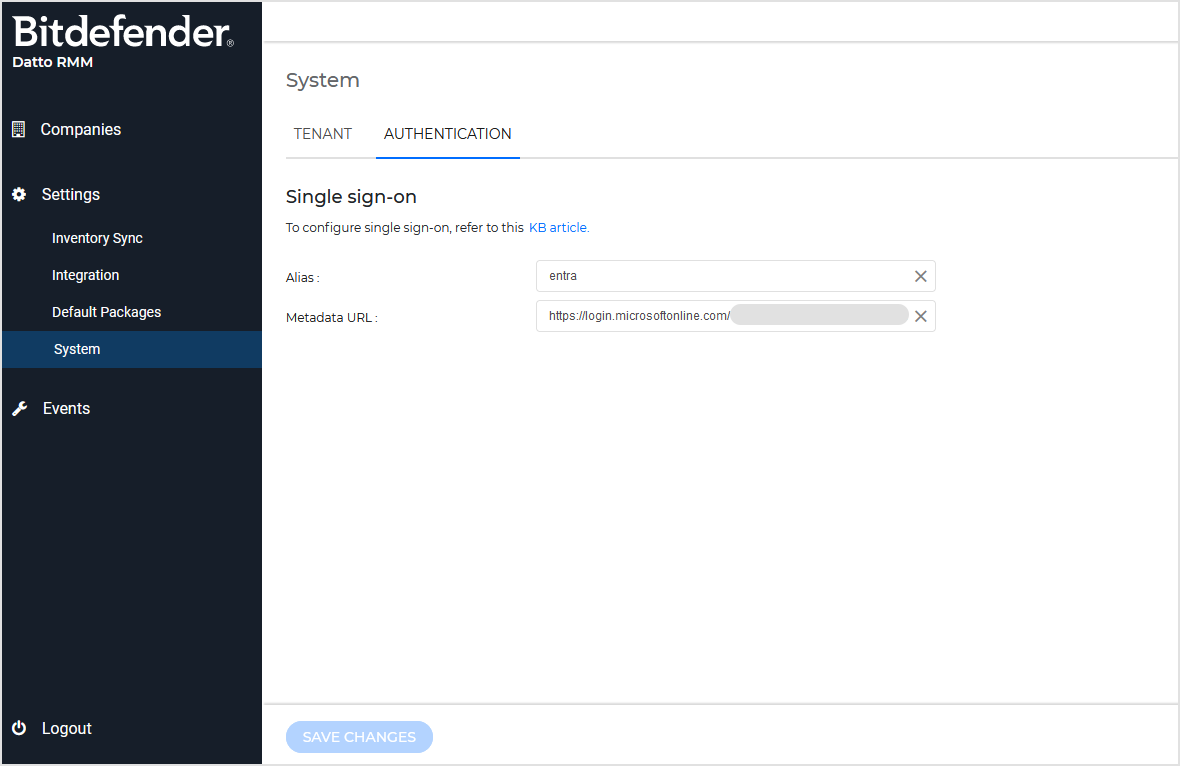
To enable single sign-on, click Save Changes.
Next time you log in to Datto RMM App with just your alias.
Disabling single sign-on
To disable single sign-on with Datto RMM App, follow these steps:
In Datto Companion APP, go to System > Authentication.
Delete the alias and metadata URL.
Click Save Changes.
Click Disable in the confirmation window.