Using endpoint tags
Tags are pieces of information that help you easily identify and take actions on managed endpoints, such as assigning policies based on specific rules or filtering items in the Network page.
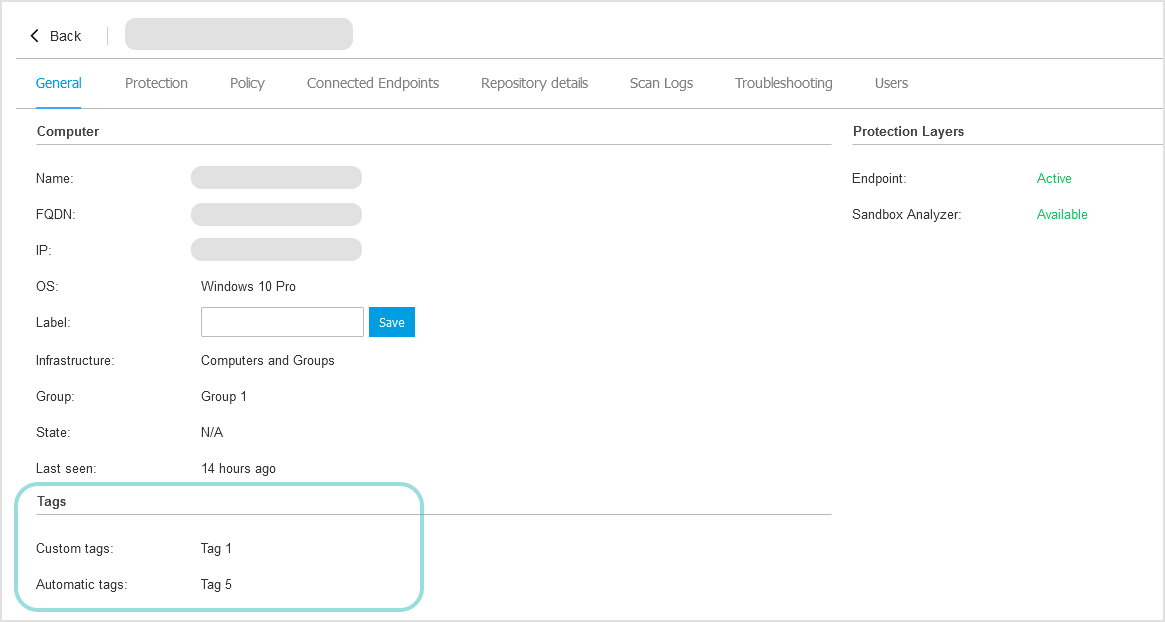
Endpoint tags do not apply to unmanaged endpoints and to Security Server instances. The assigned tags are displayed on the General tab of the endpoint details window.
The following types of tags are available in GravityZone:
Custom tags – they include only name and, optionally, a description. You can assign them to endpoints manually.
Automatic tags – they include name, description and rules. These tags are automatically assigned to any new endpoints detected in the network.
Note
GravityZone does not provide predefined tags.
As an administrator, you can create, edit, delete, assign and unassign tags only for the company you manage. A company can have a maximum of 100 tags. For each new tag that exceeds this limit, you must delete an old tag first.
This is what you can do with endpoint tags in GravityZone Control Center:
View, sort and search endpoint tags in the Network > Tags Management page.
Create, edit, and delete custom and automatic tags in the Network > Tags Management page.
Assign and unassign custom tags in the Network page.
Filter endpoints by tag in the Network page.
Create tag-based rules to automatically apply policies to endpoints in the Policies > Assignment Rules page.
View recorded actions on tags in the User Activity page, under the Tag area.
Note
MSP Partners have access to tags in their own companies with either a license key or monthly subscription. They can also manage tags on child companies provided those companies meet the licensing conditions.
Non-MSP Partners can manage endpoint tags on child companies that use a compatible GravityZone product, regardless of their own license. However, Partners need a compatible license to manage tags in their own companies.
To manage endpoint tags, Customer companies need a compatible license key or, if they use monthly subscription, they also must have the Advanced Threat Security add-on, with at least one of its components (HyperDetect or Sandbox Analyzer) active.
Endpoint tags are available with the following GravityZone products:
GravityZone Business Security Premium
GravityZone Business Security Enterprise
GravityZone Security for Workstations
GravityZone Security for Servers
GravityZone XDR
GravityZone Cloud Security for MSP
GravityZone Security for Physical Workstations (version released in April 2022)
GravityZone Security for Physical Servers (version released in April 2022)
GravityZone Security for Virtualized Environments VDI (version released in April 2022)
GravityZone Security for Virtualized Environments VS (version released in April 2022)
GravityZone Security for Virtual Env per CPU (version released in April 2022)
For all features available with different GravityZone products, refer to Features distribution.
Viewing, sorting and searching endpoint tags in Tags Management
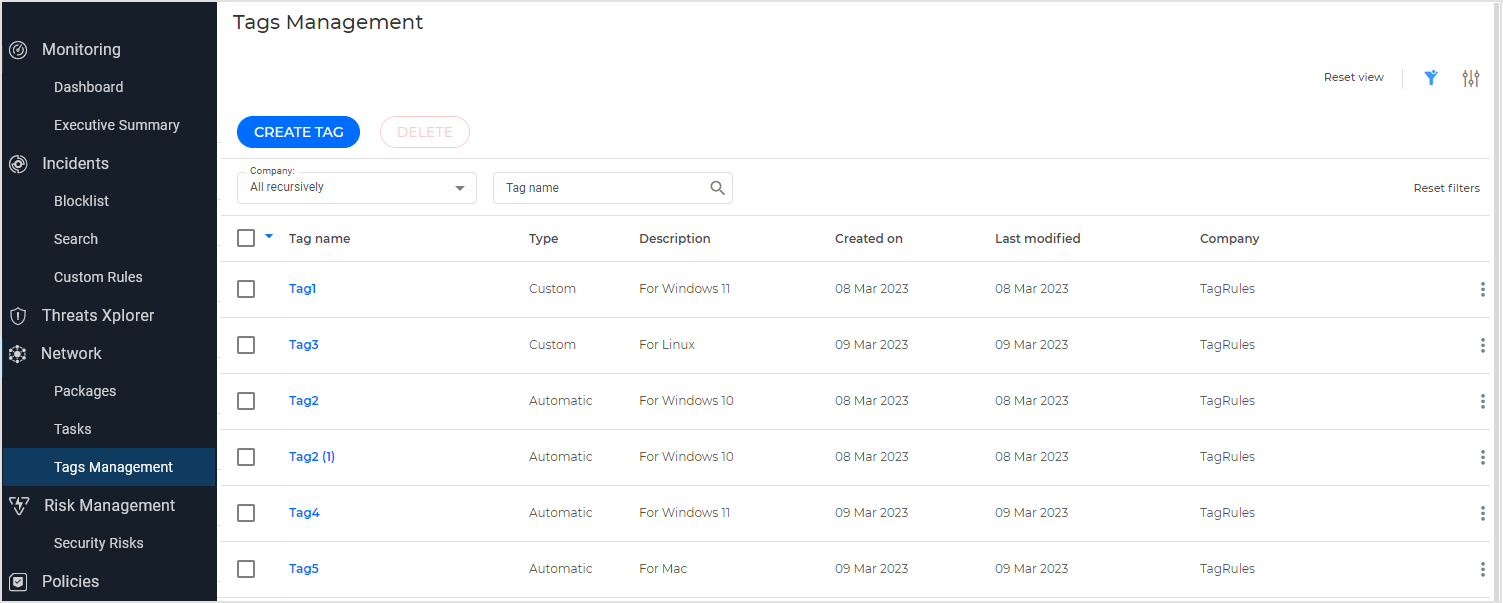
The list of all endpoint tags is available in the Network > Tags Management page.
As a Partner, if your company has a compatible license, you are going to see your company tags in the Tags Management page by default. If your company's license does not support endpoint tags, the page does not display any results and you must select at least one child company.
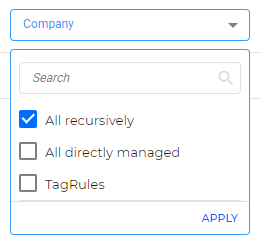
As a Partner, to view tags for child companies, use the Company filter options to make your selections:
All recursively – select this option to display all companies that you have access to, including those that are not under your direct management.
All directly managed – select this option to display all companies under your direct management (child companies located at the first level under your company).
Select one or more company names in the list, or use the search box to display specific companies.
After making a selection, click Apply.
As a Partner, click the column headers in the table to sort tags by name, type, description, creation date, last modification date, or company.
To display specific tags, use the Tag name search box. Type in the full name, only the first characters, or use the asterisk (*) as wildcard. For example, to find all tags containing Windows in their names, type in Windows, Win or *ows. GravityZone does not support double asterisk, such as *dow*.
You can customize the page appearance by using the Settings button in the upper right-corner. To return to the default columns, click Reset view.
To reset all the selections made on the page to display certain tags, click Reset filters.
Creating endpoint tags from scratch
In GravityZone, you can create automatic and custom tags from scratch in the Tags Management page, and on-the-fly custom tags in the Assign custom tags window in the Network page.
To create a tag from scratch in the Tags Management page, follow these steps:
Log in to GravityZone Control Center.
Go to the Network > Tags Management page from the left side menu and click Create tag.
In the configuration page, select the tag type:
Custom - to assign the tag manually at any time you want.
Automatic - to automatically assign the tag to any new endpoint detected by GravityZone in the network, according to the rules you define.
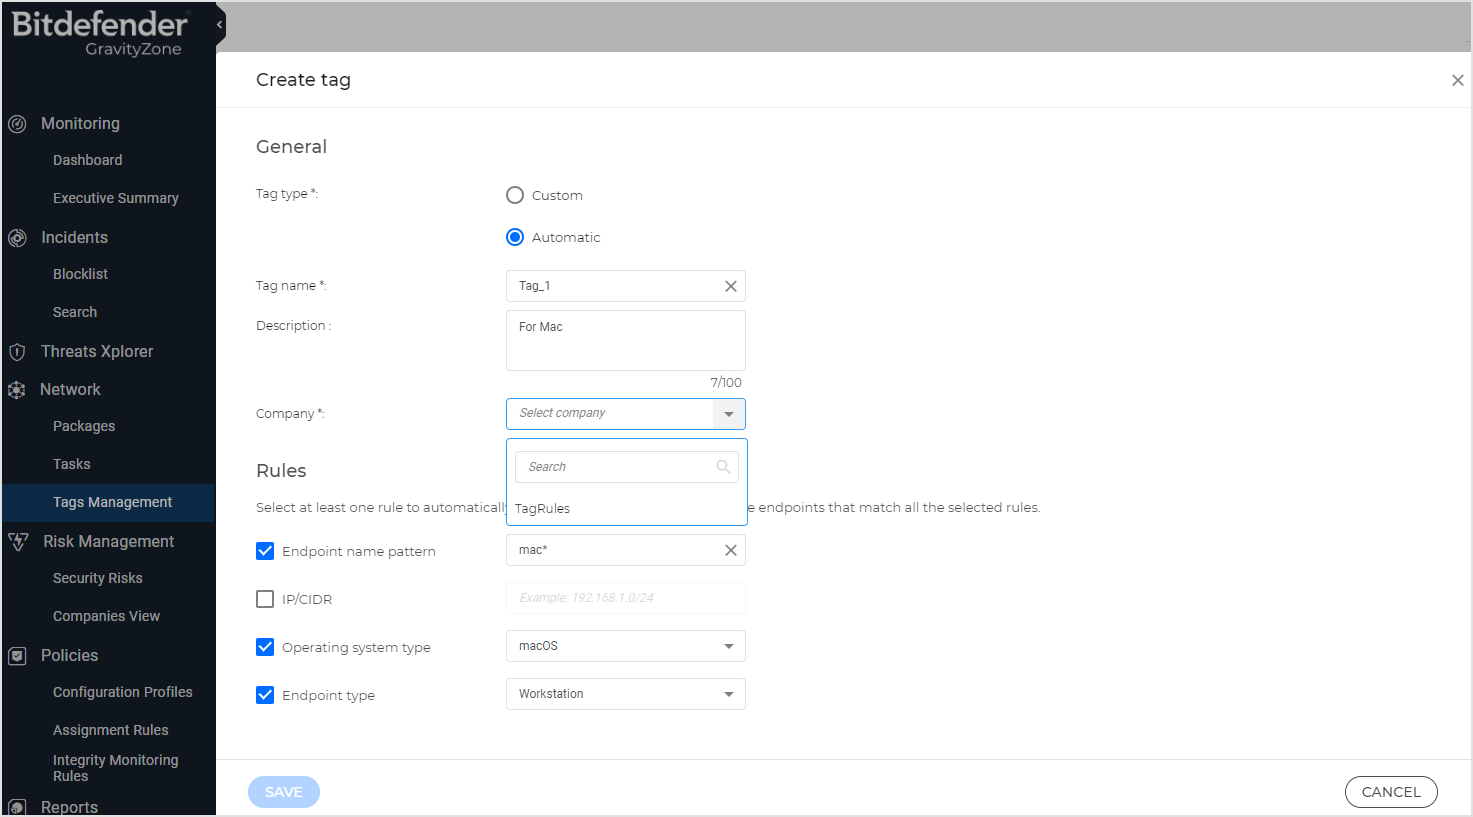
For a custom tag, enter a name and, optionally, a description. GravityZone supports tag names with a maximum of 40 ASCII characters and descriptions up to 100 characters.
As a Partner, select the company for which you create the tag.
The list displays only companies with the endpoint tags feature available and with the Your Bitdefender partner can assist you with security management option enabled.
The list is progressively populated, in batches of ten companies, as you scroll down.
To find a specific company, use the search box. Type in the full name, only the first characters, or use asterisk (*) as wildcard.
For an automatic tag, enter a name, optionally a description, and define the rules for endpoint assignment:
Endpoint name pattern. Enter a name or a part of a name that applies to multiple endpoints.
Use only Latin letters (a-z and A-Z), digits (0-9), wildcards (* and ?), underscore ( _ ), and hyphen (-). Names with multiple characters must start with a letter or a digit. Names cannot start with wildcards, such as *a or ?w. Wildcards must not be consecutive. The asterisk (*) matches multiple characters, while the question mark (?) matches a single character.
IP/CIDR. Enter the IP address in one of the following formats:
192.168.1.0/24- it matches and IP range (CIDR).192.168.1.0- it matches the endpoint or endpoints with this unique IP address.
Operating system type. Select the OS to which the tag applies: Windows, Linux, or macOS.
Endpoint type. Select either workstation or server.
GravityZone distinguishes between server and workstation Windows versions, counts all Linux distributions as servers, and all macOS versions as workstations.
Windows endpoints can be workstations or servers, depending on the operating system they run (for example, Windows 11 or Windows Server 2022). However, GravityZone counts all Linux endpoints as servers and all macOS endpoints as workstations.
Important
You must define at least one rule for automatic tag assignment. If a tag has multiple rules, the AND operator is applied to them. That means the tag applies only to endpoints that match all defined rules. For example, in case of an automatic tag with OS type: Windows and Endpoint type: server, the tag applies only to Windows Server endpoints and ignores Windows 7, 8, 10 and 11.
Click Save.
The new tag appears in the Tags Management table.
Creating endpoint tags from existing ones
To quickly create endpoint tags, you can use an existing tags as templates with limited modifications.
As a Partner, this procedure can be useful when you must create tags with similar settings to apply them across multiple companies, without wasting time configuring each one.
To create a tag from an existing one, follow these steps:
Log in to GravityZone Control Center.
Go to the Network > Tags Management page from the left side menu.
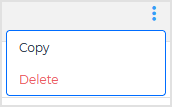
In the table, click the
 More button corresponding to the target tag.
Select Copy.
In the configuration page, make the changes you need.
You can modify the name, the description, and the rules (in case of automatic tags). You cannot change the tag type.
As a Partner, you can select a different company for the new tag. You cannot have two tags with identical names in the same company.
Click Save.
The new tag appears in the Tags Management table.
Creating custom tags on the Network page
On the Network page from the left side menu, you can create custom tags in a fast and convenient way for the endpoints you already have selected. If you want automatic tags, you need to go to the Tags Management page.
To create a custom tag in the Network page, follow these steps:
In the Network table, select at least one endpoint.
Click the Action button in the action toolbar.
Select Assign tags.

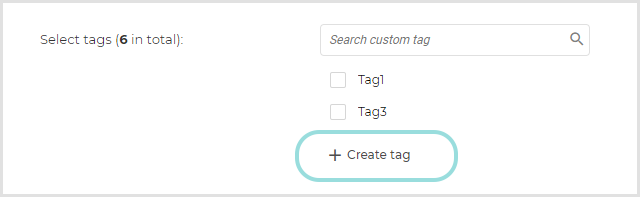
In the Assign custom tags window, click + Create tag.
In the corresponding field, enter a name and click the
 OK icon.
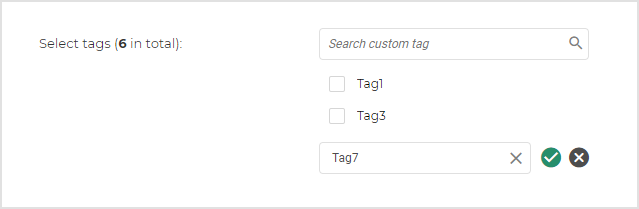
To assign the newly created tag, make sure you selected it and click Assign.
Only newly created and assigned tags are going to be added to the existing list. If you click Cancel instead of Assign after entering the name of a tag, that tag is not saved.
For details about assigning tags to endpoints, refer to the dedicated section further down this page.
Editing endpoint tags
To edit a tag, follow these steps:
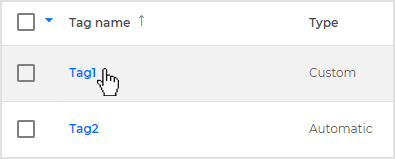
In the Tags Management table, click the name of the tag you want to edit.
In the configuration page, change the available details: name, description and, in case of automatic tags, the rules for automatic assignment.
Note
You cannot change the tag type from custom to automatic and vice versa.
Click Save.
Deleting endpoint tags
To delete one or multiple tags, follow these steps:
In the Tags Management table, select the corresponding checkboxes one by one, or click the all tags checkbox to select all tags on the current page.
Alternately, click the down arrow and choose All to select all tags on all pages.
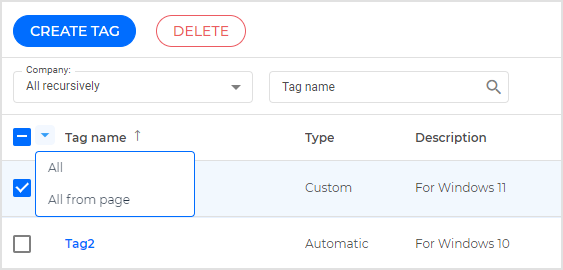
Click Delete and confirm the action.
To delete a specific tag, follow these steps:
Click the
More button corresponding to the target tag.Select Delete and confirm the action.
Important
Deleting tags used in policy assignment rules causes endpoints to revert to policies applied per device.
Assigning endpoint tags
Endpoint tags are assigned differently, depending on their type:
Custom tags are assigned manually by users in the Network page.
Automatic tags are assigned automatically, by GravityZone, based on the defined rules.
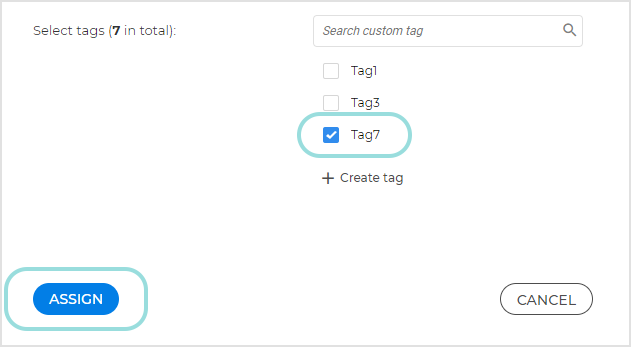
To assign custom tags to one or more endpoints, follow these steps:
In the Network table, select the target endpoints or folders.
When selecting folders, the task applies to all managed endpoints they contain.
Click the Actions button in the menu and select Assign tags.
In the configuration window, select the tags you want to assign to the endpoints.
The list contains all custom tags, including those already assigned.
Optionally, use the + Create tag option to create on-the-fly custom tags.
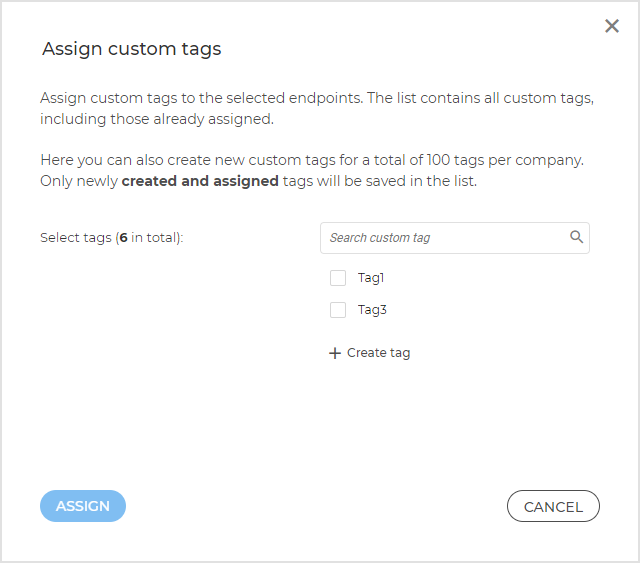
Click Assign.
A notification in lower-right side of the console informs you about the assignment process.
Refresh the Network table to view the changes.
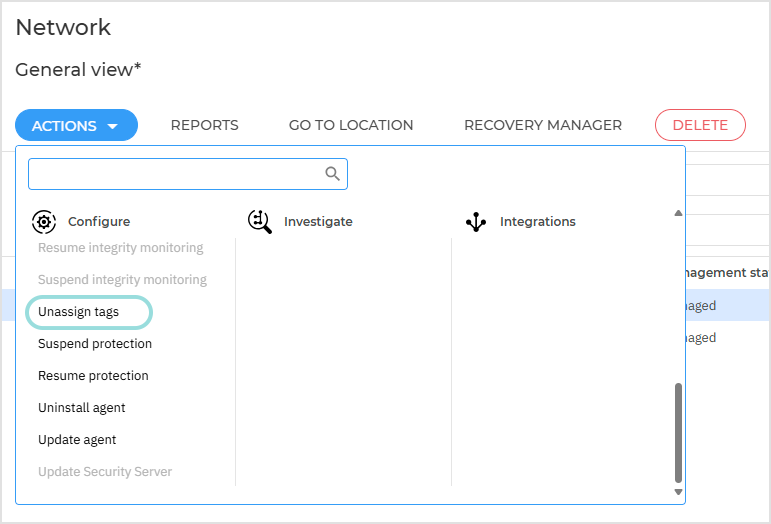
Unassigning endpoint tags
You can remove tags from endpoints by using the Unassign tags button on the Network page. The button is available in these situations:
When you select one or more endpoints with assigned tags.
When you have a selection of endpoints with and without assigned tags.
When you select a folder in Computers and Groups, regardless of its content.
The Unassign tags action is disabled when you select endpoints without assigned tags.
To unassign custom tags from one or more endpoints, follow these steps:
In the Network table, select the target endpoints or folders.
When selecting folders, the task applies to all managed endpoints they contain.
Click the Actions button in the action toolbar and select Unassign tags.
In the configuration window, select the tags you want to remove from the endpoints. If you want to unassign all, select All tags.
The list contains only custom tags, including those already unassigned.
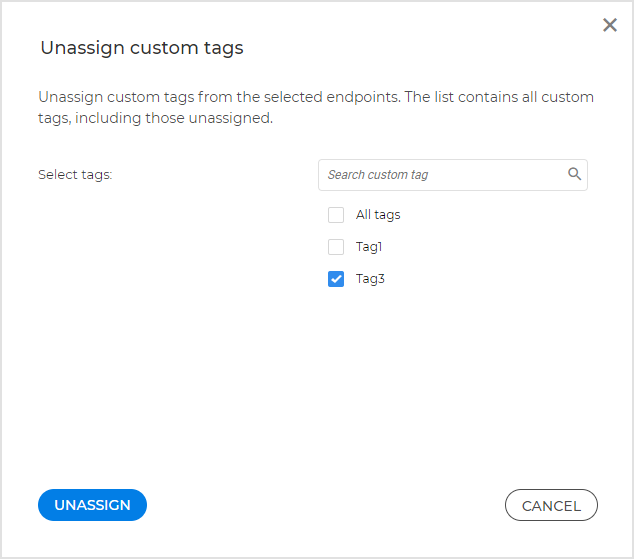
Click Unassign.
A notification in the lower-right side of the console informs you about the unassigning process.
Refresh the Network table to view the changes.
Viewing and filtering endpoints by tag in Network
You can view and filter endpoints by using the options in the Tag column in the Network table. The Tag column is hidden by default and you need to click the  Open settings button to display it.
As a Partner, when you go to the Network page from the left side menu, you are going to see your company tags by default. To view tags for other companies, make sure you also enable the Company column in the table.
This is what happens when you want to view tags for a child company:
In the Company column, select the the child company.
In the Tag filter, the name of the child company is displayed.
The list of tags available with the child company is loaded.
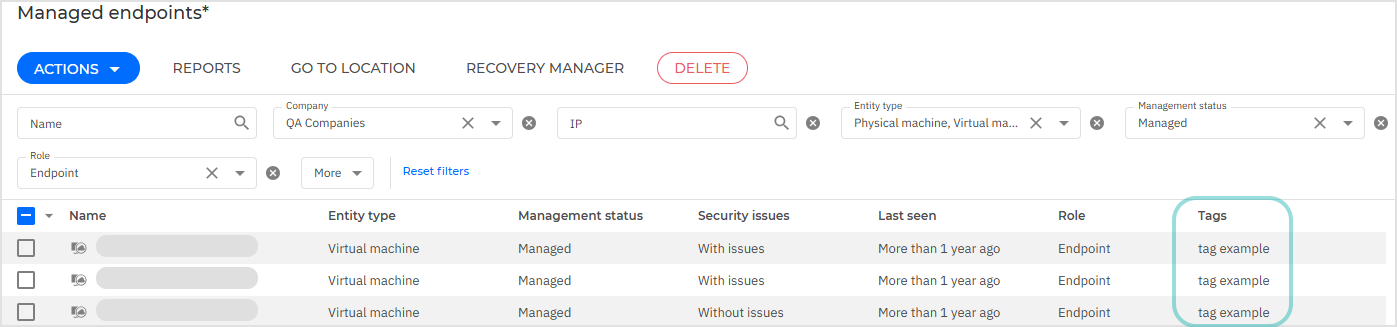
For managed endpoints, the Tag column displays all custom and automatic tags assigned to them. For folders, unmanaged endpoints and Security Server instances, the Tag column displays the N/A status.
To view the assigned tags on an endpoint, click its name and go to the General > Tags section on the endpoint details page.

To filter endpoints by tag, follow these steps:
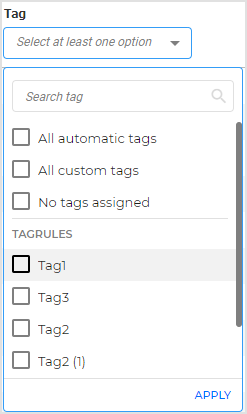
In the Tags column, click the filtering box in the Tag column and select one or more options:
All automatic tags - displays only endpoints with automatic tags.
All custom tags - displays only endpoints with custom tags.
No tags assigned - displays endpoints without any tags assigned.
Any individual tags - displays endpoints having those selected tags assigned.
Note
To directly find specific tags, use the search box. The search box is visible only when at least six tags exist in the Network > Tags Management page.
Click Apply.
For details on how to use the search and filtering options in the Network page, refer to Sorting, filtering, and searching for endpoints..
For details on how to use tags to create policy assignment rules, refer to Assigning policies.
Monitoring endpoint tags in User Activity
GravityZone records when endpoint tags are created, edited, assigned, and deleted in the User Activity section.
To view the corresponding entries:
In GravityZone left side menu, go to the Network > Tasks page.
Go to the Accounts > User Activity page from the left side menu.
In the upper-right corner, select the company.
For Area, select Tags to view when the tags have been created, edited and delete, or Network to view when tags have been assigned to endpoints.
Optionally, to view specific actions, select one of the following categories: Created, Edited, or Deleted.
To view specific actions under Network, select either Assign tags or Unassign tags.
Click Search.
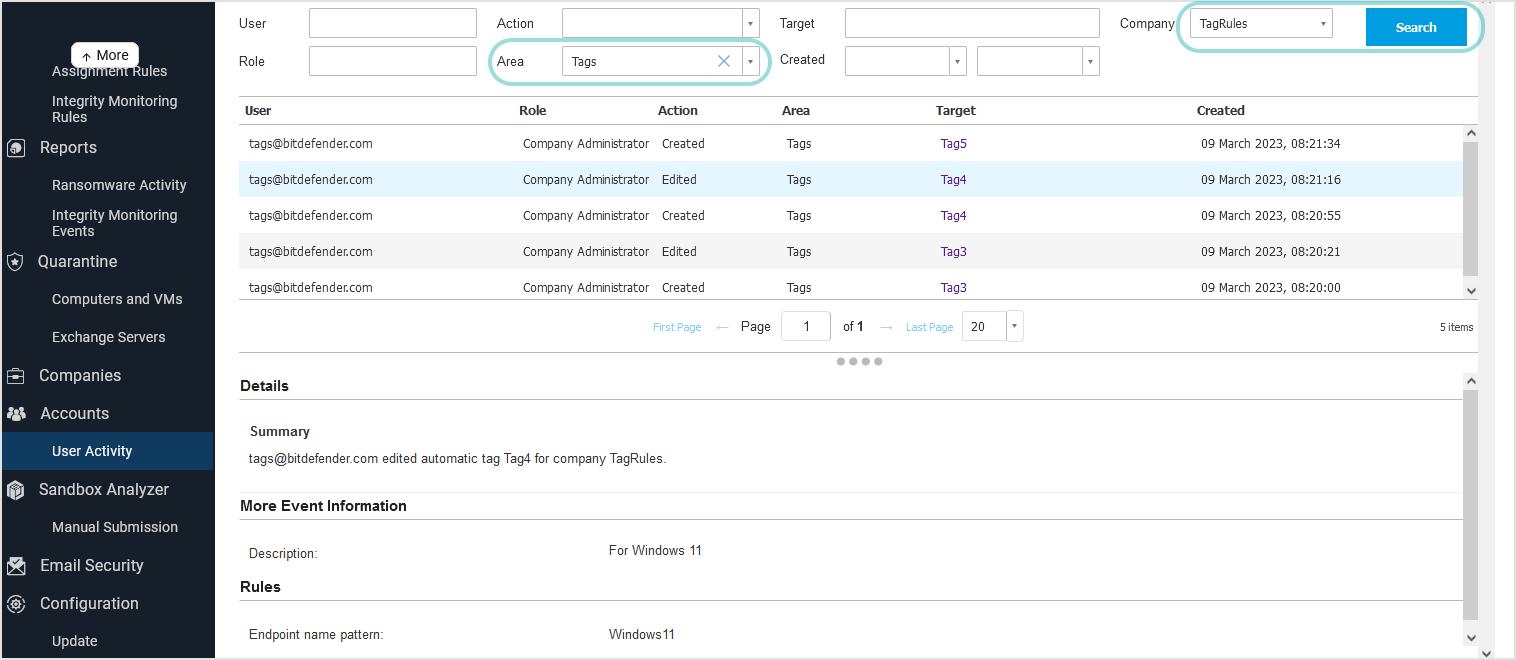
Click each entry to view details in a resizable section at the bottom of the page. Details include summary, tag name, tag type, description, and the configured rules in case of automatic tags.