Custom detection rules
Use the Custom detection rules page to define rules that mark specific behavior from your environment as a valid detection, and generate corresponding incidents in The Incidents page.
Partners can manage rules for other companies and can use the Company filter in the grid to view the rules created for each company. Customers can also see the rules Partners have applied on their company.
However, when switching to a new Partner, all custom rules created by the former Partner are disabled. The new Partner will not be able to view the rules applied by the former Partner.
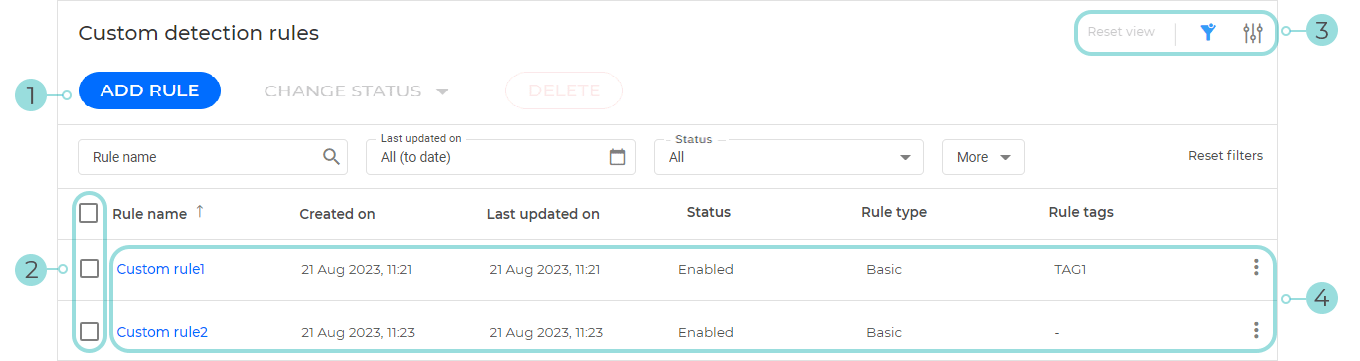
Click the Add rule button to create a new custom detection rule. For more details, refer to Creating custom detection rules.
Select the global check box or the individual rule check boxes to select them. After selecting one or more rules, you can manage them in the following ways:
To enable or disable the rules, click the Change status drop-down menu, and choose the desired action.
To delete the rules, click Delete.
Use these action buttons to customize your grid:
Click the Reset view button to reset the grid to the default settings in terms of displayed columns and filters. This option also clears existing filters and their values.
Click the
 Show or hide filters button to show or hide the filters bar.
Click the
 Open Settings button to add or remove columns from the grid.
Click a rule's name to enter edit mode and update the rule. Click a rule in the list to expand its Details panel, view the rule details, update it, or delete it. For more details, refer to Detection rule details panel.
Note
A rule will generate a maximum of 10 incidents for each endpoint in 24 hours.
Creating custom detection rules
To create custom detection rules, follow these steps:
In the Custom detection rules page, click the Add rule button.
You will be redirected to the Add rule page.
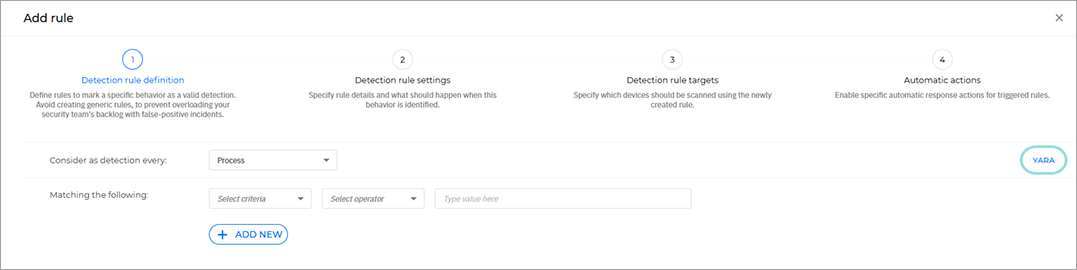
From the Add rule section, you have the option to switch to the YARA rule definition page.
Tip
For information on creating YARA detection rules, refer to YARA detection rules.
Configure the settings for Step 1: Detection rule definition:
Under Consider as detection every, select the type of entity you want the rule to apply to.
Important
Target entities display license requirement labels, indicating whether EDR or specific XDR sensors are needed to use all their criteria.
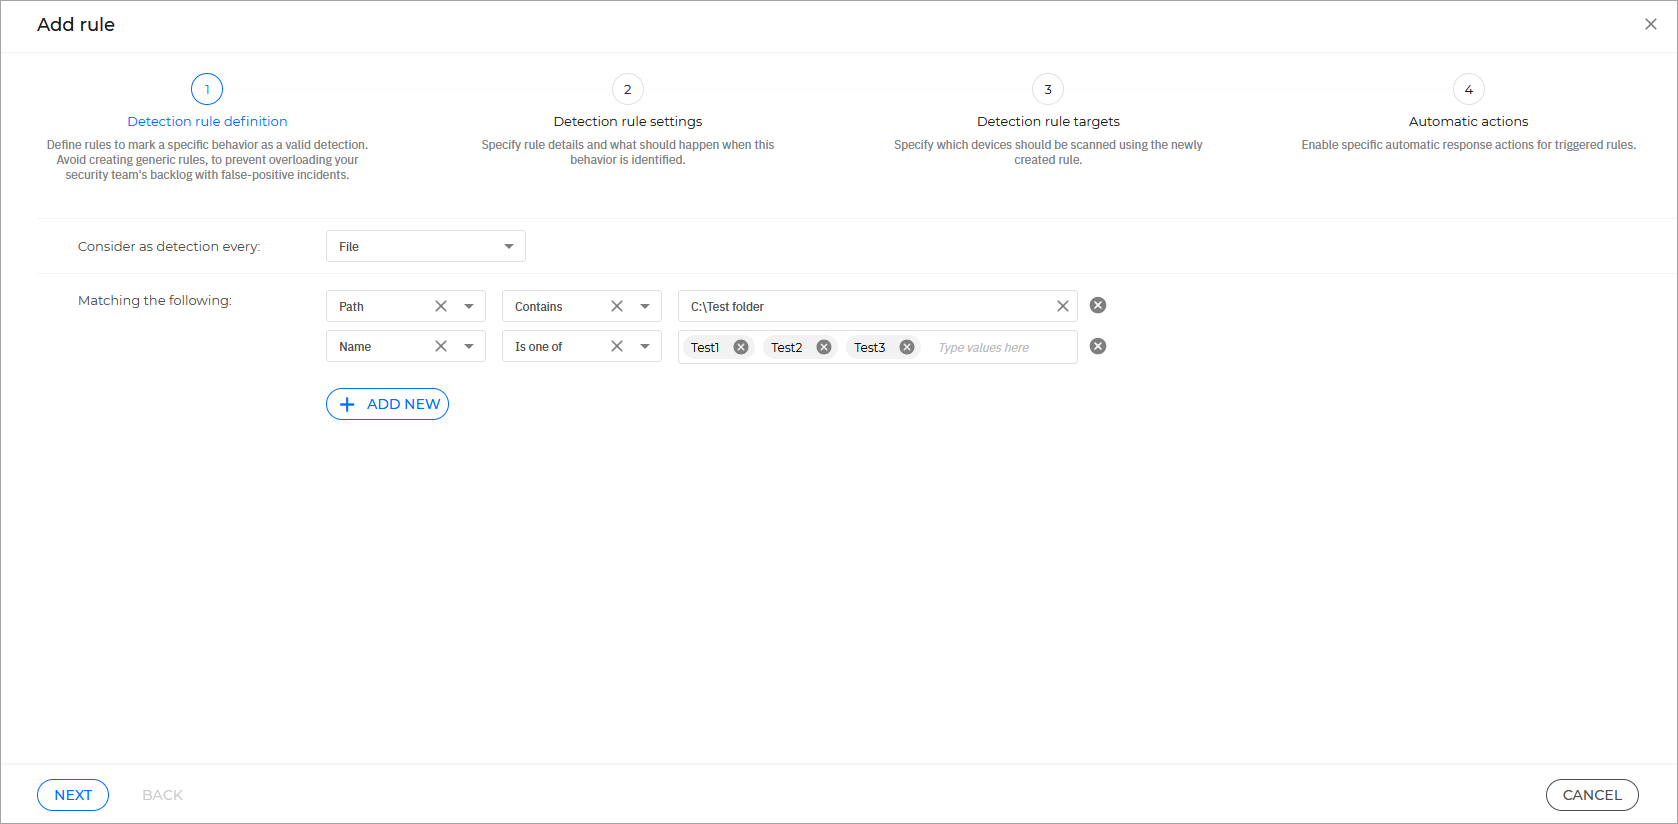
Under Matching the following, create one or more rules by configuring the following fields:
Criteria - Select the component, entity, setting, or value you want to check against the value entered under the Value field.
Note
The available options vary depending on the entity selected in the Consider as detection every field.
Operator - Select the required relationship between the value selected under Criteria and the one entered under Value. The following options are available:
Is - The value under Criteria matches the exact value entered in the Value field.
Contains - The value under Criteria contains the string entered in the Value field (for example, file extensions).
Important
For any criterion using the Contains operator, the value supports the use of wildcards. An exception applies to criteria where the field has one of the following values:
MD5
SHA256
Use wildcards with caution when creating a detection rule, as it raises the risk of making it too generic. Generic rules may cause an overflow of false-positive incidents.
Is one of - The value under Criteria matches any of the values entered in the Value field (an
ORoperation is performed between the values).You must press Enter after each value to complete the action.
Value - Enter a string you want to compare the value under Criteria with.
Click Add new to add each new criterion to the rule.
Important
The rule triggers incidents only when all criteria are met (an
ANDoperation is performed between the added criteria).Criteria fields or values labeled EDR or XDR are specific to those technologies. Items without a label apply to both.
Rules using only EDR-only criteria plus criteria available for both EDR and XDR are handled exclusively by EDR.
Rules using only XDR-only criteria plus criteria available for both EDR and XDR are handled exclusively by XDR.
Rules that include only fields and values supported by both EDR and XDR are processed by both EDR and XDR.
EDR-only and XDR-only criteria or values cannot be combined within the same rule.
For any XDR detection rule, you must use either the Alert name criterion or an operation criterion, but not both.
The Alert name criterion allows you to generate incidents based on specific alerts produced by XDR or EDR.
Click Next:
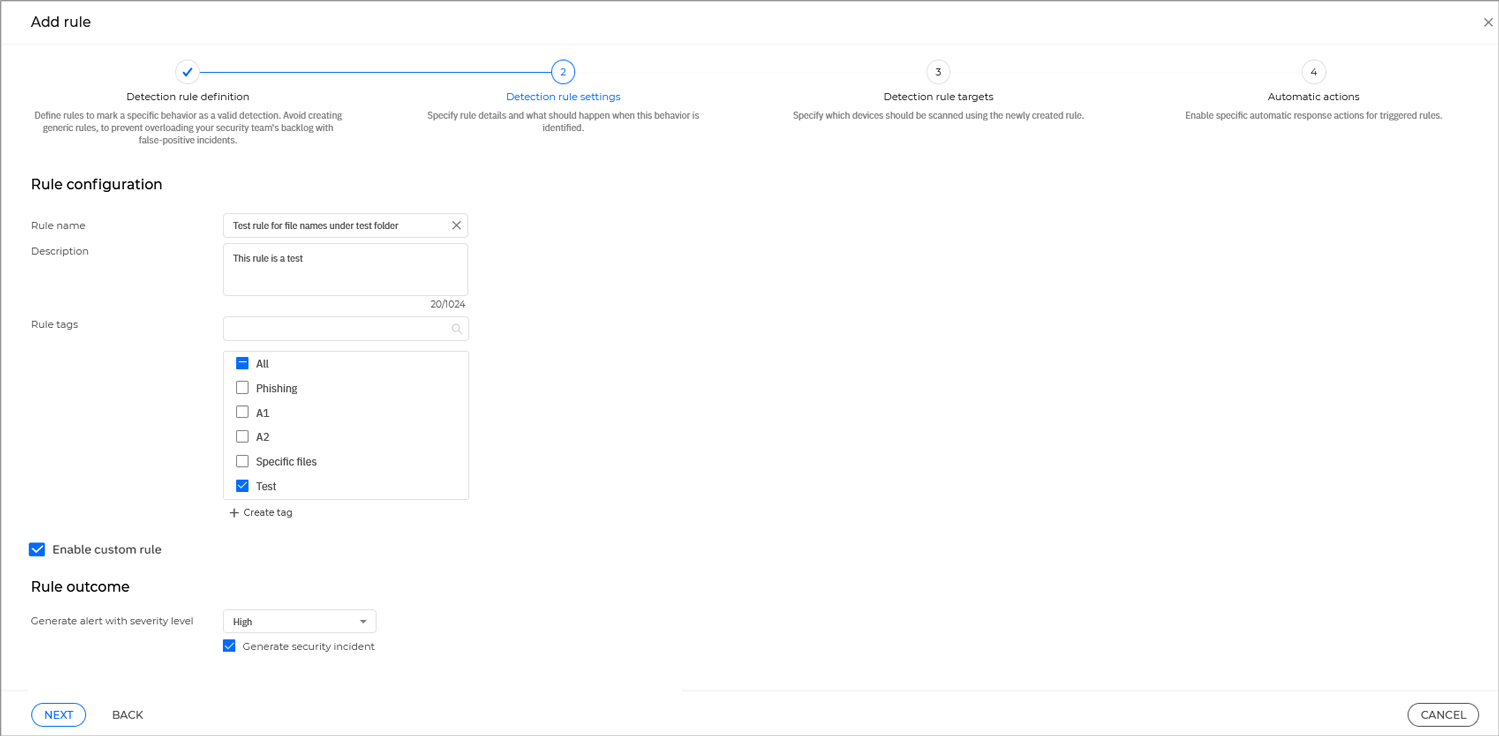
Configure the settings under Step 2: Detection rule settings:
Configure the settings under the Rule configuration section:
Type in a descriptive name for the rule under Rule name.
Under Description type in a short description of what the rule does.
Select the Rule tags you want to apply to the rule.
Rule tags can help you identify, group, and sort for rules as needed. If you do not have a tag that suits your rule, you can click the Create tag button, and add one.
Select the Enable custom rule checkbox to activate the rule immediately after creation.
Enabling this option generates alerts whenever the conditions listed in the rule are met for any specific endpoint.
Configure the settings under the Rule outcome section:
Under Generate alert with severity level select the severity level you want to assign to all the alerts created as a result of triggering this rule.
Select the Generate security incident box to automatically generate an incident when this rule is triggered.
Note
This setting is required for enabling automatic actions.
Click Next.
Configure the settings under step 3, Detection rule targets:
Under the Rule targets section, select one of the options available for the Apply rule on targets from setting:
Select your company - The rule applies to all the endpoints managed by your company.
Endpoint tags - Select from the list of endpoint tags available for your company. The rule will apply only to the endpoints that have the selected tags applied. These tags are created and managed in Network > Tags Management.
When you select the Endpoint tags option, you can choose the tags from the list in the left-side menu, and your current selection of tags will appear in the right-side menu.
Important
Endpoint tags are supported only for EDR rules.
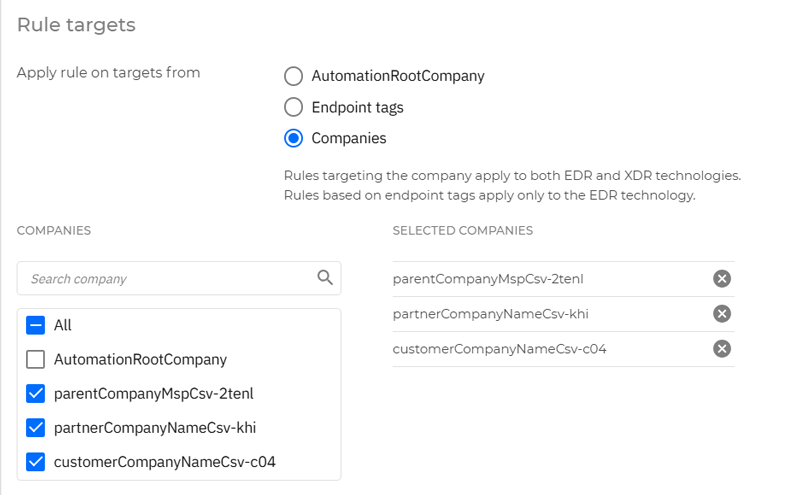
Companies - The rule will apply only to the selected managed companies.
You can select the companies from the list in the left-side menu. Your selection will be displayed in the right-side menu.
Click Next.
Configure the settings under Step 4: Automatic actions:
Select the Enable automatic actions box to activate automatic actions. These will apply to the targeted entity every time the rule is triggered.
Select the actions you want to enable for this rule by selecting them from the list below:
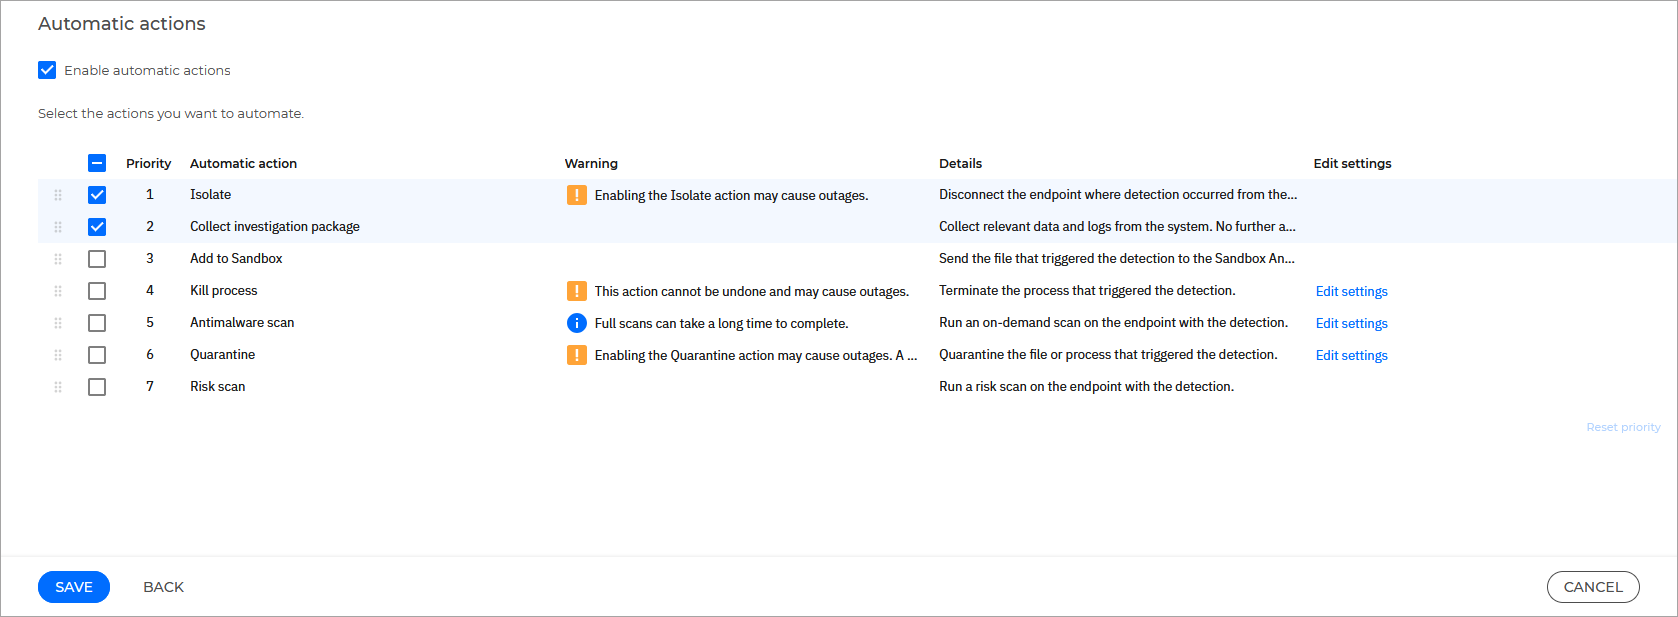
The following automatic actions are available:
Isolate
Collect investigation package
Add to Sandbox
Antimalware scan
Quarantine
Risk scan
Kill process
Important
Depending on your platform, your company's license, and what modules are installed on your endpoints, specific actions might not be available.
You can further customize certain actions by clicking the Edit settings button.
Click Save.
The new rule is now available in the Custom detection rules grid.
Important
Automatic actions are supported only for EDR detection rules.
Managing custom detection rules
Change the status of rules
To enable or disable a rule, follow these steps:
Select the checkbox next to the rule you want to modify.
Note
You can select multiple rules.
Click the Change status button on top of the grid.
Click on the action you want to take.

Alternatively, you can click the corresponding menu item on the right side of the grid and select the action you want to take.
Delete a rule
To delete a rule, follow these steps:
Select the checkbox next to the rule you want to modify.
Note
You can select multiple rules.
Click the Delete button on top of the grid.
Click Delete again to confirm the request.
You can select multiple rules.
Edit a rule
To edit a rule, click on the rule name under the Rule name column. Alternatively you can click the Edit rule button from the Rule details side panel.
For information on how to configure a rule, refer to Creating custom detection rules.
Detection rule details panel
The rule details panel contains information on the selected rule, rule criteria, rule tags, rule outcome, and options to update it or delete it.
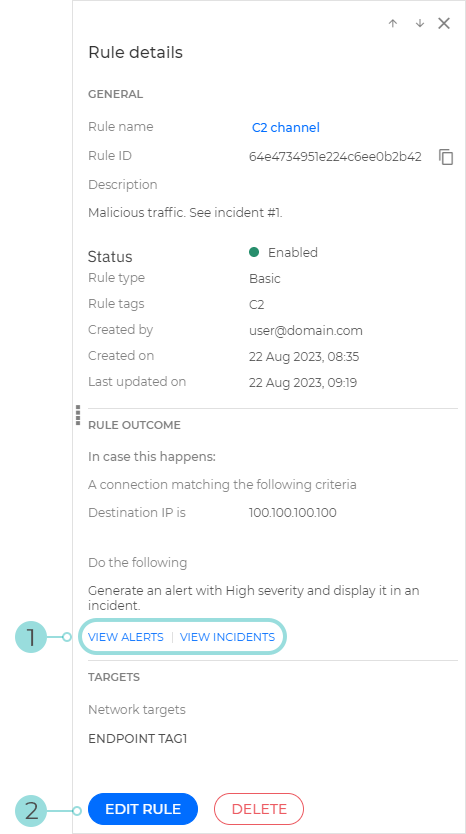
The View alerts and View incidents options redirect you to the Search and the Incidents section, respectively. Prefilled queries run automatically to retrieve all the alerts or incidents triggered by the rule.
The Edit rule button brings up the rule definition window, where you can change the rule settings.