The AWS sensor (single-account environment setup)
The AWS sensor collects and processes information about configuration changes and actions taken by users, roles, or AWS services.
The overall AWS sensor configuration process consists of two stages:
Fulfilling the prerequisites
This part of the process is performed in your AWS console, where you need to configure the AWS CloudTrail and AWS Config services, and create an SQS queue and an S3 bucket for GravityZone to access.
Configuring the sensor
This part of the process is performed in GravityZone Control Center. You need to provide the AWS information required for GravityZone to access the SQS queue and the S3 bucket.
Fulfilling the prerequisites
This part of the process is performed in your AWS console, where you need to configure the AWS CloudTrail and AWS Config services, and create an SQS queue and an S3 bucket for GravityZone to access.
Configure AWS services in your AWS console
Note
The configuration process described below is performed using an AWS root account. If you want to perform these instructions using a different account type, refer to the Configure AWS permissions article for information on how to set up the necessary permissions for your account.
For your AWS sensor to work correctly, you must first configure a few AWS services in your AWS console. You need to configure an S3 bucket that collects logs from your AWS CloudTrail tra and the AWS Config service. The AWS Config service also sends the information about configuration changes to an AWS SNS topic. An SQS queue is subscribed to this topic, so it also receives configuration information. The S3 bucket also sends notifications to the SQS queue whenever new objects are created in the bucket.
GravityZone needs to access both the S3 bucket and the SQS queue. This is done through the use of an AWS IAM service account, to which you need to apply a policy that has the following permissions configured:
Permissions for the S3 bucket:
GetObject,PutObject, andListBucketPermissions for the SQS queue:
DeleteMessage,PurgeQueue,ReceiveMessage, andChangeMessageVisibility
If you also want to use the sensor integration for incident response actions, you need to set up an additional policy that applies to the entire IAM principal. These are necessary permissions for response actions: CreatePolicy, AttachUserPolicy, ListPolicies, ListAccessKeys, and DeleteAccessKey.
Lastly, you can configure a Lifecycle rule on the S3 bucket to clear logs that were already retrieved by GravityZone. This is an optional step, aimed at managing S3 storage costs. It is not required for your sensor integration.
Keep in mind that the steps described in this section may vary depending on your unique AWS environment, policies, and requirements. For more in-depth information, refer to the official AWS Documentation.
AWS sensor prerequisites
Before setting up the AWS sensor in GravityZone, follow these steps:
Enable and configure the necessary AWS services - AWS Config, AWS CloudTrail, Amazon SQS and Amazon SNS must be enabled and configured.
(Optional) Configure a Lifecycle rule on the S3 bucket.
Important
Enabling each of the following services may incur additional costs: AWS CloudTrail, AWS Config, Amazon SQS, AWS S3, and Amazon SNS. All these services are required for a successful integration.
Configure the necessary AWS services
Configure a multi-region CloudTrail trail.
Log into your AWS console.
Use the search bar to look up "CloudTrail".
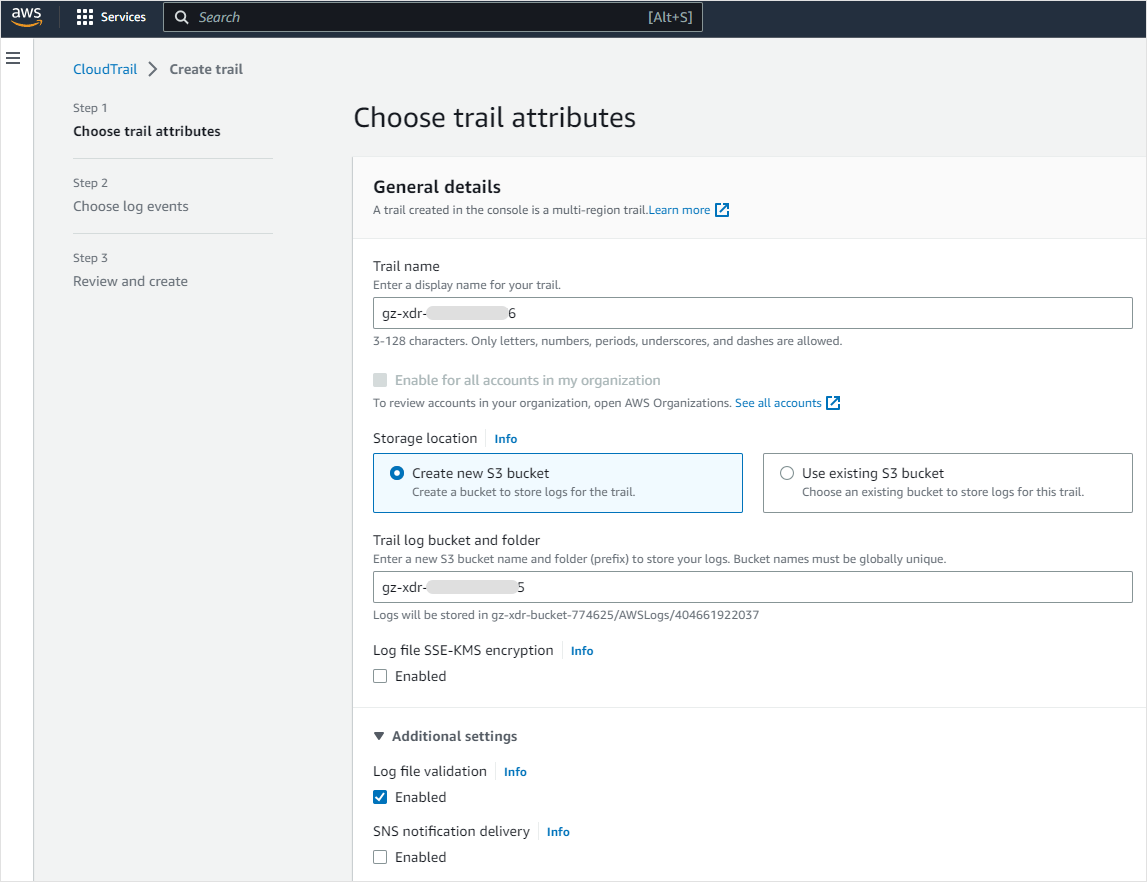
In the CloudTrail page, click the Create a trail button.
Give the trail a name.
In the Storage location section, select Create new S3 bucket.
In the Trail log bucket and folder field enter a unique bucket name.
In the Log file SSE-KMS encryption section, clear the Enabled checkbox.
Leave the rest of the fields with their default settings and click Next.
In the Events section, select all three categories : Management events, Data events, and Insights events.
In the Management events section, under API activity, select the Read and Write checkboxes.
In the Data events section, expand the Data event: S3 section.
For the Data event type field, select S3 from the drop-down menu.
For the Log selector template field, select Log all events from the drop-down menu.
In the Insights events section, select both checkboxes: API call rate and API error rate.
Click Next.
In the Review and create page, click Create trail.
You will be redirected to the Trails grid.
Configure S3 permissions for the AWS Config service.
In the Trails grid, click the S3 bucket.

In the Objects page, click the bucket name listed in the breadcrumb menu.

In the bucket page, click the Permissions tab.
Scroll down to the Bucket policy section and click the Edit button.
Copy the following code block:
  {
      "Sid": "AWSConfigBucketPermissionsCheck",
      "Effect": "Allow",
      "Principal": {
          "Service": "config.amazonaws.com"
      },
      "Action": "s3:GetBucketAcl",
      "Resource": "BUCKET_ARN",
      "Condition": {
          "StringEquals": {
              "AWS:SourceAccount": "ACCOUNT_ID"
          }
      }
  },
  {
      "Sid": "AWSConfigBucketExistenceCheck",
      "Effect": "Allow",
      "Principal": {
          "Service": "config.amazonaws.com"
      },
      "Action": "s3:ListBucket",
      "Resource": "BUCKET_ARN",
      "Condition": {
          "StringEquals": {
              "AWS:SourceAccount": "ACCOUNT_ID"
          }
      }
  },
  {
      "Sid": "AWSConfigBucketDelivery",
      "Effect": "Allow",
      "Principal": {
          "Service": "config.amazonaws.com"
      },
      "Action": "s3:PutObject",
      "Resource": "BUCKET_ARN/AWSLogs/ACCOUNT_ID/Config/*",
      "Condition": {
          "StringEquals": {
              "AWS:SourceAccount": "ACCOUNT_ID",
              "s3:x-amz-acl": "bucket-owner-full-control"
          }
      }
  }
In the Policy section, add a comma after the last statement and paste the code block on a new line, before the closed square bracket.
Update the two placeholders in the code:
BUCKET_ARNandACCOUNT_ID. The value for Bucket ARN is displayed above the Policy section. Save these values for later use.To find your Account ID, click the
 user icon in the upper-right corner of the page. Your Account ID is displayed in the drop-down menu, right below your username.
Click Save changes.
Configure AWS Config and enable AWS Config recording
Use the search bar in the AWS console to look up "Config".
In the left-side menu, click Set up AWS Config. Do not use the 1-click setup option.
Note
This step assumes the AWS Config service was never configured in your current AWS account region. If the AWS Config service is already configured, access the Settings page in the left-side menu. Click Edit, select the Enable recording checkbox and confirm your choice. Next, follow the same steps described below.
In the General Settings section, under Recording strategy, select Record all current and future resource types supported in this region.
Select the Include globally recorded resource types checkbox.
For the AWS Config role field, select the Use an existing AWS Config service-linked role option.
You can leave the rest of the fields with their default values.
In the Delivery method section, under Amazon S3 bucket, select the Choose a bucket from your account option.
For the S3 Bucket name (required) field, select the S3 bucket previously created at step 1.
In the Amazon SNS topic section, select the Stream configuration changes and notifications to an Amazon SNS topic checkbox.
Select the Create a topic option.
Enter a name for the SNS topic.
Click Next twice, and then confirm your choice.
Note
These steps enable the AWS Config recording for the current AWS region of your user account. If you want to add AWS Config notifications from other regions, refer to Configure AWS Config and enable AWS Config recording for other AWS regions.
Configure the SQS queue and subscribe it to the SNS topic.
Use the search bar in the AWS console to look up "Amazon SQS".
In the Amazon SQS page, open the left-side menu and click Queues.
In the Queues grid, click Create queue.
In the Details section, for the Type field, select Standard.
Enter a name for the queue.
Leave the rest of the fields with their default values and click Create queue.
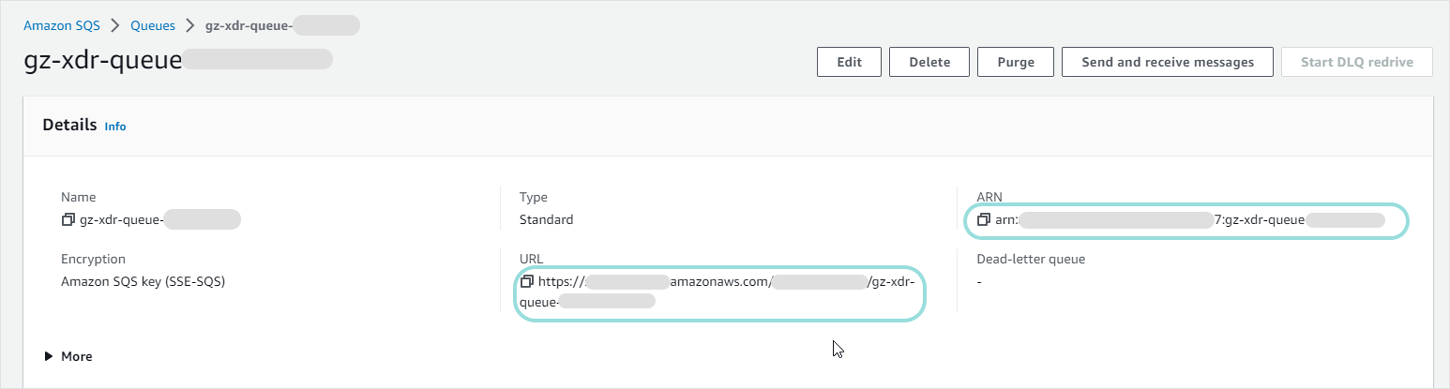
You will be redirected to the queue's dedicated page.
Copy the queue URL and ARN values for later use.
In the SNS subscriptions tab, click Subscribe to Amazon SNS topic.
In the drop-down menu, select the SNS topic you created at step 3, and click Save.
You will be redirected to the queue's dedicated page.
Click the Access policy tab.
In the Access policy (Permissions) section, click Edit.
Copy the following code block:
{
  "Sid": "Stmt1678745203026",
  "Effect": "Allow",
  "Principal": {
    "Service": "s3.amazonaws.com"
  },
  "Action": "sqs:SendMessage",
  "Resource": "QUEUE_ARN",
  "Condition": {
    "StringLike": {
      "aws:SourceArn": "BUCKET_ARN"
    },
    "StringEquals": {
       "aws:SourceAccount": "ACCOUNT_ID"
  }
  }
}
Scroll down to the Access policy section, add a comma after the last statement of the policy, and paste the code block on a new line, before the last closed square bracket.
Update the three placeholders in the code:
BUCKET_ARN,ACCOUNT_ID, andQUEUE_ARNwith the values from steps 2g., 2h., and 4g.Click Save.
Configure S3 bucket events.
Use the search bar in the AWS console to look up "S3" and select the S3 option.
In the left-side menu, click Buckets.
In the Buckets page, click the S3 bucket you created.
Click the Properties tab.
Scroll down to the Event Notifications section and click the Create event notification button.
In the General configuration section, provide a name for the notification configuration.
In the Event types section, under Object creation, select the All object create events checkbox.
In the Destination section, under Destination, select the SQS queue option.
Under Specify SQS queue, select the Choose from your SQS queues option, and select the SQS queue you created at step 4.
Click Save changes.
Next, you need to configure an IAM service account with the right permissions.
Configure AWS permissions
This procedure requires IAM administrative rights.
To configure the necessary AWS permissions, follow these steps:
Create the policies that contain the desired permissions:
If you want to use the AWS sensor integration to generate security incidents, follow the steps in Configure an IAM policy to generate security incidents.
If you want to use the AWS sensor integration to generate security incidents and take incident response actions from GravityZone, follow the steps in Configure an IAM policy to generate security incidents and Configure an IAM policy for incident response actions.
Grant the IAM service account access to the S3 bucket you previously created.
Configure limited public access to the S3 bucket via access point policies.
Grant the IAM service account access to the SQS queue you previously created.
GravityZone needs access to the S3 bucket and the SQS queue, and achieves this by using the IAM service account. That is why the account must be configured with access to these two services.
Configure an IAM policy to generate security incidents
To configure an IAM policy to generate security incidents, follow these steps:
Use the search bar to look up "IAM", and click the Identity and Access Management (IAM) option.
In the left-side menu, click Policies.
In the Policies page, click the Create policy button above the grid.
In the Specify permissions page, click the JSON button.
In the Policy editor section, replace the existing text with the following:
{
    "Version": "2012-10-17",
    "Statement": [
        {
            "Sid": "AllowAccessToS3Bucket",
            "Effect": "Allow",
            "Action": [
                "s3:GetObject",
                "s3:PutObject",
                "s3:ListBucket"
            ],
            "Resource": [
                "BUCKET_ARN/*",
                "BUCKET_ARN"]
        },
        {
            "Sid": "AllowAccessToSQSQueue",
            "Effect": "Allow",
            "Action": [
                "sqs:ReceiveMessage",
                "sqs:DeleteMessage",
                "sqs:ChangeMessageVisibility",
                "sqs:PurgeQueue"
            ],
            "Resource": "QUEUE_ARN"
        },
        {
            "Sid": "ListAttachedRolePolicies",
            "Effect": "Allow",
            "Action": [
                "iam:ListAttachedRolePolicies",
                "iam:ListRoles"
            ],
            "Resource": [
                "arn:aws:iam::ACCOUNT_ID:*"
            ]
        },
        {
            "Sid": "LightSail",
            "Effect": "Allow",
            "Action": [
                "lightsail:GetInstances",
                "lightsail:GetRelationalDatabases",
                "lightsail:GetBuckets"
            ],
            "Resource": [
                "*"
            ]
        }
    ]
}
Update the two placeholders in the code:
BUCKET_ARNandQUEUE_ARNwith the values you copied at steps 2g. and 4g. of Configure the necessary AWS services.Click Next.
In the Policy details section, provide a name and a description for your policy, and click Create policy.
You will be redirected to the Policies pages.
If you want the ability to take incident response actions directly from GravityZone, continue with the instructions below. Otherwise, skip to Apply permissions policies to an IAM service account.
Configure an IAM policy for incident response actions
To configure an IAM policy for incident response actions, follow these steps:
In the Policies page, click the Create policy button above the grid.
In the Specify permissions page, click the JSON button.
In the Policy editor section, replace the existing text with the following:
{
 "Version": "2012-10-17",
 "Statement": [
     {
         "Sid": "VisualEditor0",
         "Effect": "Allow",
         "Action": [
             "iam:ListPolicies",
             "iam:AttachUserPolicy",
             "iam:CreatePolicy",
             "iam:DeleteAccessKey",
             "iam:ListAccessKeys"
         ],
         "Resource": [
             "arn:aws:iam::ACCOUNT_ID:*"
         ]
     }
 ]
}
Update the
ACCOUNT_IDplaceholder in the code with the value you copied at step 2g. of Configure the necessary AWS services.Click Next.
In the Policy details section, provide a name and a description for your policy, and click Create policy.
You will be redirected to the Policies page.
Apply permissions policies to an IAM service account
After creating the policies, you will create an IAM service account. During the account creation process, you will configure it with one or both of the permissions policies.
To create and configure an IAM service account, follow these steps:
In the Policies page, in the left-side menu, click Users.
Click the Add users button.
In the User details section, provide a user name and click Next.
In the Set permissions page, select the Attach policies directly option.
In the Permissions policies section, look up and select the policies you previously created.
If you want to use the sensor integration to generate security incidents, select the policy you created though Configure an IAM policy to generate security incidents.
If you want to use the sensor integration to generate security incidents and take incident response actions from GravityZone, select both policies.
Note
Do not select only the incident response policy, as this action will result in a sensor misconfiguration.
Click Next.
Click Create user.
You will be redirected to the Users page.
In the Users page, click the user name in the grid.
In the user page, go to the Security credentials tab.
Scroll down to the Access keys section, and click Create access key.
In the Use case section, select the Third-party service option.
Select the Confirmation checkbox and click Next.
Click Create access key.
In the Retrieve access key page, copy the Access key and the Secret access key values for later use.
Click Done and then Continue.
You will be redirected to the user details page.
In the user details page, copy the user ARN value from the Summary section. Save the information for later use.
Grant the IAM service account access to the S3 bucket
To grant the IAM service account access to S3 bucket, follow these steps:
Use the search bar in the AWS console to look up "S3" and select the S3 option.
In the left-side menu, click Buckets.
In the Buckets page, click the S3 bucket you created at step 1 in Configure the necessary AWS services.
In the bucket details page, click the Permissions tab.
Scroll down to the Bucket policy section and click the Edit button.
Copy the following code block:
        {
            "Sid": "AllowSensorUserAccess",
            "Effect": "Allow",
            "Principal": {
                "AWS": "IAM_SENSOR_USER_ARN"
            },
            "Action": [
                "s3:GetObject",
                "s3:PutObject",
                "s3:ListBucket"
            ],
            "Resource": [
                "BUCKET_ARN/*",
                "BUCKET_ARN"],
            "Condition": {
                "StringEquals": {
                    "AWS:SourceAccount": "ACCOUNT_ID"
                }
            }
        }
In the Policy section, add a comma after the last statement of the policy, and paste the code block on a new line, before the last closed square bracket.
Update the three placeholders in the code:
IAM_SENSOR_USER_ARN,ACCOUNT_ID, andQUEUE_ARNwith the values from steps 2g. and 2h. from Configure the necessary AWS services, and step 16 from Apply permissions policies to an IAM service account.Click Save changes.
You will be redirected to the bucket details page, with the Permissions tab selected.
Configure limited public access to the S3 bucket via access point policies
To configure limited public access to the S3 bucket via access point policies, follow these steps:
In the Permissions tab of the S3 bucket details page, go to the Block public access (bucket settings) section.
Click the Edit button.
In the Edit Block public access (bucket settings) page, clear the Block all public access checkbox.
Select the following two checkboxes: Block public access to buckets and objects granted through new access control lists (ACLs) and Block public access to buckets and objects granted through any access control lists (ACLs).
Click Save changes.
In the pop-up window, type "confirm" and click the Confirm button.
You will be redirected the bucket details page.
This configuration grants public access only to the IAM service account configured in the previous steps.
Grant the IAM service account access to the SQS queue
To grant the IAM service account access to SQS queue, follow these steps:
Use the search bar in the AWS console to look up "Amazon SQS".
In the Amazon SQS page, open the left-side menu and click Queues.
In the Queues grid, click the SQS queue you previously created at step 4 of Configure the necessary AWS services.
In the queue details page, click the Access policy tab.
Click the Edit button.
Copy the following code block:
{
            "Sid": "AllowSensorUserAccess",
            "Effect": "Allow",
            "Principal": {
                "AWS": "IAM_SENSOR_USER_ARN"
            },
            "Action": [
                "sqs:ReceiveMessage",
                "sqs:DeleteMessage",
                "sqs:ChangeMessageVisibility",
                "sqs:PurgeQueue"
            ],
            "Resource": "QUEUE_ARN",
            "Condition": {
                "StringEquals": {
                    "AWS:SourceAccount": "ACCOUNT_ID"
                }
            }
        }
Scroll down to the Access policy section, add a comma after the last statement of the policy, and paste the code block on a new line, before the last closed square bracket.
Update the three placeholders in the code:
IAM_SENSOR_USER_ARN,ACCOUNT_ID, andQUEUE_ARNwith the values from steps 2g. and 2h. from Configure the necessary AWS services, and step 16 from Apply permissions policies to an IAM service account.Scroll down and click the Save button.
Configure a Lifecycle rule
This is an optional configuration step, aimed at managing S3 storage costs because it clears logs that were already retrieved by GravityZone.
If you don't want to perform this step, skip to Setting up the AWS sensor.
To configure the Lifecycle rule, follow these steps:
Use the search bar in the AWS console to look up "S3" and select the S3 option.
In the left-side menu, click Buckets.
In the Buckets page, click the S3 bucket you created at step 1 in Configure the necessary AWS services.
In the bucket details page, click the Management tab.
In the Lifecycle rules section, click the Create lifecycle rule button.
In the Create lifecycle rule page, provide a name for the rule.
For the rule scope, select the Apply to all objects in the bucket option.
Select the I acknowledge that this rule will apply to all objects in the bucket checkbox.
In the Lifecycle rule actions section, select the following checkboxes:
Expire current versions of objects
Delete expired object delete markers or incomplete multipart uploads
In the Expire current versions of objects section, in the Days after object creation field, enter
30.In the Delete expired object delete markers or incomplete multipart uploads section, in the Number of days field, enter
30.Click Create rule.
Setting up the AWS sensor
In the Configuration > Sensors Management page, select Add new to integrate a new sensor.
Select the company where you want to deploy the sensor and click Next.
Select the AWS sensor and click Integrate.
On the Check Requirements page, confirm that the prerequisite steps have been completed.
Name the integration and provide the necessary AWS details.
Select Test connectivity.
Select Add sensor.
The new integration will be available in the Sensors Management grid.