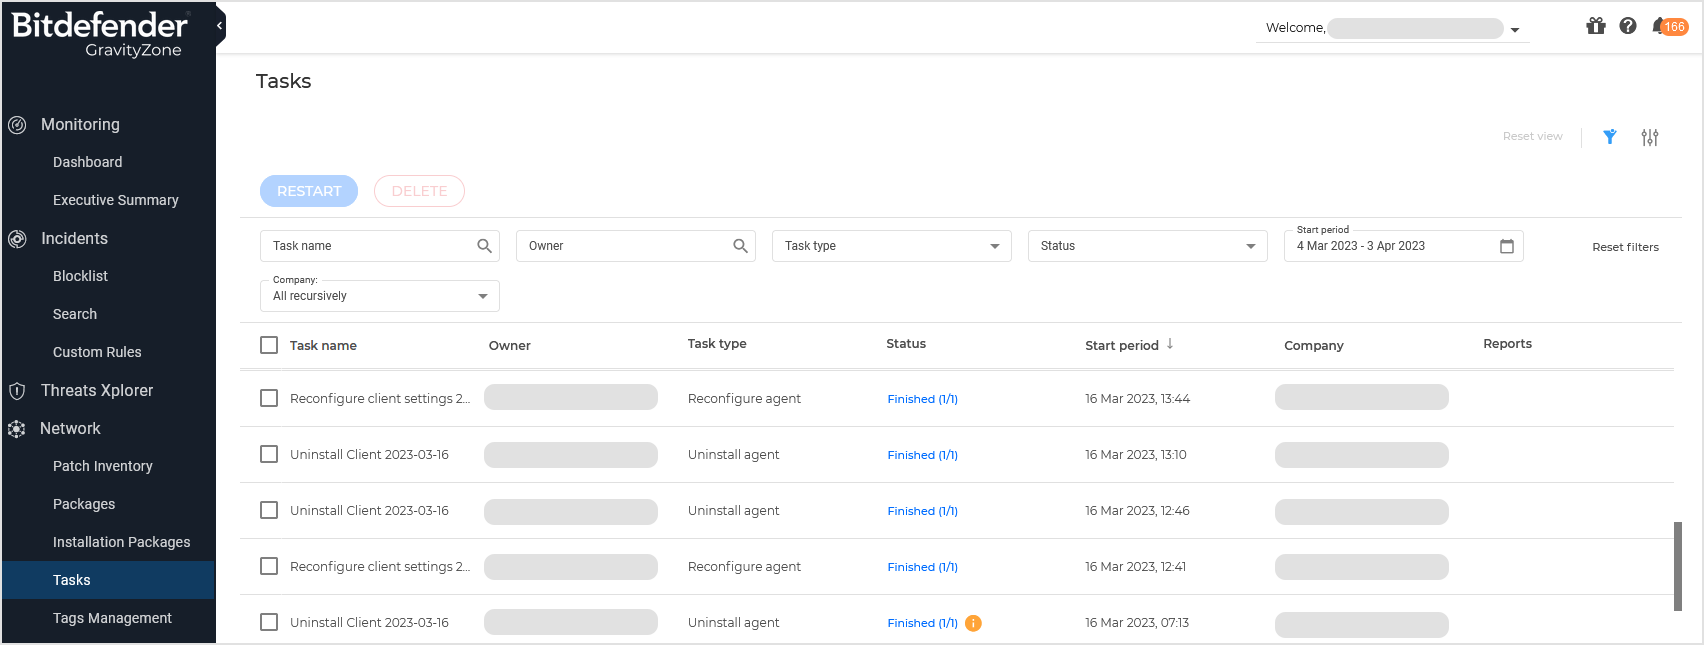
Viewing and managing tasks
The Network > Tasks page allows you to view and manage all the tasks you have created.
As a Partner, you can also view the tasks created by other users in your company and in managed companies, but you cannot take actions on them.
Users from managed companies can view tasks created by their parent company only for endpoints within their own companies. They can also view the user from the parent company who has created the task. This scenario applies to both types of Customer and Partner companies.
As a Partner, you can view all sub-tasks of all tasks for managed companies. Customer users can view the sub-tasks only for their own companies.
Once you or other user has created a task, you can view it in the tasks table.
Note
In case you do not want your Partner to create tasks in your network, you can disable the Your Bitdefender partner can assist you with security management option in the My Company section of Control Center.
You can take the following actions in the Network > Tasks page:
Actions you take on tasks are recorded in the User Activity page.
Sorting, filtering and searching tasks
Each task displays the following information grouped in different expandable columns:
Task name - a relevant name that in some cases includes the creation date.
Owner - the email address of the user who created the task.
Task type - indicates the action taken or the area affected by the task.
Status - indicates the task situation at the viewing time.
Start period - indicates the date and time when the task was created.
Company - indicates the company to which the target endpoints belong.
Reports - in some cases, GravityZone provides details on task results (for example, statistics after installing the security agent on endpoints).
To sort tasks, click the column headers.
To filter tasks, use the options available for task type, status, and start period.
As a Partner, you can filter tasks by company name. Under Company, select at least one of these options:
All recursively - this option displays tasks for your company and all managed companies in the network that allow management from above.
This is the default view of the page when you access it as a Partner.
All directly managed - this option displays managed companies located at the first level under your company that allow management from above.
Company names one by one.
To easily find specific tasks, use the search boxes at the upper side of the page. Type in the full name, only the first characters, or use the asterisk (*) as wildcard. For example, type in either scan, sca or *an to display all task names containing that sequence of characters, as in scan.
You can customize the page appearance by using the Settings button in the upper right-corner. To return to the default columns, click Reset view.
To reset all the selections that you made on the page to display certain tasks, click Reset filters.
Checking the task status
Each time you create a task for one or several network objects, you will want to check its progress and get notified when errors occur.
Go to the Network > Tasks page from the left side menu and check the Status column for each task you are interested in.
You can check the status of the main task, and you can also obtain detailed information about each sub-task.

Checking the main task status.
The main task concerns the action launched on network objects (such as install client or scan) and contains a certain number of sub-tasks, one for each selected network object. For example, a main installation task created for eight computers contains eight sub-tasks.
The numbers between brackets represent the sub-tasks completion ratio. For example, (2/8) means that two out of eight sub-tasks are finished.
The main task status may be:
Pending, when none of the sub-tasks has started yet.
In Progress, when all sub-tasks are running.
The main task status remains In Progress until the last sub-task is done.
Finished, when all sub-tasks are (successfully or unsuccessfully) finished.
In case of unsuccessful sub-tasks, a warning symbol is displayed.
Tasks that have been pending or in progress more than 48 hours are considered finished (with errors).
Checking the sub-tasks status.
Go to the task you are interested in and click the link available in the Status column to open the Status window.
You can view the list of network objects assigned with the main task and the status of the corresponding sub-task.
The sub-tasks status can be:
In Progress, when the sub-task is still running.
Additionally, for Exchange on-demand scan tasks, you can also view the completion status.
Finished, when the sub-task has finished successfully.
Pending, when the sub-task has not started yet.
This can happen in the following situations:
The sub-task is waiting in a queue.
There are connectivity issues between Control Center and the target network object.
Failed, when the sub-task could not start or it had stopped due to errors, such as incorrect authentication credentials and low memory space.
The sub-task is considered failed if it takes more than 48 hours to complete, or if it is retrying for the 4th time.
Stopping, when the on-demand scanning is taking too long to complete and you have chosen to stop it.
To view the details of each sub-task, click it and check the right-side Details pane.
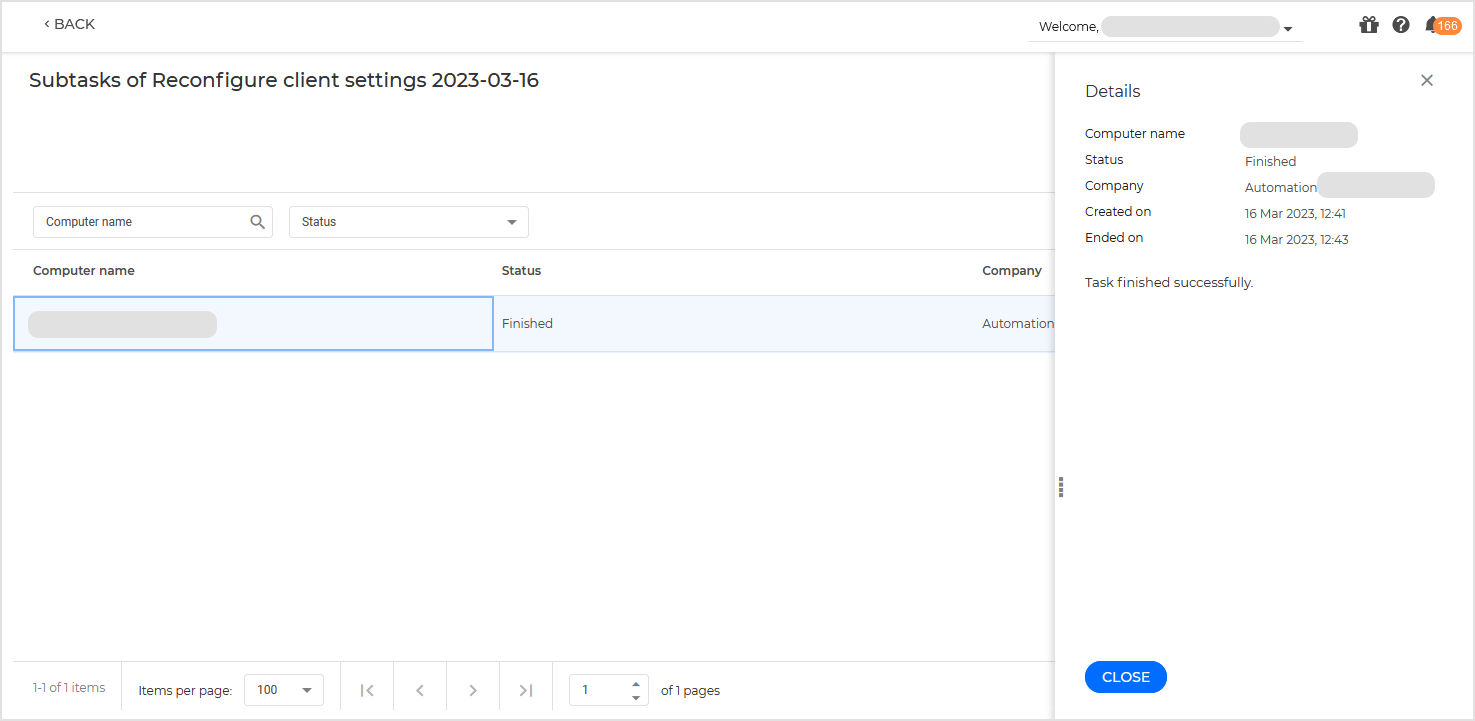
Sub-task details include:
Computer name
Status
Company
Date and time when the task started.
Date and time when the task ended.
No end date and time are mentioned when the status is Pending or In Progress.
Description of encountered errors.
Viewing task reports
From the Network > Tasks page you have the option to view quick scan tasks reports.
In GravityZone left side menu, go to the Network > Tasks page.
Go to the Network > Tasks page from the left side menu.
Select the check box corresponding to the scan task you are interested in.
Click the corresponding
 button from the Reports column.
Wait until the report is displayed.
For more information, refer to Report types.
Restarting tasks
For various reasons, the client installation, uninstallation or update tasks may fail to complete. You can choose to restart such failed tasks instead of creating new ones, following the next steps:
In GravityZone left side menu, go to the Network > Tasks page.
Go to the Network > Tasks page from the left side menu.
Select the check boxes corresponding to the failed tasks.
Click the Restart button at the upper side of the table. The selected tasks will restart and the tasks status will change to Retrying.
Note
For tasks with multiple sub-tasks, the Restart option is available only when all sub-tasks have finished and it will execute only for failed sub-tasks.
You can restart only tasks for which you are the owner.
The following tasks support restarting:
Malware scan
Patch install
Patch uninstall
Install agent
Repair agent
Update agent
Restart endpoint
Reconfigure agent
Run network discovery
Exchange scan
Remove from isolation
IOC scan
Risk scan
Risk fix
Suspend integrity monitoring
Resume integrity monitoring
Stopping Exchange scan tasks
Scanning the Exchange Store can take a considerable amount of time. If by any reasons you want to stop an on-demand Exchange scan task, follow the steps described herein:
In GravityZone left side menu, go to the Network > Tasks page.
Go to the Network > Tasks page from the left side menu.
Click the link in the Status column to open the Task Status window.
Select the check box corresponding to the pending or running sub-tasks you want to stop.
Click the Stop tasks button at the upper side of the table. Click Yes to confirm your action.
Note
You can also stop an on-demand scan of the Exchange Store from the events area of Bitdefender Endpoint Security Tools.
Deleting tasks
GravityZone automatically deletes finished tasks after 30 days. This action occurs every Saturday at 00:00 (server time) to avoid load. Any finished task that reaches the 30-day mark after this deadline will be deleted the following Saturday.
GravityZone considers finished all tasks successfully completed and also those marked as timed out after being pending or in progress for more than 48 hours.
If you still have many tasks, it is recommended to manually delete the tasks that you no longer need, to prevent the list from getting cluttered.
To manually delete tasks, follow these steps:
In GravityZone left side menu, go to the Network > Tasks page.
Select the checkboxes corresponding to the tasks you want to delete.
Click the Delete button at the upper side of the table.
Click Yes to confirm your action.
The tasks will be deleted along with their subtasks.
Important
You can manually delete only tasks with a Pending or Finished status. Deleting a pending task also cancels the task.
When attempting to delete tasks with an In Progress status, only pending subtasks will be removed. In-progress subtasks will not be deleted because they have already reached their endpoints and cannot be canceled.
You can delete only tasks for which you are the owner.
You can check the tasks and subtasks deleted in the past on the Accounts > User activity page in the GravityZone main menu.
To view information about deleted tasks and subtasks, follow these steps:
Go to the User activity page.
In the upper right corner, select your company.
For the action, select Deleted.
For the area, select Tasks.
Optionally, use the Created filters to select a time interval and other fields for a more targeted search.
Click Search.
In the results list, click each task for details, including deleted subtasks.