Configuring GravityZone Control Center single sign-on with AD FS
GravityZone Control Center supports single sign-on (SSO) with various Identity Providers (IdP) that use SAML 2.0 as authentication standard.
This topic describes how to configure GravityZone Control Center single sign-on with AD FS. For generic information on configuring other Identity Providers, refer to Configuring single sign-on using a 3rd party identity provider.
Prerequisites and requirements
You have a GravityZone Cloud administrator account to manage users, your company and other companies.
An Active Directory instance has been configured, where users have accounts with the same email addresses as in GravityZone.
AD FS service has been fully installed and configured.
You have a valid SSL certificate for AD FS and the fingerprint for that certificate.
Important
As GravityZone administrator, you can configure single sign-on for users from your company and from companies under your management. You cannot enable SSO for your own GravityZone account due to security reasons.
Users must be under companies that have SSO enabled. While SSO is active, users cannot log in with GravityZone credentials.
Email addresses are case sensitive with GravityZone SSO. Therefore, username[at]company.domain is different from UserName[at]company.domain and USERNAME[at]company.domain. If the email address from GravityZone does not match the email address from the Identity Provider, the user will receive a login error message when trying to connect to Control Center.
Configuring GravityZone Cloud single sign-on
To configure AD FS for single sign-on, you need to do the following:
Add a relying party trust
The connection between GravityZone and AD FS is defined using a relying party trust.
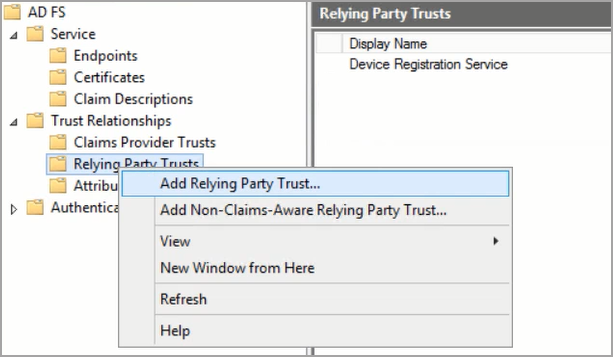
Log in to the server where AD FS is installed.
Launch the AD FS Management application.
Select Trust Relationships > Relying Party Trusts.
Right-click and select Add Relying Party Trust….
In the Add Relying Party Trust Wizard window, follow these steps:
On the Welcome page, click Start.
On the Select Data Source page:
Select the option Import data about the relying party published online or on a local network.
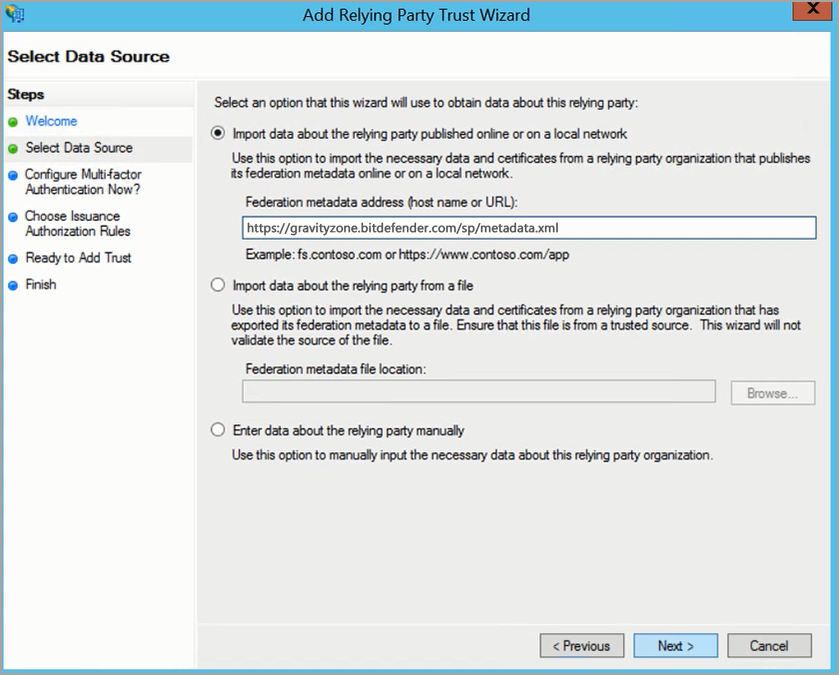
In the Federation metadata address (host name or URL) box, enter the address of the service provider:
https://gravityzone.bitdefender.com/sp/metadata.xmlClick Next.
On the Specify Display Name page, enter the name of the service provider (
gravityzone.bitdefender.com) and click Next.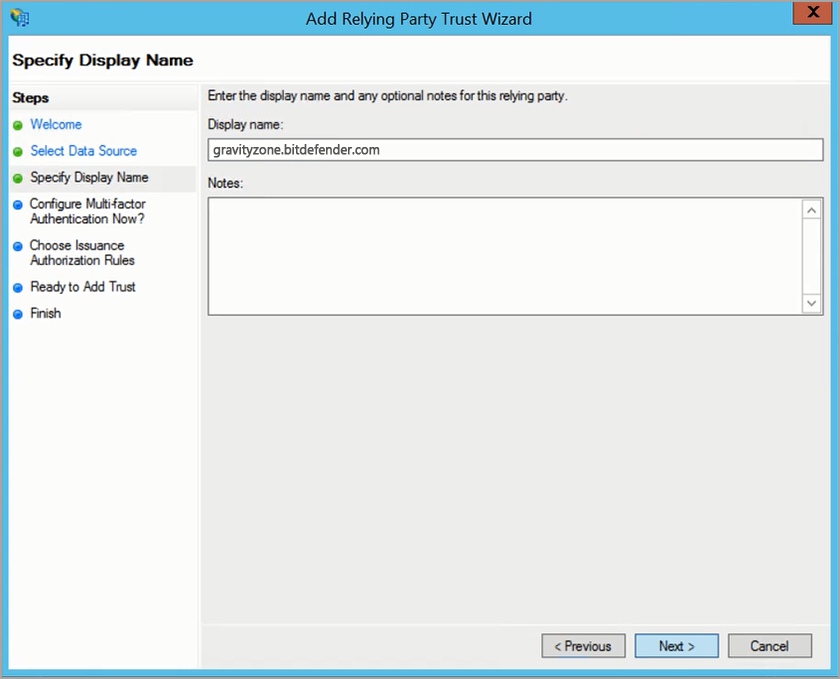
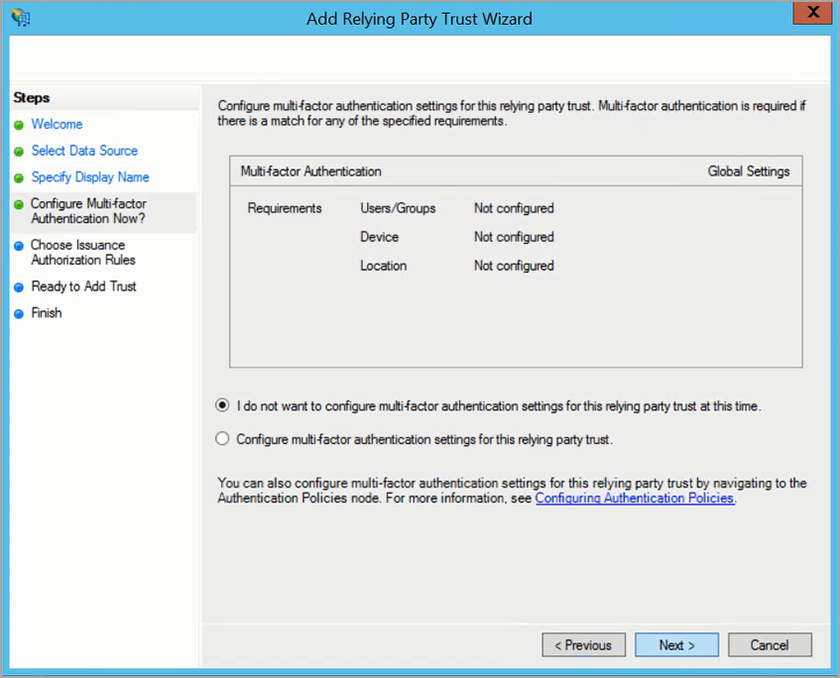
On the Configure Multi-factor Authentication Now? page, select the option I do not want to configure multi-factor authentication settings for this relying party trust at this time and click Next.
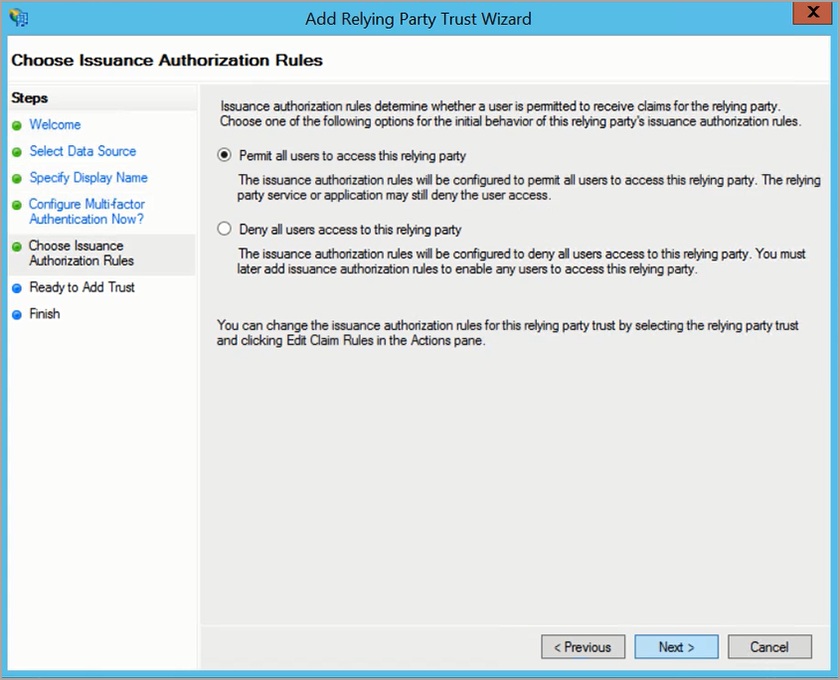
On the Choose Issuance Authorization Rules page, select the option Permit all users to access this relying party and click Next.
Note
You do not need configure individual access for users to single sign-on at this time, because you will manage them from GravityZone Control Center.
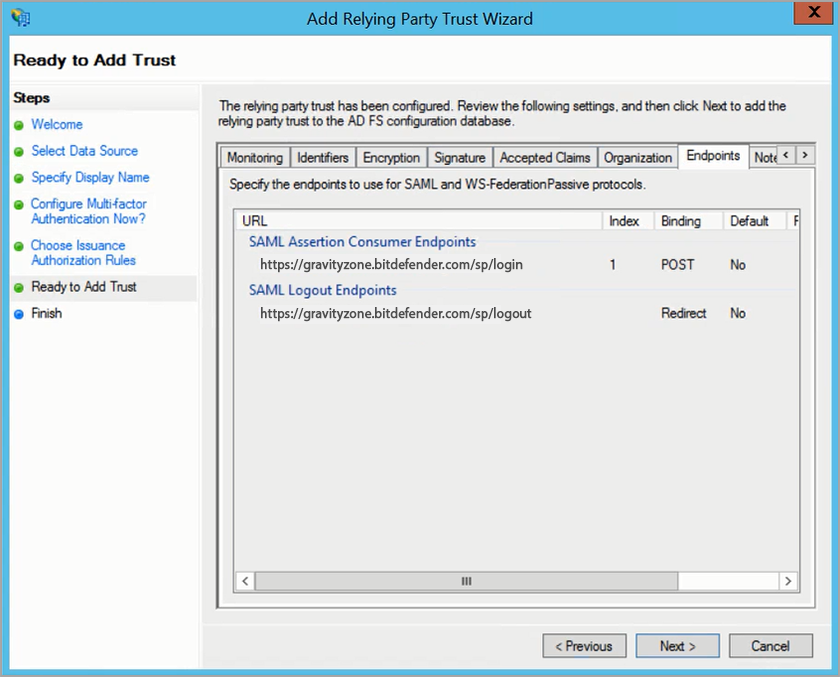
On the Ready to Add Trust page:
Go to the Endpoints tab and verify the following addresses have been added:
For SAML Assertion Consumer Endpoints:
https://gravityzone.bitdefender.com/sp/login, with bindingPOST.For SAML Logout Endpoints:
https://gravityzone.bitdefender.com/sp/logout, with bindingRedirect.
Click Next.
On the Finish page, select the option Open the Edit Claim Rules dialog for this relying party trust when the wizard closes.
Click Close.
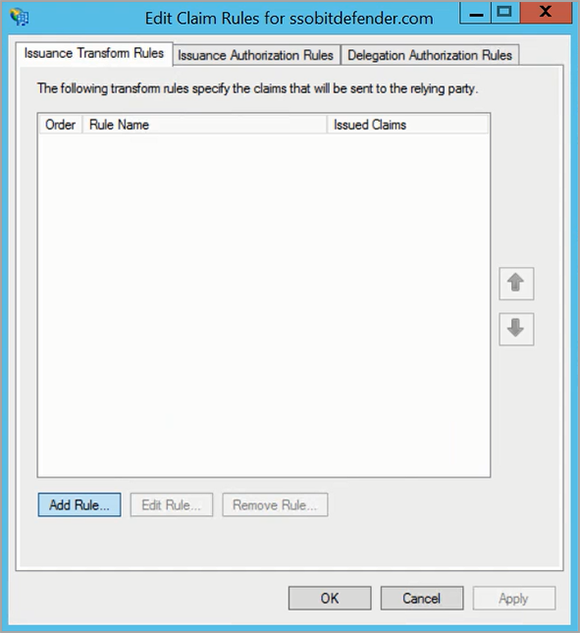
Create claim rules
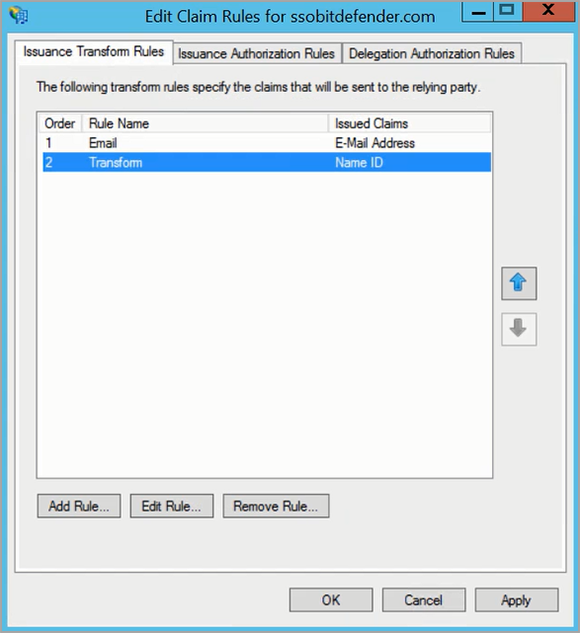
After adding a relying party trust, you need to create claim rules. The Edit Claim Rules window opens once you created the trust.
Click Add Rule to create a new rule.
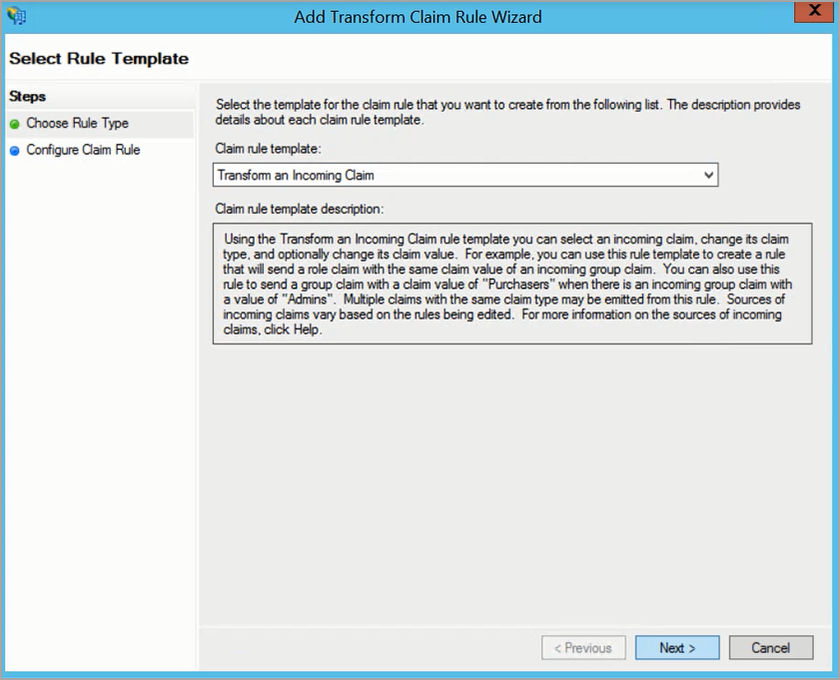
In Add Transform Claim Rule Wizard, follow these steps:
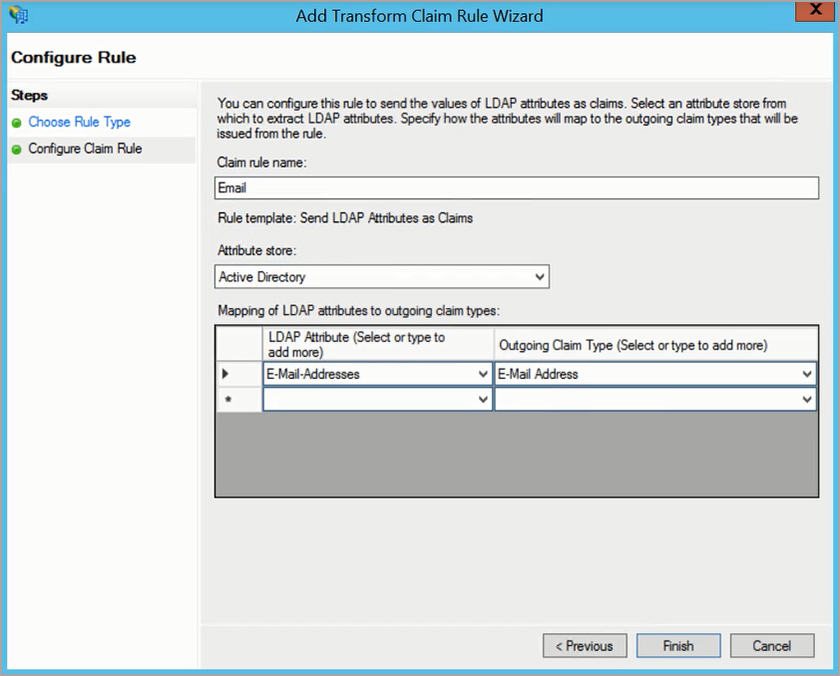
On the Choose Rule Type page, select the template Send LDAP Attributes as Claims and click Next.
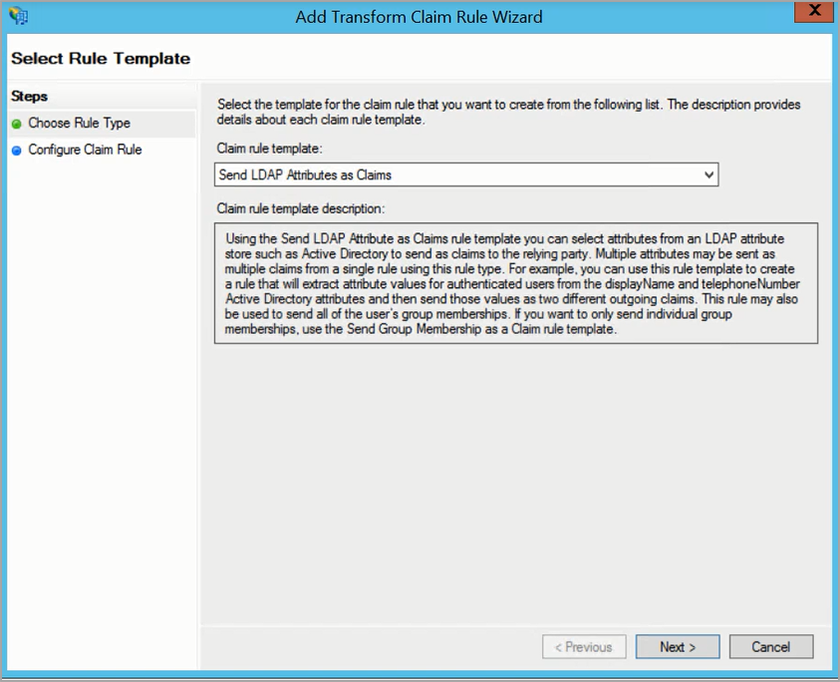
On the Configure Claim Rule page, make the following configuration:
In the Claim rule name box, enter a relevant name (for example, Email).
For Attribute store, select Active Directory.
In the table below, under LDAP Attribute (Select or type to add more), select E-Mail-Addresses.
Under Outgoing Claim Type (Select or type to add more), select E-mail Address.
Click Finish.
Back in the Edit Claim Rules window, click Add Rule to create a new rule.
In Add Transform Claim Rule Wizard, follow these steps:
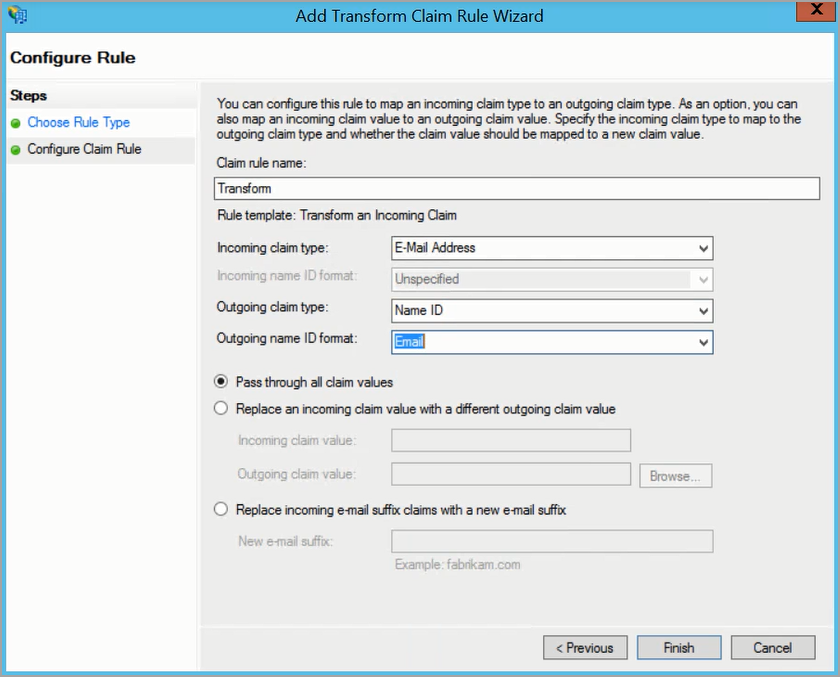
On the Choose Rule Type page, select the template Transform an Incoming Claim and click Next.
On the Configure Claim Rule page, make the following configuration:
In the Claim rule name box, enter a relevant name (for example, Transform).
For Incoming claim type, select E-Mail Address.
For Outgoing claim type, select Name ID.
For Outgoing name ID format, select Email.
Select Pass through all claim values.
Click Finish.
Click Apply and OK.
Update the certificate
AD FS is configured to use by default self-signed certificates that are valid for one non-leap year (365 days). Upon expiration, certificates can be updated automatically or manually, by using the metadata URL.
Automatic certificate update
Certificates are updated automatically if the Auto Certificate Rollover feature is enabled in AD FS. That means AD FS monitor the changes to the relying party trust, including changes in the certificates, and updates them if the case.
To enable monitoring on the AD FS server:
Open Administrative Tools and then the AD FS Management application (or run mmc.exe).
In the left-side menu, go to Trust Relationships > Relying Party Trusts.
In the central panel, right-click on the entry corresponding to GravityZone (gravityzone.bitdefender.com) and select Properties.
In the Monitoring tab, make sure the GravityZone SAML metadata URL (https://gravityzone.bitdefender.com/sp/metadata.xml) is displayed.
Select the Monitor relying party and Automatically update relying party check boxes.
Click Apply, then OK.
AD FS starts monitoring the relying party trust for changes every 24 hours.
Manual certificate update
To manually update the certificate on the AD FS server using the GravityZone SAML metadata URL:
Open Administrative Tools and then the AD FS Management application (or run mmc.exe).
In the left-side menu, go to Trust Relationships > Relying Party Trusts.
In the central panel, right-click on the entry corresponding to GravityZone (gravityzone.bitdefender.com) and select Properties.
In the Monitoring tab, make sure the GravityZone SAML metadata URL (https://gravityzone.bitdefender.com/sp/metadata.xml) is displayed. If not displayed, enter the metadata URL and click Test URL. Wait for validation.
Click OK.
Close the Properties window.
While still in Trust Relationships, right-click on the entry corresponding to GravityZone (gravityzone.bitdefender.com) and select Update from Federation Metadata.
In the Identifiers tab, click Update.
Go to the Encryption and Signature tabs and check the Effective and Expiration dates.
After updating the certificate, verify that the login through SSO is working properly.
Enable SSO in GravityZone
After configuring the Identity Provider, go to GravityZone Control Center to enable SSO for companies and to change the authentication method for users. Only users under a company with SSO enabled have the option to log in with an Identity Provider.
Enable SSO for your company
This is how you enable SSO for GravityZone Control Center for your company:
In the upper-right corner of Control Center, click the
 user icon and then select My Company.
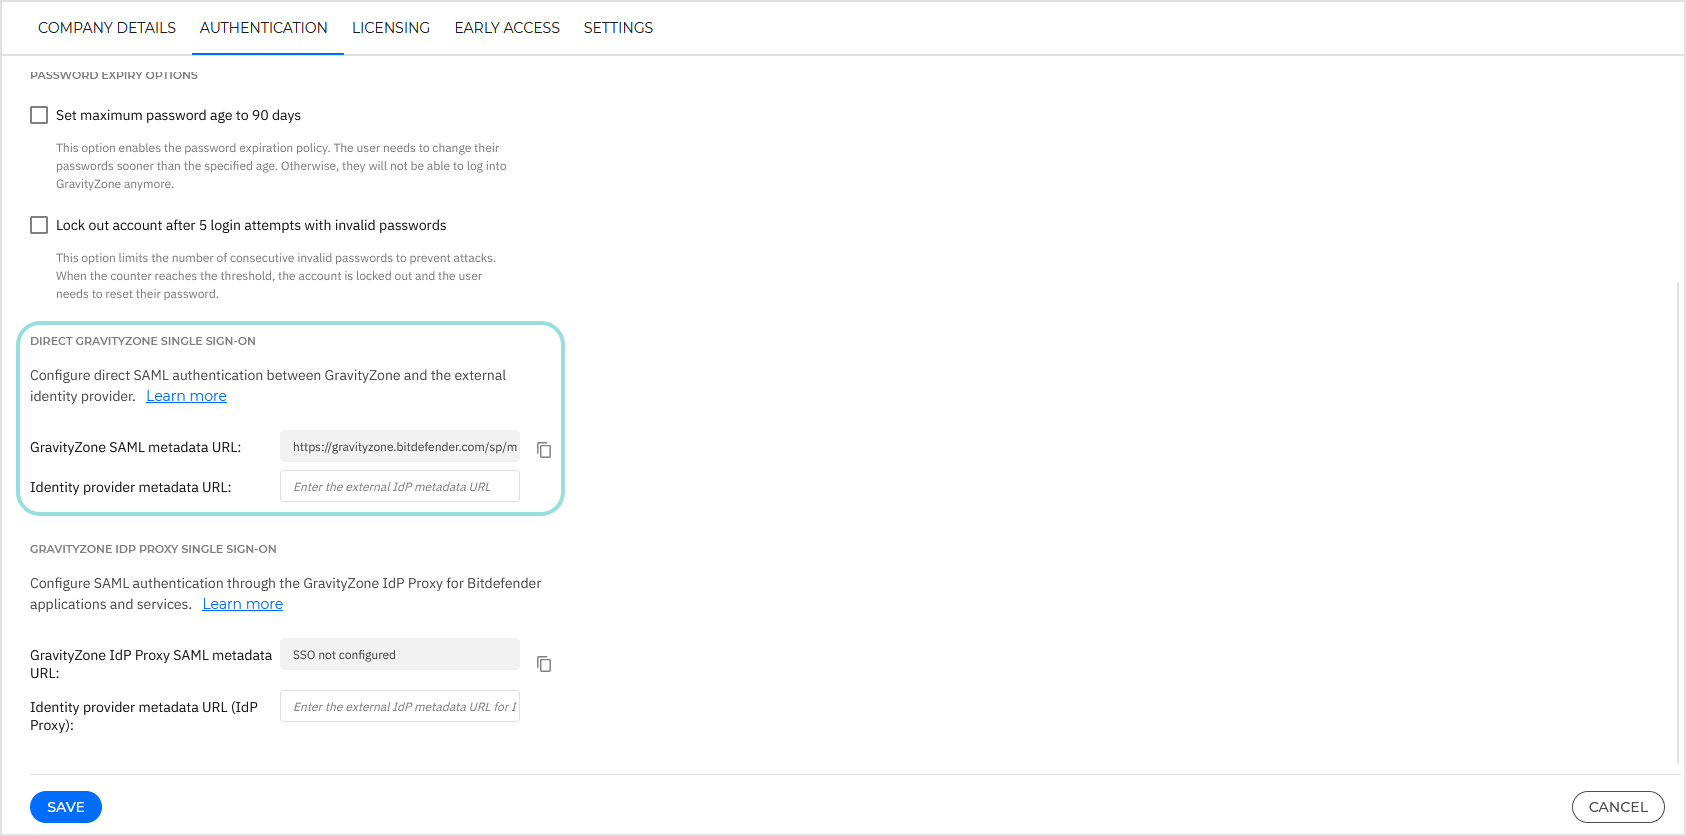
In the Authentication tab, under GravityZone Control Center single sign-on, enter the identity provider metadata URL in the corresponding field. The other field, reserved for the GravityZone metadata URL, is non-editable.
For AD FS, the Identity Provider metadata URL has the format:
https://[:adfs_host]/FederationMetadata/2007-06/FederationMetadata.xml, where[:adfs_host]is the service FQDN.Click Save.
Enable SSO for managed companies
This is how you enable single sign-on for a company under your management:
Log in to GravityZone Control Center.
Go to the Companies page from the left side menu.
In the table, click the company’s name.
Under GravityZone Control Center single sign-on, enter the identity provider metadata URL in the corresponding field. The other field, reserved for the GravityZone metadata URL, is non-editable.
For AD FS, the identity provider metadata URL has the format:
https://[:adfshost]/FederationMetadata/2007-06/FederationMetadata.xml, where[:adfshost]is the service FQDN.Click Save.
Change the authentication method for users
After enabling SSO for a company, GravityZone user accounts under that company become available for changing their authentication method.
You can change the authentication method for users one by one, as follows:
Log in to GravityZone Control Center.
Go to the Accounts page from the left side menu.
In the table, click the user’s name.
Under Login Security, go to Authentication method and select Login using your Identity Provider.
Click Save.
You can enable SSO for as many GravityZone users as you want, but not for your own administrator account.
Note
You cannot enable SSO for your own administrator account.
Tested identity providers
The following identity providers have been officially tested with GravityZone SSO:
Log out from GravityZone.
Log out from AD FS.
Enter a valid email address created for testing (other than the one of your GravityZone administrator account).
Click Next.
You should be redirected to the identity provider's authentication page.
Authenticate with your identity provider.
You will be redirected back to GravityZone and, in a few moments, you should automatically log in to Control Center.
Disable GravityZone Control Center SSO
To disable single sign-on for GravityZone Control Center:
Delete the Identity Provider metadata URL from the configuration page of that company.
Click Save and confirm the action.
Users can obtain new passwords by clicking the Reset my password option on the Control Center login page and following the instructions.
To re-enable GravityZone SSO for a company, enter again the identity provider in the configuration page and click Save.
After re-enabling SSO, users under that company will continue to log in to Control Center with GravityZone credentials. You have to manually configure each account, one by one, to log in with the identity provider again.