One-click Remediation
This feature is currently available for AWS only.
Configuring One-click Remediation
To enable a Remediation Role ARN, follow these steps:
From GravityZone Cloud Security Posture Management, select the Scan Configuration page.
From the Scan Group column, select the account for which you want to enable the remediation.
Click the Edit icon.

The Account Details panel is displayed.
In the Account Details panel, click the Configure remediation link.
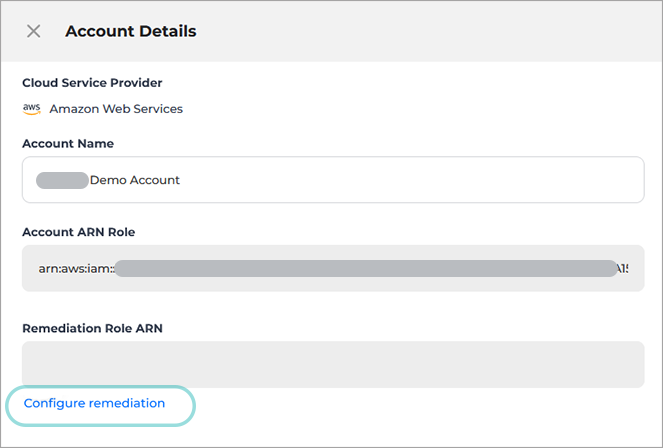
The Remediation Configuration page is displayed.
There are two available methods to add a remediation role:
CloudFormation method (Recommended)
Follow these steps to enable a Remediation Role ARN using the CloudFormation method:
Under Select a connection method, select the CloudFormation method.
Important
Do not close the creation screen during the AWS installation.
Open a new browser tab or window and log in to AWS Account with an administrator account.
Go back to the GravityZone Cloud Security Posture Management Remediation Configuration browser page.
Click Launch CloudFormation Stack.
The Create stack page will be displayed in a new browser window. The information is automatically filled in for multiple sections of the page.
In the Create stack page, scroll down to the Capabilities section.
Check the I acknowledge that AWS CloudFormation might create IAM resources. checkbox.
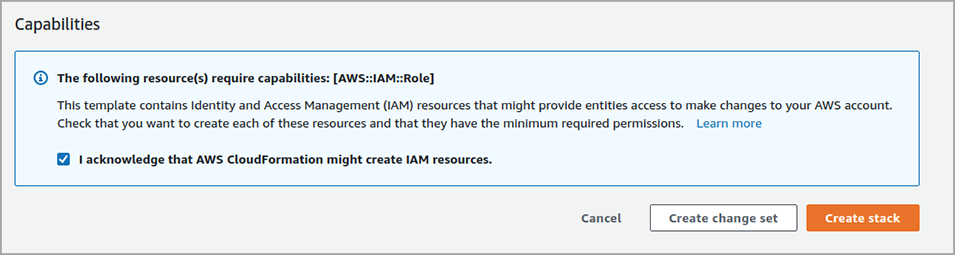
Click Create Stack.
The Stack will now appear in your AWS account:
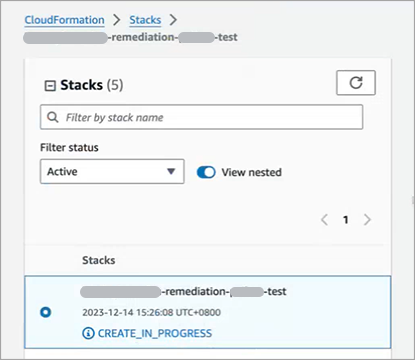
Wait until the CloudFormation Stack status shows CREATE_COMPLETE.
Go to the Outputs tab.
Copy the information from the Value column.
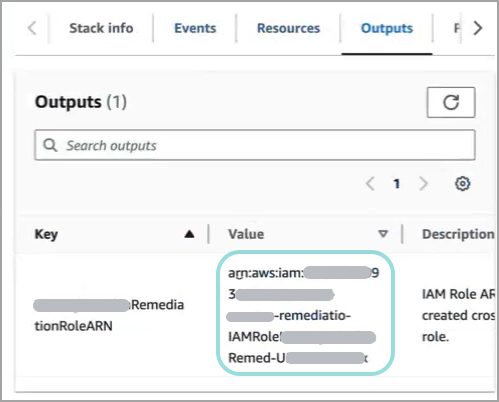
Go back to the Remediation Configuration browser page.
Paste the value under the Paste Role ARN here field.
Click Add.
Manual method
You can adjust and limit to what degree you want GravityZone Cloud Security Posture Management to remediate your AWS cloud assets.
Create a customer managed policy
To create a customer managed policy from you AWS Management Console, follow these steps:
Under Select a connection method, select the Manual method.
Important
Do not close the creation screen during the AWS installation.
Open a new browser tab or window and log in to AWS Account with an administrator account.
Go to the IAM > Policies section and click Create policy.
Select the JSON tab.
Copy the following parameters and paste it in the Policy editor:
{
    "Version": "2012-10-17",
    "Statement": [
        {
            "Sid": "AllowWardenRemediation",
            "Effect": "Allow",
            "Action": [
                "cloudtrail:AddTags",
                "cloudtrail:CreateTrail",
                "cloudtrail:DescribeTrails",
                "cloudtrail:GetEventSelectors",
                "cloudtrail:GetTrail",
                "cloudtrail:GetTrailStatus",
                "cloudtrail:PutEventSelectors",
                "cloudtrail:StartLogging",
                "cloudwatch:DescribeAlarms",
                "cloudwatch:DescribeAlarmsForMetric",
                "cloudwatch:EnableAlarmActions",
                "cloudwatch:PutMetricAlarm",
                "ec2:CopyImage",
                "ec2:CreateFlowLogs",
                "ec2:DescribeFlowLogs",
                "ec2:DescribeImages",
                "ec2:DescribeSnapshotAttribute",
                "ec2:DescribeSnapshots",
                "ec2:ModifyImageAttribute",
                "ec2:ModifySnapshotAttribute",
                "elasticloadbalancing:DescribeLoadBalancerAttributes",
                "elasticloadbalancing:DescribeLoadBalancers",
                "elasticloadbalancing:ModifyLoadBalancerAttributes",
                "iam:CreateRole",
                "iam:DeactivateMFADevice",
                "iam:DeleteAccessKey",
                "iam:DeleteLoginProfile",
                "iam:DeleteServiceSpecificCredential",
                "iam:DeleteSigningCertificate",
                "iam:DeleteSSHPublicKey",
                "iam:DeleteUser",
                "iam:DeleteUserPolicy",
                "iam:DeleteVirtualMFADevice",
                "iam:DetachUserPolicy",
                "iam:GetAccessKeyLastUsed",
                "iam:GetAccountPasswordPolicy",
                "iam:GetLoginProfile",
                "iam:GetRole",
                "iam:GetUser",
                "iam:ListAccessKeys",
                "iam:ListAttachedUserPolicies",
                "iam:ListGroupsForUser",
                "iam:ListMFADevices",
                "iam:ListServiceSpecificCredentials",
                "iam:ListSigningCertificates",
                "iam:ListSSHPublicKeys",
                "iam:ListUserPolicies",
                "iam:PutRolePolicy",
                "iam:RemoveUserFromGroup",
                "iam:UpdateAccountPasswordPolicy",
                "kinesis:DescribeStream",
                "kinesis:StartStreamEncryption",
                "kms:DescribeKey",
                "kms:EnableKeyRotation",
                "kms:GetKeyRotationStatus",
                "logs:CreateLogGroup",
                "logs:DescribeLogGroups",
                "logs:DescribeMetricFilters",
                "logs:PutMetricFilter",
                "rds:DescribeDBInstances",
                "rds:DescribeDBSnapshotAttributes",
                "rds:DescribeDBSnapshots",
                "rds:ModifyDBInstance",
                "rds:ModifyDBSnapshotAttribute",
                "s3:CreateBucket",
                "s3:GetBucketAcl",
                "s3:GetBucketLocation",
                "s3:GetBucketPolicy",
                "s3:GetEncryptionConfiguration",
                "s3:ListBucket",
                "s3:PutBucketAcl",
                "s3:PutBucketLogging",
                "s3:PutBucketPolicy",
                "s3:PutBucketTagging",
                "s3:PutEncryptionConfiguration",
                "sns:CreateTopic",
                "sns:GetTopicAttributes",
                "sns:ListSubscriptions",
                "sns:ListSubscriptionsByTopic",
                "sns:SetTopicAttributes",
                "sns:Subscribe",
                "sns:TagResource",
                "sqs:GetQueueAttributes",
                "sqs:GetQueueUrl",
                "sqs:SetQueueAttributes"
            ],
            "Resource": "*"
        }
    ]
}
Note
For more information on Actions, check the official documentation.
Click Next.
The Review and create window is displayed.
Fill in the information under the Policy details section:
Under Policy name type in a descriptive name such as
gravityzone-cloud-remediation-policy.Type in a clear description for the policy.
Click Create policy.
The new policy is created and you can search for it by name under IAM > Policies.
Create a role using the newly created customer managed policy
Follow the steps below:
Go to the IAM > Roles section and click Create role.
The Select trusted entity window is displayed.
Under Trusted entity type, select AWS Account.
In the An AWS account section, select Another AWS account.
Go back to the Remediation Configuration browser page and copy the Account ID.
Under Account ID, paste the information copied at step 4.
Under the Options section, check the Require external ID box.
Go back to the Remediation Configuration browser page and copy the External ID.
In the External ID box, paste the information copied at step 7.
Note
Make sure the Require MFA checkbox is unchecked.
Click Next.

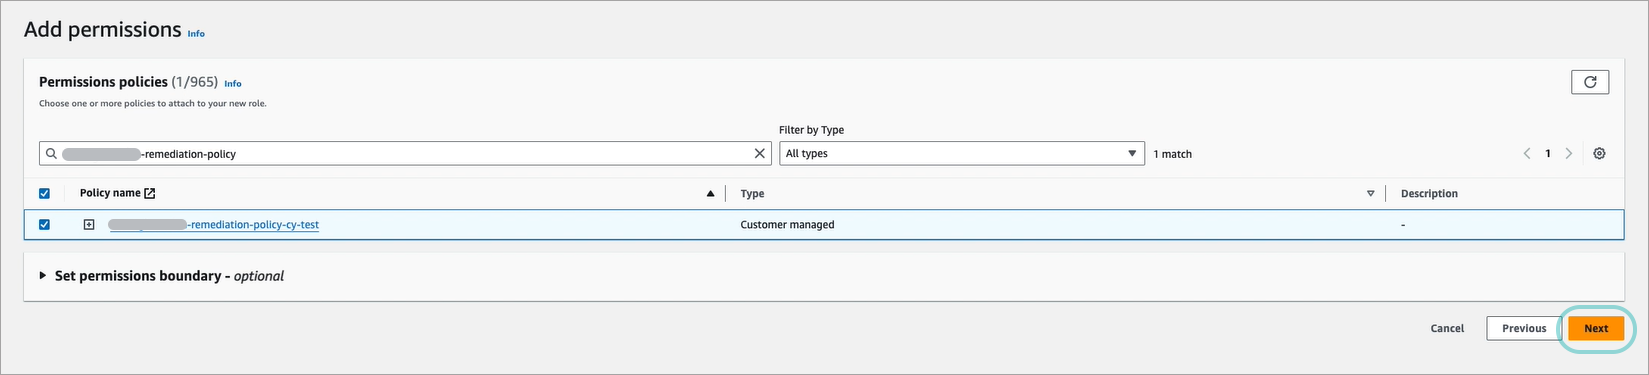
The Add permissions window is displayed.
Under Permission policies, search for the newly created policy by name and select it.
Click Next.
The Create Role window will be displayed.
Fill in the information under the Role details section:
Under Role name, type in a descriptive name such as
gravityzone-cloud-remediation.Type in a clear description for the role.
Scroll down to the bottom of the page and click Create role.
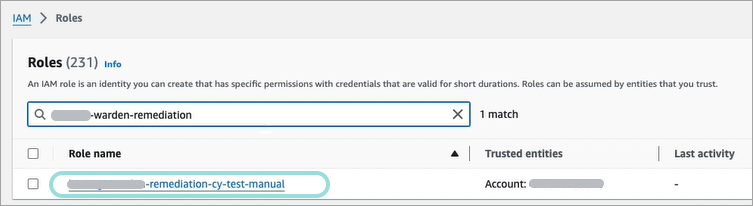
The Roles page is displayed.
Search for the newly created role by name and click it.
The Roles page is displayed.
Click the Edit button from the Summary section.

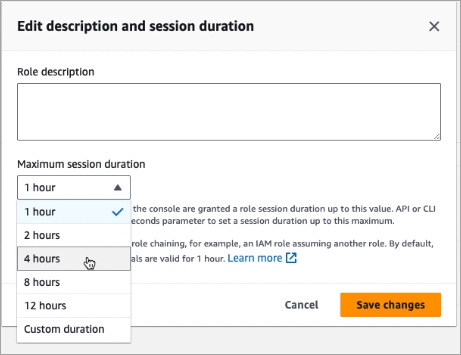
The Edit description and session duration window is displayed.
Set the Maximum session duration to 4 hours and click Save changes.
Click the Copy button under ARN in the the Summary section.

Go back to the Remediation Configuration browser page.
In the Paste Role ARN here field, paste the ARN you copied at step 17.
Click Add.
The Remediation Role ARN can now be displayed in the Account Details panel.
Using the One-click remediation process
Refer to the following steps to perform the remediation process:
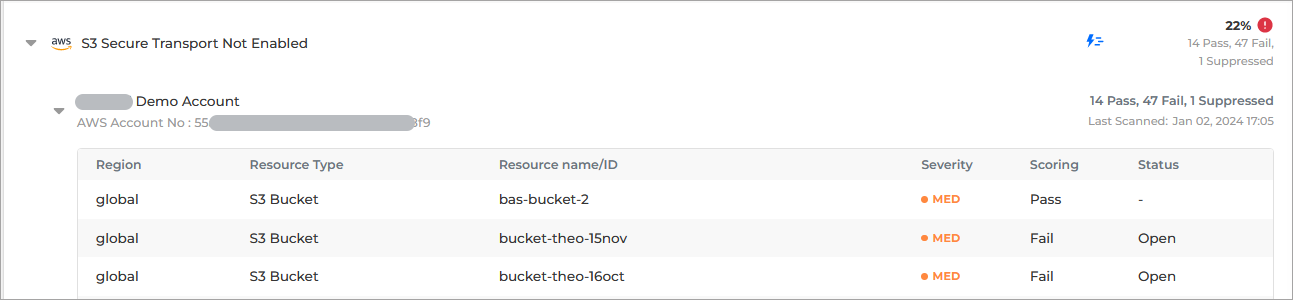
Go to Posture Management > Rules page.
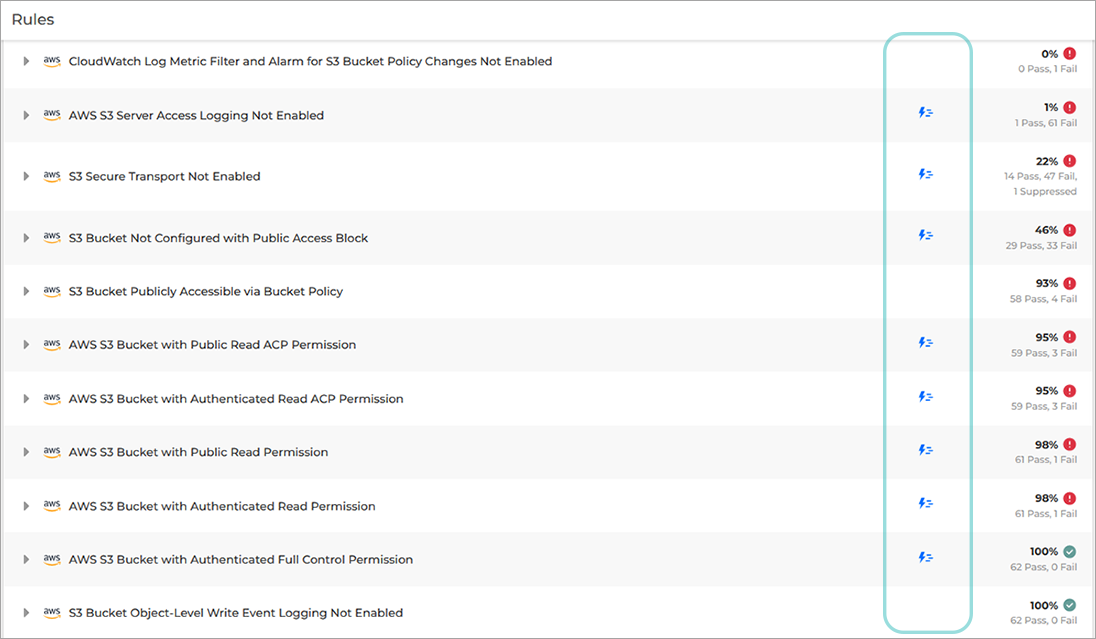
From the Rules page, you can either select one from the list, or search for a specific rule using the search field.
You can easily identify the rules for which one-click remediation was configured by the icon available on the same row as the rule title.
Note
Where the icon is missing, it means the remediation process is not available. The remediation icon may be present for a specific rule but not applicable to all the accounts listed below that specific rule.
Click the rule you want to remediate and expand the details.
Click on any row to access the Check Details panel.
Click the Remediation tab.
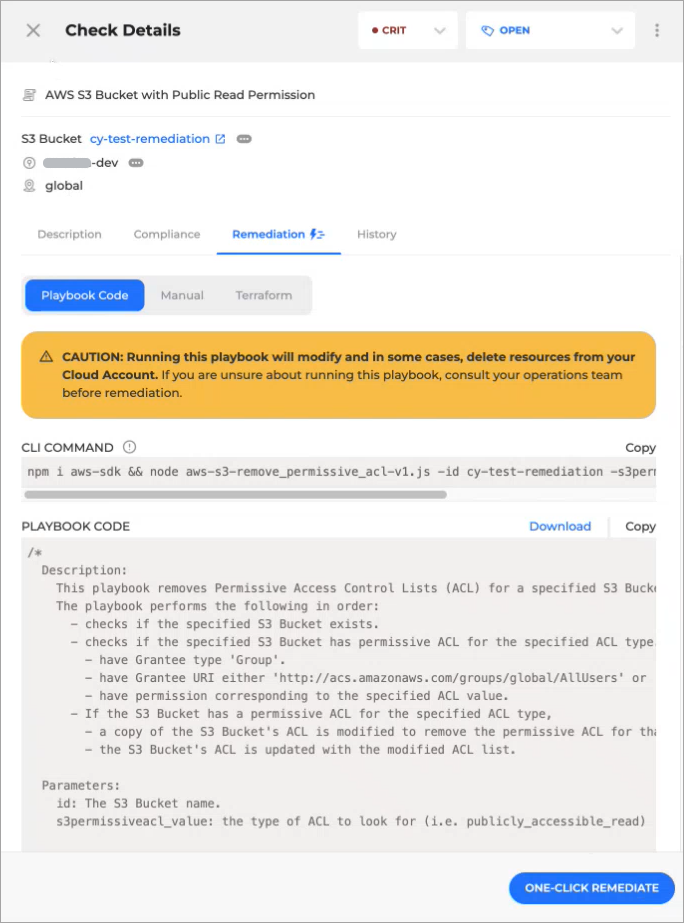
The Playbook Code remediation option is selected by default.
Note
One-click remediation is not specific to Playbook Code in general, but only to a subset of rules.
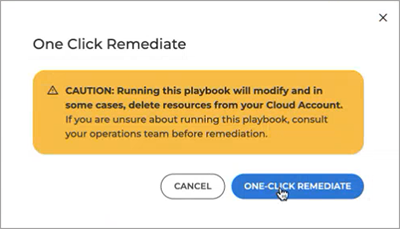
Click the One-click remediate button.
The following pop-up will be displayed.
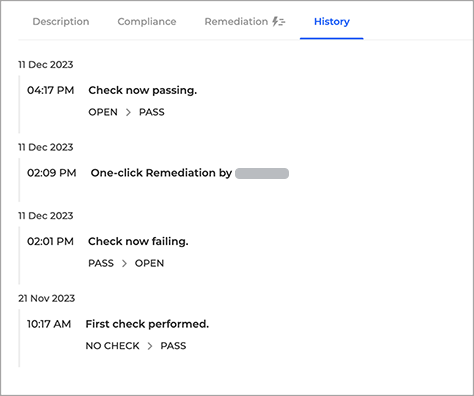
After a few moments, a message is displayed informing you if your remediation was successful or failed. You can check the details by accessing the AWS console or directly by clicking the link from the Check Details panel, next to the resource name. For you to see the status change in GravityZone Cloud Security Posture Management, you need to process a new scan.
You can find the entries in both the History tab, under Check Details, and the Activity Log under Settings.
One-click remediation rules
Kinesis Server Side Encryption Not Enabled
AWS S3 Bucket with Public Write ACP Permission
IAM Password Policy - Numbers Required Not Configured
IAM Password Policy - Expiration Period of 90 Days or Less Not Configured
AWS RDS Snapshot Not Private
IAM Password Policy - Lowercase Characters Required Not Configured
IAM Password Policy - Minimum Password Length of at Least 14 Characters Not Configured
AWS S3 Bucket with Public Read ACP Permission
IAM Password Policy - Symbols Required Not Configured
IAM Password Policy - Prevent Reuse of Last 24 Passwords Not Configured
AWS EBS Volume Snapshot Not Private
AWS EC2 AMI Not Private
SQS Server Side Encryption Not Enabled
IAM Password Policy - Uppercase Characters Required Not Configured
AWS S3 Bucket with Authenticated Write ACP Permission
Access Keys for IAM Users Created During Initial Setup
AWS S3 Bucket with Authenticated Read ACP Permission
Customer Managed CMKs Automatic Key Rotation Not Enabled
AWS S3 Bucket with Authenticated Write Permission
AWS S3 Bucket with Public Full Control Permission
S3 Bucket Default Server-Side Encryption Not Enabled
AWS S3 Bucket with Authenticated Read Permission
S3 Secure Transport Not Enabled
AWS S3 Bucket with Authenticated Full Control Permission
AWS S3 Bucket with Public Write Permission
AWS S3 Bucket with Public Read Permission
SNS Topic Server-Side Encryption Not Enabled