Maintenance windows
The Maintenance windows page includes settings that allow you create configuration profiles to control maintenance operations on endpoints. Being independent from the policy, you can generate multiple maintenance windows suited for every scenario that might arise within your environment.
This approach simplifies the process of configuring policies and, at the same time, helps you create and apply more targeted policies.
You can share permissions for maintenance windows, so the other GravityZone users from your company will be able to view and use them.
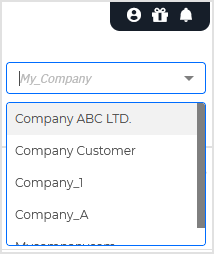
As a partner, you can create and modify maintenance windows for managed companies. You cannot share maintenance windows across companies. Specifically, you can use maintenance windows only in the company for which they have been created. To view the maintenance windows for your managed companies, use the selector in upper-right corner of the page.
You can create and apply maintenance windows with Patch Management settings.
The Patch Management module releases you from the burden of keeping the endpoints updated with the latest software patches, by automatically distributing and installing patches for a vast variety of products. You can check the list of supported vendors and products in this article.
Note
The Patch Management module is available for:
Windows for workstations
Windows for servers
macOS
The following Linux distributions: CentOS, RHEL, and SLE.
For the list of requirements and limitations, refer to Patch Management.
In the Maintenance windows page, you can view, filter, search for, create, edit, and delete windows. To use a maintenance window, you must assign it to a policy in the Policies section. Creating, editing and deleting maintenance windows are recorded in User activity log.
Note
Bitdefender installs only digitally-signed patches. If a vendor provides patches that are not signed, Bitdefender does not consider them. In this case, you can manually download and install those patches.
Note
To manage patches manually, use the options available in the Patch Inventory section.
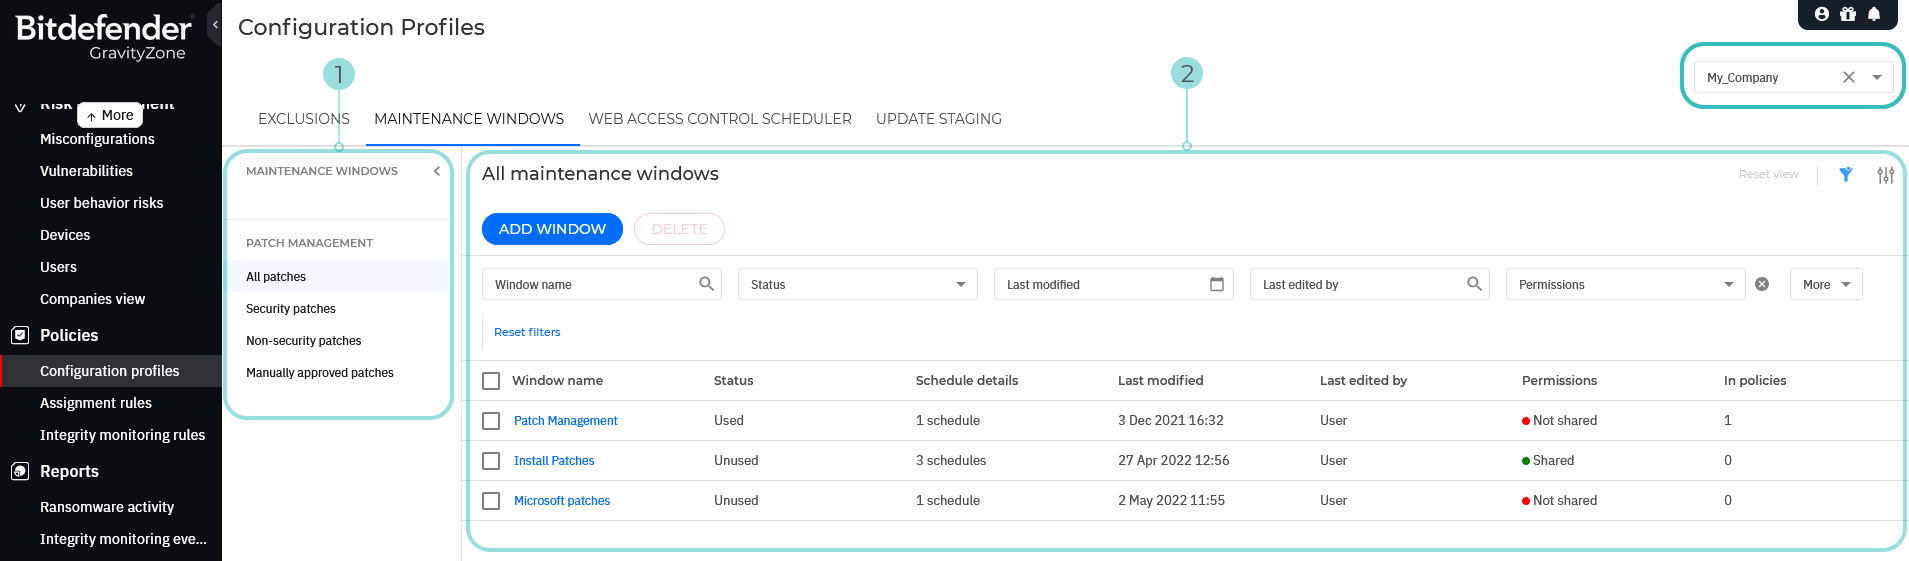
Viewing maintenance windows
The Maintenance windows page includes two major areas:
The selection panel, which contains the list of available maintenance windows ordered by type.
The details grid, where you create new maintenance windows or manage the existing ones.
As a partner, you can only view maintenance windows for one company at a time. To switch companies, click the X icon next to the current company's name in the selector located in the upper-right corner of the page.
Filtering and searching for maintenance windows
On the Maintenance windows page, you can easily filter and searching for maintenance windows by using the options available in the selection panel and in the details grid.
As a partner, use the selector in the upper-right corner to choose the company for which you want to view maintenance windows.
Under the Patch Management category, select one of these types:
All patches
Security patches
Non-security patches
The details grid will display the maintenance windows accordingly. Details include:
Window name.
Status - indicates whether the maintenance window is being used in policies or not.
Schedule details - indicates the number of schedules configured within the maintenance window. For example, a maintenance window with three schedules indicates one schedule for patch scanning and two for applying security and non-security patches, respectively.
Last modified - indicates date and time when the maintenance window was modified.
Last edited by - indicates the last user who modified the maintenance window.
Permissions - indicates whether other users have shared permissions to modify the displayed maintenance windows.
In policies - indicates the number of policies to which the maintenance windows are assigned.
You can sort the maintenance windows by clicking the header of the following columns: Window name, Status, Last modified, Last edited by, Permissions, In policies.
You can search or filter maintenance windows by:
Window name - type in one or more characters and click the magnifying glass (or press Enter) to display matching maintenance window names.
Status - select the one of the items from the drop-down list and click APPLY to display used, unused, or all maintenance windows.
Last modified - click to display a calendar where you can specify precise intervals.
Select one of the predefined options in the left-side panel (Last 24 hours, Last 7 days, Last 30 days) or customize the interval by using the calendar in the right-side panel. Use the left and right arrows on the sides of the panel to navigate through the calendar.
Click CONFIRM to apply the selection.

Last edited by - type in one or more characters from the user names and click the magnifying glass (or press
Enter) to display maintenance windows created or modified by certain GravityZone users.In the More filtering box, select Permissions and click APPLY to display maintenance windows with shared or not shared permissions.
Additional options are available in the upper-right corner of the grid:
Click the
 Show/Hide Columns button to add or remove filter columns.
Click the
 Show/Hide Filters button to show or hide the filters bar.
Click the Clear button to reset all filters.
Creating and editing a maintenance window
With maintenance windows, you control automatic patch deployment. First you will configure how patches are downloaded to the endpoints, and then which patches to install and when.
GravityZone performs patch deployment in two independent phases:
Assessment - When requested via the management console, endpoints scan for missing patches and report them back.
Installation - The GravityZone console sends the endpoint agents a list of patches you want to install. The agents downloads the patches and then installs them.
The maintenance window provides the settings to automate these processes, partly or entirely, so that they run periodically based on the preferred schedule.
Important
For the assessment and installation to be successful on Windows endpoints, you must ensure the following requirements are met:
Trusted Root Certification Authorities stores the DigiCert Trusted Root G4 certificate.
Intermediate Certification Authorities includes the DigiCert Trusted G4 Code Signing RSA4096 SHA384 2021 CA1.
Endpoints have installed the patches mentioned in these Microsoft articles:
For Windows 7 and Windows Server 2008 R2: Microsoft Security Advisory 3033929
For Windows Vista and Windows Server 2008: You cannot run an application that is signed with a SHA-256 certificate on a computer that is running Windows Vista SP2 or Windows Server 2008 SP2
On macOS, the module requires Full Disk Access permissions for Bitdefender Endpoint Security Tools components. For details, refer to Full Disk Access is not allowed for Bitdefender Endpoint Security Tools in macOS.
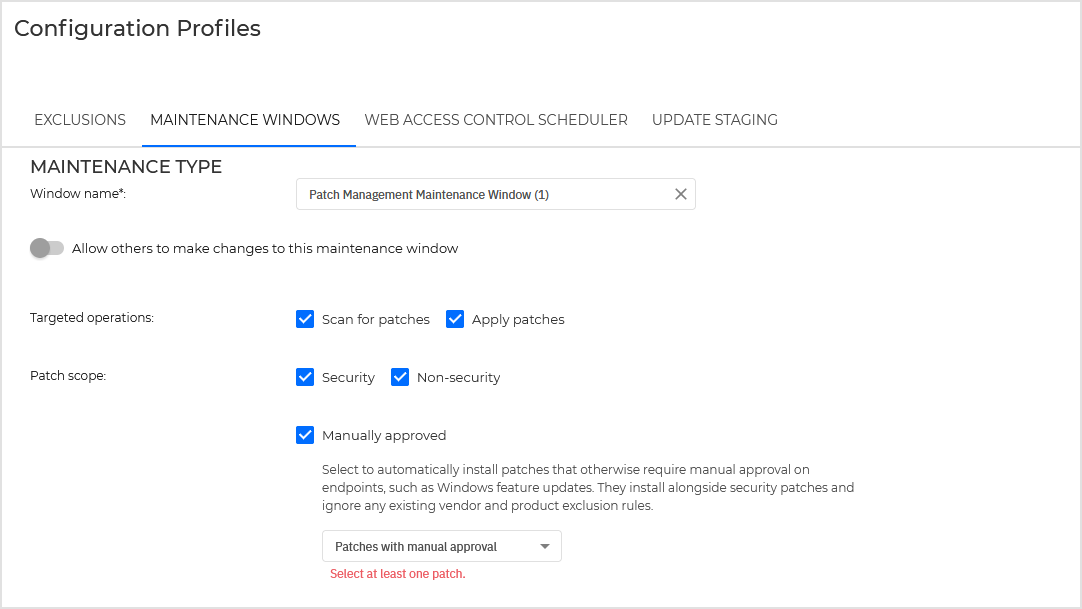
To create a maintenance window, follow these steps:
Use the selector in the upper-right corner of the page to choose a company.
Click the Add window button.

Enter a window name. This field is mandatory.
Enable the option Allow others to make changes to this maintenance window if you want shared permissions.
For targeted operations, select one or both these options:
Scan for patches - the security agent scans the endpoint for missing patches and it reports them back to GravityZone console.
Apply patches - the GravityZone console sends the agent a list of patches you want to install. The endpoint downloads the patches from the Patch Caching Server and then installs them. Further, choose what type of patches to be installed on the endpoints:
Security patches - include fixes for vulnerabilities/CVEs.
Non-security patches - include bug fixes and new features for third-party applications.
Manually approved patches - include patches like Microsoft Windows Feature Updates or other security tools.
Once you have selected Scan for patches and Apply patches, additional options will appear on the page, as described below.
Configure scheduling options:
Smart scan for patches when new applications are installed. When a new application is installed on the endpoint, the security agent automatically installs all discovered OS and application updates, regardless of any planned scan and installation tasks.
Note
Patch Management does not support smart scan on Linux endpoints.
Use the same schedule for all targeted operations. The security agent scans for patches and then, as soon as possible, it installs them on the endpoint.
Use fallback schedule compatible with Bitdefender Endpoint Security Tools for Windows version 7.3.2.x or older. This option ensures compatibility with the previous generation of the security agent which provided only limited scheduling capabilities. For the best experience with the Patch Management module, we recommend updating Bitdefender Endpoint Security Tools for Windows to version 7.4.1.111 or later.
Important
If you apply the maintenance window with this option disabled to non-compatible endpoints, the security agent will not perform patch scanning and patch installation on them.
Depending on the options you have enabled, the following scheduling forms will appear on the page:
Schedule for patch scanning, where you configure when the patch scanning operation takes place.
Schedule for applying patches - security, where you configure when security patches and manually approved patches are installed on the endpoints.
Schedule for applying patches - non-security, where you configure when the non-security patches are installed on the endpoints.
Note
If you have selected Use the same schedule for all targeted operations, a single schedule form replaces the individual schedules.
Schedules are based on the endpoint time.
In a schedule form, you can configure with great flexibility when the desired action (patch scanning or patch installation) to take place:
Immediately (only for patch installation) - the security agent will install patches as soon as possible after finishing a patch scanning.
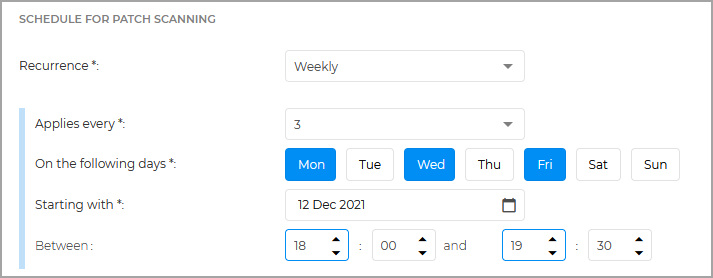
Weekly - the security agent scans for patches and installs them during the week as follows:
On certain weeks of the month (every one, two, three, or four weeks).
On specific days (any selection from Monday to Sunday).
Starting with a specific date.
Between certain hours (any selection from 00:00 to 23:59).
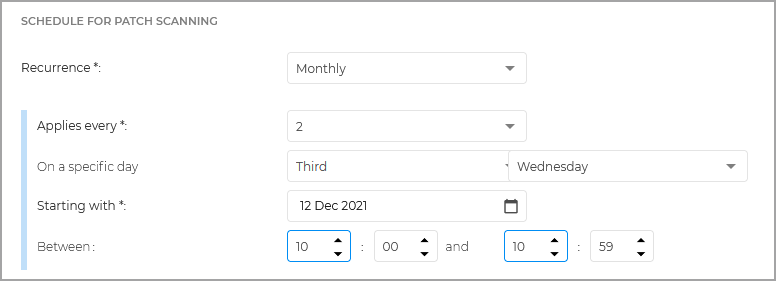
Monthly - the security agent scans for patches and installs them during the month as follows:
On certain months of the year (every one, two, three and so on, up to every twelve months).
On specific days (any selection from the first to the last day of the month or during specific days of the week)
Starting with a specific date.
Between certain hours (any selection from 00:00 to 23:59).
Examples:
For weekly schedule, you can set a patch scan task to take place every three weeks, on Monday, Wednesday and Friday, starting 12 December 2021, between 18:00 and 19:30.
For monthly schedule, you can set a patch scan task to take place every two months, on the third Wednesday of the month, starting 12 December 2021, between 10:00 and 10:59.
Note
If you have chosen the scan to take place on the 31st day of the month, the task will be skipped in months with 30 days or less.
For various reasons, an endpoint may be offline when patch installation is scheduled to run. Select the option If missed, run as soon as possible to install the patches immediately after the endpoint comes back online.
Configure reboot preferences:
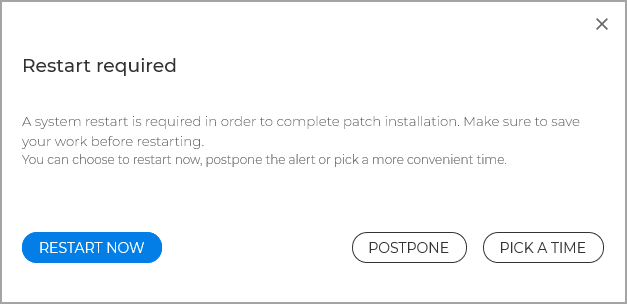
Users postpone the system restart until a more convenient time. Select this option to allow endpoint users to restart the system whenever they want, without enforcing a time limit.
On Windows endpoints, the security agent will display a dialog window where users can restart the system immediately, postpone the restart alert, or pick a more convenient time.
Users postpone the system restart only within a specific interval. Select this option to enforce a time limit within endpoint users can restart their systems. Further, you can specify:
An additional number of minutes if the interval is missed.
A customized message for endpoint to display before the restart.
On Windows endpoints, the security agent will display a dialog window where users can restart the system immediately, postpone the restart alert, or pick a more convenient time. An interface message will inform them when the restart is schedule to take place, according to the configuration made in GravityZoneControl Center. The customized message will appear before the restart as a Windows message.
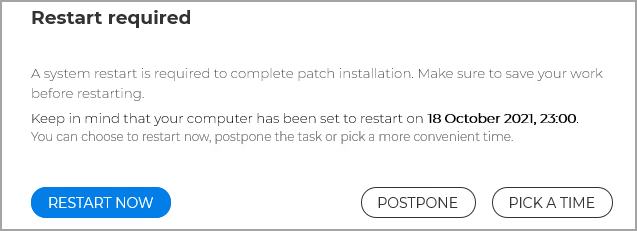
Example:
If you have set the interval between 16:30 and 17:30, with additional 10 minutes for missed interval, users can postpone the restart within that hour. Starting at 17:30, they will have only 10 minutes left until the automatic restart of the system, regardless of their actions.
System restarts automatically after a specific number of minutes. Select this option to enforce automatic restart on the endpoints, after a specific time. In this case, endpoint users cannot postpone or pick a time for restart. For this option you can also customize a message to be displayed before the restart.
Important
For endpoint users to be prompted to take actions, make sure you have enabled Endpoint restart notification, Display alert pop-ups and Display notifications pop-ups options in the General > Notifications section of the policy settings. If these options are disabled and the automatic restart not selected, you need to manually restart the endpoint after patch installation.
Note
Patch Management currently does not support reboot on Linux endpoints.
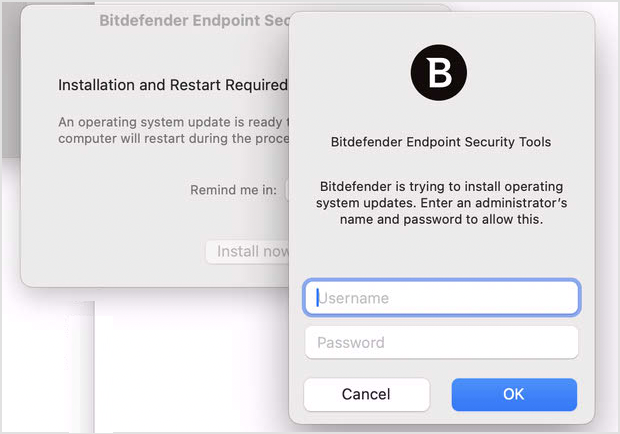
On macOS, GravityZone applies operating system patches only for minor versions, for example from version 13.5 (Ventura) to 13.6 (Ventura), but not from 13.9 (Ventura) to 14.0 (Sonoma).
Installing an operating system patch on Mac requires restarting the endpoint. Mac users can postpone the installation for up to 4 hours in the prompt window. If users do not take any action for 24 hours in the prompt window (either install or postpone), GravityZone console will consider the corresponding task as failed. To perform the update, Mac users must enter their local administrator credentials when prompted.
When needed, the Patch Management module prompts macOS users to restart applications to complete updates. Users can postpone updates for up to 24 hours. After this interval, the installation task expires with "timeout" status and is reported as such to the GravityZone console.
Patch Management bypasses silent mode on macOS. Therefore, even if you disable notifications in the policy active on endpoints, users will still be prompted to take action if the case.

Configure additional patch settings:
Select Relays with Patch Caching Server role.
The patch dissemination process is using Patch Caching Servers to optimize the network traffic. Windows endpoints connect to these servers and download patches through the local network. For high availability of patches, it is recommended to use more than one server.
To add relay servers:
Make a selection in the drop-down list.
Enter one or more custom names or IP addresses and separate them by semicolon (;). The field length limit is 256 characters.
Click the
 button to confirm your selection. Click the X icon to delete a relay from the list.
If the list is empty, then you need to install the Patch Caching Server role on Relays in your network. For details on installation, refer to Install security agents - standard procedure.
Note
Relays can be Windows or Linux machines that will download and store updates from Microsoft and other vendors only for Windows endpoints. Once a patch required, Windows endpoints will download it from the caching server, preventing bandwidth clogging.
Linux and macOS endpoints download patches directly from vendors’ websites.
For each selected relay, you can configure priority. An endpoint requests a patch from the assigned servers in order of priority. The endpoint downloads the patch from the server where it finds it first. A server that lacks a requested patch will automatically download it from the vendor, to make it available for future requests.
Note
Relays with Patch Caching Server role and the policy where the maintenance window is being used must belong to the same company. You cannot use Patch Caching Servers from other companies.
Select the option Use vendors websites as fallback location for downloading the patches to make sure your endpoints receive software patches in case Patch Caching Servers are unavailable. In case you disable this option, you risk to leave your network outdated if Patch Caching Servers are unavailable and, at the same time, the internet connection is interrupted.
Downloaded patches are deleted from Patch Caching Servers after 7 days.
Under Vendors and products to include or exclude from being patched, create a list with applications you want to be updated or not.
A list with Included will contain the applications will be updated. All the rest will be ignored.
A list with Excluded will contain the applications ignored from updating. All the rest found on the endpoint will be updated.
If you make no selection, the security agent will update all applications installed on the endpoint.
To create a list of vendors and products:
Select Included or Excluded. The selected option applies to the entire list you are creating.
From the drop-down list, select vendors and applications, and click Select products.
Note
The list displays separate product versions for Windows, Linux, and macOS.
Click the
button to add your selection to the list. To delete a vendor or product, click the X icon.To edit the selection, click the product name in the list to open up a contextual menu where you can make changes.
Click Save to confirm the configuration and create the maintenance window.
To edit a maintenance window, click the name in the grid to open it. After making changes, click Save.
Deleting a maintenance window
To delete a maintenance window:
In the details grid, select the checkbox corresponding to the target maintenance window.
Click the Delete button.
Confirm the action.
Important
When deleting an assigned maintenance window, the Patch Management module will be disabled in that policy. To re-enable it, you have to assign a new maintenance window.
Assigning a maintenance window to a policy
To apply Patch Management settings into your network, you need to assign the maintenance window to a policy.
Note
To assign a maintenance window created for other company, you have to log in to GravityZone as an administrator of that company.
This is how you assign the maintenance window to a policy:
Go to the Policies page in the left side GravityZone menu.
Click Add to create a new policy, or open an existing one to edit it.
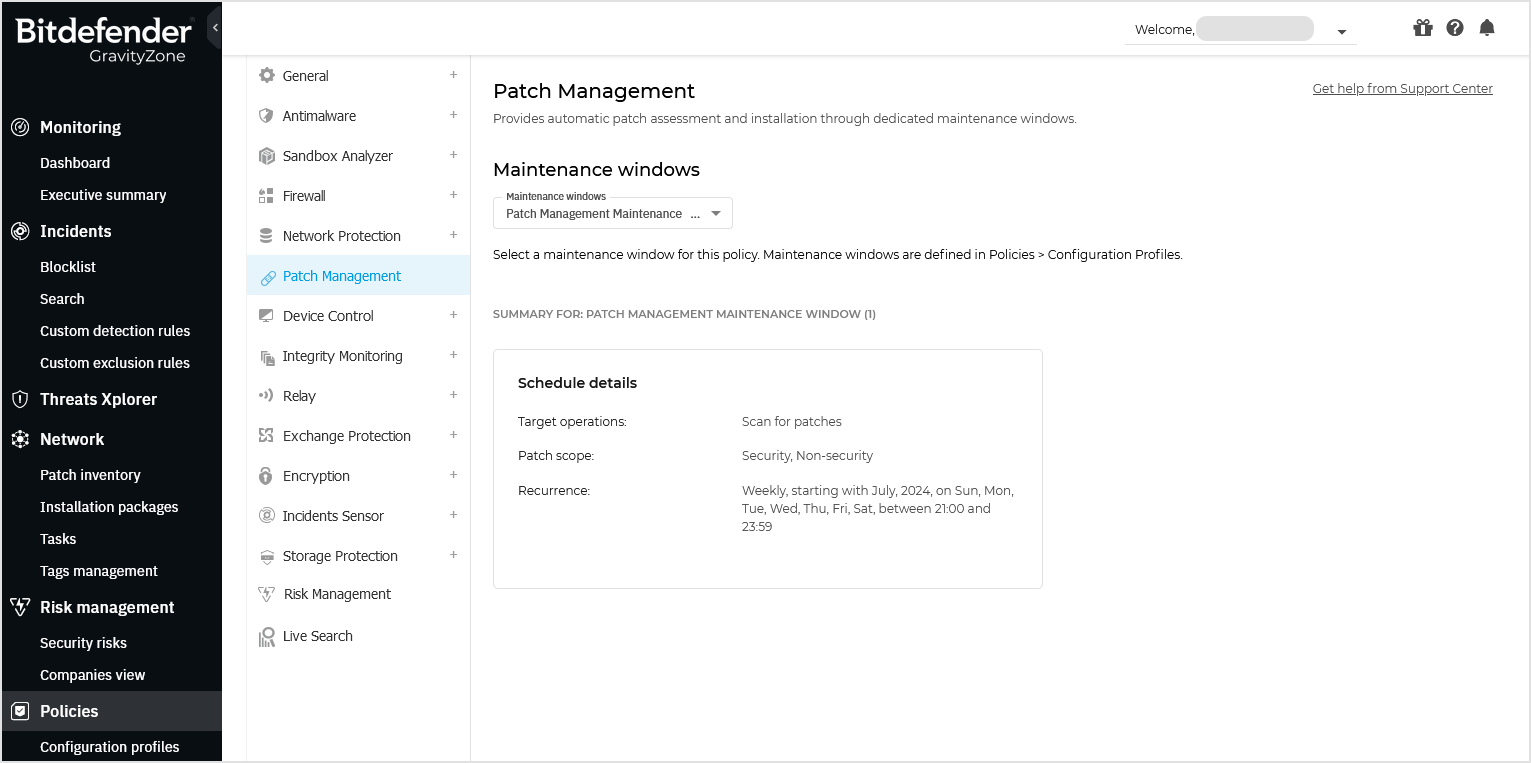
In the Patch Management section, under Maintenance windows, make a selection from the drop-down list.
The list includes all the maintenance windows created by you and other users, if they have shared permissions.
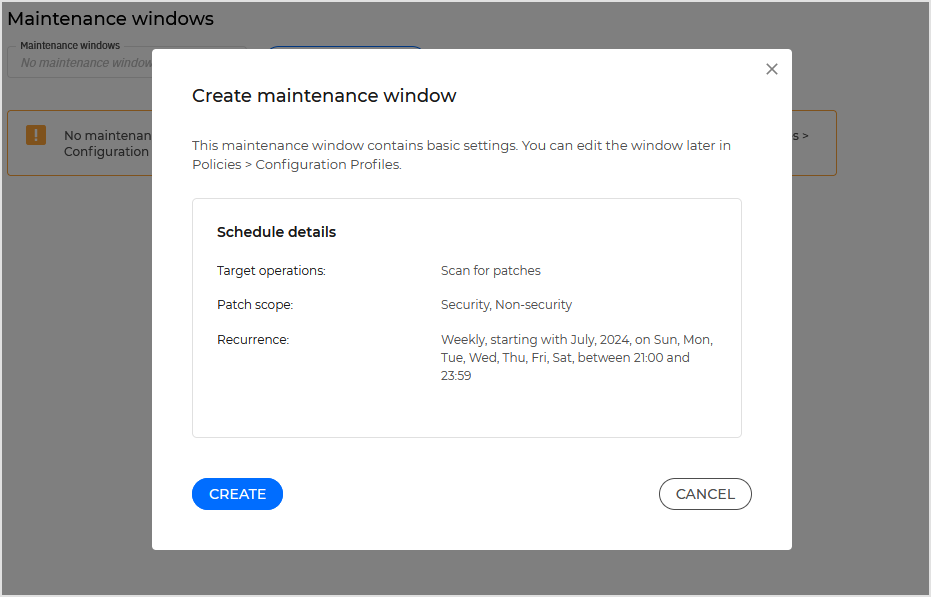
If no maintenance window is available in the list, a Create window button is visible.
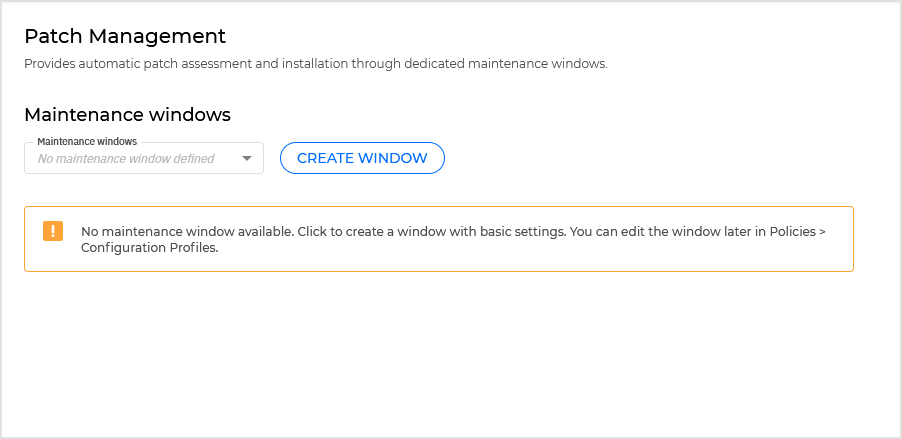
Click the button to quickly create a window with basic settings, which only include patch scanning. To edit the window and add other capabilities, such as patch installation, go to the Policies > Configuration profiles in the GravityZone main menu.
Click Save to confirm the action.
Once the maintenance window assigned to the policy, the Patch Management section will display a summary that includes:
Maintenance window name
Target operations (Scan for patches or Apply patches)
Patch scope (Security, Non-security, or Manually approved)
Recurrence
Reboot details
You can assign only one maintenance window per policy. To assign the same maintenance window to multiple policies, you must edit each policy one by one.
To remove a maintenance window from a policy:
Under to Maintenance windows, select No maintenance window selected from the drop-down list.
Confirm your action.
Click Save,
The maintenance window is removed and the Patch Management module becomes inactive.