Setting up the Datto RMM integration
For integration, you need to create for the current Datto RMM administrator user an API key and API secret. The administrator’s API key will be used to link the Datto RMM tenant to their respective Bitdefender GravityZone root company.
Please note that more than one Datto RMM administrator can log in to the Bitdefender Datto RMM App by using the same Datto RMM tenant ID.
Generating Datto RMM API Key & Secret and getting Access URL
To create the necessary API key, follow these steps:
In Datto RMM web portal, go to Setup > Global Settings and make sure the Enable API Access settings under Access Control is set to On.
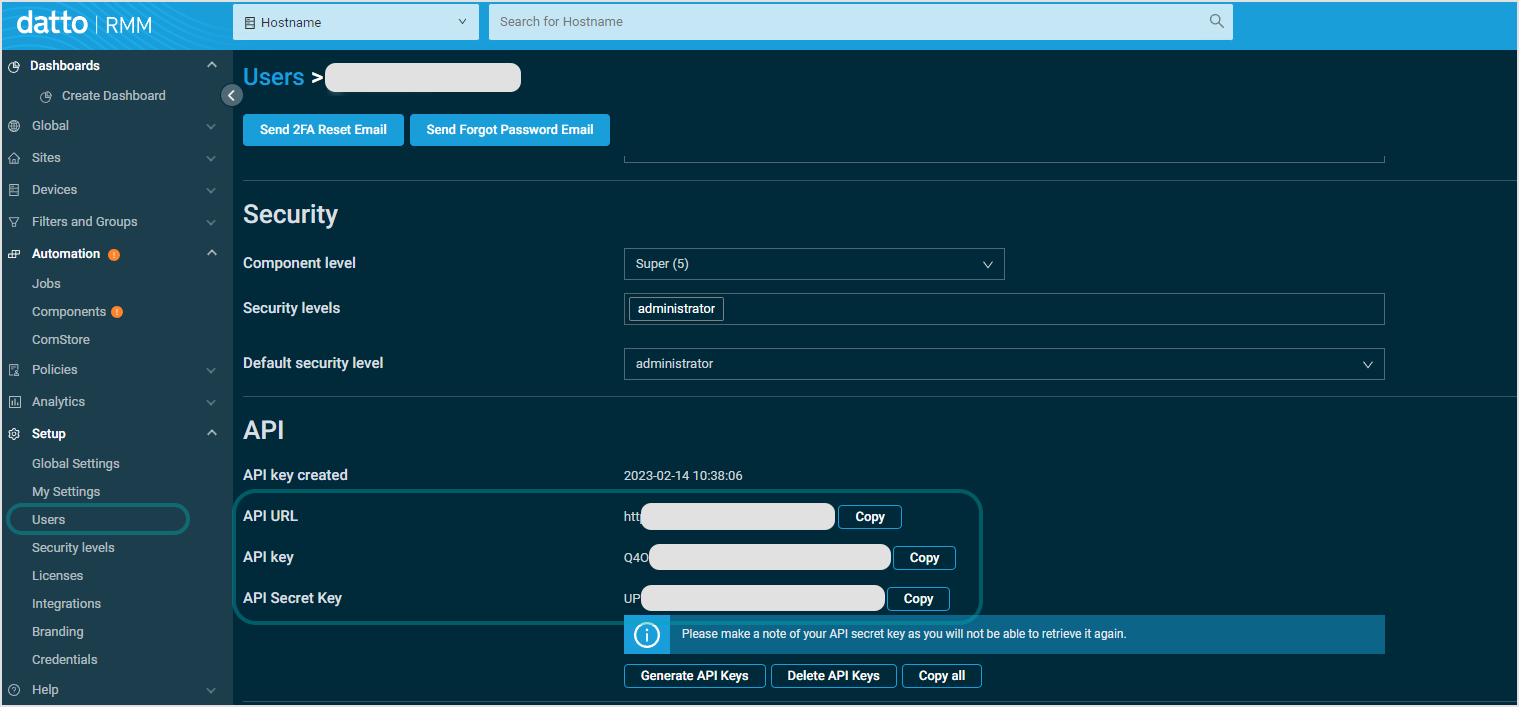
Under Web Portal > Setup > Users, select your account and API, and click Generate API Keys.
Save the information generated at this stage for later use in Datto RMM App.
Note
Access to the Datto RMM App is available after registration to all users from within the Datto tenant that have the security level set as administrator. Each user must use his own generated API Key & Secret to log in to Datto RMM App.
Warning
Please make a note of your API secret key as you will not be able to retrieve it again.
Logging in to Datto RMM App
To log in to the Datto RMM App platform, you have three different options:
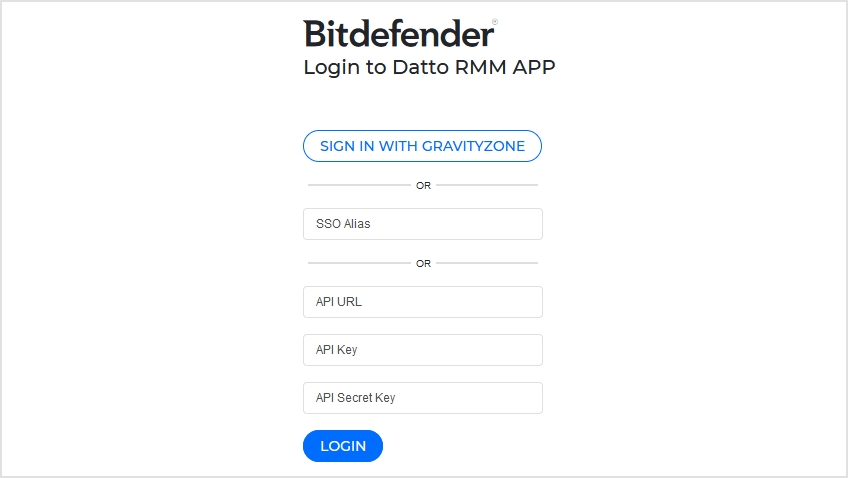
Sign in with GravityZone
To log in with GravityZone, follow these steps:
Click the Sign in with GravityZone button.
You will be redirected to the Bitdefender IdP service page.
Enter the email address used with your GravityZone account.
Click Next.
If you have an active session in GravityZone, you will automatically be logged in to Datto RMM App.
If you do not have an active session in GravityZone, you must add your password and the 2FA verification code. Following this step, you will be logged in to Datto RMM App.
You must have a Partner role in GravityZone with access to all managed companies selected as targets in the account settings.
This option requires configuring GravityZone as identity provider (IdP). For details, refer to System.
Note
If you already use a third-party identity provider for GravityZone, we recommend you to configure and log in to Datto RMM App with the SSO alias and the same IdP.
SSO alias
To log in with a SSO alias, follow these steps:
Enter an SSO alias.
Click Login
This option requires configuring single sign-on (SSO) with a third-party identity provider (IdP). For details, refer to Configuring Datto RMM single sign-on (SSO) with an identity provider.
API details
To log in using the Datto RMM API details, follow these steps:
Enter the API details generated in the Datto RMM web portal:
API URL (Datto RMM tenant address)
API Key
API Secret Key
Click Login.
If no previous Bitdefender GravityZone integration was detected for the Datto RMM tenant), you will be presented with a welcome message to fill out the required integration information details on the Settings > Integration, Default Packages and Inventory Sync pages.
This option is available when you log in to Datto RMM App for the first time and do not have the other options configured.
Settings
In the Settings section of the Datto RMM App, you can take these actions:
On the Integration page, configure the initial integration between Datto RMM and Datto RMM App.
On the Default Packages page, define the default installation package used for deploying Bitdefender security agent on the Datto RMM devices.
On the Inventory Sync page, configure automatic synchronization between Datto RMM sites and GravityZone companies.
On the System page, reset the Datto RMM and Datto RMM App integration.
Integration
For the initial integration registration (or if the integration was reset), you need to add the integration details to synchronize the Datto RMM and GravityZone platforms.
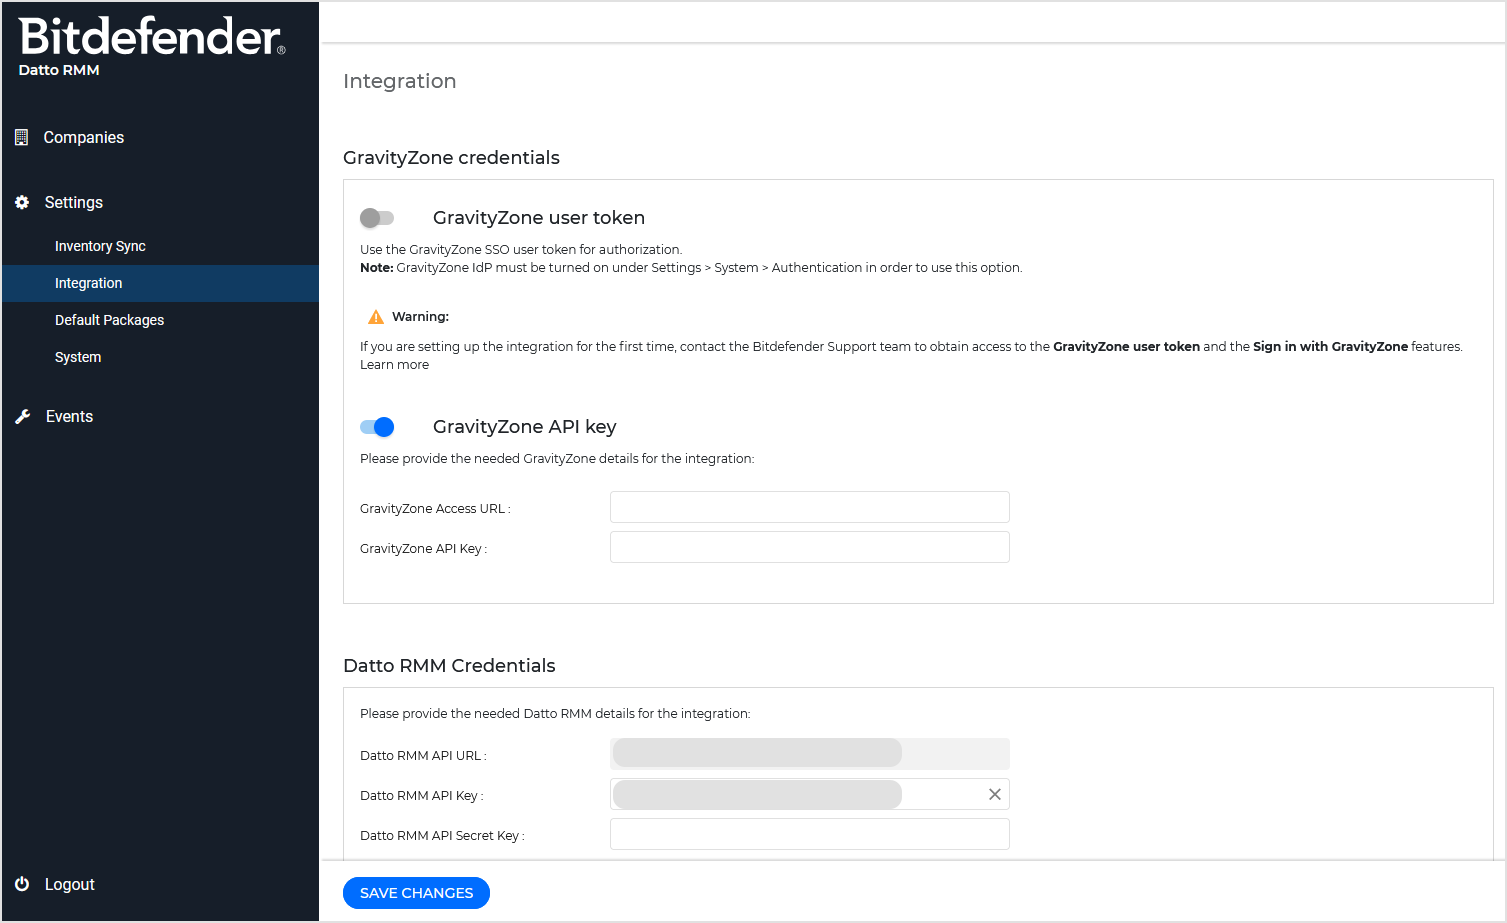
GravityZone credentials
In this section, you can select either of these options for authorizing the integration:
GravityZone user token. Click the toggle switch to generate and use a single sign-on (SSO) token that provides access to GravityZone resources.
To enable this option, the following conditions must be met:
GravityZone identity provider (IdP) must be activated on the Settings > System > Authentication page.
The user for whom the token will be created must be part of the GravityZone company registered in the integration.
The same user must have a Partner role in GravityZone with access to all companies selected as targets in the account settings.
Important
If you are setting up the integration for the first time, contact the Bitdefender Support team to obtain access to the GravityZone user token and the Sign in with GravityZone features. For details, refer to Enabling sign-in with GravityZone identity provider for first-time integrators.
GravityZone API key. Click the toggle switch to add the API access URL and API key from your Bitdefender GravityZone root account.
This is how you obtain the GravityZone API access URL and API key:
Log in to GravityZoneControl Center with a partner account.
Go to Welcome, (User) > My Account in the upper-right corner of the screen.
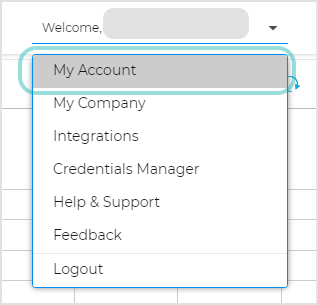
Under Control Center API, copy the Access URL Address.
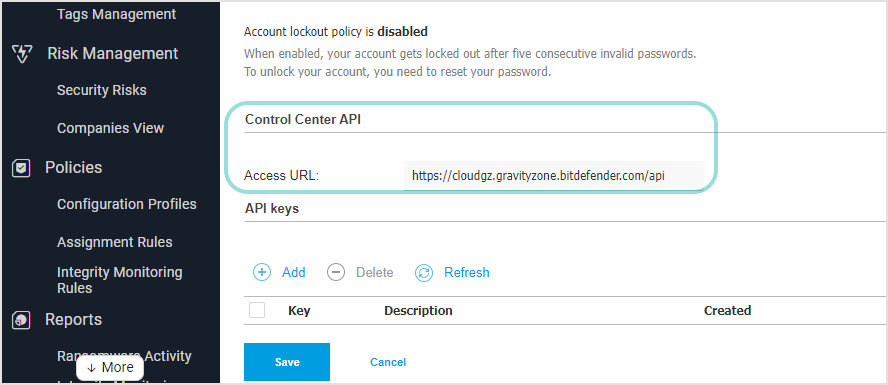
Under API Keys, select Add, enter a name for the new GravityZone API Key and select the following APIs:
Companies
Licensing
Packages
Network
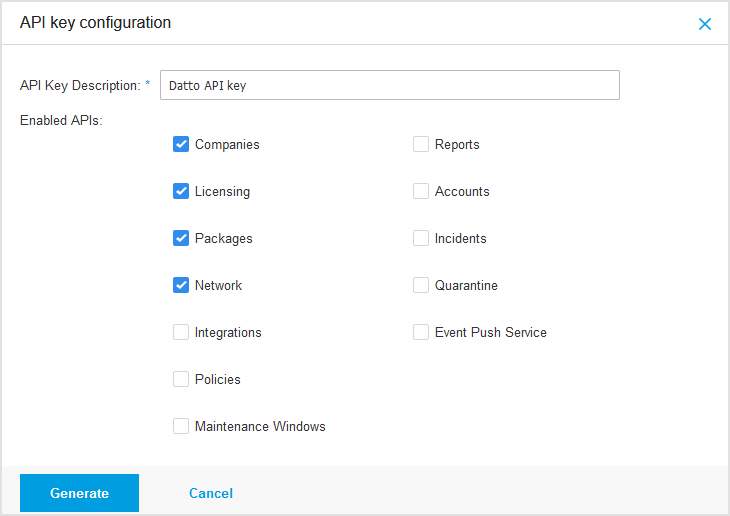
Click Generate.
On the new page, copy your API key and saved it in a safe location. After you close the window, the key will no longer be visible.
Back in Datto RMM App, go to Settings > Integration.
Under GravityZone credentials > GravityZone API key, add the access URL and the newly created GravityZone API key.
Note
You cannot use GravityZone token and GravityZone API key at the same time.
Datto RMM credentials
In this section, add the Datto RMM details needed for integration:
Datto RMM API URL (Datto RMM tenant address)
Datto RMM API key
Datto RMM API secret key
When finishing the configuration on the page, click Save changes.
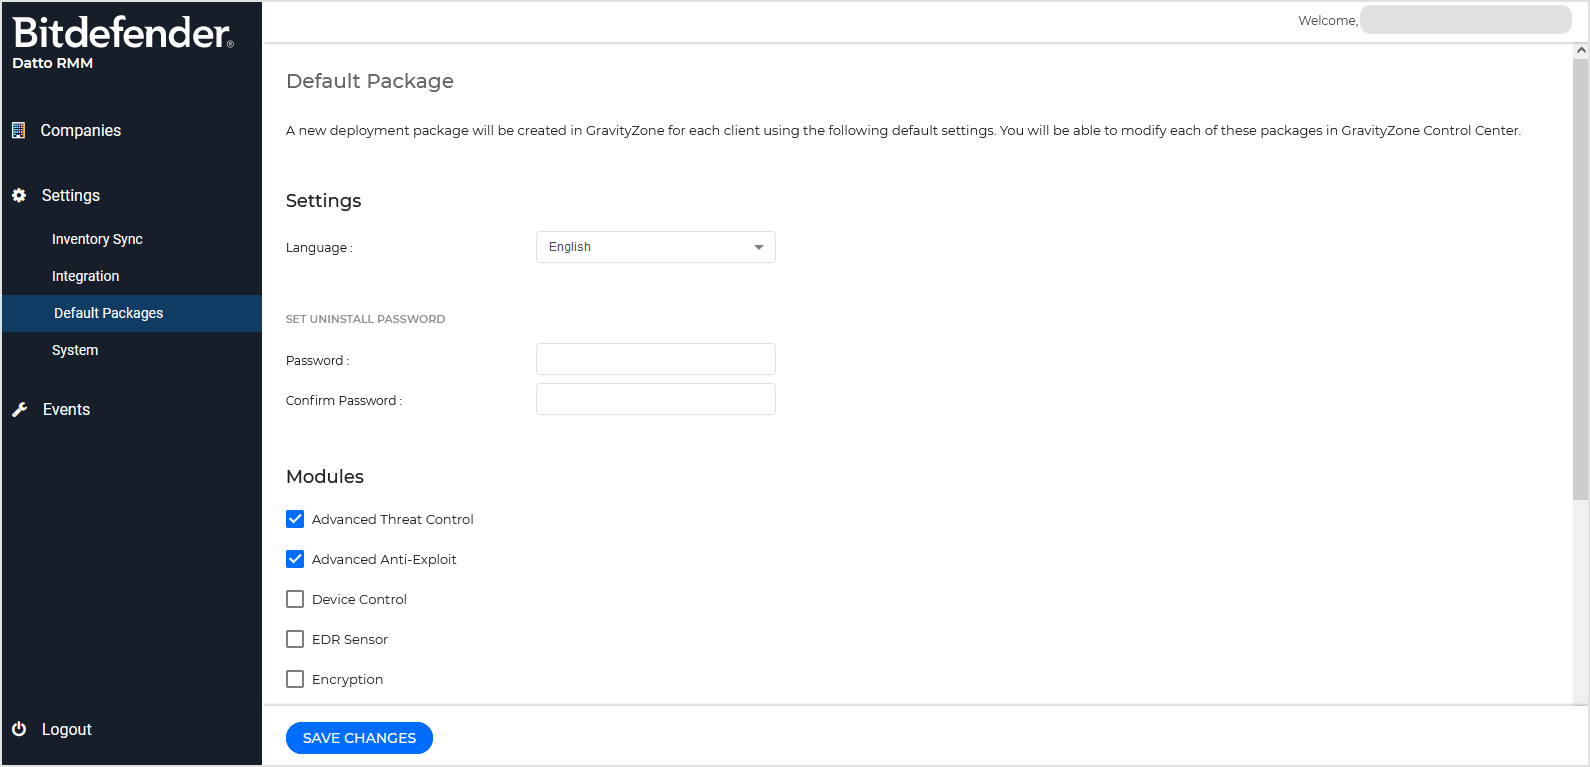
Default Packages
A new deployment package will be created in GravityZone Control Center for each valid association between a GravityZone company and a Datto RMM site. The modules represent the default features with which the security agent will be deployed.
The installation package uses a small-sized file to download and run the security agent installation files on your devices. The features can be adjusted in the GravityZone Control Center under Network > Installation Packages, where you select the respective Company column.
Warning
Do not rename the installation package name, otherwise the Datto RMM site variable will be affected and the deployment will fail.
The following modules are available for selection (the Antimalware module is automatically included and is not listed here):
Advanced Anti-Exploit
Advanced Threat Control
Device Control
Firewall
Content Control
Network Attack Defense
Power User
Depending on add-ons, you will be able to install the Bitdefender security agent with certain features. The following add-ons modules are available for selection, depending on your subscription options:
EDR Sensor
Patch Management
Exchange Protection
Full Disk Encryption
For more information, refer to the Feature specific deployment guides.
Changes in the deployment package apply to subsequent Bitdefender agent installations. They do not result in re-configuring existing installations.
Remove competitor: It is recommended to keep this check box selected to automatically remove any incompatible security software while the Bitdefender agent installs on Datto devices.
By deselecting this option, Bitdefender agent will install next to the existing security solution. You can manually remove the previously installed security solution later, at your own risk.
System
Tenant
If you need to reset the current Datto RMM - Datto RMM App integration in order to change the Datto RMM tenant or the GravityZone company, use the Reset tenant option.
Please note that all data will be deleted, including settings and integration details. After this action, you will have to reconfigure the tenant in the Settings > Integration section.

Authentication
On this page, you can enable GravityZone identity provider or configure a third-party identity provider for single sign-on.
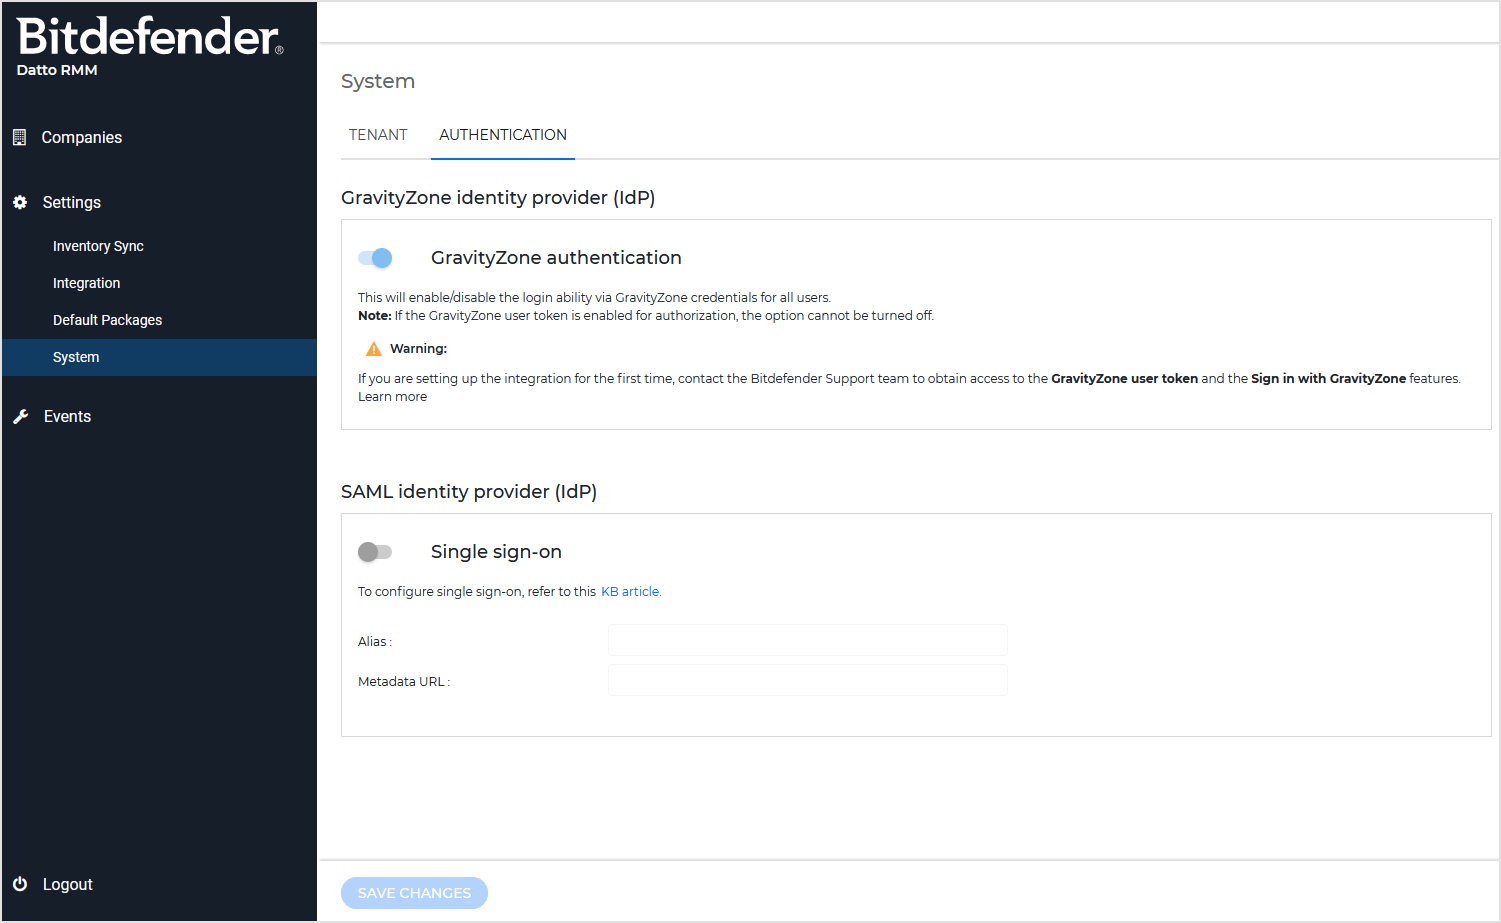
To enable GravityZone identity provider (IdP) and activate the Sign in with GravityZone button on the login page, click the GravityZone authentication toggle switch. This change applies to all Datto RMM App users.
Note
You cannot disable this option as long as GravityZone user token is enabled on the Integration page.
If you already use a third-party identity provider for GravityZone, we recommend you to configure and log in to Datto RMM App with the SSO alias and the same IdP.
Important
If you are setting up the integration for the first time, contact the Bitdefender Enterprise Support team to obtain access to the GravityZone user token and the Sign in with GravityZone features. For details, refer to Enabling sign-in with GravityZone identity provider for first-time integrators.
To configure single sign-on (SSO) with a third-party identity provider, follow these steps:
Under SAML identity provider (IdP), click the Single sign-on toggle switch.
Provide the alias and the metadata URL for your identity provider.
Click Save changes.
For details on how to configure the identity provider and Datto RMM App to use single sign-on, refer to Configuring Datto RMM single sign-on (SSO) with an identity provider.
To disable single sign-on with a third party identity provider, follow these steps:
Turn off the toggle switch.
Click Save changes.
Companies
After the integration is successfully added, all Datto RMM sites will be listed as the "source" of the integration and the GravityZone companies as the "destination". The section presents you the following information:
All available Datto RMM sites (Managed type only).
All existing mappings between Datto RMM sites and GravityZone companies.
Mapping management: create new associations or delete existing ones.
Notice
The integration imports all available sites of Managed type. The integration does not import OnDemand sites.
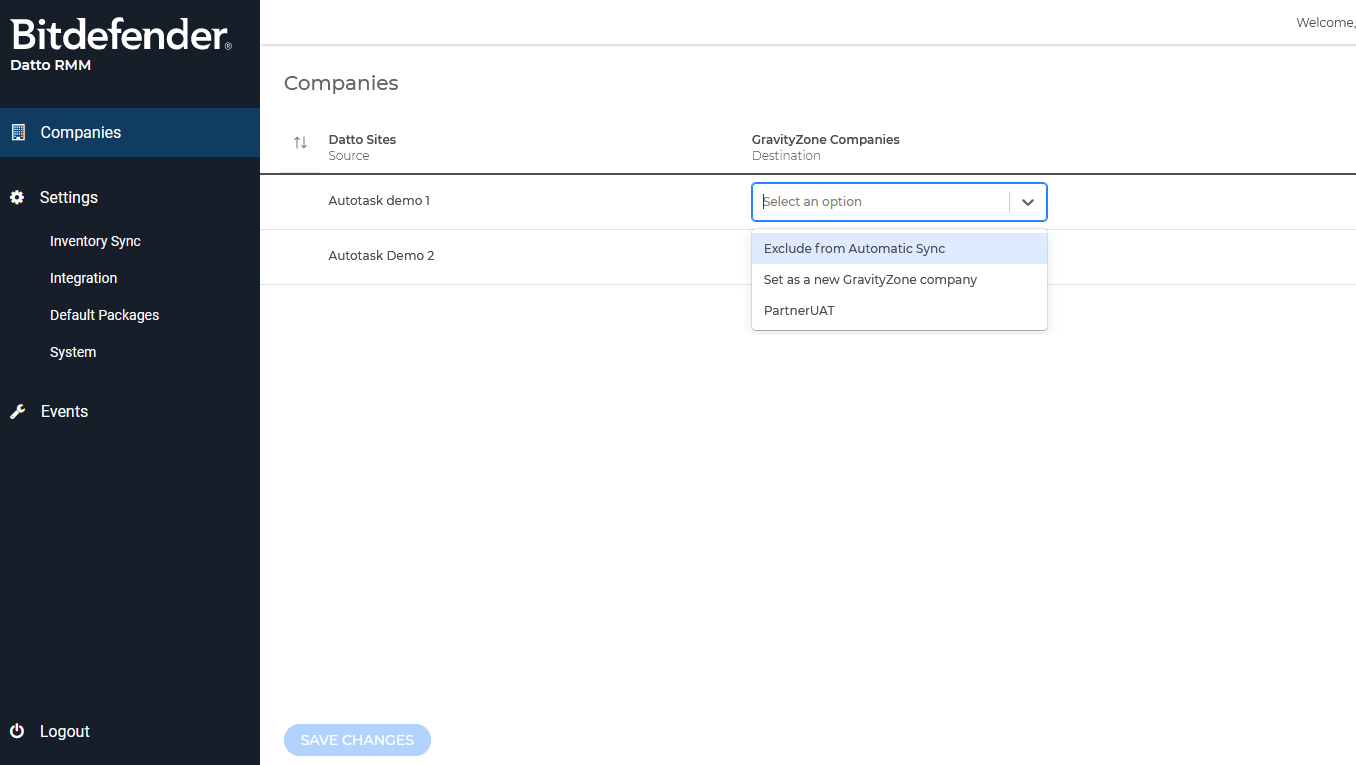
To map (associate) a Datto RMM site to a GravityZone company, follow these steps:
Choose one of these options:
Select an existing GravityZone company, for which no existing mapping is listed.
Select Set as a new GravityZone Company to create a new company in the Bitdefender platform.
Select Exclude from Automatic Sync to skip the Datto site from being automatically associated by the recurrent synchronization task.
The settings for automatic synchronization are available on the Inventory Sync page.
If the Datto RMM site already exists as a GravityZone company, you cannot use the Set as a new GravityZone Company option.
After you selected one or more mappings that need to be created, click the Save Changes button.
A confirmation windows display all the associations that will be created in Datto RMM App. Click Confirm to start the creation task.

After the task is successfully finished, the Datto RMM App mapping takes the following actions:
It creates an installation package in GravityZone Control Center for the respective associated GravityZone company. The modules defined under Settings > Integration > Default Packages are enabled.
It creates a Datto RMM site variable named GravityZonePackageLink for the respective associated Datto RMM Site with a string value.
For details about automatic synchronization, refer to Inventory Sync.
Select the X symbol of the corresponding GravityZone company column.
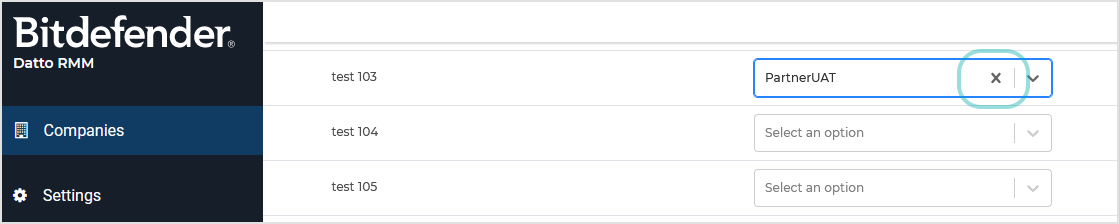
Click Save Changes.
Confirm the Delete association action to start the delete task.
Inventory Sync
The integration replicates your managed inventory structure consisting of Datto RMM sites as companies in GravityZone through an automatic synchronization task that runs every hour. Following the synchronization, an inventory management system monitors both inventories for discrepancies and, depending on the settings, handles resulting events.
On the Inventory Sync page of Datto RMM App, you can configure the settings for the synchronization task as follows:
Under Synchronization level, select an option for inventory monitoring and event reporting or handling.
Under Synchronizaton event handling, select the type of action for choose how to fix events, depending on the synchronization level.
Optionally, under Prefix settings, configure naming preferences for new companies in GravityZone.
Click Save Changes.
The synchronization task will run next time with the new settings.
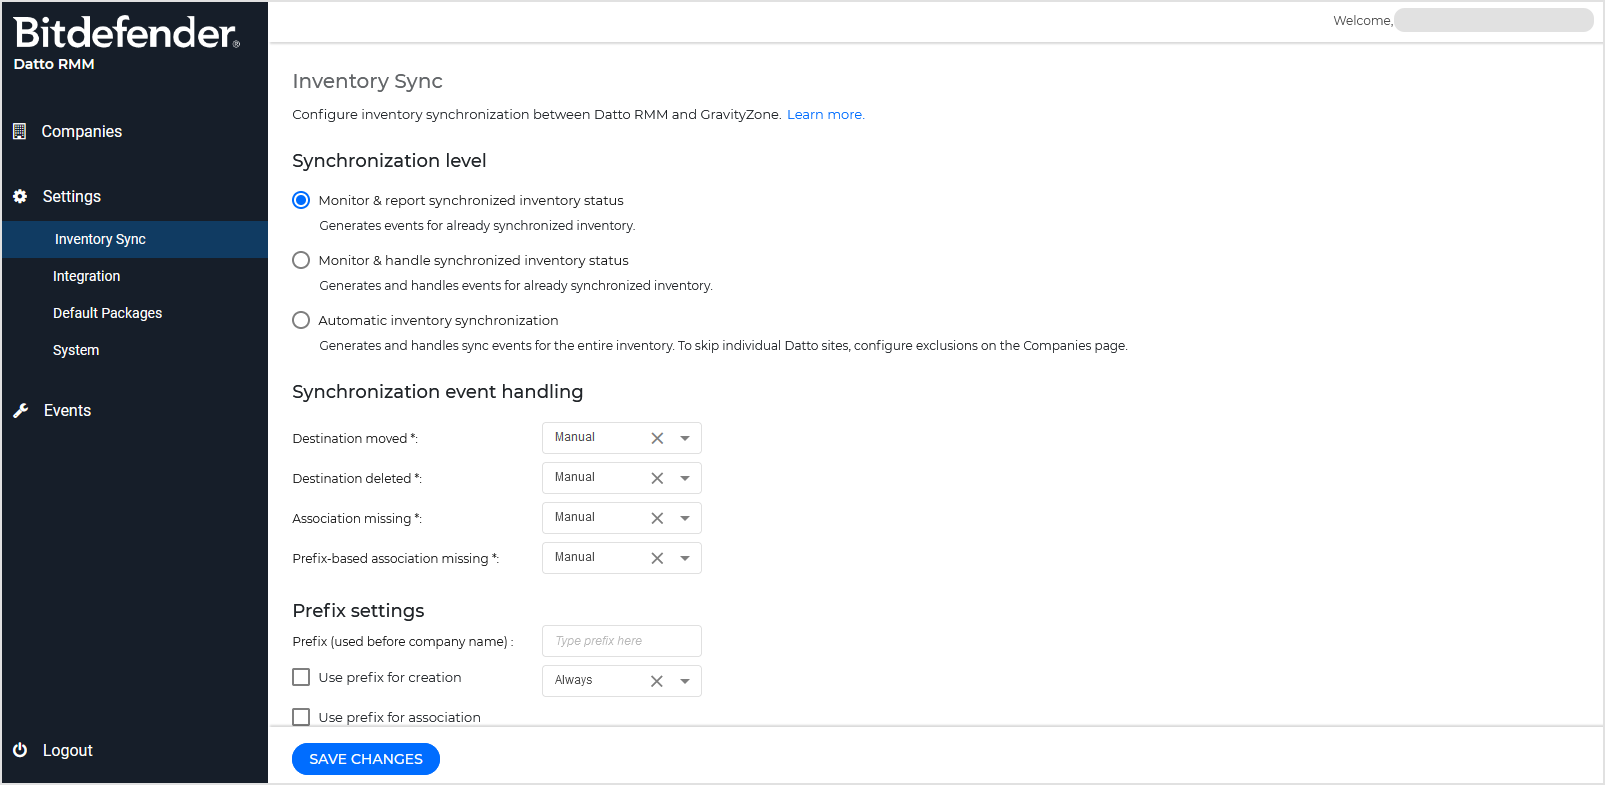
Synchronization level
In this section, you select options that control synchronization between inventories. Each option has a scope and triggers corresponding event actions.
The scope refers to the affected entities as follows:
Synchronized entities - Datto RMM App operates only on Datto RMM sites that have an association with GravityZone companies.
Entire inventory - Datto RMM App operates on all Datto RMM sites, regardless they have an association or not in GravityZone.
Event actions refer to Datto RMM App behavior in relation to the detected inventory discrepancies as follows:
Report only - Datto RMM App only reports sync events in the interface and you must handle them manually.
Handle - Datto RMM App tries to automatically handle sync events according to the settings. Event handling may include a prefix attached to the name of a GravityZone company.
Option | Description | Scope | Event action |
|---|---|---|---|
Monitor & report synchronized inventory status | Monitors synchronized entities and generates events when detecting discrepancies. | Operates only on entities that have an association. | Reports events on the Events page. The synchronization task ignores the settings in the Synchronization event handling section. |
Monitor & handle synchronized inventory status | Monitors synchronized entities, generates events and takes action on them according to the settings. | Operates only on entities that have an association. | Tries to resolve events according to the settings in the Synchronization event handling section. |
Automatic inventory synchronization | Monitors all entities, generates events and takes action on them according to the settings. | Operates on all entities (regardless they have an association or not), except exclusions. To add exclusions, go to the Companies page. | Tries to resolve events according to the settings in the Synchronization event handling section. |
Synchronization event handling
In this section, you select the type of action for handling sync events:
Automatic - Datto RMM App tries to handle events according to the settings.
Datto RMM App automatically handles events only for Monitor & handle synchronized inventory status and Automatic inventory synchronization options under Synchronization level.
Manual - Datto RMM App does not automatically handle events. Manual actions are available for each issue on the Events page.
Synchronization events are available with the following automatic actions:
Event type | Description | Automatic action |
|---|---|---|
Destination moved | The associated GravityZone company was moved under another partner. | Moves the GravityZone company to match the site location in Datto RMM. |
Destination deleted | The associated GravityZone company no longer exists. | Creates a new GravityZone company. |
Association missing | The association between the Datto site and the GravityZone company no longer exists. This event only occurs with Automatic inventory synchronization enabled. | Associates the two entities. |
Prefix-based association missing | The association between the Datto site and the GravityZone company no longer exists. The GravityZone company used a prefix. This event only occurs with Automatic inventory synchronization enabled. | Associates the two entities. |
Prefix settings
In this section, you can specify a prefix to be attached to new GravityZone companies with similar names.
A blank space is inserted between the prefix and the actual name. For example, if you specify "New" as the prefix, a Datto site named "Abc" would be associated to a company "New Abc" in GravityZone.
The following options are available with the prefix:
Use prefix for creation - the prefix is added to the name of new GravityZone companies as follows:
Always - select this option use the prefix for every new company in GravityZone regardless of its name.
Only if the name already exists - select this option to use the prefix for new companies when their names match existing companies.
Use prefix for association - Datto RMM App searches for GravityZone companies using the prefix and associates them with Datto sites.
Events
After associations are created, the Datto RMM App is designed to keep the two inventories in sync and any discrepancy between them generates events that need to be handled manually by the user. Events are automatically generated in the following situations:
Event type | Description | Primary action | Secondary action |
Destination creation | The “Set as a new GravityZone Company” association action cannot be completed because the Datto RMM site name is already used in another GravityZone tenant. | Create new GravityZone company with given name. | Ignore: no association is created. |
Destination moved | The associated GravityZone company was moved under another partner. | Move: destination is moved and the event disappears. | Ignore: the event disappears, but association is not deleted. |
Destination deleted | The associated GravityZone company no longer exists. | Recreate the company with the same name as the Datto site or recreate the company using a custom name. Associate the two entities. | Ignore: the event disappears, but association is not deleted. |
Association missing | The association between the Datto site and the GravityZone company no longer exists. | Rename the existing GravityZone company with a prefix and create a new company with the previous name. Associate the Datto site with the new company. | Ignore: no association is created. |
Prefix-based association missing | The association between the Datto site and the GravityZone company no longer exists. The GravityZone company used a prefix. | Associate the Datto site with the GravityZone company, or rename the company the same as the Datto site and associate the two entities. | Ignore: no association is created. |
Source deleted | The associated Datto RMM site no longer exists. | Delete the associated company from the GravityZone account and deletes the association, or keep the GravityZone company and delete the association. | Ignore: the event disappears, but association is not deleted. The event continues to occur until it is handled with a primary action. |
Events are displayed in Datto RMM App in the following sections:
Companies. If an issue is detected for a given association, an exclamation mark is shown for that association.
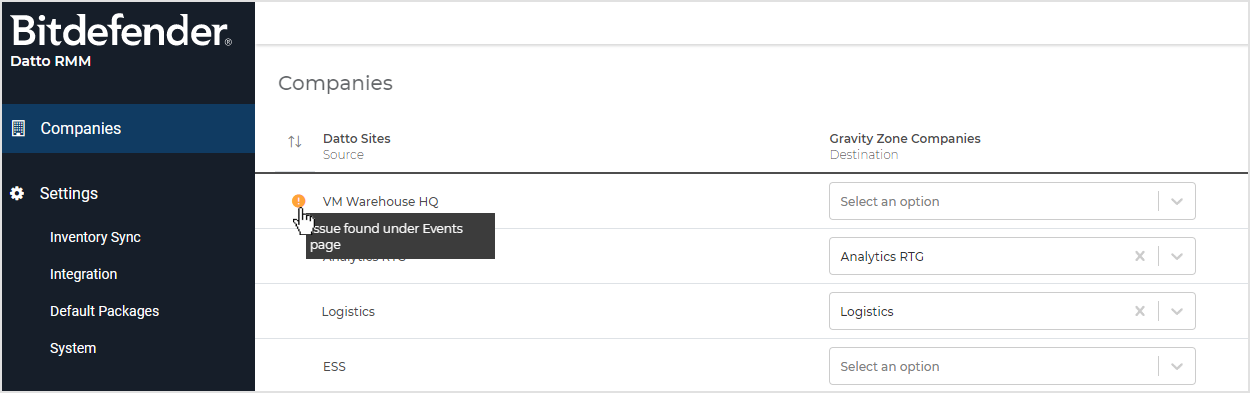
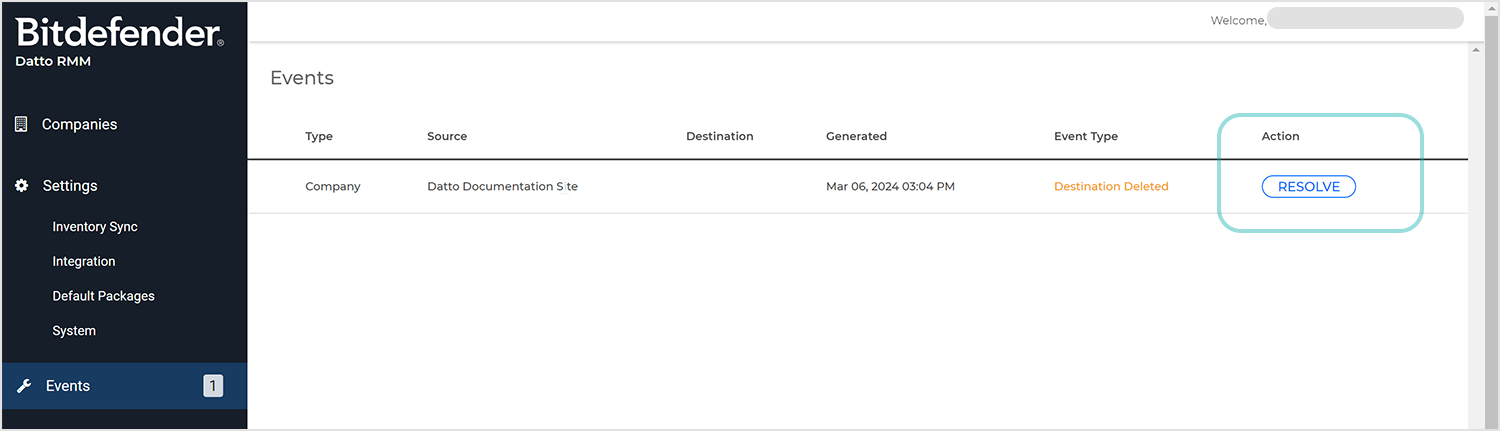
Events. All events are displayed with the following information:
Type
Source
Destination
Generation time
Event type
Action
To take action on an active event:
Go to the Events page.
Click the Resolve button corresponding to that event.
Depending on the event type, several actions are available to resolve the event. Select an action.
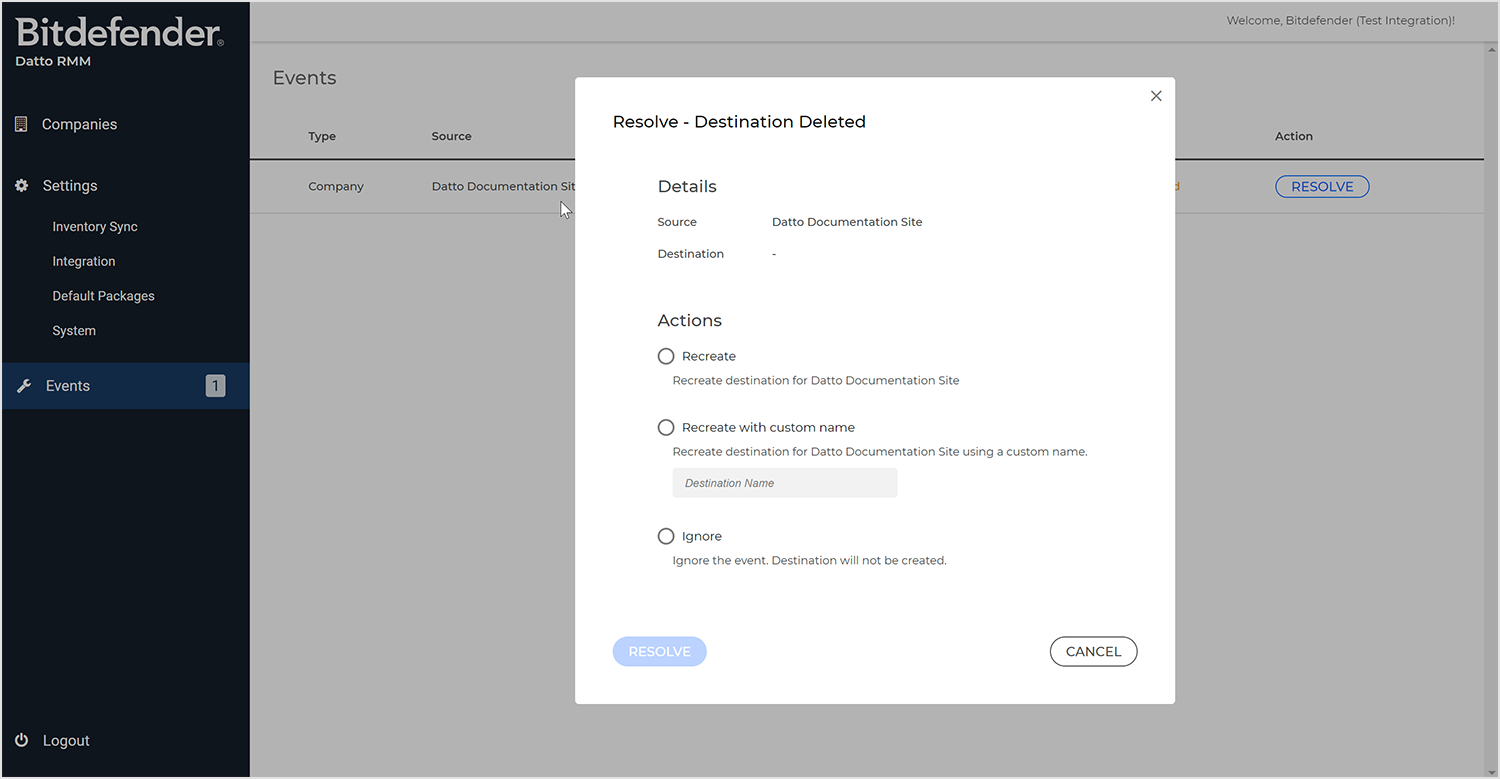
Click Resolve to confirm the action.