Using policy assignment rules
In the Policy Assignment Rules page, you can create and manage rules for assigning GravityZone security policies to the inventory, as part of the automatic agent synchronization.
This is what you need to know about policy assignment rules:
Rules apply to organizations and all their descendants by view, policy and priority.
When configuring a rule, you can select only organizations synchronized with GravityZone companies. Policies are available depending on the company associated with the organization. Policies may have been defined for that company or the companies above it within the hierarchy.
You can create one rule per view in each organization. Machines in multiple views receive a security policy based on the rule priority. Lower priority rules take precedence when the same machine is in the scope of multiple rules (the rule on position 1 applies before the rule on position 2).
After adding a rule, the Bitdefender plugin does not enforce it immediately, but following the next automatic agent synchronization.
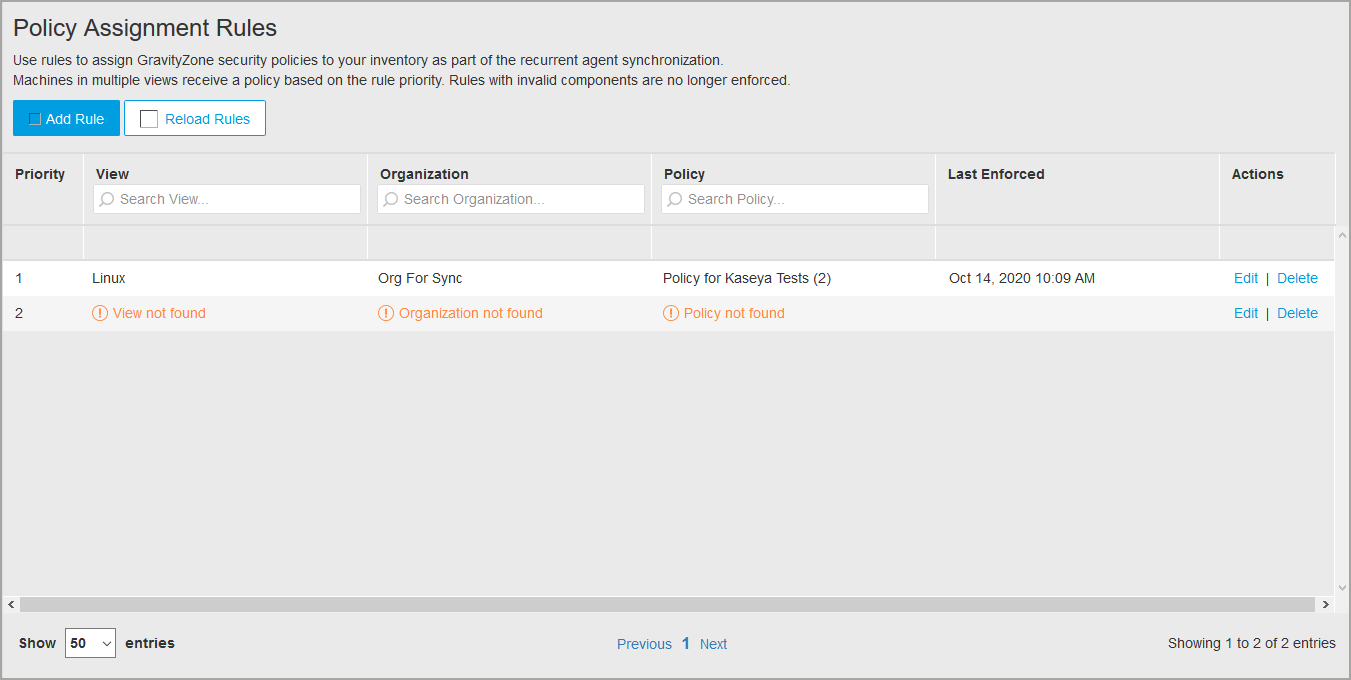
The automatic agent synchronization ignores invalid rules. A rule is not valid when any of its components (organization, view or policy) is not valid. Examples:
Organization does not exist.
Organization is not associated with a GravityZone company.
Company does not exist.
Company does not have access to policy.
When a rule becomes invalid, machines are redistributed to other valid rules, if they are within their scope. If no rules are available, then the machines will not have any policy enforced.
Policy assignment rules are only available for associated agents (not excluded), with no active sync events.
When accessing the section, the Bitdefender plugin starts a validation and update process that ensures you see the latest information. During this process, rule editing is disabled.
The Policy Assignment Rules page displays rules by priority, view, organization and policy. Use the search field in each column to find a specific rule.
Additional details include the time when the rule was last enforced, which is indirect relation with the most recent automatic agent synchronization. New rules will not display any value until the automatic synchronization takes place. Invalid rules will not have their time updated since they are ignored during synchronization.
This is what you can do in the Policy Assignment Rules page:
Creating rules
To create a policy assignment rule:
Click Add Rule.
In the configuration window, define the following elements:
Organization - the drop-down list displays only Kaseya organizations with active associations. Therefore, the rule applies to those organizations and their descendants. You can select All or one specific organization.
View - the drop-down list displays Kaseya views depending on the rights you have as user.
Policy - the drop-down list displays security policies available for the GravityZone company associated with the selected Kaseya organization. The list includes policies created for the company itself and for its parents.
Priority - determines the order of applying a rule in relation with other rules. When adding or editing a rule, you can set a custom priority number in a dedicated field. For example, a rule with priority number 1 will apply first, a rule with priority number 2 will apply second, and so on, depending on how many rules are in the table. After adding the rule, you can move it up or down in the table by using arrows in the Priority column.
Click Save.
The rule will appear in the table.
Editing rules
When a rule is invalid or you want to change it for another reason:
In the Actions column, click Edit.
In the configuration window, select another organization, view or policy, as desired.
In case of an invalid rule, you receive suggestions on what changes you have to make.
Click Save.
The changes apply at the next automatic agent synchronization.
Deleting rules
To remove a rule:
In the Actions column, click Delete.
In the confirmation window, choose one of the options:
Leave policy applied – the security policy remains applied to the machines after the rule is deleted.
Inherit policy from above – the security policy is removed from the machines at the next automatic agent synchronization and it will be replaced with a valid policy from the closest parent company available.
Click Delete to confirm the action.