On-execute
In the Antimalware > On-Execute section of the policy, you can configure protection against malicious processes, when they are executed. It covers the following protection layers:
Note
The range of actions you can take may vary depending on the license included in your current plan.
Cloud-based threat detection
Cloud-based Threat Detection technology identifies advanced threats running cloud-based machine learning algorithms, while ensuring on-the-fly updates. This technology improves the efficiency of your environment by lowering the required local disk footprint and resources consumption.
Important
This cloud scanning technology is used only when the security agent installed on endpoints is set to operate in EDR (Report only) mode in Bitdefender EDR standalone for MSP.
This technology comprises to major components:
The Content Extractor - It extracts metadata from your environment and sends it to the cloud for processing.
The Threat Detector - It receives metadata packs from the Content Extractor, analyzes the information using stat-of-the-art machine learning and heuristic algorithms, and based on the results it generates a detection.
This component does not have the need to directly access files, buffers, memory, or operating system files. It requires a small disk footprint and can be updated on-the-fly.
Click the toggle to enable Cloud-based Threat Detection.
Advanced Threat Control
Bitdefender Advanced Threat Control is a proactive detection technology that uses advanced heuristic methods to detect new potential threats in real-time.
Note
This module is available for:
Windows for workstations
Windows for servers
macOS
Linux
Advanced Threat Control continuously monitors the applications running on the endpoint, looking for malware-like actions. Each action is scored and an overall score is computed for each process. When the overall score for a process reaches a given threshold, the process is considered harmful. The module will automatically attempt to disinfect the detected file. If the disinfection routine fails, the file will be deleted.
Note
Before applying the disinfect action, a copy of the file is sent to quarantine so that you can restore the file later, in the case of a false positive. This action can be configured using the Copy files to quarantine before applying the disinfect action option available in the Antimalware > Settings tab of the policy settings. This option is enabled by default in the policy templates.
For Windows systems, Advanced Threat Control provides additional capabilities to safeguard critical registry keys, including those associated with the Security Account Manager, from unauthorized access or exploitation such as malicious registry key dumping.
To configure Advanced Threat Control:
Click the toggle to enable Advanced Threat Control.
Warning
If you disable Advanced Threat Control, computers will be vulnerable to unknown malware.
The default action for infected applications detected by Advanced Threat Control is Remediate.
You can set another default action, using the available menu:
Block - to deny access to the infected applications.
Report only - to only report the infected applications detected by Bitdefender.
Click the security level that best suits your needs (Aggressive, Normal or Permissive). Use the descriptions to guide your choice.
As you set the protection level higher, Advanced Threat Control will require fewer signs of malware-like behavior to report a process. This will lead to a higher number of applications being reported and, at the same time, to an increased likelihood of false positives (clean applications detected as malicious).
Note
It is highly recommended to create exclusion rules for commonly used or known applications to prevent false positives (incorrect detection of legitimate applications).
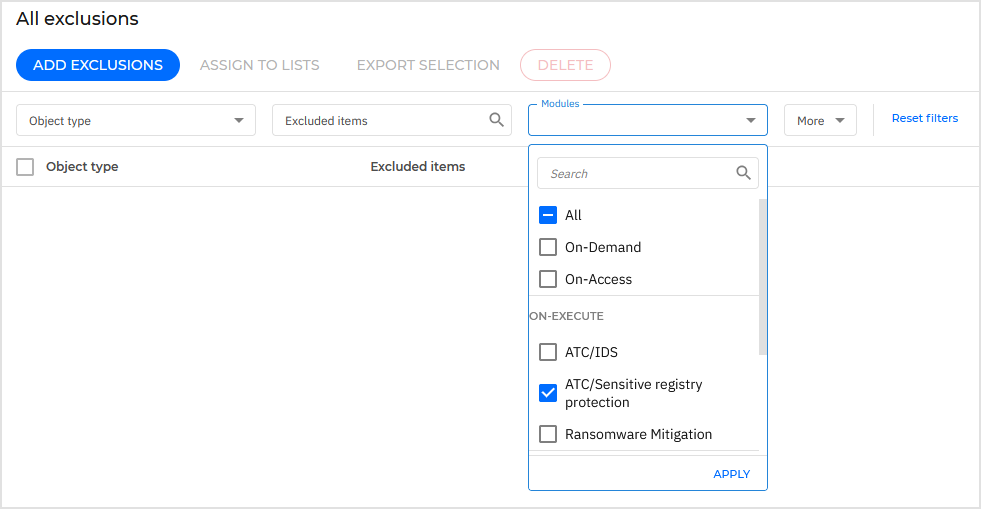
Go to the Antimalware > Exclusions section in policy settings or to the Configuration profiles > Exclusions page and configure the ATC/IDS process exclusion rules for trusted applications.
You can also create IP/mask exclusions for trusted systems that perform necessary registry changes, using the ATC/Sensitive registry protection option.
The Sensitive Registry Protection option protects critical registry keys and ensures comprehensive protection of user authentication data and system security policies on your Windows endpoints.
You can set one of the following actions:
Kill process - Blocks malicious registry key dumping by immediately stopping the associated process execution.
Report only - Reports malicious registry key dumping without taking any mitigation action.
The Kernel-API Monitoring option enables advanced kernel-level monitoring, allowing the detection of unusual system behaviors and safeguarding against exploitation attempts that target system integrity. The feature strengthens Advanced Threat Control’s ability to detect and mitigate sophisticated attack techniques early in the attack chain and protects against threats leveraging vulnerable drivers to undermine the security solution.
Warning
As this feature introduces deep monitoring capabilities, we recommend testing it in a controlled environment first to assess its impact and compatibility with your system.
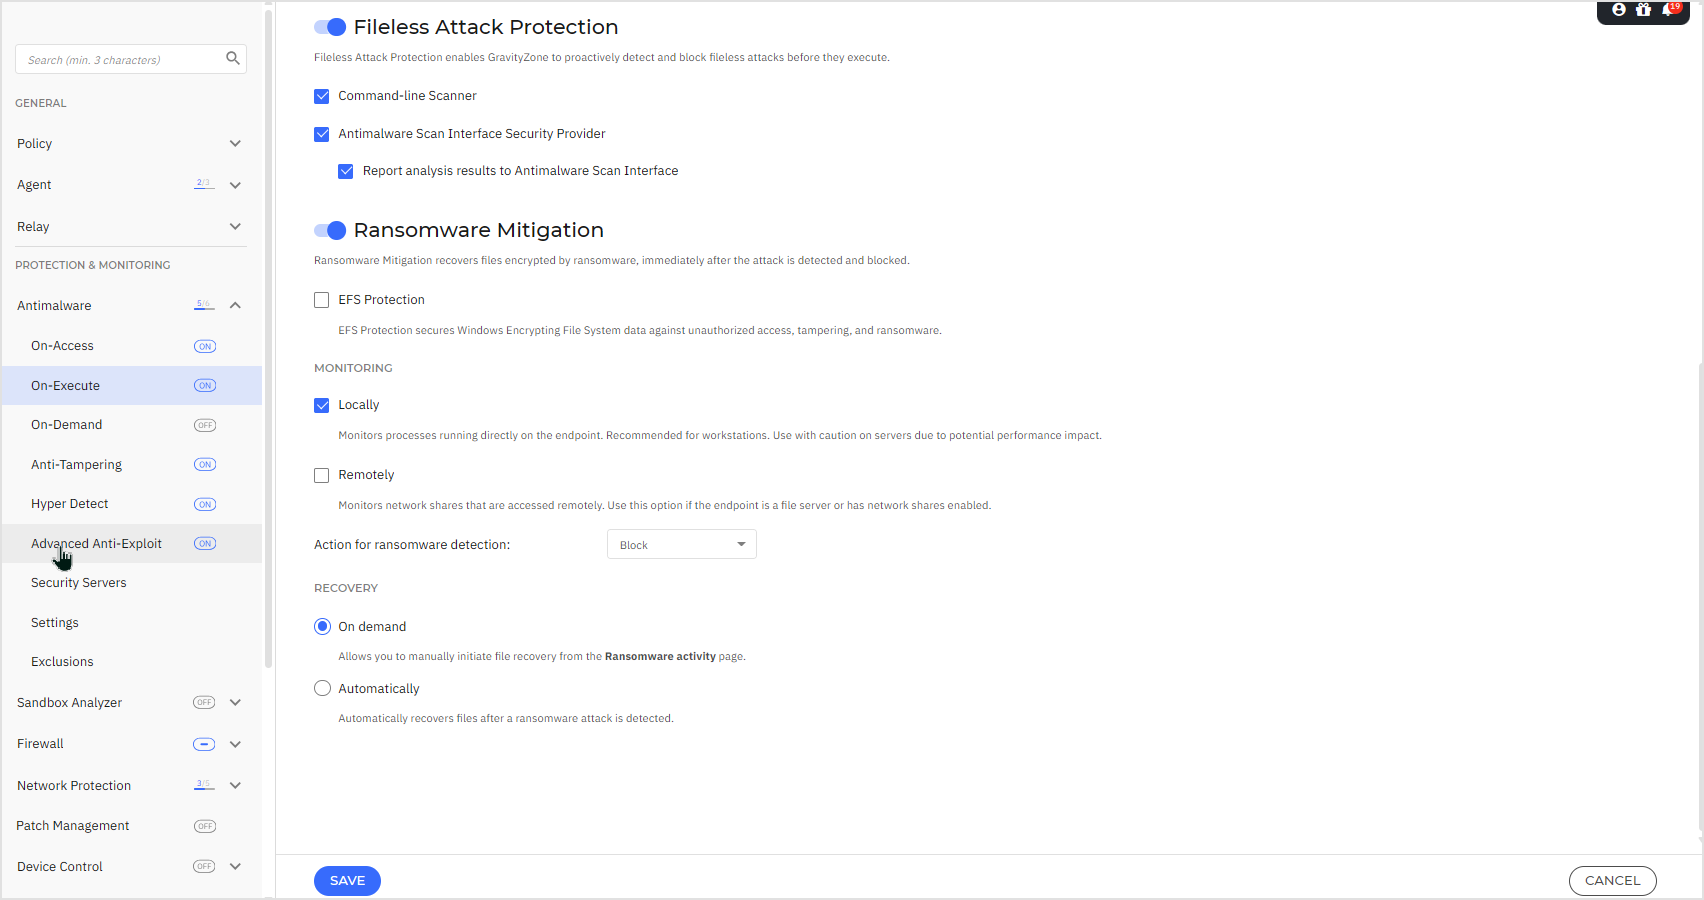
Fileless Attack Protection
Fileless Attack Protection is set by default to detect and block fileless malware at pre-execution, including terminating PowerShell running malicious command line, blocking malicious traffic, analyzing memory buffer prior to code injection, and blocking the code injection process.
You can configure it as follows:
Command-Line Scanner detects fileless attacks at pre-execution stage.
Antimalware Scan Interface Security Provider scans content at a deeper level using Windows Antimalware Scan Interface (AMSI) integration. Scripts, files, URLs, and others are sent by different services that require a security analysis before accessing, running, or writing them to the disk. Additionally, you can control whether to report the outcome of the Antimalware module analysis further to the AMSI services or not.
Note
This module is available for:
Windows for workstations
Windows for servers
Ransomware Mitigation
Ransomware Mitigation uses detection and remediation technologies to keep your data safe from ransomware attacks. Whether the ransomware is known or new, GravityZone detects abnormal encryption attempts and blocks the process. Afterwards, it recovers the files from backup copies and restores them to their original location.
Requirements
Important
Ransomware Mitigation requires Advanced Threat Control and On-access Scanning, available when the security agent installed on endpoints is set to run in Detection and prevention mode.
For information about supported operating systems and disk space requirements, refer to Ransomware Mitigation.
Behavior
File monitoring. The entire system is monitored, except for the user’s temporary folder, c:\Users\{name}\AppData\Local\Temp\. For information about what file types are being monitored, refer to Ransomware Mitigation.
The backup process. The backup process is triggered whenever a suspicious process tries to modify a file. The retention period for backup files is 30 days. After a file is restored successfully, its backup is deleted from storage.
Note
Backups are available for files which are 15 MB in size, or smaller.
Naming convention for restored files. The files are restored in their original location, next to their encrypted version. The naming convention for a restored file follows this pattern: OriginalName - Restored.OriginalExtension. If that name already exists within the target directory, the naming convention changes to OriginalName – Restored(2).OriginalExtension.
IP block for remote attacks. In case of a remote attack, an IP block is instituted for two hours, or until there is a system restart.
Configuration
To configure Ransomware Mitigation:
Click the toggle to enable Ransomware Mitigation.
Select the monitoring modes you want to use:
Locally - GravityZone monitors the processes and detects ransomware attacks initiated locally on the endpoint. It is recommended for workstations. Use with caution on servers due to performance impact.
Remotely - GravityZone monitors access to network share paths and detects ransomware attacks that are initiated from another machine. Use this option if the endpoint is a file server or has network shares enabled.
Select the automatic action for ransomware detection:
Report only - Processes continue running when ransomware attacks are detected and reported.
Block - Processes are stopped when ransomware attacks are detected and reported. This is the default action.
Select the recovery method:
On demand - You manually choose the attacks from which to recover the files. You can do this from the Reports > Ransomware Activity page at any time of your convenience, but no later than 30 days from the attack. After this time, recovery will no longer be possible.
Automatically - GravityZone automatically recovers the files right after a ransomware detection.
For the recovery to be successful, endpoints need to be available.
Select EFS Protection. This technology safeguards against attacks on Encrypting File System data on Windows systems by preventing unauthorized access, encryption tampering, or file locking by ransomware.
Monitoring
Once enabled, you have multiple options to check if your network is under a ransomware attack:
Check notifications and look for Ransomware Detection.
For more information on this notification, refer to Notification Types.
Check the Reports section.
The Security Audit report displays information about remote ransomware attacks.
The Ransomware Activity report lays out data related to both local and remote attacks. Inside this page you can also launch recovery tasks, if needed.
In case you notice a detection that is a legitimate encryption process, have certain paths where you allow file encryption, or allow remote access from certain machines, add exclusions to the Antimalware > Custom Exclusions policy section. Ransomware Mitigation allows exclusions on folder, process, and IP/mask.