Product Configuration
Domains
For more information on the Domains screen click here.
To access Product Configuration actions go to Products > Product Configuration.
Add a domain
Click the
 Add button at the top of the screen.
Add the domain name under Domain.
Add the the full hostname or IP address of your destination mail server under Deliver To.
Note
You can add additional Inbound Mail routes later.
Click the
 Add button.
This enables a DKIM for your company domain.
Note
If your company has multiple registered domains, DKIM will be enabled for all of them.
View a domain's full public DKIM key
Click the  DKIM icon corresponding to the domain you want to view.
Note
DKIM (Domain Key Identified Mail) needs to be enabled and configured for your domain(s) in order for the icon to appear.
Delete a domain
To delete a domain click the  Remove Domain button under the Remove column corresponding to the domain you wish to delete.
Edit a domain
Double click anywhere on the row corresponding to the domain you wish to edit.
Make the necessary modifications.
Click the
 Update button.
Note
Changing a domain name will also change the DKIM key.
Inbound Mail
For more information on the Inbound Mail screen click here.
To access Group Management actions go to Products > Product Configuration > Inbound Mail.
Add inbound route
Click the
Add button.Select a domain from the Domain dropdown menu.
Note
You can manage domains from the Domains screen.
Assign a value to the inbound mail route by typing in a value or using the arrows in the Cost field. This will be used when setting up rules to indicate importance and set priorities.
Set the destination by typing in the destination mail server hostname or IP in the Deliver to field.
Click the
Update button.
Delete inbound route
To delete an inbound route click the Delete domain button corresponding to the route you wish to remove.
Edit inbound route.
Double click anywhere on the row corresponding to the inbound route you wish to modify.
Make the necessary modifications.
Click the
Update button.
Outbound Mail
For more information on the Outbound Mail screen click here.
To access Group Management actions go to Products > Product Configuration > Outbound Mail.
Add outbound route
Click the
Add button at the upper right side of the screen.Type in the destination mail server hostname or IP in the Hostname field.
Click the
Update button.
Delete outbound route
To delete an outbound route click the Delete domain button corresponding to the route you wish to remove.
Edit outbound route.
Double click anywhere on the row corresponding to the outbound route you wish to modify.
Make the necessary modifications.
Click the
Update button.
Disclaimer
For more information on the Outbound Mail screen click here.
To access Disclaimer actions go to Products > Product Configuration > Disclaimer.
Creating a disclaimer
Select the domain for which you wish to create the disclaimer from the Domain dropdown menu.
Note
Selecting Default Disclaimer will apply the disclaimer to all your domains.
Type in the disclaimer in the rich text format under HTML disclaimer. This disclaimer will be automatically chosen if the email is in HTML format.
Type in the disclaimer in plain text format under Plain text disclaimer. This disclaimer will be automatically chosen if the email is in plain text format.
Note
It is recommended to also fill in the plain text disclaimer for those email recipients whose email client does not display HTML emails.
Check the Activate this disclaimer box to activate the disclaimer.
Note
If the box is not checked the disclaimer will not be attached to any email originating from the selected domain.
If both the default disclaimer and a domain specific one are activated, the one specific for that domain will be sent.
Click the
 Apply Changes button.
Note
The same steps apply for modifying a disclaimer.
Deactivating a disclaimer
Select the domain for which you wish to create the disclaimer from the Domain dropdown menu.
Uncheck the Activate this disclaimer box to deactivate the disclaimer.
Click the
Apply Changes button.
Custom Quarantine
For more information on the Custom Quarantine screen click here.
To access Disclaimer actions go to Products > Product Configuration > Custom Quarantine.
Add Custom Quarantine status
Click the
Add button at the upper right side of the screen.Type in the name of the new quarantine status
(optional) If you wish for end users to have access to this quarantine status through their Personal Quarantine section check the Permit User Access box.
Click the
Add button.
Delete Custom Quarantine status
To delete a Custom Quarantine status click the Remove domain button corresponding to the route you wish to remove.
Edit Custom Quarantine status
Double click anywhere on the row corresponding to the status you wish to modify.
Make the necessary modifications.
Click the
Update button.
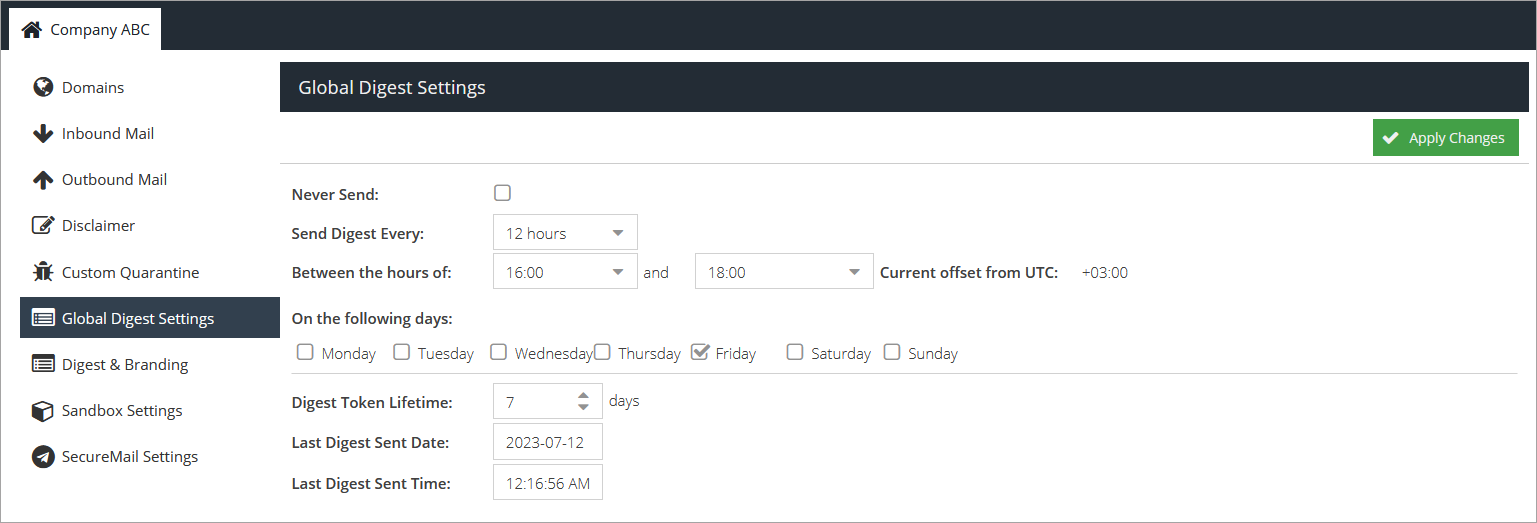
Global Digest Settings
Use this tab to control the frequency with which GravityZone Security for Email sends reports with recent activity. These reports are called Spam Digest Emails.
You can establish the frequency, time slot and specific days of the week in which to send reports.
Editing Global Digest Settings
Go to Products > Product Configuration > Global Digest Settings.
Customize the service by editing the following fields:
Never Send - disable the service.
Send Digest Every - set the frequency of emails.
Between the hours of - specify the start and end time for Spam Digest emails.
On the following days - specify the days of the week that emails are sent.
Digest Token Lifetime - specify the number of days the links to the Quarantine Portal included in the emails should be valid for (maximum 1 year). After this time has passed, the links are no longer functional.
Last Digest Sent Date - the date the last email was sent to any mailbox.
Last Digest Sent Time - the time the last email was sent to any mailbox.
Click the
Apply Changes button.
Note
For more information, refer to Digest generation and Quarantines.
Deactivating Global Digest Settings
To deactivate sending the digest check the Never Send box.
Digest and Branding
In the Digest and Branding tab you can edit the appearance of digest emails sent by GravityZone Security for Email.
To access Disclaimer actions go to Products > Product Configuration > Digest and Branding.
Edit Digest and Branding
You can override the default branding used on the Spam Digest email. By default, this will use the logo from the Account Settings > Branding section, however, this can be overridden with a specific URL to an image hosted externally. It is also possible to customize the envelope headers from the Spam Digest email.
Select the source of the image you wish to send by selecting either Use your account branding or Use a custom image.
Fill in the below fields:
Custom Digest Image URL (only if you select USe a Custom image)
URL
From Address
Support Email
Digest From Name
Type in your company banner in the HTML and plain text boxes under Branding Settings.
You can add a domain wide notice to every email that is sent (if Outbound Mail filtering is configured), which could be used to advertise or notify recipients about some specific news.
Click the
Apply Changes button.