Jamf integration guide
The Bitdefender GravityZone MTD will detect malicious activity and, based on the MDM platform, can take local action. When an app is connected to an MDM, the MDM can perform safe actions on top of what the app does locally.
Prerequisites
Integration with Jamf requires a connection between the Bitdefender Mobile Security console and the Jamf server.
Jamf App on an MDM Enrolled Device | Self Service, and iOS is supported. |
Jamf Console Access | Access to Jamf website at: https://yourHost.jamfcloud.com where yourHost is the URL portion provided by Jamf. Release 10.14.0 or later |
An Administrator Account in Jamf Console | You need an administrator login with the administrator permission access. |
MDM Password | Do not use a colon (:) in the MDM access password field or use `password` as a password value. |
Communication between MDM and Bitdefender Mobile Security console
Through an integration, the Bitdefender Mobile Security console is set up to share information with the Jamf dashboard. When the app notices an event, it checks the current Threat Policy on the device. If there is a specific MDM action set, the mobile security center is told about it. The app then contacts the right Jamf server and gives it the commands it needs to carry out the task.
Configuring Jamf
The MDM integration allows for synchronization of devices. This enables MDM console administration of device management functions. Users are managed through a scheduled synchronization procedure after the initial synchronization during the MDM integration setup. If additional devices exist within the device group(s) used for synchronization, they are added to the Mobile Security console. When devices are removed, they are also eliminated from the console. These modifications do not eliminate any of the associated device events.
Enrolling a device in Jamf
To enroll a device you can follow one of the following methods:
URL and administrator login.
After the application deployment is set up, you can enroll a device by invoking a URL on the device and logging in as an administrator.
Note
You must turn on the user-initiated enrollment for iOS devices in the Jamf console. The enrollment URL is similar to this website: https://yourHost.jamfcloud.com/enroll where yourHost is the URL portion provided by Jamf. Ensure the URL link has the “https” prefix, or the URL may not load in a browser.
This URL brings up this screen on your iOS device.
To enroll a device in Jamf you need to follow these steps:
Log in to the Jamf enroll page with a username and password.
Skip over the “Assign to user” screen by clicking Enroll.
Click Continue and Allow for downloading the profile.
Click Install several times and Done
SMTP Server Setup and an Enrollment Invitation
To set up a SMTP server you neeed to follow these steps:
Log in to the Jamf console.
Select Devices.
Select Management Settings.
Select System Settings.
Select SMTP Server.
Provide the input field values for setting up your SMTP server.
Click the Save button.
You need to set up device enrollment invitations. To complete the enrollment invitations, perform these steps:
Log in to the Jamf console.
Select Devices.
Select Enrollment Invitations.
Click + New.
Select User-Initiated Enrollment for the enrollment method.
Select either email or SMS messages for the invitation method.
Click Next.
Ensure the Require Login checkbox is unchecked. This figure shows this option.
Click Next.
Enter the email addresses and click Next.
Specify the email message details, such as the subject and message text.
Then click Next and click Done. This figure shows you some sample values for the message details.
Note
After the SMTP server setup and the email is configured and sent, the email recipient can click on the link and enroll their device.
On-Demand MDM synchronization
Due to the MDM synchronization window, there are instances in which a new MDM user has a GravityZone MTD delivered to their device and attempts to launch it before the device has been synchronized with the MDM. The Mobile Security console manages this by performing a synchronization on demand when an app attempts to activate but no information exists for it. The Mobile Security console obtains the authentication app's identification information and correlates it with the correct customer for authentication. The mobile security console then retrieves the device and user information from the MDM configured for this customer. This device's app is now authenticated and permitted to proceed.
Note
Ensure you completed adding a Jamf administrator user in the Jamf console and that you created one or more Jamf device groups that contain the devices to be protected.
To set up the MDM integration in Mobile Security console:
Log in to Mobile Security console.
Go to the Manage page.
Select Integrations.
Click on Add MDM and select the MDM integration you want to use.
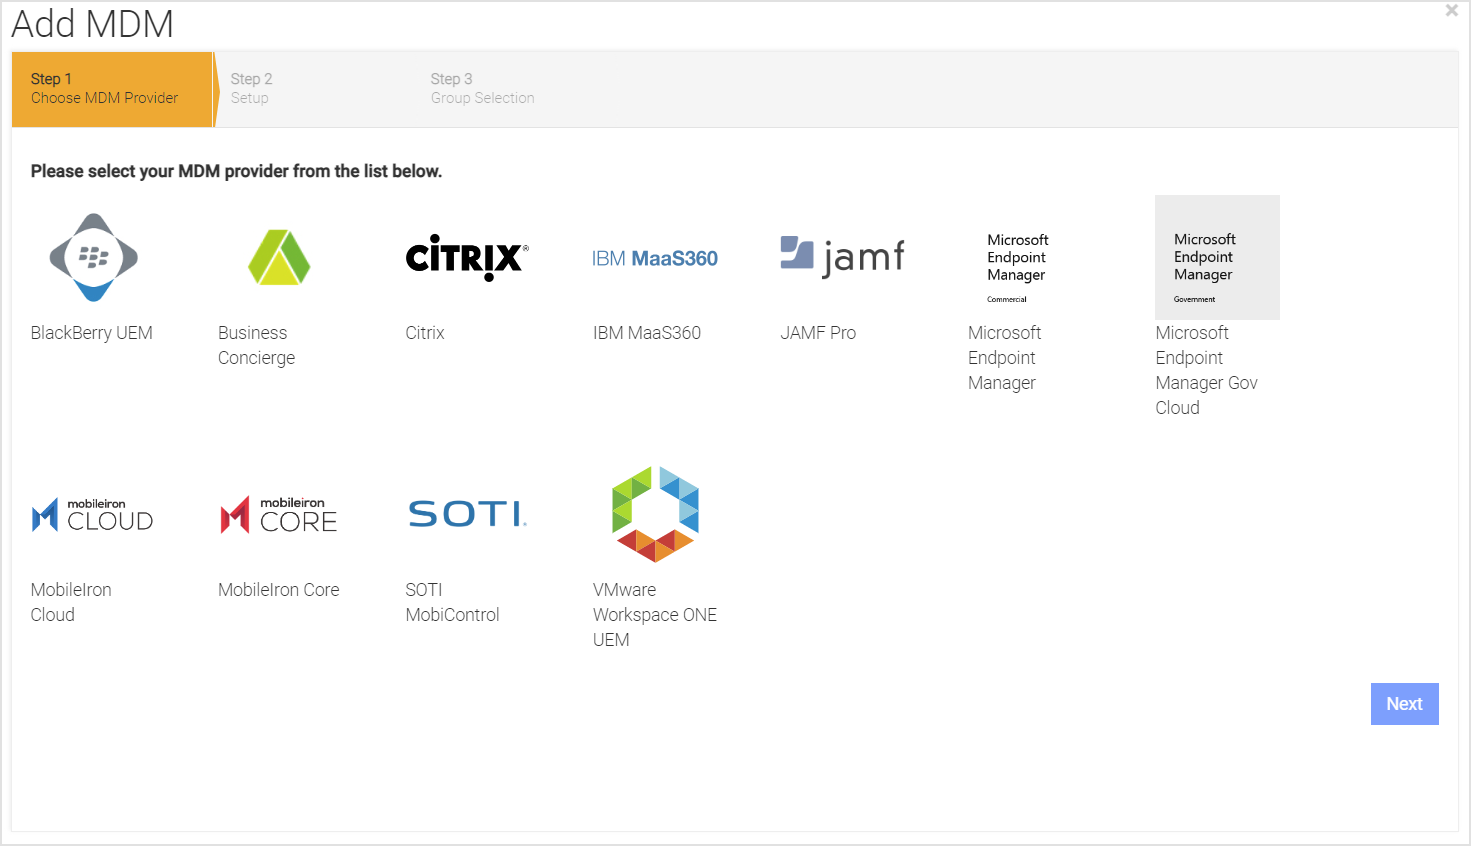
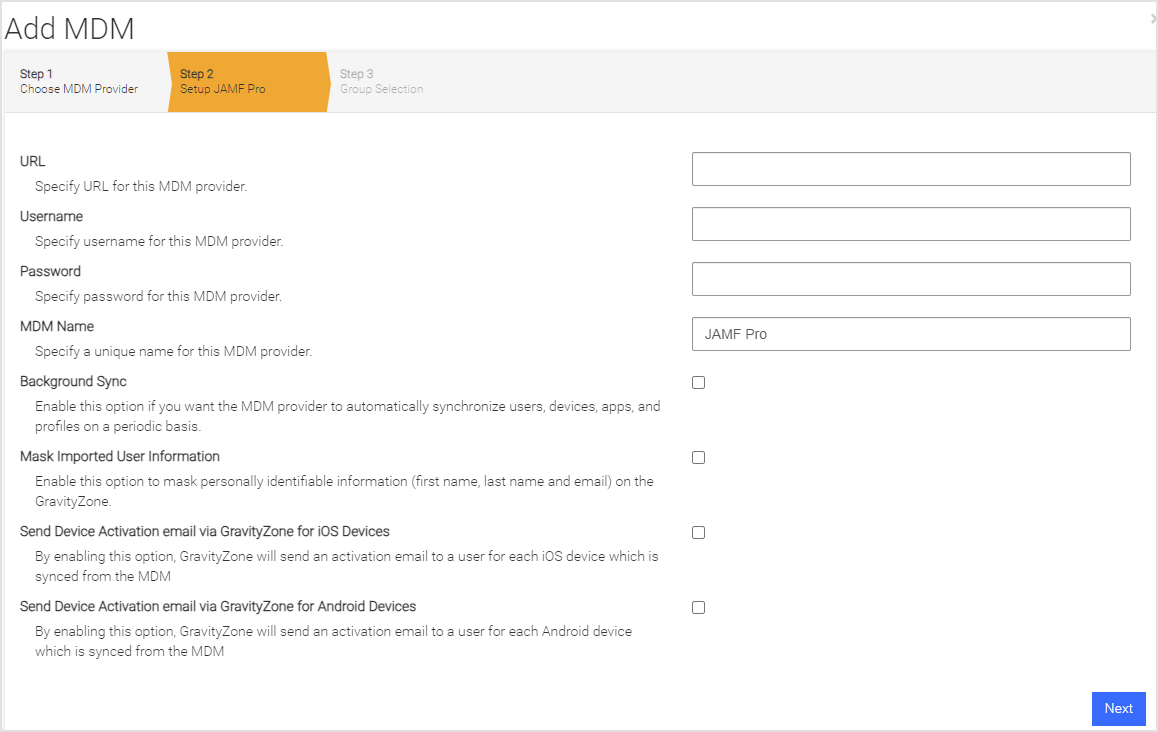
Enter information pertinent to the UEM integration list in the table, and click Next.
Item
Description
URL
The URL of the Jamf Server that is in this format:
https://yourHost.jamfcloud.com/where yourHost is the URL portion given to you by Jamf.Username
The Jamf Administrator username that was created and is used to log into the Jamf console.
Password
The password of the Jamf Administrator used to log into the Jamf console.
MDM Name
The name used in Mobile Security console to reference this MDM integration. This name is prepended to the group name to form the Mobile Security console group name.
Background Sync
Check this box to ensure users and devices are synchronized with the chosen Jamf Device Groups.
Mask Imported Users Information
Check this box to mask personally identifiable information about the user when displayed, such as name or email address.
Send Device Activation email via Mobile Security console for iOS Devices
Check this box to send an email to the user for every iOS device synced with the MDM.
Send Device Activation email via Mobile Security console for Android Devices
This check box does not apply. Only iOS is supported.
Click Next and choose the User Group(s) to synchronize. The available groups show up in the Available Device Groups list and can be moved to the Selected Mobile Security console Groups list by clicking on the plus sign (‘+’). This can be reversed by clicking on the minus sign (‘-’).
Click Next.
Specify the MDM alerts if you want to be notified when there are MDM sync errors. If you want more than one email address, separate them by a comma.
Click Finish to save the configuration and start the first synchronization by clicking Sync Now.
Device application deployment set up
For the initial setup, you define or configure the following:
Administrator User with Access.
Device Groups.
GravityZone MTD (iOS only).
Jamf user with administrator access
To create a Jamf administrator with the proper access, perform these steps:
From the main menu, select Computers.
Click Management Settings.
Click System Settings.
Select Jamf Pro User Accounts and Groups.
Click the + New button.
Choose to create a standard account.
Enter the field values for the new administrator.
Ensure the Access Level is “Full Access.”
Ensure the Privilege Set is “Administrator.”
Click Save.
Device groups
There are two types of device groups available to organize and synchronize devices with Mobile Security console. There are:
Smart Device Groups.
Static Device Groups.
You can choose how your devices are organized into one or more device groups. For example, device groups can organize devices for different risk postures.
When you add the Jamf MDM to the Mobile Security console, these items are created:
Extension Attribute of the Bitdefender risk posture.
Device Groups for the different risk postures.
These device groups are created with specific criteria and aligning them for specific risks, and using this is a good practice.
Security for Mobile
To deploy theGravityZone MTD through Jamf MDM, use the version of the app available through the Apple App Store. The latest iOS app is in the application stores, and it is good practice to deploy the latest application through Jamf. To obtain the application from the public application store, search the appropriate store for GravityZone MTD. To deploy as an internal app, log in to Jamf, specify the proper application (or IPA file for iOS) to Jamf under app configuration.
To load the GravityZone MTD as an app for deployment, perform these steps:
From the main menu, select Devices.
Select Mobile Device Apps.
Click + New.
Choose an App Type of App Store app.
Click Next.
Type in “GravityZone MTD” in the search dialog and set the app store country as “United States”.
Click Next.
Select Bitdefender GravityZone MTD by clicking the Add button.
Provide a display name and ensure you select the following on the General tab:
Install Automatically/Prompt Users to Install for the Distribution Method.
Automatically Force App Updates should be enabled.
For the Scope tab, you can specify specific devices, users, user groups, or you can specify all devices and users. You can specify a device user group as a specific target and this is the recommended method.
For the App Configuration tab, use the App Config Generator. Select the file from the repository “com.jamfsoftware.casperfocus/current” as the default. Specify the known values and add additional configuration values as needed. See the table in the “iOS Activation” section for more information.
Click Save.
Configuring scope of device application
For a mobile device application like GravityZone MTD, you can define the scope of the application. You can define the scope with mobile device groups similar to the figure. Or you can define specific user groups, devices, or users.
Assigning an enrolled device to a static device group
If you decide to use Static Device Groups instead of Smart Device Groups, the following steps describe how to assign an enrolled device to a static device group.
Log in to the Jamf console.
Select Devices.
Select Static Device Groups.
Select the group within which you want the device.
Click on Assignments and Edit.
Select the desired device(s) and Save.
Configuring device application auto-activation
The GravityZone MTD for iOS can automatically activate. The process is described in the following sections.
iOS
GravityZone MTD makes use of the application configuration when the app is pushed down to the device. This provides the best user experience, allowing the user to startup iOS app without having to enter any credentials. The application configuration pre-programs iOS app with the required information. This configuration is performed within Jamf. During the add application step, there is a configuration option. As another alternative, you can edit the application after the application is added.
Configuration Key | Value Type | Configuration Value | Additional Notes |
|---|---|---|---|
MDMDeviceID | String | $UDID | Required |
tenantid | String | Retrieve from Mobile Security console | Copy the value from the Tenant ID field on the Mobile Security console Mobile Security ConsoleManage page under the General tab. |
defaultchannel | String | Retrieve from Mobile Security console | Copy the value from the Default Channel field on the Mobile Security console Manage page under the General tab. |
tracking_id_1 | String | Use the desired identifier | (Optional) This is a tracking identifier. |
tracking_id_2 | String | Use the desired identifier | (Optional) This is a tracking identifier. |
display_eula | String | no | (Optional) If this key is not used, the default displays the End User License Agreement (EULA). |
About app configuration
For the app configuration, you can use the app configuration generator which generates a starting PLIST file for you. Set the PLIST XML value in the field under the App Configuration tab.