Rules
Overview
Rules can be created to allow or block emails based on different criteria.
Rules can be created:
Globally - for all or selected customers under an MSP partner
Organizationally - for a specific customer
Domain - for a specific domain
Users - for specific users or mailboxes
Rule Types:
Allow Rules - based on sender addresses or domains
Block Rules - based on sender addresses or domains
Custom Rules - based on sender addresses, domains, IP addresses, subject lines, URLs, Headers, attachment types.
Tip: It is important to understand the difference between an allow rule and a custom rule as they pertain to the email verdict you’re trying to bypass, as outlined in the table below.
Email Verdict | Bypassed by Allow Rule | Bypassed by Custom Rule |
|---|---|---|
Spam | Yes | Yes |
Infomail | Yes | Yes |
Impersonation | Yes | Yes |
Policy - Banned Attachment | No | Yes |
Policy - Geo | No | Yes |
Malware | No | Yes |
Phishing | No | Yes |
Rules can be created from:
From the portals (MSP level, customer level, end-user level)
Creating an Allow Rule
Overview
Allow Rules can be created to permit specific sender addresses or domains to bypass specific filters within Mesh.
For security reasons, allow rules do NOT bypass phishing, malware, banned, or geo filter verdicts. To bypass these verdicts, you need to create a custom rule
Email Verdict | Bypassed by Allow Rule | Bypassed by Custom Rule |
|---|---|---|
Spam | Yes | Yes |
Infomail | Yes | Yes |
Impersonation | Yes | Yes |
Policy - Banned Attachment | No | Yes |
Policy - Geo | No | Yes |
Malware | No | Yes |
Phishing | No | Yes |
Allow Rules Can Be Applied
Globally - for all or selected customers under an MSP
Organizationally - for a specific customer
Domain - for a specific domain
Users - for specific users or mailboxes
Step 1: Select "New +"
Click "New+". A popup window will appear.
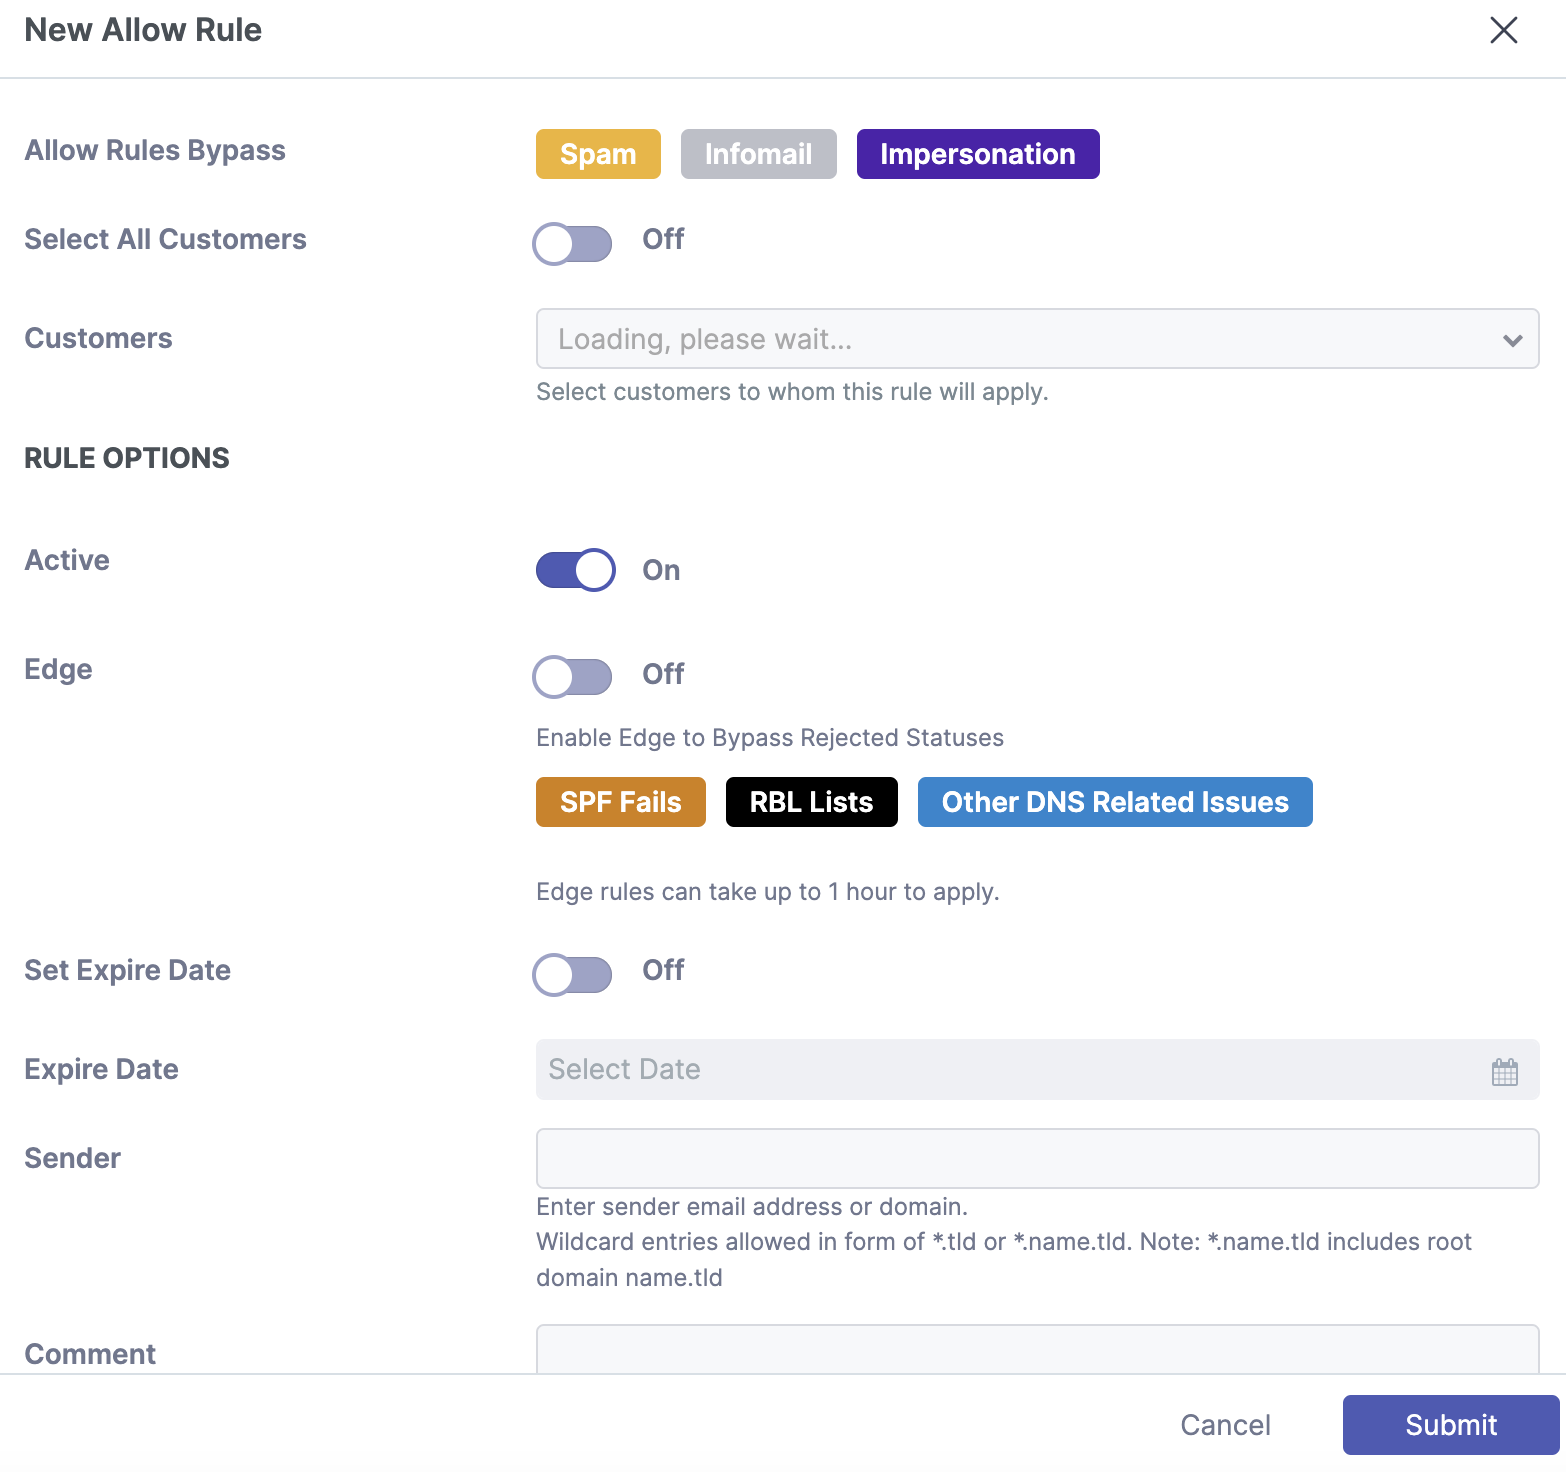 |
Step 2a: Select Customers To Whom The Rule Will Apply (Partner view)
Click “Select All Customers” or select what customers you would like to apply the rule.
Step 2b: Select Organization/Domain/User To Whom The Rule Will Apply (Customer view)
Select if you are applying the rule to the “Organization”, “Domain”, or a particular “User”.
Step 3: Set The Rule Options
Note
Rules will trigger if the header-from OR envelope-from matches the entry.
To allow a sender, enter the email address as shown below
sender@example.com
To allow a domain AND all subdomains, enter the domain as shown below (do not include the '@' symbol)
example.com
To allow a subdomain, enter the domain as shown below (do not include the '@' symbol)
subdomain.example.com
To create a wildcard entry, enter the rule as shown below. This example would allow emails from domains ending in .io:
*.io
Step 4: Enable Edge Slider (Optional)
The “Edge” slider should only be enabled if you wish to bypass SPF checks or DNS issues. For example, if an email is being quarantined as spam, you do not need to enable the edge slider. Enabling this unnecessarily can be a security risk.
Step 5: Submit
Click Submit to create the rule.
Creating a Custom Rule
Criteria, Actions, and Applying Custom Rules
Unlike Allow and Block Rules, Custom Rules can be multi-conditional, based on the following criteria:
Sender address, or domain
IP address or range
Subject
URLs
Headers
Attachment types
Custom Rules actions are as follows:
Deliver
Deliver + Banner (Only available Mesh Unified and Mesh 365)
Deleted
Quarantine
Rejected
Junk (Only available Mesh Unified and Mesh 365)
Junk + Banner (Only available Mesh Unified and Mesh 365)
Custom Rules Can Be Applied:
Globally - Can be created from the partner level for all or selected customers.
Organizationally - Can be created for a specific customer.
Domain - Can be created for a specific domain.
Users - Can be created for specific users or mailboxes.
What Do Custom Rules Bypass if Set to Deliver
Custom Rules when set to deliver, bypass all filtering categories.
Verdict | Bypassed by Custom Rule? |
|---|---|
Spam | Yes |
Infomail | Yes |
Impersonation | Yes |
Malware | Yes |
Phishing | Yes |
Policy - Banned Attachment | Yes |
Policy - Geo Filter | Yes |
Create Custom Rule
Step 1: Click New
Navigate to the Policy page, click on Custom Rule, and then select New+.
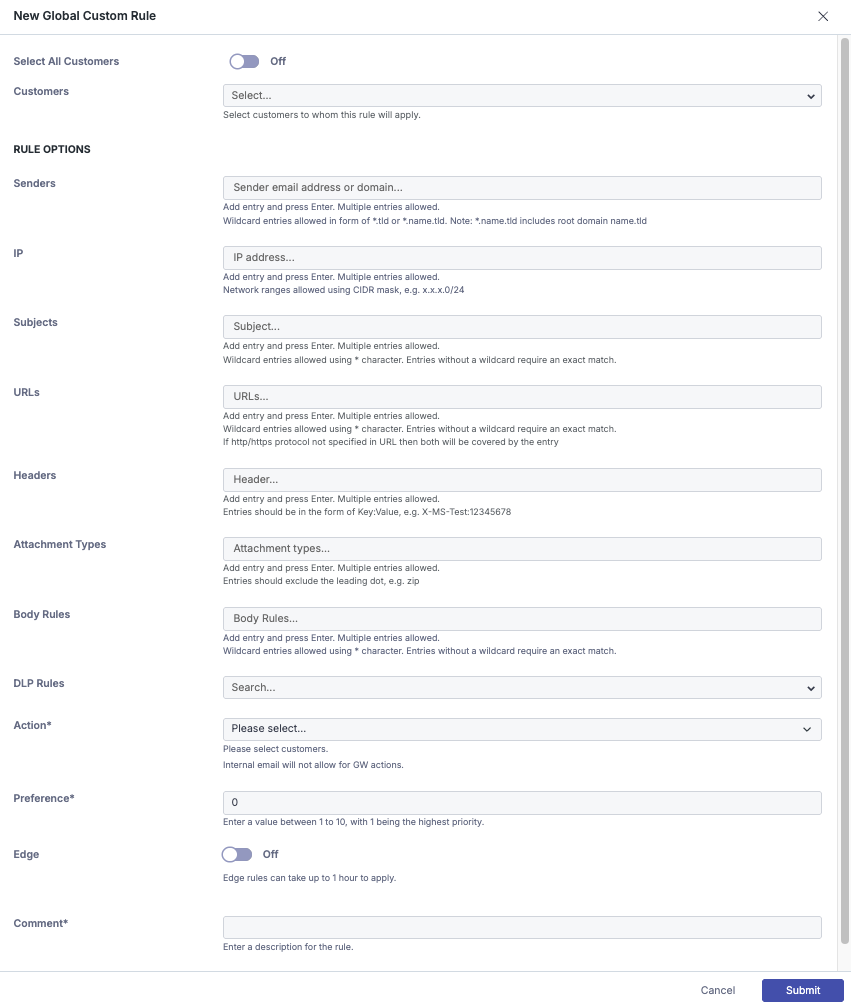
Step 2a: Select Customers to Whom the Rule Will Apply (Partner View)
When "Select All Customers" is enabled, the rule will select all existing customers or manually select the specific customers you want the rule to apply to.
Note
Customers using different products may have different actions available to them.
Step 2b: Select Organization/Domain/User To Whom The Rule Will Apply (Customer view)
Select if you are applying the rule to the “Organization”, “Domain”, or a particular “User”.
Step 3: Select The Rule Options
For each section, one or more entries are allowed, and each section must have at least one match in the message for the rule to trigger.
Note
Important: Each section in a custom rule functions as an AND statement, however, entries within an option function functions as an OR statement.
For example, a custom rule with one sender, one IP entry, two subject entries, and three attachments specified, the rule will require the message to contain at least one match from each entry to trigger the rule.
Sender
Note
Rules will trigger if the header-from OR envelope-from matches the entry.
To allow a sender, enter the email address in this format: sender@example.com
To allow a domain AND all subdomains, enter the domain as shown below (do not include the '@' symbol): example.com
To allow a subdomain, enter the domain in this format (do not include the '@' symbol): subdomain.example.com
To create a wildcard entry, enter the rule in this format. This example would allow emails from domains ending in .io: *.io
IP
The sender's IP address or a pool of IP addresses, as shown below:
1.1.1.1
1.1.1.0/24
Subject
An exact match is required, unless using the wildcard symbol *.
 |
For example: The above rule will trigger on any subject lines starting with “This is an example" OR “Ticket#".
Body Rules
Define keywords/strings that, if found in the message body, will trigger the rule. It is possible to add one or more entries. Required to be a exact match unless using the wildcard symbol “*” which will allow for additional characters if inserted on the left, right or both sides of the entry. Each entry acts as a unique rule.

For example, the above rule will trigger on any emails containing the word Voicemail or lines starting with Microsoft.
DLP (Data Loss Prevention) Rules
When enabled, DLP rules help identify and flag messages that contain patterns commonly associated with sensitive data. The current categories are Credit Card numbers, IBANs, or Social Security numbers (SSNs).
Credit Card Numbers - Matches industry-standard formats, e.g. 5555-5555-5555-4444, 4111111111111111.
IBANs - Matches valid IBAN formats (country-specific variations are supported).
Social Security Numbers (SSNs) - Matches the standard U.S. SSN format (111-22-3333) as well as variations without separators (e.g. 111223333).
Once a match is detected, the configured action for the rule (e.g. quarantine, reject, or banner the message) will be applied.

URL
Wildcard entries are allowed in the form of *.tld or *.name.tld. You can also use a wildcard at the end of a full address. If HTTP/HTTPS protocol is not specified in URL then both will be covered by the entry.
example.com
*.example.com
https://example.com/contact-us
https://example.com/*
Headers
Used to identify specific email headers. This can help when allowing Security Awareness Tools or mass mailing services as they commonly will inject a unique custom header.
 |
Attachment Type
Used to check for specific attachments. This can be used override the banned attachments specified in the customer’s policy or only trigger when. Entries should exclude the leading dot, e.g. zip.
 |
Step 4: Exclude verdicts
This option can be used to exclude a particular verdict in a custom allow rule.

If this field is left empty, the custom rule will trigger for ALL verdicts. If you select an option from the dropdown menu, for example Malware or Impersonation, an email that receives either of those verdicts would not trigger the rule.
Step 5: Actions
Decide the action applied on the email.
Deliver
Deliver + Banner (Only available Mesh Unified and Mesh 365)
Delete
Quarantine
Reject
Junk (Only available Mesh Unified and Mesh 365)
Junk + Banner (Only available Mesh Unified and Mesh 365)
Note
If an email has the Delete or Reject action it CANNOT be recovered.
Step 6: Preference
The preference controls when the rule is triggered if there are other custom rules you would like to process first. In most cases, 1 will be the most appropriate. Rules are still applied based on their hierarchy first. You can find more information here.
Step 7: Edge Rule
The “Edge” slider should only be enabled if you wish to bypass SPF checks or DNS issues. Enabling this will carry out the action at the connection level. In most cases, you do not need to enable this.
Step 8: Comment
Text field to describe the rule and make searching in the future easier.
Step 9: Submit
Click Submit to save settings. The table will now be updated with the created rule.
Creating a Block Rule
Overview
Block Rules can be created to delete emails from a specific sender address or domain.
Block Rules Can Be Applied
Globally - for all or selected customers under an MSP
Organizationally - for a specific customer
Domain - for a specific domain
Users - for specific users or mailboxes
Step 1: Select "New +"
Click "New+". A popup window will appear.
 |
Step 2a: Select Customers To Whom The Rule Will Apply (Partner view)
Click “Select All Customers” or select what customers you would like to apply the rule.
Step 2b: Select Organization/Domain/User To Whom The Rule Will Apply (Customer view)
Select if you are applying the rule to the “Organization”, “Domain”, or a particular “User”.
Step 3: Set The Rule Options
Note
Rules will trigger if the header-from OR envelope-from matches the entry.
To block a sender, enter the email address as shown below
sender@example.com
To block a domain AND all subdomains, enter the domain as shown below (do not include the '@' symbol)
example.com
To block a subdomain, enter the domain as shown below (do not include the '@' symbol)
subdomain.example.com
To create a wildcard entry, enter the rule as shown below. This example would allow emails from domains ending in .cool. Wildcards can be quite useful for blocking entire Top Level Domains (TLDs):
*.cool
Step 4: Submit
Click Submit to create the rule.
Import Rules Using a CSV File
A CSV file can be used to upload large amounts of allow or block rules in bulk. Rules in the CSV file should adhere to the format outlined in the below tables.
To upload a CSV with allow and/or block rules, perform the following steps.
Step 1: Navigate to the "Policy"
On the customer level account, navigate to the "Policy" page in the sidebar.
Step 2: Select Allow/Block Rule.
Select the "Allow Rules" or the "Block Rules" tab.
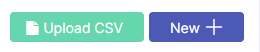
Step 3: Select "Upload CSV"
Click the "Upload CSV" icon in the top right corner. A popup window will appear. An example CSV can be downloaded by clicking the blue "here".
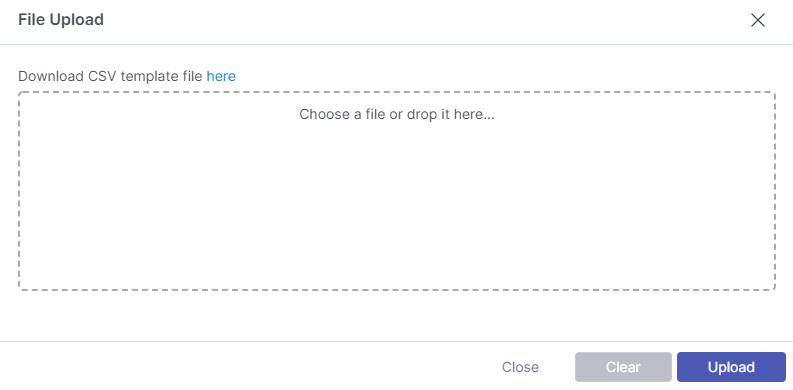 |
Step 4: Select file and Upload
Click the "Chose a file" or drag a CSV file onto the box and select upload.
Allow rules format
sender | recipient | rule | |
|---|---|---|---|
1 | importantclient@example.com | ceo@meshsecurity.io | allow |
2 | example.com | meshsecurity.io | allow |
3 | *.com | Organization | allow |
Note
Explanation:
Demonstrates a user to user allow rule.
Demonstrates a domain to domain allow rule
Demonstrates a wildcard allow rule for all domains ending in “.com”. It is applied to the entire customer organization.
Note
Rules will trigger if the header-from OR envelope-from matches the entry.
Block rules format
sender | recipient | rule | |
|---|---|---|---|
1 | malicioussender@example.com | ceo@meshsecurity.io | block |
2 | example.com | meshsecurity.io | block |
3 | *.ru | Organization | block |
Note
Explanation:
Demonstrates a user to user block rule.
Demonstrates a domain to domain block rule
Demonstrates a block rule for all domains ending in “.ru”. This would block any emails for a TLDs registered in Russia. It is applied to the entire customer organization.
Note
Rules will trigger if the header-from OR envelope-from matches the entry.
Troubleshooting Tips
When creating domain level rules, do not include the “@” symbol.
Keep the file size under 2000 rows. If you need to upload 2000+ rules, creating multiple CSV files is recommended.
If your upload is failing, check your CSV to ensure that it is following the template format and that the file type is correct. Ensure there are no invalid symbols, whitespace, or invalid domains/addresses.
If you need to create an allow or block rule for an IP address, please create a “Custom Rule”. More information can be found here: https://docs.emailsecurity.app/help-center/creating-a-custom-rule.
Note
Tip: You can combine allow and block rules into one list for importing as long as it remains under the maximum limit of 2,000 rules. This can be performed using the “Upload CSV” button in either the Allow Rules page OR the Block rules page. Allow rules will appear in the allow page and vice versa.
Export Rules
Allow, block, and custom rules can be exported to a CSV or JSON file. Here are the steps to complete an export.
Note
The export saves your search results, allowing you to specify what you want to appear in the file.
1. Navigate to the Policy page
Navigate to the Policy page in the sidebar.
2. Select Allow/Block rule
Select the Allow or the Block tab and perform the search.
3. Export
Select Export. The format selection window is opened.
4. Select format
Select a format and choose whether you would like to include any allow or block rules.
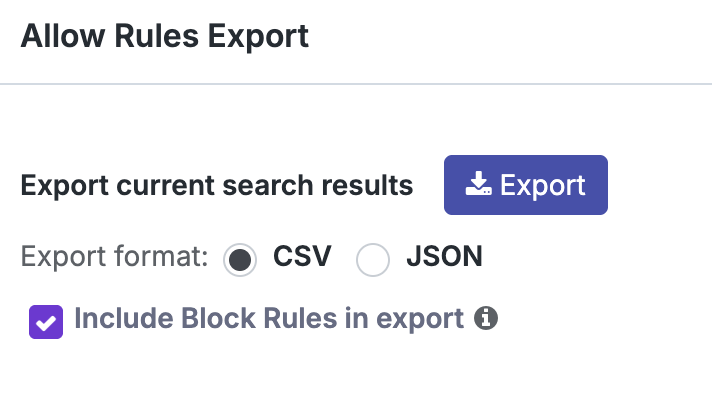
5. Download
Once you have completed you configuration, click the icon to begin the download.
Reasons for creating allow rules during onboarding
There are certain scenarios that may result in Mesh correctly blocking wanted emails.
Frequent or High-priority senders
We regularly see senders with misconfigured settings such as SPF or DKIM, that can result in their emails being quarantined by Mesh. It can be beneficial to create allow rules for your customer’s most frequent or high-priority senders.
Third party tools like CRMs or PSAs that send email on your behalf
Third party tools like CRM's or PSA’s often use the customer’s domain in the header/envelope from. Because these emails are coming from an external source, they will hit impersonation filters in Mesh.
Note
Avoid creating a same domain allow rule. A same domain allow rule is when the sender domain matches the recipient domain.
You can overcome this with by creating a custom rule using the sender address AND IP address to prevent emails from being quarantined.
Know The Difference Between Allow Rules and Custom Rules.
It is important to familiarize yourself with the difference between allow and custom rules and where they are best used ⟶ Rules
Email Verdict | Bypassed by Allow Rule | Bypassed by Custom Rule |
|---|---|---|
Spam | Yes | Yes |
Infomail | Yes | Yes |
Impersonation | Yes | Yes |
Policy - Banned Attachment | No | Yes |
Policy - Geo | No | Yes |
Malware | No | Yes |
Phishing | No | Yes |
O365 Safe Senders and Blocked Senders
If using Mesh 365 or Mesh Unified, O365 Safe Sender and Blocked Senders rules can be used to seamlessly allow or block emails. Safe Senders are treated similar to regular allow rules and only bypass certain verdicts. You can learn more about our rules here: Rules
Note
Safe sender and block senders created in O365 are not replicated to the Mesh policy page.
Note
If the customer is using Mesh Unified and the policy action for a verdict is “Quarantine in Mesh”, the safe sender rule will not be triggered. This is due to safe sender rule being processed at the API level.
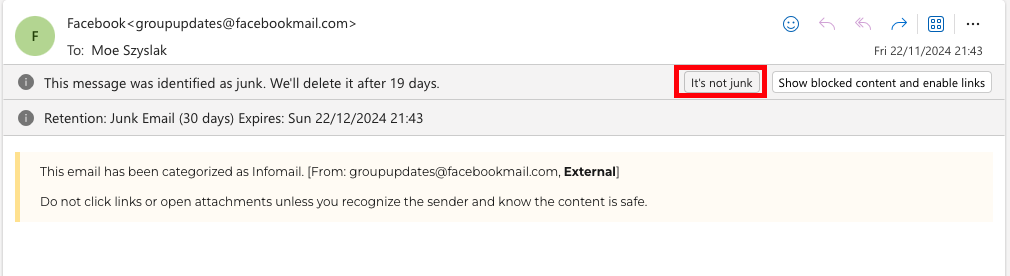
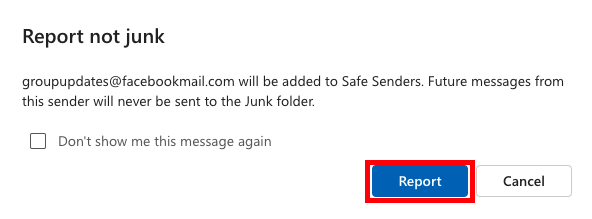
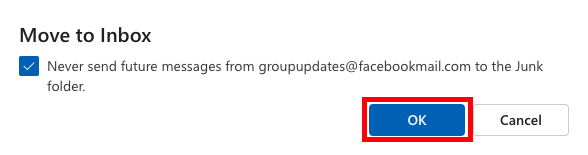
How to create a Safe Sender
There are two methods to create a safe sender rule in O365.
Step 1a: Click “It’s not junk”
In your Outlook client, click “It’s not junk”.
 |
Step 2a: Click “Report”
Click “Report” to confirm the creation of the rule.
 |
Step 1b: Drag to Inbox
Dragging the email from the message list to the inbox.
Step 2b: Click Checkbox and OK
Click “Ok” to confirm the creation of the rule.
 |
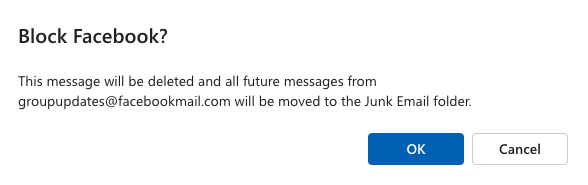
How to create a Blocked Sender
We currently replicate Microsoft's block action which is to move the email to the Junk folder going forward. If you want to delete an email instead, a block rule is more appropriate. Learn more here: Creating a Block Rule
Step 1: Right Click an Email
Right click an email from the message list.
Step 2: Click Block Sender
Click “Block Sender”.
 |
Step 3b: Click OK
Click “Ok” to confirm the creation of the rule.
 |
How to Check if an Email is on Safe Senders or Blocked Senders list
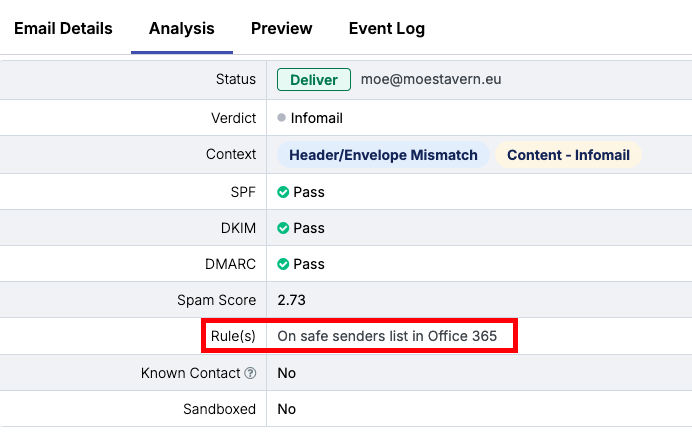
Within the Live Email Tracker we show this information in the email status and email analysis for both safe and blocked senders.
 |
 |