Configuration
Network Settings
In the Configuration > Network Settings page, you can configure settings related to Network inventory, for example creating and managing scheduled rules for deleting unused endpoints.
The options are organized into the following sections:
General Network inventory settings
Under the Network Inventory settings section, the following options are available:
Automatically copy the label of the Relay to connected endpoints, if not specified otherwise. Select this option if you want the label you assigned to a specific relay to be automatically added to all endpoints assigned to it.
Note
This will not overwrite any labels previously added to said endpoints.
Avoid duplicates of cloned endpoints. Select this option to enable a new type of network objects in GravityZone, called golden images. This way you can differentiate the source endpoints from their clones.
You can also select Applies to cloned physical endpoints that are joined in Active Directory to resolve cloned HDD drives from decommissioned machines, as well as Applies to cloned virtual endpoints that are joined in Active Directory to resolve clones created using VMware Instant Clones.
Further on, you need to mark each endpoint you clone as follows:
Log in to GravityZone Control Center.
Go to the Network page from the left side menu.
Select the endpoint you want to clone.
From its contextual menu, select Mark as Golden Image.
Add MAC address to endpoint name. Select this option if you want to view the MAC address of the endpoint at the end of its name in Network Inventory. This option applies only to endpoints in Computer and Groups, after they synchronize with Control Center.
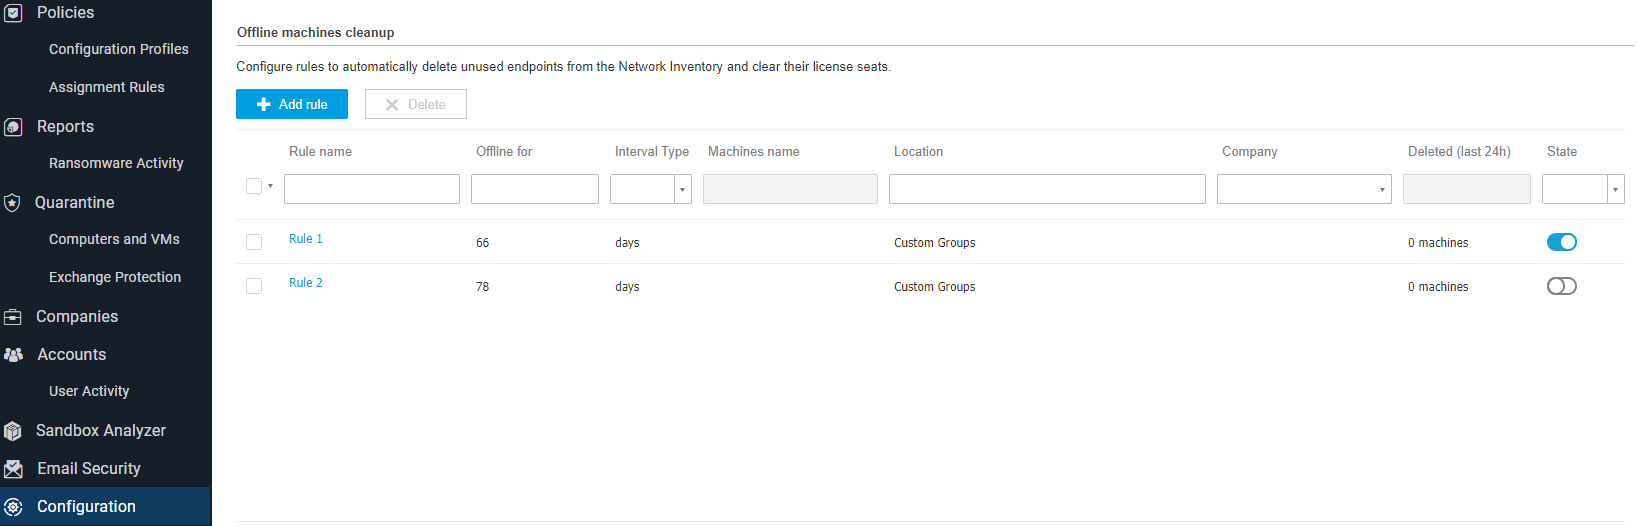
Offline machines cleanup
Under the Configuration > Network Settings > Offline machines clean up section, create rules to automatically delete unused endpoints from the Network Inventory.
Creating rules
To create a cleanup rule:
Under the Offline machines cleanup section, click the Add rule button. The configuration page is displayed.
Enter a rule name.
Specify the amount of time for which the machines are offline. Select the time unit - hours or days, from the drop-down list, and enter the number in the next field.
Under the Cleanup criteria section, select the hour when the rule should start to run.
If you select hours, the rule applies every hour, starting with the one you have selected.
If you select days, the rule applies daily at the specified hour.
Enter a name pattern, which can apply to all endpoints. This field is case sensitive and accepts only letters, digits, wildcards (* and ?), underscore (_), and hyphen (-). For example, use
machine_1to delete the machine with this name, ormachine_*to delete all machines whose name begin withmachine_. Or you can use*to apply the rule to all machines regardless their name.Note
The asterisk (*) wildcard can replace multiple characters, while the question mark (?) wildcard can only replace one character.
Select the company where the endpoints are located.
Select the endpoint groups to target with this rule.
Click Save.
Important
The rule applies only to the selected company and target endpoints.
Note
The cleanup rules can be set for the following intervals:
Between 1 and 730 days
Between 1 and 23 hours
Viewing and managing rules
The Network Settings > Offline machines cleanup section displays all the rules you have created. A dedicated table provides you with the following details:
Rule name
The number of days since the machines went offline
Machine name pattern
Location in the Network Inventory
Company name
The number of machines deleted in the last 24 hours
State: enabled, disabled, or invalid
Note
A rule is invalid when targets are no longer valid, due to certain reasons. For example, the endpoints have been deleted or you do not have access to them anymore.
A newly created rule is enabled by default. You can enable and disable rules at any time by using the On/Off switch in the State column.
The table displays existing rules for the selected company. To view the rules for another company, use the drop-down menu from the Company column to make a different selection.
If needed, use the sorting and filtering options at the upper side of the table to find specific rules.
To modify a rule:
Click the name of the rule.
In the configuration page, edit the rule details.
Click Save.
Security Server Settings
Security Server Cache Sharing
Security Servers use their caching mechanism to deduplicate antimalware scanning, optimizing this process. One step further with scanning optimization is to share this cache with other Security Servers.
To enable and configure cache sharing:
Go to the Configuration > Security Server Settings page.
Select the Security Server Cache Sharing check box.
Choose the sharing scope:
Share cache between all available Security Servers. It is recommended to use this option if all Security Servers are in the same network.
Share cache between Security Servers available in the Assignment list. Use this option when Security Servers are spread in different networks and cache sharing may generate a high amount of traffic.
If limiting the scope, create the group of Security Servers.
Select the Security Servers from the drop-down list and click Add.
Only Security Servers in the table will share their cache.
Click Save.
Privacy
In this section you can define the following settings:
Submit crash reports to Bitdefender
Select this option so that reports will be sent to Bitdefender Labs for analysis if the security agent crashes.
The reports will help our engineers find out what caused the problem and prevent it from occurring again.
No personal information will be sent.
Send feedback regarding the Security Server' health
Select this option to send anonymized telemetry data about the Security Server.
Use Bitdefender Global Protective Network (GPN) to enhance protection
Select this option to submit detections to Bitdefender to improve the efficiency of the Antimalware module.
If this option is disabled, you may experience the following:
A large amount of false positive/negative detections
Delays in detecting zero-day attacks
Central Scan engines efficiency significantly reduced
Other modules relying on Antimalware are also affected
Enable password expiry
Select this option if you want to configure password expiration settings for the Security Server.
Note
The default value is 90 days, and the maximum value is 365 days.