YARA detection rules
Overview
YARA rules are queries you can use to scan endpoints for patterns of malicious behavior. Use the YARA detection rules feature to generate custom alerts and security incidents based on the results of these scans.
Find this new feature by going to the Incidents > Custom detection rules page. When adding a new rule, click the YARA button to switch to the YARA rule definition.
Important
You can create a maximum of
50YARA rules.This feature is available for macOS, Windows, and Linux endpoints with x64 architecture that have BEST configured with the Local Scan mode.
YARA detection rules are not available for Linux endpoints with ARM64 architecture.
Prerequisites
To use this feature, you must meet the following requirements:
You have an active EDR license.
Important
Licenses offering deployment only in EDR (Report only) mode do not support this feature.
The installed BEST version on your endpoint satisfies the OS-specific requirement:
Windows: BEST version
7.9.5.318or newerLinux: BEST version
7.0.3.2248or newermacOS: BEST version
7.16.42.200016or newer
Creating YARA detection rules
To create a YARA rule, follow these steps:
Log in to GravityZone Control Center.
Go to the Incidents > Custom detection rules page from the left side menu.
Click Add rule.
You will be redirected to the Add rule page.
At the Detection rule definition step, click the YARA button to switch to YARA rule definition.
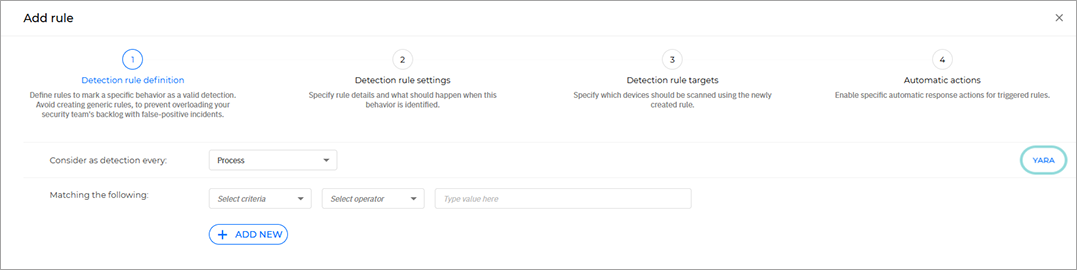
Type your rule query.
Important
Refer to the YARA Performance Guidelines and Writing YARA rules documentation. Following these guidelines can minimize potential performance issues for the endpoints being scanned.
You can enter up to 30,000 characters per YARA rule.
Only ASCII characters are supported.
The YARA detection rules feature does not support the include directive, which allows external file contents to be added during rule compilation.
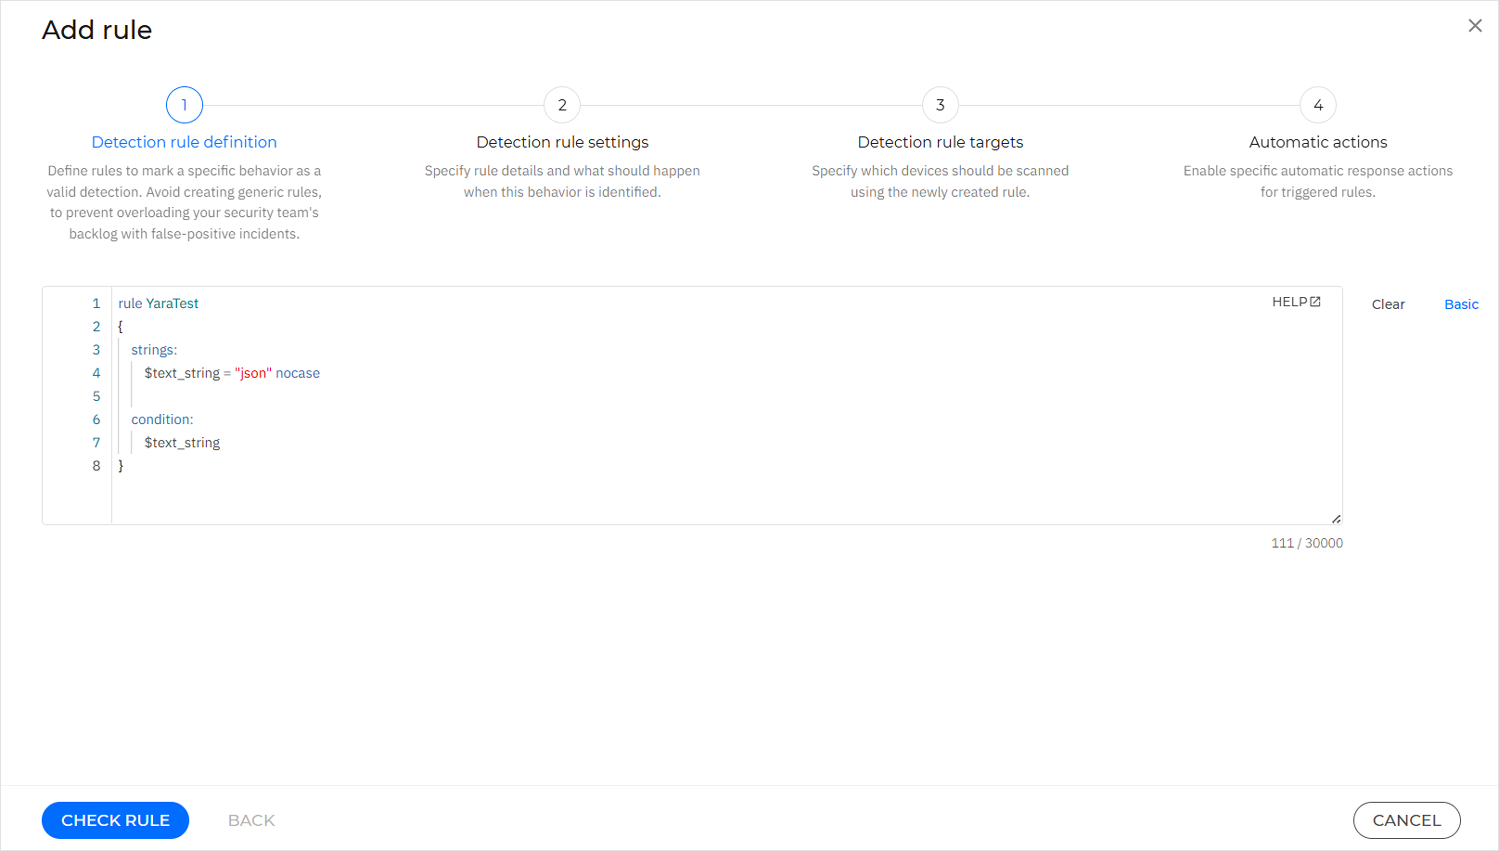
Click Check rule.
If there are any errors in the rule syntax, you will receive error messages or warnings. Hover over the highlighted lines to get more detailed information on what needs to be fixed.
Correct any highlighted syntax errors, then click Check rule again.
Once the rule is successfully validated, click Next.
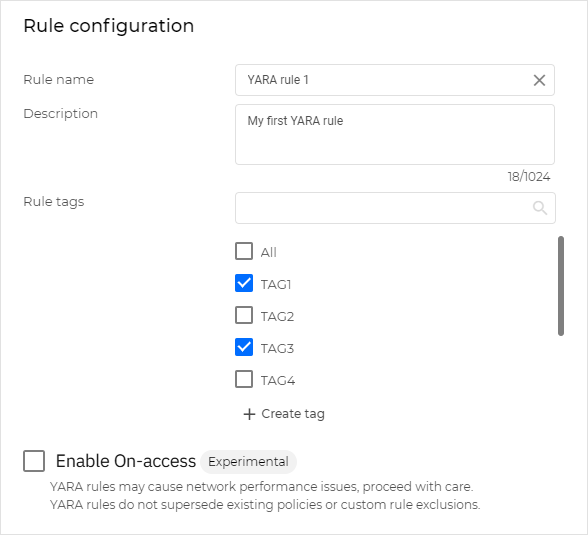
At the Detection rule settings step, in the Rule configuration section, add a descriptive rule name.
Optional: Type a rule description and select relevant tags for the rule.
Important
If you do not have a tag that suits your rule, you can click Create tag and add one.
Rule tags can help you identify, group, and sort rules as needed.
Optional: Enable the Enable On-access option to activate the rule immediately after creation.
Warning
Use this option with caution, as it can impact the performance of the scanned endpoints. We therefore recommend that only experienced security analysts configure such rules, ensuring queries are highly specific.
This feature processes files up to 50 MB in size. To scan larger files, perform an on-demand scan instead. Note that on-demand scans using YARA rules do not generate incidents, only alerts.
This option applies the same on-access scanning settings defined in the endpoint’s active policy and does not override them.
The YARA detection rules feature does not apply the scan actions configured in the On-access Scanning policy settings.
Tip
Enabling this option generates both alerts and incidents as a result of YARA scans whenever the conditions listed in the rule are met for any specific endpoint. You can view the alerts in the Search page and the incidents in the Incidents page.
Note
The total active YARA detection rules from the Custom detection rules table can generate up to 100 unique incidents per hour. If a YARA detection is triggered for an event that already has an active incident, that incident will be automatically updated, and the detection will not count toward the 100-incident limit.
The total active YARA detection rules from the Custom detection rules table can generate up to 5000 alerts per hour.
A single YARA rule from the Custom detection rules table can contain multiple individual YARA rules defined in the query syntax. For each individual YARA rule, up to 1000 alerts can be generated per hour.
In the Rule outcome section, select the appropriate severity level for the generated alerts.
Click Next.
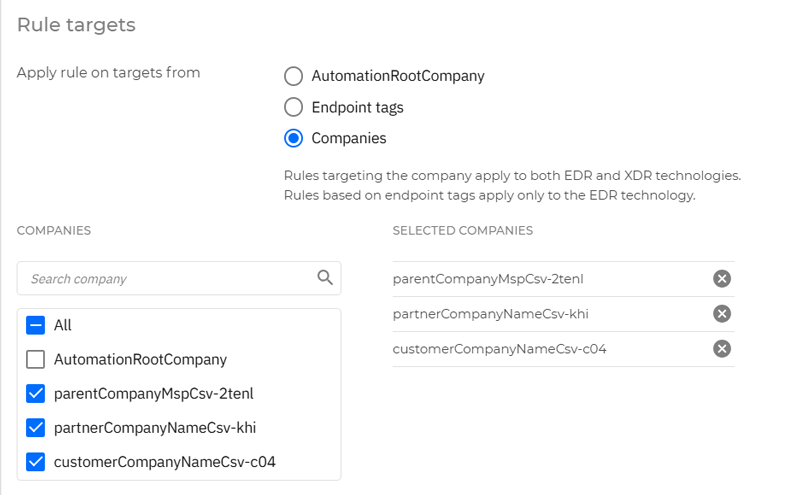
At the Detection rule targets step, in the Rule targets section, select which endpoints the rule will scan.
Select the entire company or specific endpoint tags.
If you select the Endpoint tags option, select the tags from the list in the left-side menu.
Your current selection will be displayed in the right-side menu.
Note
The rule will apply only to the endpoints that have the selected tags applied.
These tags are created and managed in Network > Tags management.
If you select the Companies option, the rule will apply only to the selected managed companies.
Select the companies from the list in the left-side menu. Your selection will be displayed in the right-side menu.
Click Next.
Optional: At the Automatic actions step, configure which response actions are automatically triggered when the YARA detection rule is matched and set their execution priority.
Select Enable automatic actions to activate automatic actions.
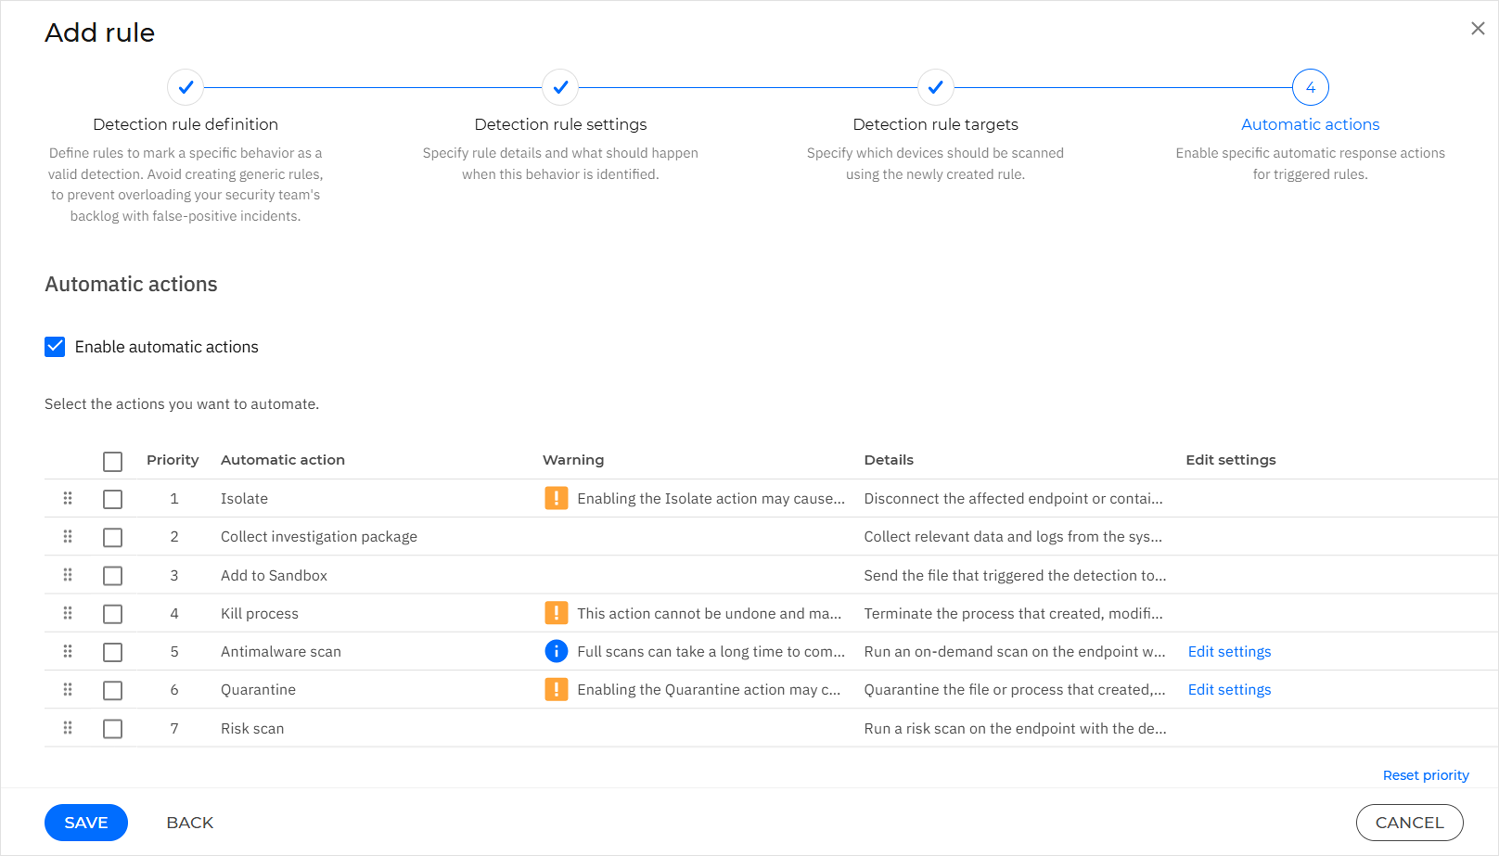
Drag and drop the response actions to reorder them according to your desired priority.
Note
To restore the default order, click Reset priority.
Select the actions you want to enable for the YARA rule.
The following automatic actions are available:
Isolate
Collect investigation package
Add to Sandbox
Kill process
Antimalware scan
Quarantine
Risk scan
Important
Automatic response actions for YARA rules require the following minimum BEST versions:
Windows: 7.9.29.589
Linux: 7.8.0.200265
macOS: 7.22.55.200114
If you selected Quarantine in the previous step, you can click Edit settings next to the quarantine action.
The Edit quarantine configuration side panel will then open.
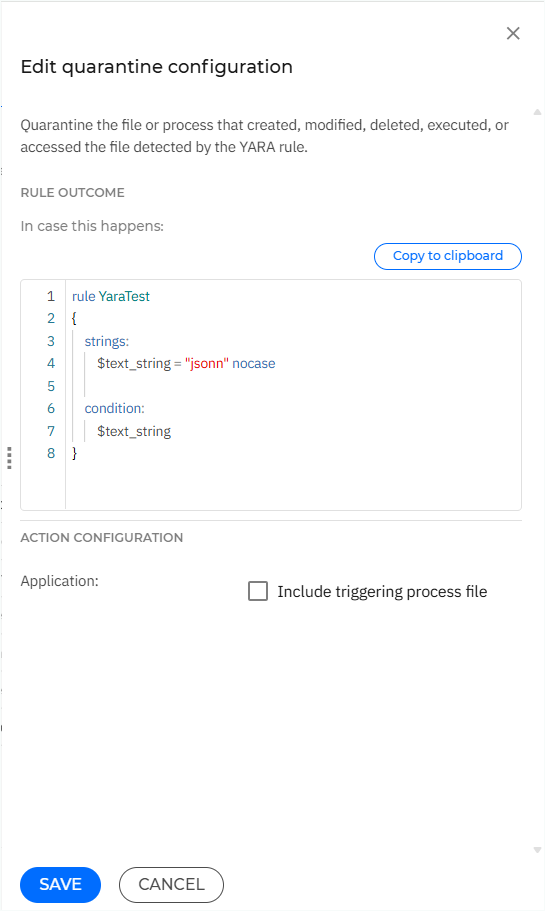
If you need the Yara rule text, select Copy to clipboard.
Click Include triggering process file to also quarantine the executable of the parent process that created, modified, deleted, executed, or accessed the file detected by the YARA rule.
Click Save.
If you selected Antimalware scan in the previous step, you can click Edit settings next to the Antimalware scan action.
The Edit scan configuration side panel will then open.
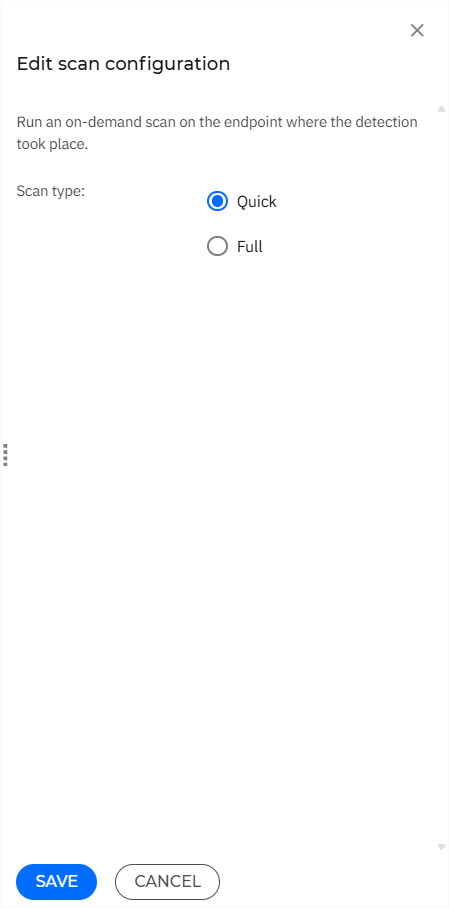
If you want to initiate an on-demand scan on the affected endpoint, select either a Quick or Full scan.
Click Save.
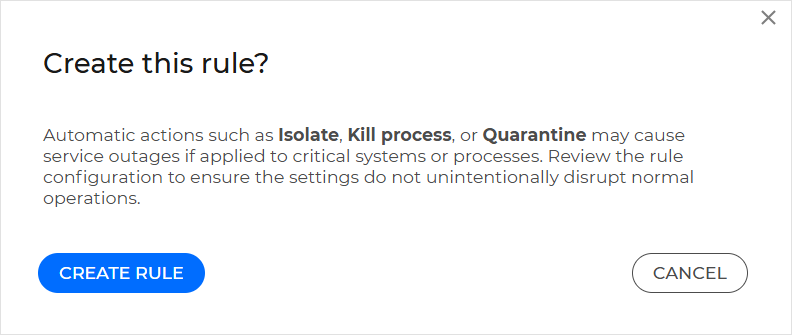
Click Save.
If any of the Isolate, Kill process, or Quarantine actions are selected, the dialog box below is displayed. After reviewing the rule configuration, click Create rule.
The YARA rule you created will be displayed in the Custom detection rules table.
Note
Once a YARA rule is created, it cannot be converted into a basic rule.
YARA rules in the Custom detection rules table
Filtering to display YARA rules
To view your YARA rules, go to Incidents > Custom detection rules in GravityZone Control Center. Identify them by the YARA value in the Rule type column.
To filter the rules table to display only YARA rules, follow these steps:
Click the More drop-down above the rules table.
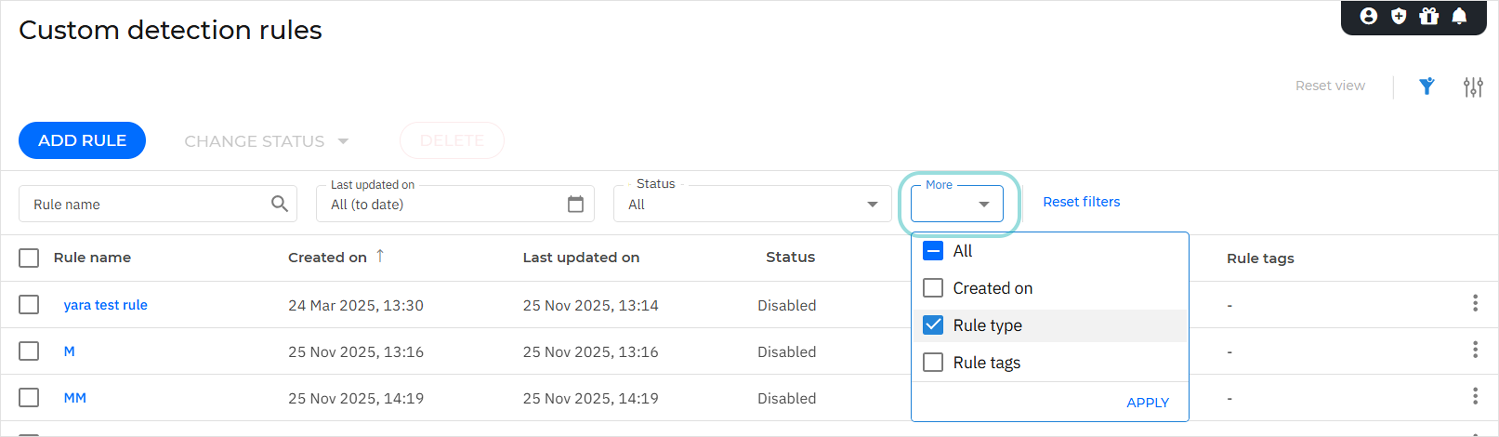
Select the Rule type checkbox.
Click Apply.
This adds the Rule type filter above the table.
Click the Rule type filter.
Select the YARA checkbox.
Click Apply.
Enabling or disabling several YARA rules
To enable several YARA rules, follow these steps:
In the Custom detection rules table, check the boxes for the YARA rules you want to enable.
Click the Change status button above the table.
Click Enable.
Click Confirm.
To disable several YARA rules, follow these steps:
In the Custom detection rules table, check the boxes for the YARA rules you want to disable.
Click the Change status button above the table.
Click Disable.
Click Confirm.
Viewing YARA rule details
Clicking one of the YARA rules in the table opens its details panel. The details panel for YARA rules contains information related to the rule name, ID, description, YARA query, and other rule details.
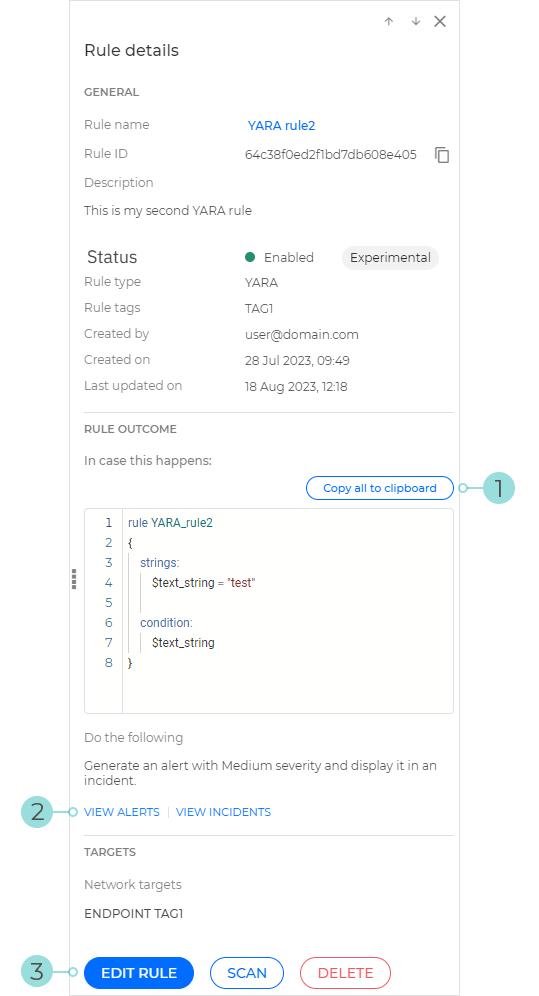
The Copy all to clipboard button makes it easy to copy the entire YARA query to the clipboard.
The View incidents and View alerts options redirect you to the Incidents and Search pages, respectively. Prefilled queries run automatically to retrieve all the alerts or incidents generated by the YARA rule.
The Edit rule button brings up the rule definition window, where you can change the rule details.
Performing on-demand scans
To perform an on-demand scan, follow these steps:
You can start an on-demand scan in two different ways:
In the details panel of a YARA detection rule, click the Scan button.
In the Custom detection rules grid, click the
 vertical ellipsis button at the right end of the table entry, and click Scan.
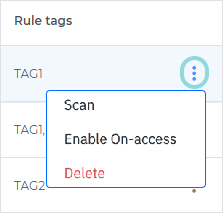
In the Define local targets window, specify the folders or disk drives to scan.
Important
The Specific folders field does not support wildcard characters, but it supports system variables.
On-demand scanning of network shares is not supported for YARA rules.
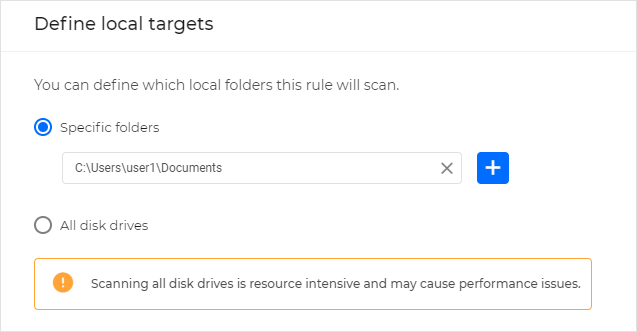
Click Scan.
Note
On-demand scans generate only alerts, not incidents. You can view the generated alerts in the Incidents > Search page by adding the
other.rule_idfield in your query.
A task is generated for this scan. You can view it in Network > Tasks.
You can view detailed results of the scan in the Network > Endpoint details > Scan Logs tab.
A record of the scan, together with its details and results, is also available in Accounts > User activity.