Configure Outbound flow
Configure Outbound SMTP (Smart Host) flow to go via GravityZone Security for Email SMTP Servers.
It is important that you configure your Exchange connectors to send outbound email out through the MailSafe service. This ensures that both your outbound traffic is scanned and your traffic is profiled to help improve spam filtering. This article explains how to configure your connectors correctly.
Login to the Microsoft Exchange Server as an administrator.
Go to Start > All Programs > Microsoft Exchange 2010 > Exchange Management Console to open the Exchange Management Console.
In the left Pane, go to Microsoft Exchange > Organization Configuration.
Select Hub Transport.
In the middle pane, select the Send Connectors tab. A list of send connectors will be displayed.
Delete any Send Connectors that are destined for the internet. This will normally be all of them.
Create connectors for each sending hosts in the appropriate cluster - either US or EU.
In the right pane, select the New Send Connector link.
Enter the Name as per the cluster list, and select the Intended use as Internet.
Select Next.
On the Address Space page, select the Add button to add an SMTP Address Space.
Enter the Address Space as
*and the Cost as10. Click OK to create the connector, and then click Next to continue.On the Network Settings page, select Route Mail Through the following Smart Hosts.
Click the Add button to add a smart host.
When prompted, select Fully Qualified Domain Name and the first hostname from the appropriate cluster - either US or EU.
Click Next.
On the Configure Smart Host Authentication settings page, select None and then click Next.
On the Source Server page, add any other Exchange Servers that should be able to send email to this connector. In most cases, where there is only one server, the server will already be added. Click Next.
On the final page, click New to create the connector.
Click Finish.
It is important that you configure your Exchange connectors to send outbound email out through the MailSafe service. This ensures that both your outbound traffic is scanned and your traffic is profiled to help improve spam filtering. This article explains how to configure your connectors correctly.
Login to the Microsoft Exchange Server as an administrator.
Open Exchange Admin Center by visiting https://your-exchange-servers-hostname/ecp.
In the left Pane, select mail flow ⟶ Connectors.
Select the + icon to create a new send connector.
Enter an identifiable name for your connector such as Email Security Mail Relay.
Ensure the type is set to Custom.
Select Next.
Specify the mail to be relayed by the option Route mail through smart hosts.
Select the +” icon to create a new smart host.
Create connectors for each sending hosts in the appropriate cluster - either US or EU.
Select Next.
Ensure Smart Host Authentication is set to None.
Select Next.
For the Address space, select the + button to add a domain.
Enter the FQDN as
*and change the cost to10.Click Save.
On the Source Server page, add any other Exchange Servers that should be able to send email to this connector by hitting the + button. In most cases where there is only one server, the server will already be added. Click Next.
Click Finish.
Follow the steps below to configure Office 365 to always send messages using the EMS server:
Log in to your Office 365 Admin Center, and go to Admin Centers > Exchange.
In the left-hand pane, click Mail Flow > Connectors.
Click + to add a new connector.
In the From: field, select Office 365.
In the To: field, select Partner Organization.
Give the new connector a sensible name.
Click Next.
Under When do you want to use this connector? select Only when email messages are sent to these domains, then click the + icon and enter
*.Click Next.
Under How do you want to route email messages, select Route email through these smart hosts.
Add hosts according to the correct addresses for your cluster - see Europe, United States.
Click Next and then click Confirm to create the connector.
Note
If you wish to verify the connector, be sure not to use an internal address. For example, use a personal email address which is not a domain configured for your customer.
If the validation fails check the settings below before contacting technical support:
The connector is enabled.
The default domain is the domain configured in EMS domain settings (MailFlow > Accepted Domains).
Login to your Google Workspace Admin Console with an administrator account.
Click on the Menu button
 .
.Select Admin > Apps > Google Workpace.
Click on GMail to take you to Settings for Gmail.
At the bottom of the page, click Advanced Settings.
Go to Hosts > Add Route.
Enter a Name for the route, such as GravityZone Security for Email Outbound.
In the Specify email server select Multiple hosts.
Add a primary entry for each of the outbound servers based on your region.
For US and ROW open ports
25and587and add the following hosts:smtp1.us.scanscope.netsmtp2.us.scanscope.net
For EU open ports
25and587and add the following hosts:smtp1.scanscope.netsmtp2.scanscope.net
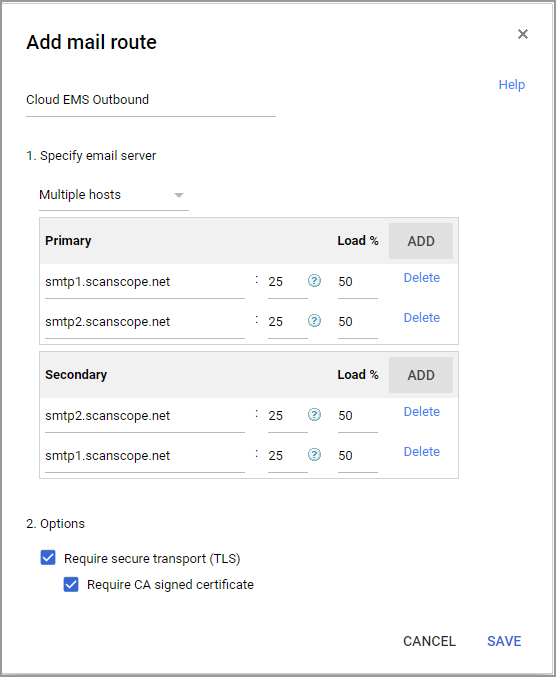
Click Save.
Navigate back to General settings > Routing > Routing section.
Click Configure for routing.
The Add settings option appears.
Enter a Name for the rule, such as GravityZone Security for Email Outbound Rule.
Under Messages to affect(section 1), select Outbound.
Under For the above types of messages, do the following(section 3), select Change route.
Change Normal routing to GravityZone Security for Email Outbound Rule, created above.
(Optional)Under Encryption (onward delivery only), select Require Secure Transport (TLS).
Click Add Settings or Save if you are editing an existing configuration.
At the bottom of the Advanced Settings page, click Save to apply changes.
Note
It can take up to one hour for your settings to come into effect. You can track changes in the Admin console audit log.