Setting up Datto integration
For Datto integration, you need to create a GravityZone company, configure the installation package, get the API key and the Access URL in GravityZone Control Center, and then fill this information as variable values in site settings.
Creating companies in GravityZone
GravityZone groups devices together as companies, similarly to Datto sites. Prepare the deployment environment by creating companies in Control Center and matching sites in Web Portal.
To create a company in Control Center:
Log in to GravityZone Control Center using your Partner credentials (see Requirements).
Go to the Companies page from the left side menu.
Configure company details and, in the Type field, select Customer.
In the Licensing tab, select Trial or Monthly Subscription.
Click Save and add company.
A company is created and added to the Companies list.
Creating a security installation package
The security agent deployment requires an installation package for each company created in GravityZoneControl Center. The installation package uses a small-sized file to download and run the security agent installation files on your devices.
To create an installation package:
In GravityZone Control Center, navigate to the Network > Packages.
Click Add at the top, to open the package configuration window.
Enter a name for your installation package.
Note
Use unique names for newly created packages to ensure the correct security agent installation.
Under Company, select the company where you are going to install the security agent on.
Select the protection modules you want to install.
For more information, refer to the this section in the GravityZone documentation.
Configure Scan mode settings.
Configure package settings.
For more information, refer to the Creating installation packages section in the GravityZone documentation.
Under Deployer, ensure the package connects to the Bitdefender Cloud to download the installation files.
Click Save.
Generating API Key and getting Access URL
Get the GravityZone API key and Access URL to add them as variable values to the site settings. The Bitdefender component will need to call the Packages API to deploy the security agent.
You can generate API keys for each user account.
To generate an API key and get the Access URL in Control Center:
In Control Center, click the username at the top and choose My Account.
Go to the API keys section and click Add to open the APIs list.
Enable Packages API and click Save to confirm.
A key is generated and added to the table.
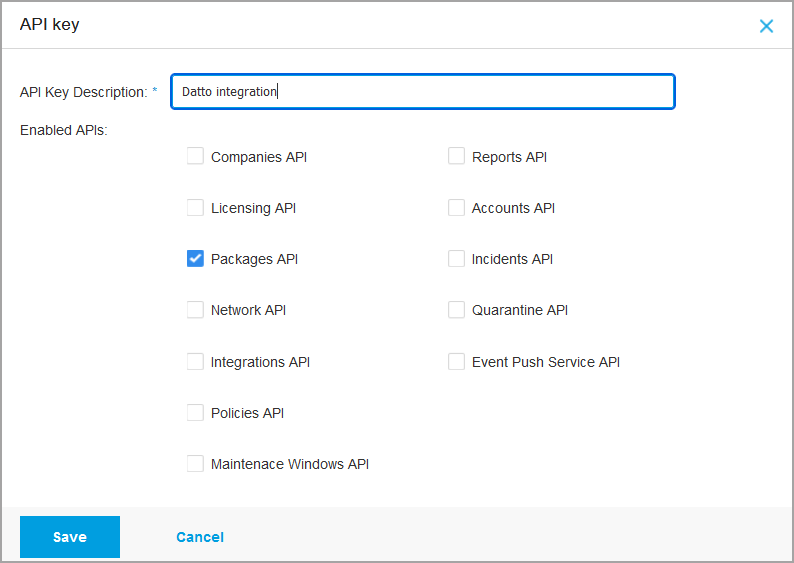
Click the key to open API details.
Copy the key and keep it safe.
To prevent the leaking of sensitive information, do not share or distribute your own generated API keys.
Close the API details window.
Under the Control Center API section, copy the Access URL and keep it safe.
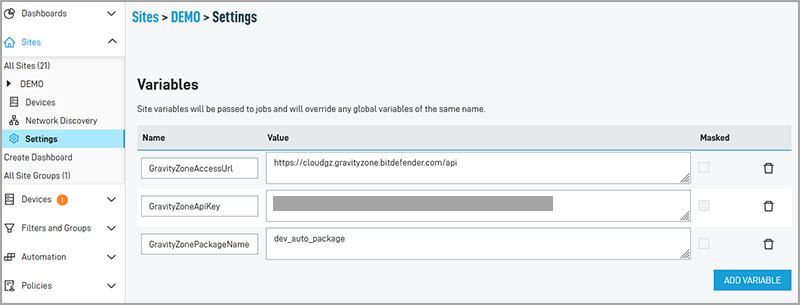
Defining site variables
Define variables used by the Bitdefender component at the site level. By defining site variables, you can deploy the security agent to your targets through the Web Portal.
To define site variables in the old UI:
Log into Web Portal.
Click Sites to open the drop-down list.
Go to the Settings tab of your selected site.
Under Variables, click Add Variable to add the following entries, individually:
Variable name
Value
GravityZoneAccessUrl
Enter the Access URL to provide access to Control Center.
GravityZoneApiKey
Enter the API key to identify the APIs called by the component.
GravityZonePackageName
Enter the installation package name created in Control Center. This should match the Control Center company with the site where you want to deploy the security agent.
The values are case-sensitive, so you must enter the variables exactly as they appear in the table.
Select Mask value for each variable to hide its value.
To define site variables in the new UI:
Log in to Web Portal.
In the left-side menu, click Sites, select your site and go to Settings.
Scroll down to Variables and click Add Variable to add the following entries, individually:
Variable name
Value
GravityZoneAccessUrl
Enter the Access URL to provide access to Control Center.
GravityZoneApiKey
Enter the API key to identify the APIs called by the component.
GravityZonePackageName
Enter the installation package name created in Control Center. This should match the Control Center company with the site where you want to deploy the security agent.
Note
You need to define the variables only once and change the default package value when you want to deploy a different installation package.
To manage security for your devices in Datto, you execute Bitdefender components through monitoring policies and jobs.