Onboarding
This article helps you get started with using your new GravityZone product.
To take your first steps in using your GravityZone product, follow the sections below:
Your first login
Depending on your license type and purchase method, you will obtain your credentials from the following sources:
Yearly license, purchased online - obtain your credentials by signing up for a trial by following step 1 in the procedure below. Your license will be sent to you via email.
Monthly subscription, purchased from a Bitdefender partner - your Bitdefender partner will provide you with your credentials.
Yearly license, purchased from a Bitdefender partner - your Bitdefender partner will usually provide you with both your license key and your credentials. If you receive only the license key, follow step 1 to obtain credentials for logging in.
Follow the steps below to log in to the GravityZone console:
Optionally, sign up for a trial.
Follow this step if you want to sign up for a trial or you have a license key but no credentials have been provided to you:
Access the Free Trial section from our website.
Select any product from the GravityZone Cloud suite, regardless of your purchase. You can select Business Security for a quicker process.
Complete the form with the required information and submit it.
Your account is automatically created and your credentials, along with a link to reset your password, are provided via email.
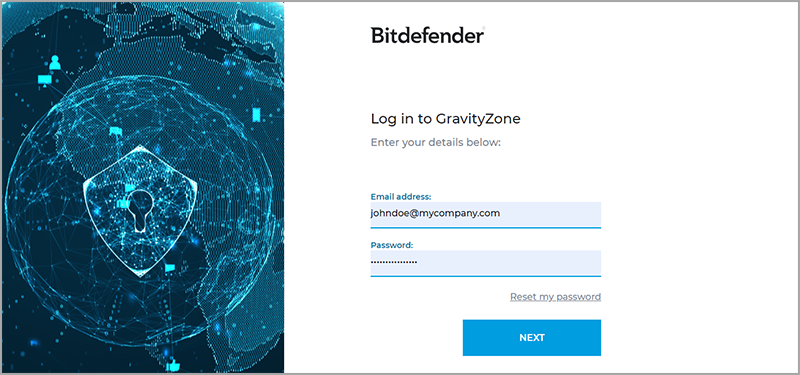
Access the GravityZone login page.
Log in using the credentials provided to you:
Enter the email address of your account and click Next.
Enter your account password and click Next.
When first logging in you will be asked to set up two factor authentication. You can skip this step up to five times, after which you will have to set it up before logging in. Learn more
At the first login, you have to agree to Bitdefender Terms of Service. Then, click Continue to start using GravityZone.
Use two-factor authentication (2FA)
GravityZone Cloud platform uses by default two-factor authentication (2FA).
Two-factor authentication adds an extra layer of security to GravityZone accounts, by requiring an authentication code in addition to Control Center credentials. 2FA requires downloading and installing the Google Authenticator, Microsoft Authenticator, or any two-factor TOTP (Time-Based One-Time Password Algorithm) authenticator app on a device such as a smartphone or computer. The authentication app generates a six-digit code each 30 seconds. To complete the Control Center login, after entering the password, the user will have to provide also the six-digit authentication code.
When connecting to Control Center using 2FA, follow these steps:
Open your web browser.
Go to the following address: https://gravityzone.bitdefender.com.
Enter the email address of your account and click Next.
Enter your username and click Next.
Enter the password of your account and click Next.
When connecting for the first time, configure two-factor authentication and enter the required six-digit code. Learn more.
By default, you must enter the six-digit code from your authentication app every time you log in.
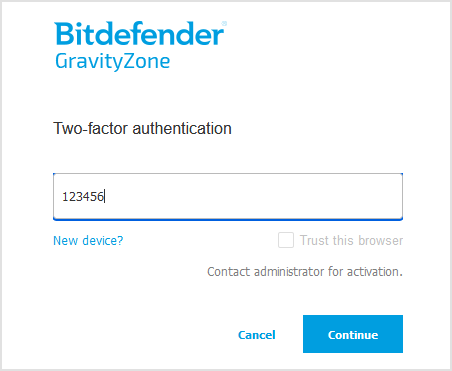
To skip this step, select the Trust this browser option so that GravityZone does not require the six-digit code for up to 90 days.
Note
The Trust this browser option is disabled by default. As an administrator, you can enable it and configure the interval for trusting browsers for all accounts under your company, including yours, in the My Company > Authentication tab. Learn more.
For accounts belonging to other companies, configure their authentication settings in the Companies page. Learn more.
To revoke the current device or all devices that skip the six-digit code for your account, refer to this topic. To revoke all devices for other accounts, refer to this topic.
If you have selected Trust this browser, but GravityZone still requires the six-digit code when you log in again, check the troubleshooting scenarios in this topic.
Agree to Bitdefender Terms of Service and click Continue to log in.
Configure two-factor authentication
Note
This step is part of the initial login to GravityZone Control Center.
When connecting for the first time in Control Center and your account has two-factor authentication enforced, you are prompted to enable two-factor authentication in a configuration page, after entering GravityZone credentials. Follow these steps:
Download and install on your device, such as a smartphone or a computer, Google Authenticator, Microsoft Authenticator, or any two-factor TOTP (Time-Based One-Time Password Algorithm) authenticator compatible with the standard RFC6238.
On your device, open the authenticator.
In the Add an account screen, scan the QR code from the GravityZone configuration page, to link the app to your GravityZone account. Alternately, use the secret key displayed under the QR code (copy and paste it if you use a computer).
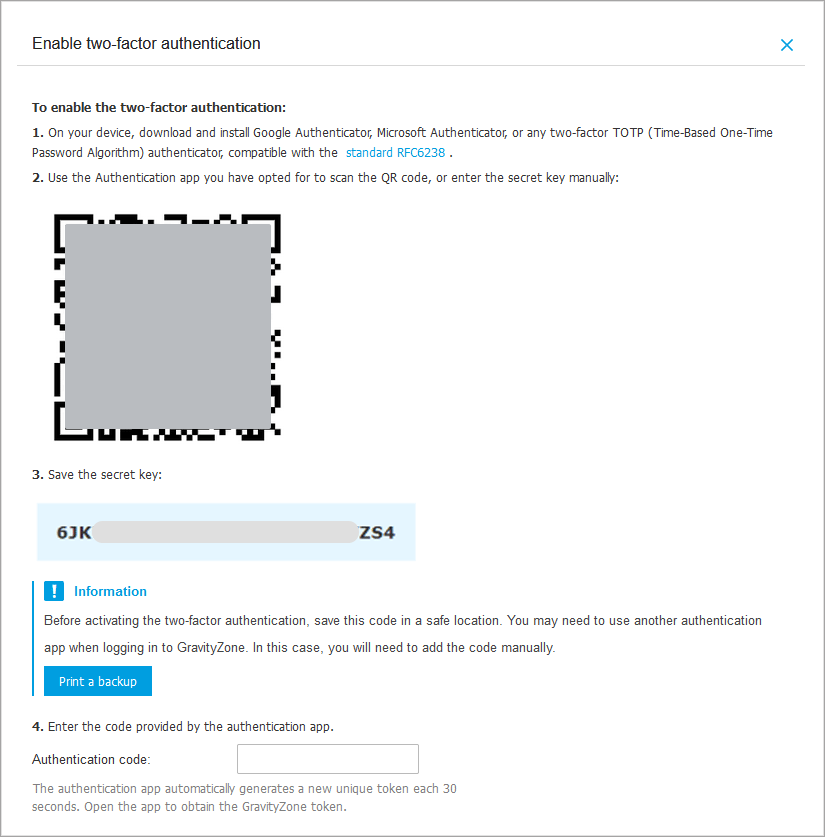
This action is required only once.
Important
Make sure to copy and save the secret key in a safe location. Click Print a backup to create a PDF file with the QR code and secret key. If the device used for activating two-factor authentication is lost or replaced, you will need to install Google Authenticator, Microsoft Authenticator, or any two-factor TOTP (Time-Based One-Time Password Algorithm) authenticator - compatible with the standard RFC6238, on a new device and provide the secret key to link it to your GravityZone account.
If you did not have the secret key, contact your Bitdefender administrator to reset two-factor authentication.
Enter the six-digit code from the authenticator in the Authentication code field.
Click Enable to complete the feature activation and to log in to Control Center.
If you do not have an authenticator yet, click the Skip button to log in directly to Control Center. You can skip 2FA five times only. At the sixth login attempt, you are not able to log in without two-factor authentication.
Use single sign-on (SSO)
To connect to Control Center using single sign-on with an Identity Provider (IdP), follow these steps:
Open your web browser.
Go to the following address: https://gravityzone.bitdefender.com.
Enter the email address of your account and click Next.
GravityZone redirects you to the authentication page of your Identity Provider.
The Identity Provider checks if you have already been authenticated. If so, you automatically log in to Control Center.
If not, you need to authenticate with your Identity Provider credentials.
The Identity Provider validates your credentials and redirects you to GravityZone Control Center.
Following the validation of a token received from Identity Provider, GravityZone provides you access into Control Center.
For details and configuration procedures with single sign-on (SSO) in GravityZone, refer to Configuring single sign-on using a 3rd party identity provider.
Important
You cannot use at the same time single sign-on (SSO) and two-factor authentication (2FA) in GravityZone.
Watch a full video tutorial on the topic here:
Adding your license keys
Note
This step is only necessary if you have a yearly license. If you have a monthly subscription, you will inherit the license key used by your partner.
Click the
 user icon in the upper-right corner of the console and select My company.
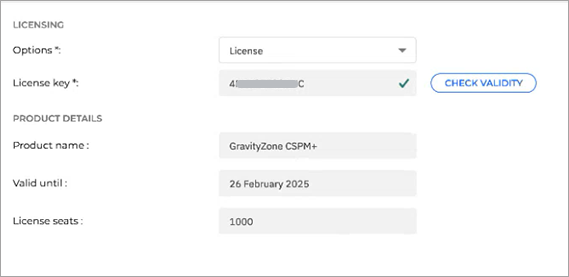
Go to the Licensing tab and under the License usage details section click Add product.
Enter the license key in the Add new product window.
Click the Check validity button.
Note
In some cases, adding a specific license key will replace one of your current products. This may lead to a change of the feature set you will have.
Warning
Depending on your company type, some products may be incompatible.
Click the Add product button.
The initial setup
Configure endpoint protection and deploy the security agent
This section provides you with the steps required to deploy security agents on your endpoints and customize the level of protection provided for each one by setting up custom installation packages.
Bitdefender Endpoint Security Tools (BEST) is the security agent that monitors and protects the endpoint, and reports the information to GravityZone.
Depending on your needs and current network setup, BEST may be deployed in multiple ways.
Follow the steps below to create and deploy a package as efficiently as possible. Refer to the Installation page for in-depth customization options.
Important
Before you start the installation check the prerequisites outlined in Prepare for the installation.
To install BEST, follow these steps:
Log in to your GravityZone console.
Go to the Installation Packages page from the left side menu, under Network.
Click the Create button at the top of the table.
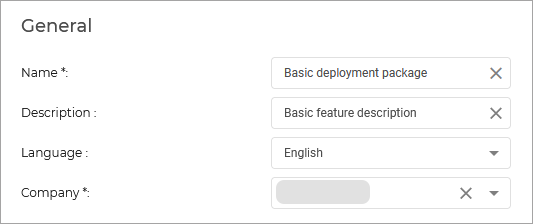
Fill in the information under the General tab:
Scroll down to the Modules section, and select the modules you want to deploy on your endpoints.
Note
You can identify the features you have access to using this feature matrix.
Optional: you can further customize the installation package. Learn more
Scroll down and click the Save button.
Select the newly created package from the list of packages and click Send download links.

Enter the email addresses of the users that will be deploying the security agents on your endpoints, and click Send.
On your endpoints, open the link to download the installation package.
Important
Do not rename the installation file. It may cause errors.
Run the file.
Configure your policies
The above procedure makes use of the default GravityZone policy, which is automatically applied to an endpoint when the BEST agent is deployed.
Some features need to be activated in the policy that is applied to an endpoint. If they are not, the feature will not be active on the endpoint. To enable a feature, you will need to copy and edit the default policy and apply it to the endpoints where you want the feature deployed.
The following features are enabled by default:
Advanced Anti-Exploit
Advanced Threat Control
Bitdefender EDR
Firewall
HyperDetect
Network Attack Defense
eXtended Detection and Response
The following features are not enabled by default:
Content Control
Device Control
Risk Management
Full Disk Encryption
Integrity Monitoring
Security for Storage
Additionally, the following features require further configuration:
Patch Management
Security for Exchange
You can find what options need to be configured in a policy for each feature in the Feature specific deployment guides.
Running scans
Important
We recommend you first run a full scan after the installation process.
To run a full scan, follow these steps:
In the left side of the console, click Network.
Select the endpoints you want to scan.
Click
 Tasks and then Scan.
In the Type category, select Full Scan.
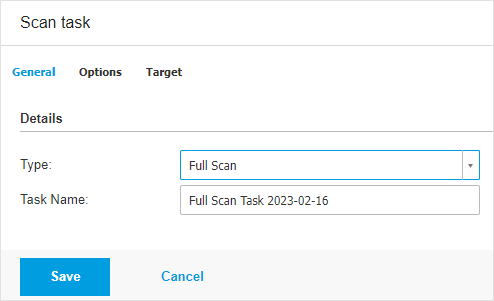
Save your changes.
Security monitoring
Once you have finished configuring protection for all your endpoints, you can monitor and keep track of security events and incidents by using the following resources:
Important
The data and endpoints under the sections described below is only available if the security agent has been deployed on your endpoints.
Check endpoint statuses
The Network page provides several features for exploring and managing all endpoints available in your network. It also enables you to run tasks remotely and to generate reports.
You can find a list of your managed endpoints in the network page, organised into folders, companies or networks. Information is displayed for each endpoint including an icon that indicates the status of the endpoint. Refer to Network object types and statuses for a list with all available icon types and statuses.
For detailed status information regarding your endpoints, refer to the Checking the endpoints status section.
View Executive Summary
Executive Summary presents a concise security overview of all protected endpoints in your network and is specially designed to help you monitor, analyze and provide executive management with easy-to-interpret data. Composed mostly of widgets, enhances visibility by offering details about endpoint modules, detections and taken actions, threat types and techniques, your company risk score, and others.
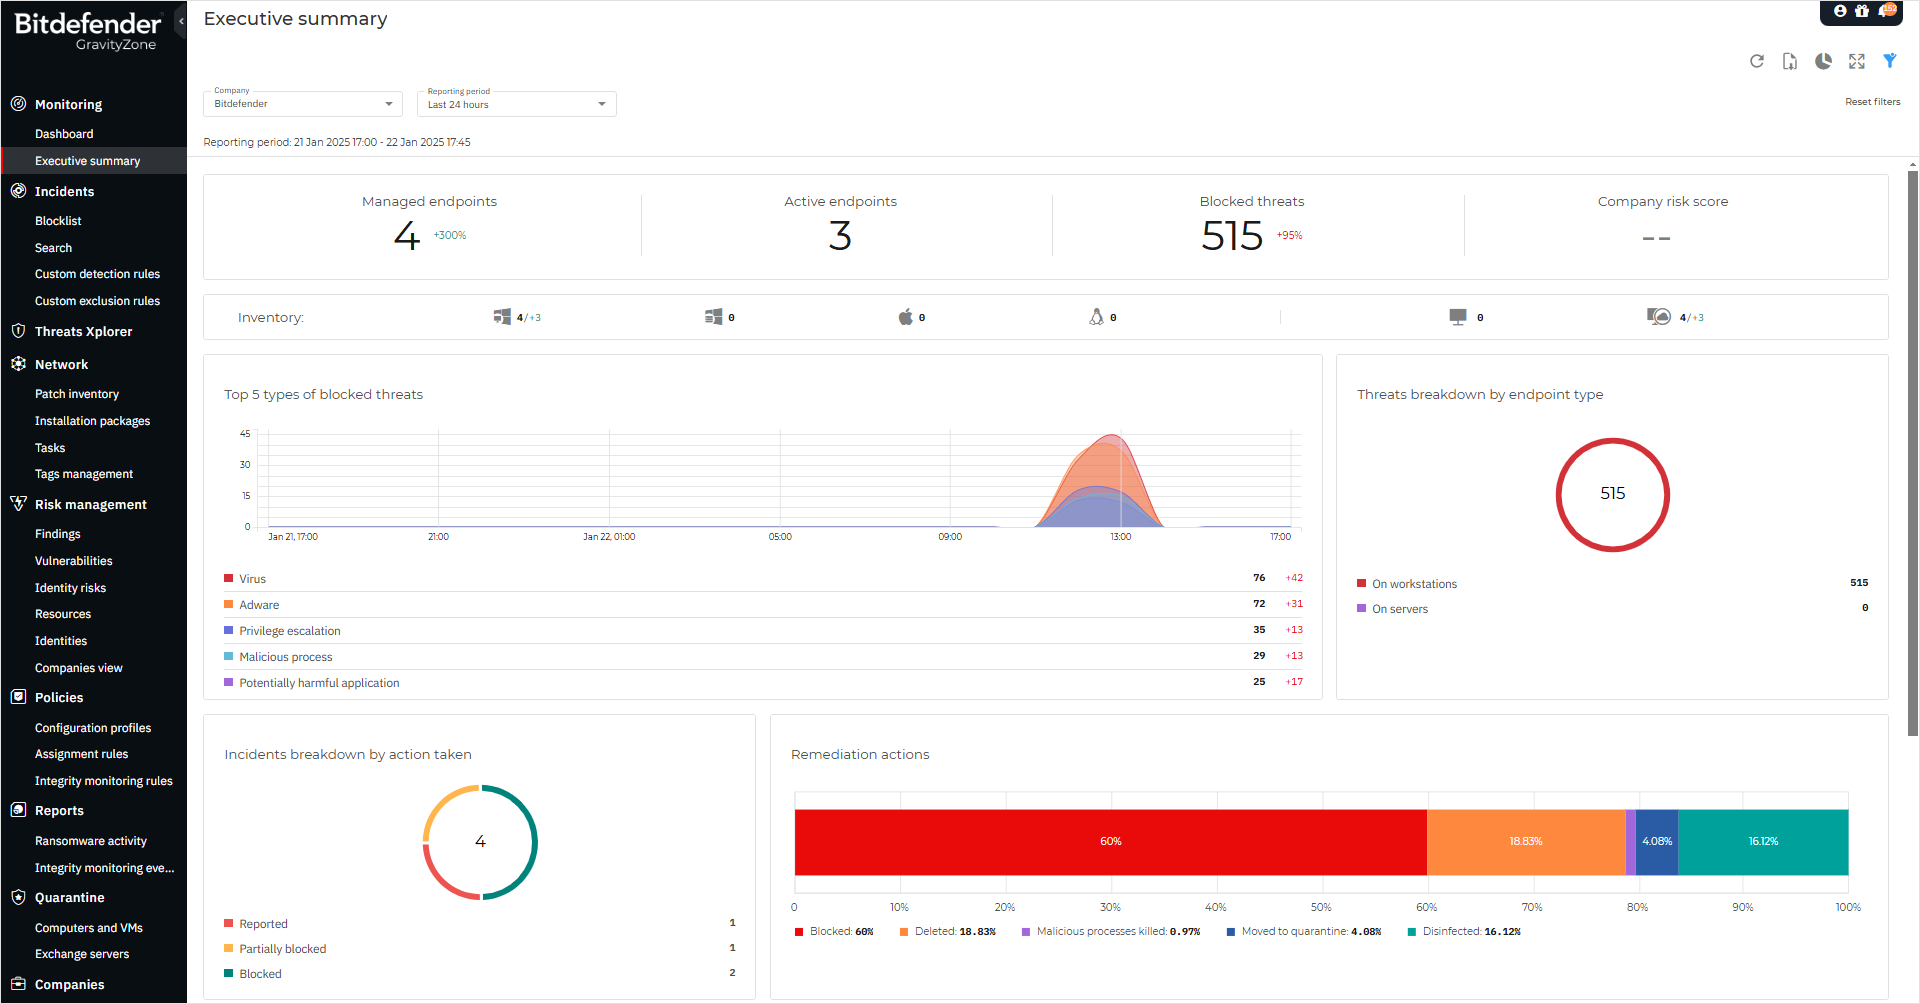
Executive Summary provides you with the possibility to explore data, by browsing from a statistical level to a more granular and detailed view. The drill-down capability helps you navigate instantly from widgets to specific sections of the Control Center.
The information is displayed through widgets, making it easy to interpret the data. Refer to Executive Summary for information on each chart and widget.
Check Reports
Control Center allows you to create and view centralized reports that can be used for multiple purposes, such as:
Monitoring and ensuring compliance with the organization's security policies.
Checking and assessing network security status.
Identifying network security issues, threats and vulnerabilities.
Monitoring security incidents and malware activity.
Providing upper management with easy-to-interpret data on network security.
Several different report types are available so that you can easily get the information you need. The information is presented as easy-to-read interactive charts and tables, allowing you to quickly check the network security status and identify security issues.
For more information on creating, scheduling, and viewing reports, refer to Reports.
Create portlets
Portlets provide you with security event information from your environment. You can customize the portlets and create your own, specifying the protection mechanism you would like the monitor and the time interval you would like to see in the data.
To create a portlet follow the steps below:
Log in to GravityZone Control Center.
Go to the Dashboard page from the left side menu.
Click the Add portlet button on the upper right side of the page.
Select the portlet you wish to create.
Note
You can customize the Dashboard page by dragging and dropping a portlet to the position that best suits your needs.
There is a portlet available for each report type provided by the console.
Check Notifications
Notifications keep you up to date with the security status of your environment.
Click the  Notification icon on the right side of the Control Center to display the Notification area.
To configure notifications, click the  Configure button and select the type of notifications you want to receive. For help with configuration settings, refer to Configuring notification settings.
View Threats Xplorer
Threats Xplorer is specially designed to offer you highly increased visibility over the detected threats in your network. The feature centralizes detection events from multiple GravityZone technologies and classifies them by category, threat type, remediation actions, and many others.
Use the filters above the grid to refine the list of events currently displayed.
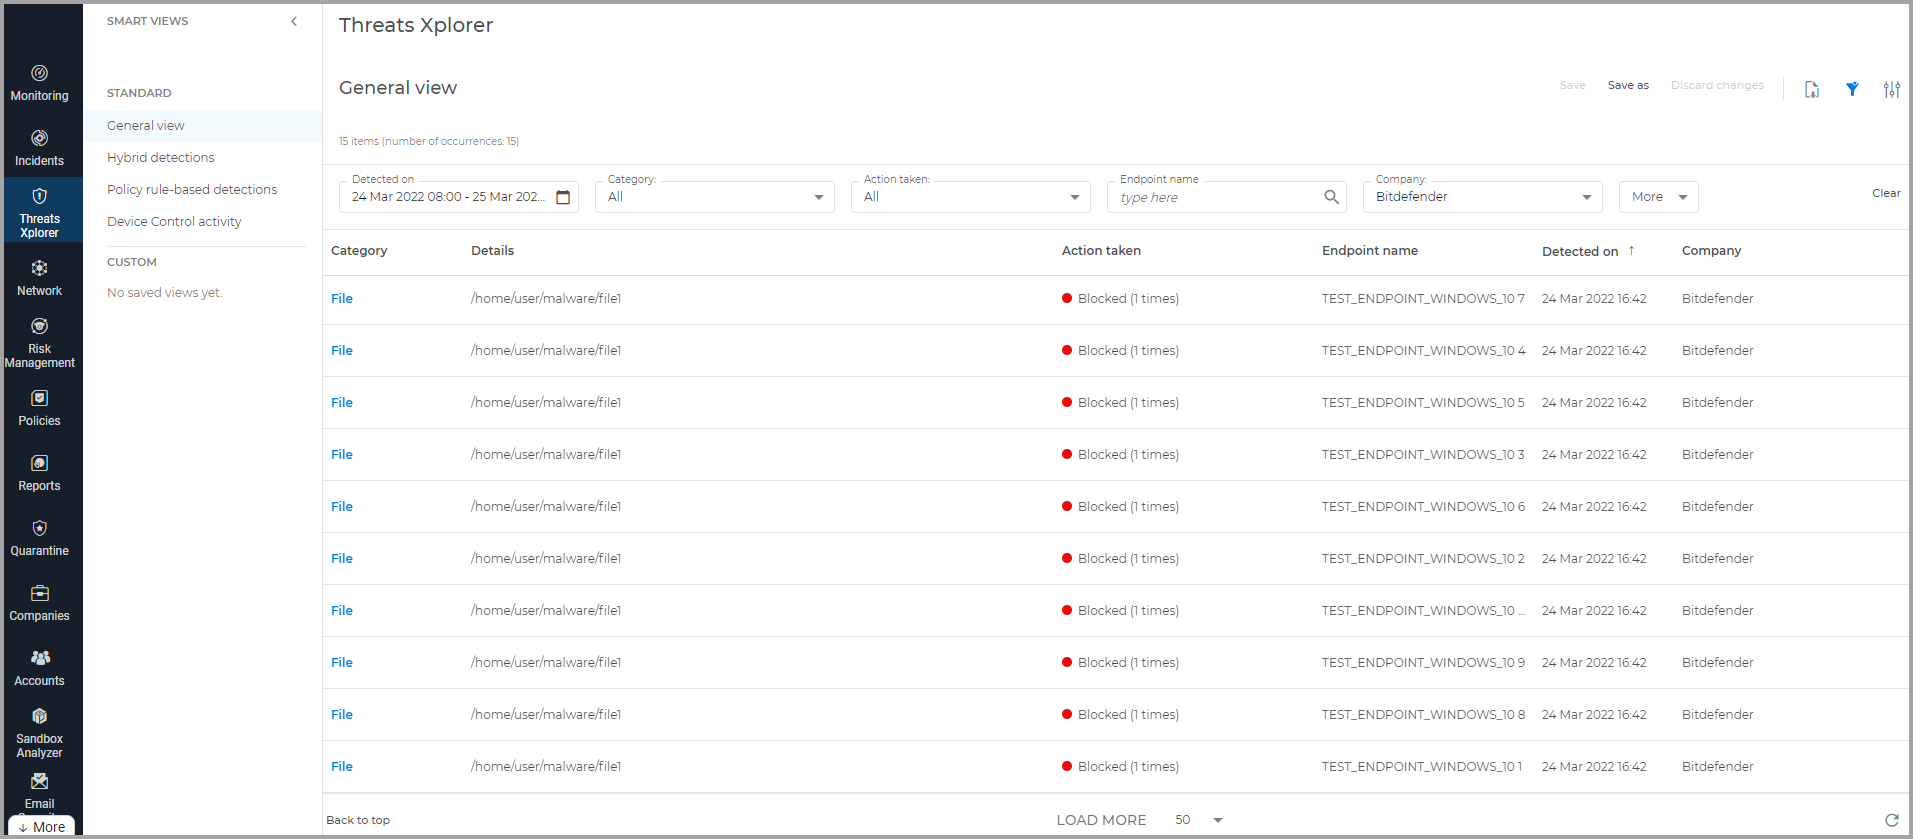
By default, the grid displays the detection events for the last 24 hours.
Refer to Threats Xplorer, for more information on this feature.
Troubleshooting and support
If you encounter any difficulties while using GravityZone, refer to the dedicated troubleshooting chapters below:
If you haven't found your answer, you can always check our FAQ page or contact the Bitdefender Enterprise Support.