Mesh Unified
This guide outlines how to install Mesh Unified for organizations on Microsoft 365.
If this is your first time setting up a customer in Mesh, review the Before You Start Checklist.
Tip
Installation time: 10–15 minutes.
Create a mail flow rule for Mesh in Microsoft 365
To allow email filtered by Mesh to be delivered safely without additional filtering from Microsoft, create a mail flow rule in Microsoft 365 for the IP ranges applicable to your region.
The following video guides you through the process:
Populate users through Azure Sync
To allow users to receive quarantine digests and create their own allow and block rules, populate them in the users table.
Log in as a customer and go to Users > Import & Sync > Azure Sync.
Select O365 Authorize to allow Mesh to synchronize users from Azure.
For more information, see User population and role types.
Azure Sync runs automatically every hour. For synchronized mailboxes that do not require an account in Mesh, select the mailbox and set it to Disable.
Note
API-level filtering is enabled after authorization is complete.
Import allow and block rules (optional)
Import a list of safe senders or domains by using the CSV template.
Update your MX records
Update your MX records with the values applicable to your service region.
MX records are region-specific, and no other records should be present.
If you use MTA-STS, update the MX entries there as well.
Note
Wait at least 15 minutes after creating your account in Mesh before updating your MX records. This prevents delivery interruptions while the system updates.
Create a connector in Microsoft 365
To prevent threats from bypassing Mesh filtering and to allow email from the service MTAs to reach your mail environment, create a connector for Mesh in Microsoft 365.
Note
Complete this step only after pointing your MX records to Mesh. Wait 24 hours to allow for DNS propagation.
Disable or remove any conflicting IP connectors. If you are moving from another Secure Email Gateway, you may have an existing connector that rejects email not sent from a specific IP range. Verify this before changing your MX records to prevent email from being rejected.
The following video guides you through the process:
Use the IP ranges applicable to your region.
Follow the step-by-step guide for creating a connector.
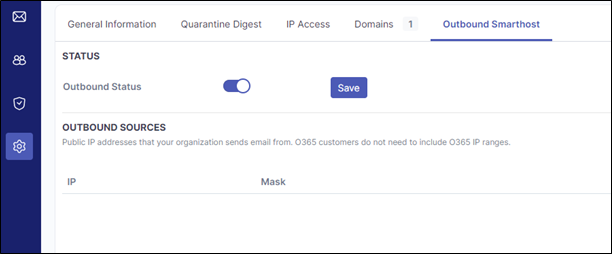
Enable outbound email scanning (optional)
Follow the step-by-step guide for enabling outbound email scanning.
Note
If your tenant uses automatic forwarding, review the outbound email scanning guide.
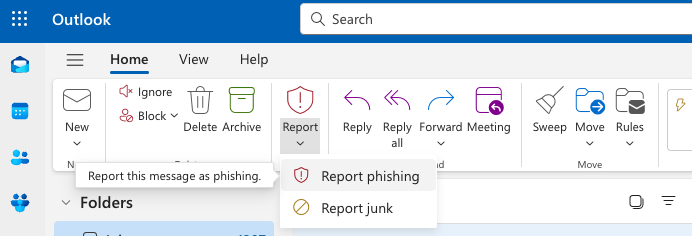
Configure the Report Junk and Phishing button (optional)
Use the Outlook report button to share potential false negatives and false positives with your help desk and the Mesh detection team. Follow the step-by-step guide for configuring the Report Junk and Phishing button.
Tip
You’re all set. Your email is now protected by Mesh Unified.
Upgrade to Mesh Unified
Upgrade from Mesh Gateway
Upgrading to Mesh Unified provides access to the full suite of features:
Automatic and manual remediation. For more information, see Auto Remediation and Manual Remediation.
Verdict and contextual warning banners. For more information, see Banners.
Flexible policy options, including the ability to use the Junk folder in Microsoft 365 and Outlook. For more information, see Policy templates and policies.
Support for allow and block rules created in Microsoft 365 and Outlook. For more information, see Safe and blocked senders.
Insider threat protection through internal traffic scanning.
Note
Mesh Unified is available only when the tenant uses Microsoft 365 or Office 365.
Note
Important information before upgrading:
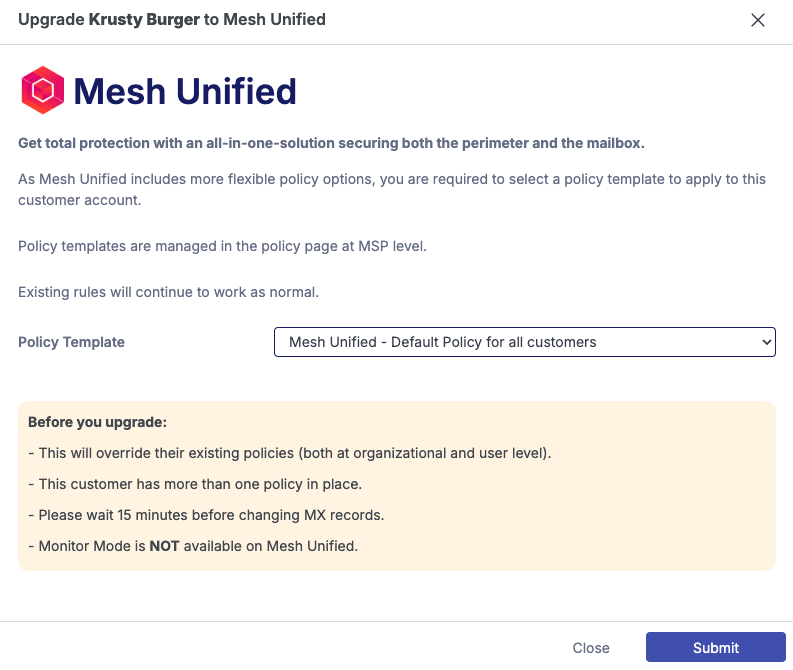
Monitor Mode is not available with Mesh Unified.
The upgrade overrides all existing policies.
You cannot switch between services after upgrading.
Create a Mesh Unified policy template
Create a Mesh Unified policy template. For more information, see Policy templates and policies.
Upgrade the service
Select Upgrade, and then select the policy template.

Complete the Mesh Unified setup
The Mesh Gateway and Mesh Unified setup processes overlap, so configuration should be quick. To complete all required steps, follow the Mesh Unified setup guide.
Upgrade from Mesh 365
Upgrading to Mesh Unified provides access to the full suite of Gateway features:
Outbound scanning through the smart host.
SPF, DKIM, and DMARC validation.
Email spooling.
The ability to remove or bypass Microsoft spam filtering.
Note
Important information before upgrading:
Monitor Mode is not available with Mesh Unified.
The upgrade overrides all existing policies.
You cannot switch between services after upgrading.
Wait 15 minutes before updating the MX records.
Create a Mesh Unified policy template
Create a Mesh Unified policy template. For more information, see Policy templates and policies.
Upgrade the service
Select Upgrade, and then select the policy template.
Complete the Mesh Unified setup
To ensure that Mesh Unified functions as intended, complete all steps in the Mesh Unified setup guide.