KSPM
Kubernetes Security Posture Management (KSPM) expands the risk management capabilities in GravityZone to cover Kubernetes environments. KSPM is included automatically under the CSPM+ license. Licensing is based on the number of nodes, which is calculated as the daily average across the month-to-date interval.
KSPM findings are displayed under Risk management > Findings. For more information, refer to Findings.
Kubernetes resources associated with KSPM findings are displayed under Risk management > Resources. For more information, refer to Resources. For a list of Kubernetes cluster resources that are excluded from scanning by default, refer to Default exclusions in KSPM.
KSPM uses Kubernetes Cluster Agent to identify Kubernetes resources and detect misconfigurations. For information on how to deploy Kubernetes Cluster Agent to your cluster, refer to the installation instructions below. For information on the ports and URLs that Kubernetes Cluster Agent uses for communications, refer to GravityZone (cloud) communication ports.
Install Kubernetes Cluster Agent
Prerequisites
Internet access on your cluster is critical, as Kubernetes Cluster Agent must be able to communicate with GravityZone.
Ensure that you have named your cluster, so it is easily identifiable in the GravityZone interface.
Ensure that you have a user account with installation permissions for your cluster, including the ability to create Deployments, CronJobs, ConfigMaps, and Secrets.
Install Helm and Kubectl on the machine that you are using to interact with the cluster. You will need to run the Kubernetes Cluster Agent installation commands on the same machine.
Note that the Helm chart is optimized for small to medium-sized clusters and requires no more than 2 GiB of RAM and 2 CPUs. For larger clusters, adjust the resource allocation accordingly.
Steps
To deploy Kubernetes Cluster Agent on a cluster, take the following steps:
In the GravityZone Control Center, go to Network > Installation packages.
In the package list, select Kubernetes Cluster Agent.
Note
If the package is not visible, make sure you have selected Kubernetes Agent from the Type filter above the list, then click Apply.
In the toolbar, select Download, then select Kubernetes Helm chart. This opens the Download the Kubernetes cluster agent screen. The screen provides commands for installing Kubernetes Cluster Agent in all supported Kubernetes environments.
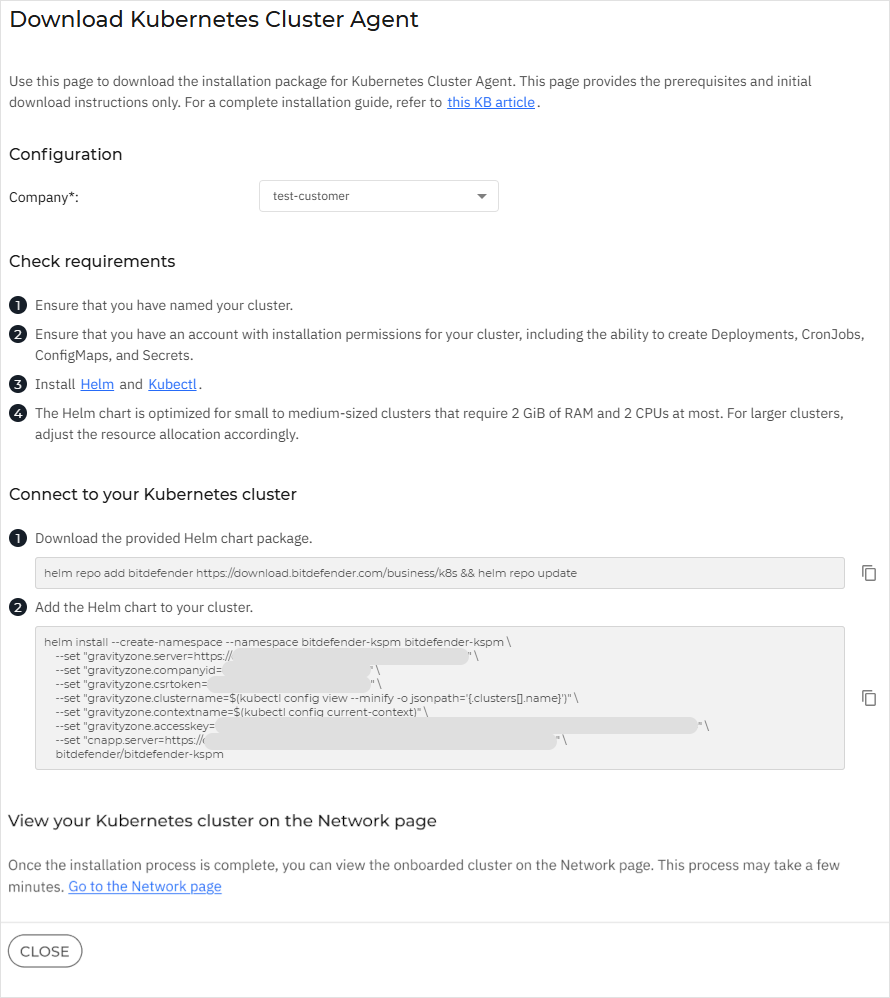
Under Configuration, select the company where you want to onboard the Kubernetes cluster from the Company dropdown menu.
Under Connect to your Kubernetes cluster, select
 Copy next to the command in Step 1, Download the product Helm chart package.
Go to your Kubernetes environment and run the command.
Under Connect to your Kubernetes cluster, select
Copy next to the command in Step 2, Add the Helm chart to your cluster.Go to your Kubernetes environment and run the command.
To verify the deployment, go to Risk management > Resources and use the Platform > Kubernetes filter to make sure that your Kubernetes resources are visible.
Note
Kubernetes Cluster Agent will start scanning once the Helm chart has been added to the cluster. However, it may take a few minutes for the Kubernetes resources to become visible on the Resources page.
Following the initial scan, Kubernetes Cluster Agent scans your cluster at 24-hour intervals. The timing and frequency of the scans are not configurable.
To view the newly onboarded cluster on the Network > Container clusters page, select Go to the Network page under View your Kubernetes cluster on the Network page.
Note
Kubernetes Cluster Agent will start scanning once the Helm chart has been added to the cluster. However, it may take a few minutes for the Kubernetes cluster information to appear on the Container clusters page.