Configuring the integration
ConnectWise Automate requires access to GravityZone services. To authorize access, you need to generate an API key in GravityZone Control Center, then configure the integration in the Tools > Bitdefender GravityZone section of the ConnectWise Control Center.
This is what you have to take into account when configuring the integration:
Important
If a ConnectWise Automate integration does not communicate with Bitdefender services for more than 30 days, it is automatically disabled. To re-enable it, you must completely reconfigure the Bitdefender Plugin.
Generate the API key
To generate the API key, follow these steps:
Log in to GravityZone Control Center using your Partner account credentials.
Click the
 user icon in the upper-right corner of the console and select My Account.
Go to the API keys section and click Add at the top side of the table.
Enable the following APIs:
Companies API
Licensing API
Packages API
Network API
Integrations API
Policies API
Reports API
Accounts API
Incidents API
Quarantine API
Event Push Service API
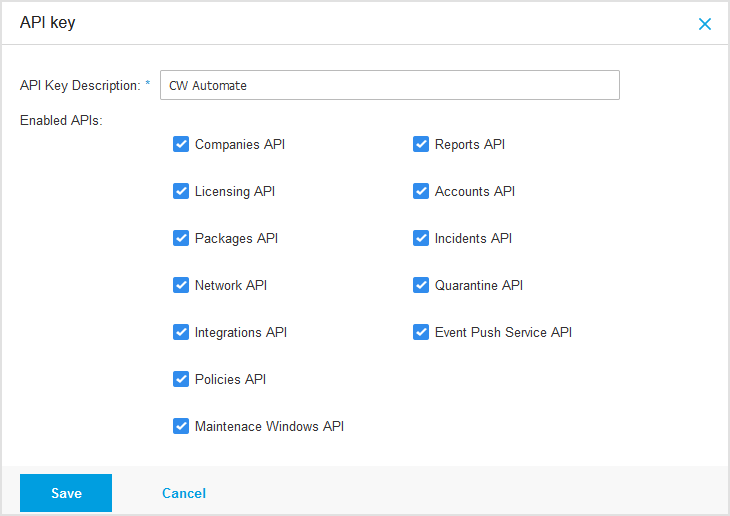
Click Save.
An API key is generated. To prevent the leaking of sensitive information, do not share or distribute your own generated API keys.
Copy the Access URL from the Control Center API section.
Plugin Settings
The Plugin Settings page contains data necessary to connect ConnectWise Automate to GravityZone, like access URL, API key and installation options for the Bitdefender security agent.
In ConnectWise Automate Control Center, go to Tools > Bitdefender GravityZone > Plugin Settings.
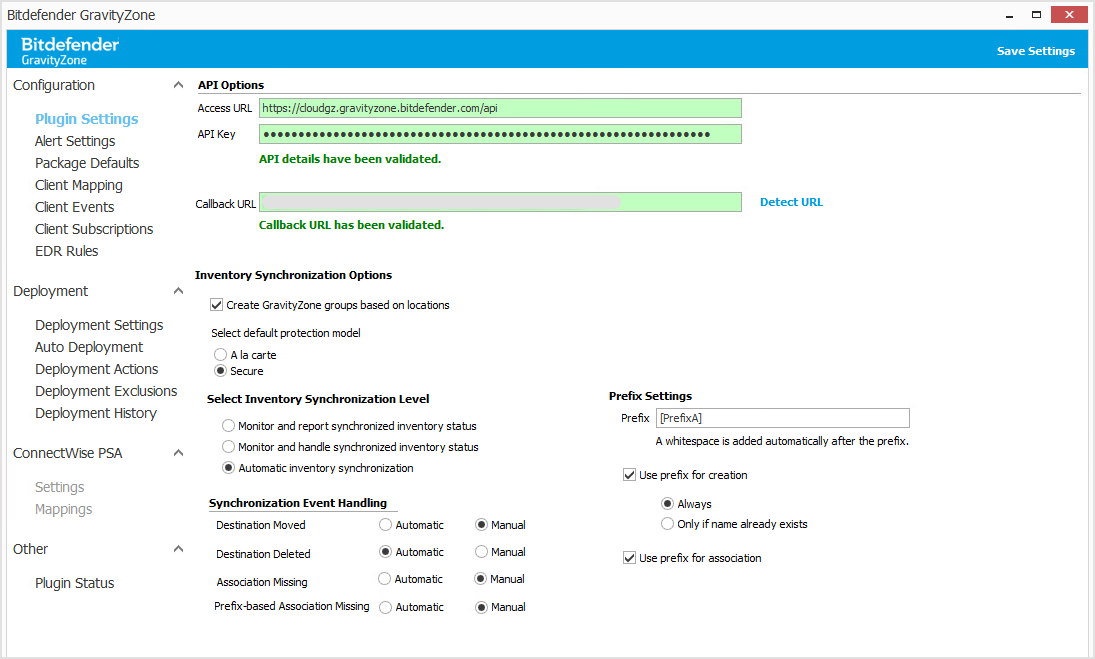
Under API Options, enter the URL of GravityZone console along with the generated API key and click Validate.

Next to Callback URL, click Detect URL to auto discover the ConnectWise Automate Server and verify that the callback URL field contains the correct address.
Click Save Settings in the upper right corner of the screen to confirm the changes.
Alert Settings
In the Alert Settings page, you can configure the Bitdefender Plugin to send you alerts based on push notifications from GravityZone protection modules.
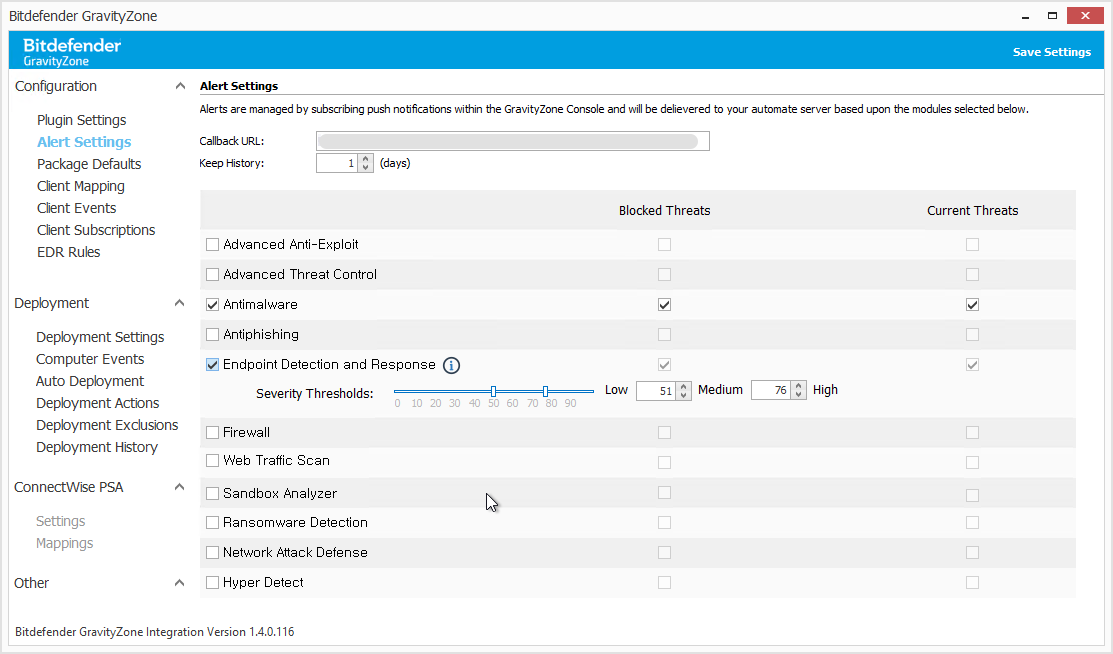
To configure alert settings, follow these steps:
Select the number of days for keeping old data for alerts (up to 120 days).
Select check boxes to enable alerts for specific security events and for Blocked Threats or Current Threats (which are still present on computers). Alerts are available for the following security events:
Advanced Threat Control
Advanced Anti-Exploit
Antimalware
Antiphishing
Endpoint Detection and Response (EDR)
Firewall
Hyper Detect
Network Attack Defense
Ransomware Mitigation
Sandbox Analyzer
Web Traffic Scan
For certain security events, such as Antiphishing, Ransomware Mitigation and Web Traffic Scan, you can only select Blocked Threats, as Bitdefender automatically takes action without waiting for user interaction.
For EDR incidents, you can only enable alerts for all threats, with no option to select separately the blocked or current ones. This limitation is due to the complex nature of the EDR incidents, on which Bitdefender may take actions while monitoring and reporting them. Therefore, in order to have a complete incident coverage, it is critical to receive alerts for both current and blocked threats. Learn more about EDR incidents in ConnectWise Automate integration.
Optionally, for Endpoint Detection and Response, you can change the ConnectWiseAutomate ticket category by editing the severity thresholds of alerts.
Tickets can have three severity categories based on a score from 0 to 100: Low, Medium, and High. The default severity thresholds are provided by Bitdefender, but can be changed them.
To edit the severity thresholds, move the sliders left or right, or enter the desired values in the corresponding boxes.
For example, values 51 and 76 indicate that tickets with a score of 50 or below will have low severity, tickets with a score of 51 to 75 will have medium severity, and tickets with a score of 76 and above will have high severity.

For details on configuring ticket category, refer to EDR incidents in the ConnectWise Automate integration with GravityZone.
Click Save Settings at the upper right corner of the screen to confirm your selection.
You can view the security events related to alerts in the GravityZone tab of the Client, Location, and Computer screens. For details, refer to Security events.
Package Defaults
The integration creates a new deployment package in the GravityZone Control Center for each mapped client or location. Configure deployment packages to install the Bitdefender security agent on target machines.
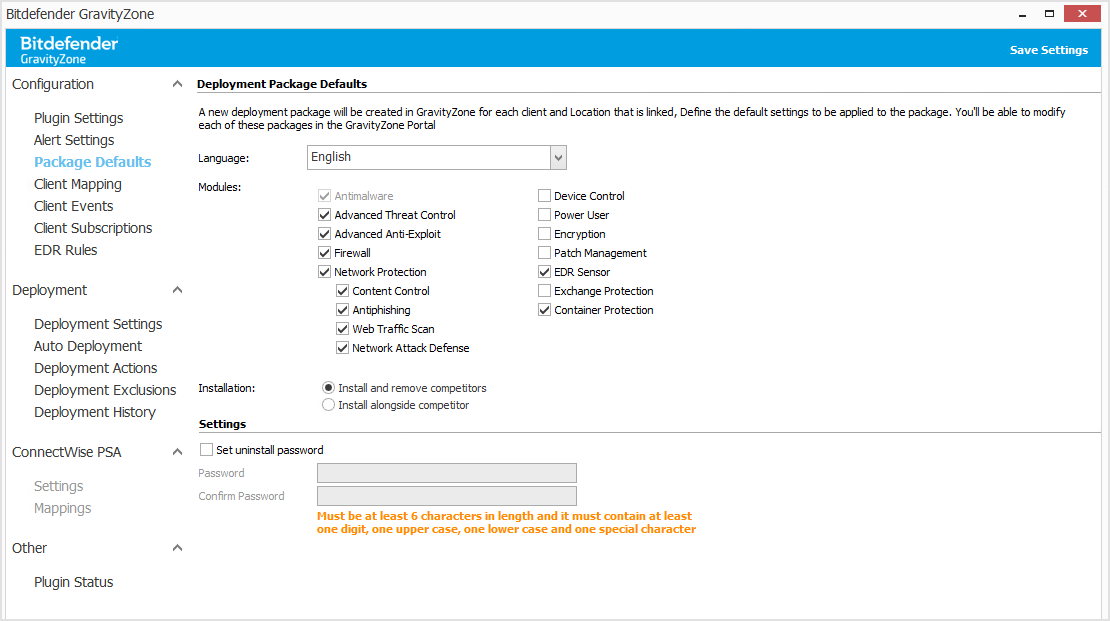
In Automate Control Center navigate to Tools > Bitdefender GravityZone.
Go to Package Defaults.
Under Language, select the package language from the drop-down menu.
Under Modules, select the protection module enabled in the default package.
Under Installation, choose to uninstall existing security products or deploy on top of them.
Under Settings, you can set an uninstall password for the security agent.
Click Save Settings in the upper right-hand corner to confirm the changes.
Making changes in the Package Defaults page does not update deployment packages already existing in the GravityZone console. In this situation, you need to either manually update them in the GravityZone console or to recreate them.
To recreate a package, follow these steps:
Delete the ConnectWise Automate deployment package from the GravityZone console.
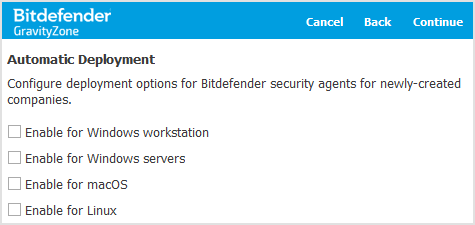
In Automate Control Center, go to Tools > Bitdefender GravityZone > Auto Deployment.
Click Refresh Package List.
The Plugin will recreate the deployment package based on the settings from the Package Defaults page.
Client Mapping
The Bitdefender Plugin creates company records for existing ConnectWise Automate clients within GravityZone Control Center. You can control the creation of these company records using the settings on the Client Mapping page. Also, during this process, you can configure the product type or subscriptions for the new companies.
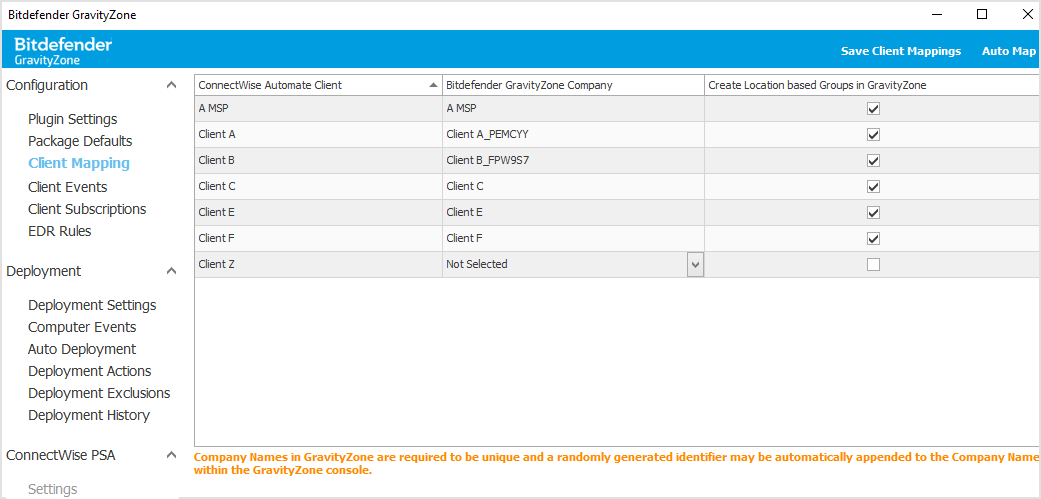
To automatically configure GravityZone companies associated with ConnectWise Automate clients, click the Auto Map button in the upper right corner of the page. Subsequent dialogs will ask you if you want to create GravityZone companies with random names and location based groups.
To manually configure GravityZone companies for clients without previous mapping:
In the Bitdefender GravityZone Company column, click the corresponding entries for ConnectWise Automate clients.
From the drop-down menu, select Create Customer Record to create a new company in GravityZone.
Two other options are related to exclusions or to existing companies:
Ignore Customer - excludes that client from the mapping process (when using Auto Map, for example).
Select a GravityZone company already created to associate it to the ConnectWise Automate client.
Optionally, in the Create Location based Group in GravityZone column, select the check boxes for clients for which you want this setting.
Click the Save Client Mappings button.
If you have selected Create Customer Record, a configuration wizard guides you through the synchronization process, which implies selecting the product type for the new companies and the available features.
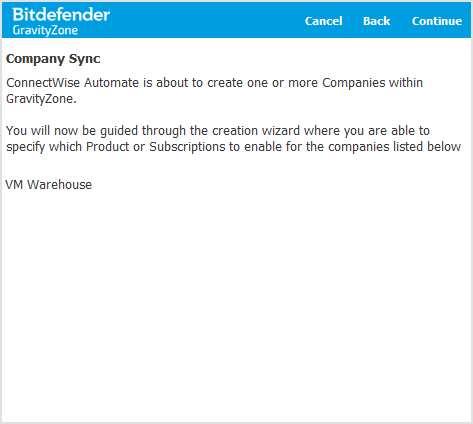
Click Continue and follow the on-screen indications:
Select the product. Depending on the product type, the Bitdefender security agent installed on computers belonging to that company will have certain features enabled.
The following product types are available:
Endpoint Security, the fully-featured security solution, with all modules available for deployment on machines running Windows, Linux or macOS.
Bitdefender EDR, a lightweight Endpoint Detection and Response (EDR) solution for Windows-based systems that can run alongside any third-party protection platform.
Click Continue.
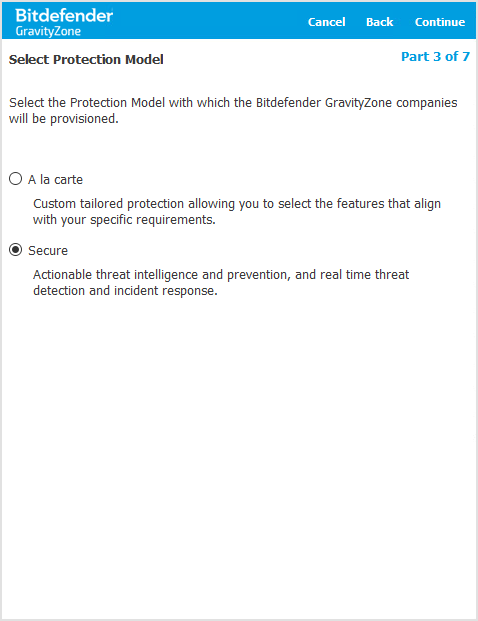
Select the protection model. Depending on the protection model, certain add-ons will be automatically included and not displayed for selection under the Add-on Management step.
The following protection models are available:
A la carte, custom tailored protection allowing you to select the features that align with your specific requirements.
Secure, actionable threat intelligence and prevention, and real time threat detection and incident response.
Click Continue.
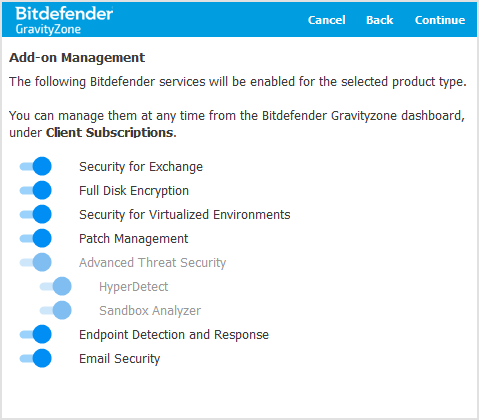
Select what add-ons to be available with the product type. Depending on the add-ons, you will be able to install the Bitdefender security agent with certain features.
Tip
Depending on the selected protection model, certain add-ons will not be visible for selection as they are already included or not compatible with the selected model. Example: the Secure protection model already includes Advanced Threat Security (HyperDetect and Sandbox Analyzer) and Endpoint Detection and Response and is not compatible with Container Protection and Security for Virtualized Environments.
Click Continue.
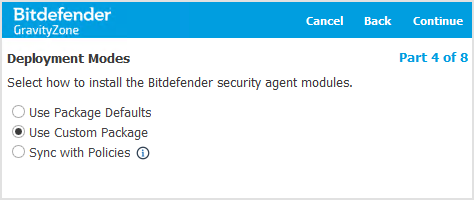
Configure the deployment modes for the Bitdefender agent. Select one of these options:
Use Package Defaults - deploys the Bitdefender agent with the features set selected in the Package Defaults section.
Notice
An installation package will be provisioned for the mapped Client in GravityZone.
Click Continue.
Use Custom Package - deploys the Bitdefender agent with a custom features set.
Click Continue.
Next, configure these settings:
Under Language, select the package language from the drop-down menu.
Under Modules, select the protection module enabled in the custom package.
Under Installation, choose to uninstall existing security products or deploy on top of them.
Click Continue.
Under Deployer section, choose the entity the endpoints will connect to for communication.
Under Settings, you can set an uninstall password for the security agent.
Sync with Policies - deploys the Bitdefender agent with features active in your assigned GravityZone policy.
The modules deployed through the Sync with Policies option are synchronized each 24 hours with the corresponding features active in the policy currently applied on the computers. If Bitdefender detects more than 10 policies defined for your GravityZone company, a message will warn you to make sure that you have correctly applied them within the organization.
Note
The Sync with Policies option is only available for Windows operating systems. For Linux and macOS deployments, a default installation package will be created with the Antimalware feature available. To add more features, edit the installation package in the GravityZone Control Center.
Click Continue.
The Plugin will create one or more companies in GravityZone having the specified product type. The Bitdefender security agent installed on computers within these companies will include features as configured in the wizard.
Click Continue.
Select the EDR rules you want to assign to the client, if applicable.
Click Finish.
If you do not select any option, you can install the security agent manually afterwards.
For details about auto deployment, refer to Synchronizing ConnectWise Automate computers with GravityZone.
Click Finish.
In case of clients already associated to GravityZone companies, changing the mapping does not move any installed Bitdefender agents to the newly selected companies within GravityZone Control Center. To show under the new company in GravityZone, you must uninstalled and then reinstall the Bitdefender agents.
Once a company is mapped, you can reconfigure the product type and the available Bitdefender services in the Client Subscriptions page.
Note
The Bitdefender Plugin provisions companies for MSPs using Monthly Subscription, Monthly Subscription Trial, and Monthly License Trial.
Client Events
In the Client Events page, you can view and manually handle inventory synchronization events. This page only displays events that have been configured for manual handling or that the system was unable to handle automatically.
For details, refer to Synchronizing the ConnectWise Automate inventory with GravityZone.
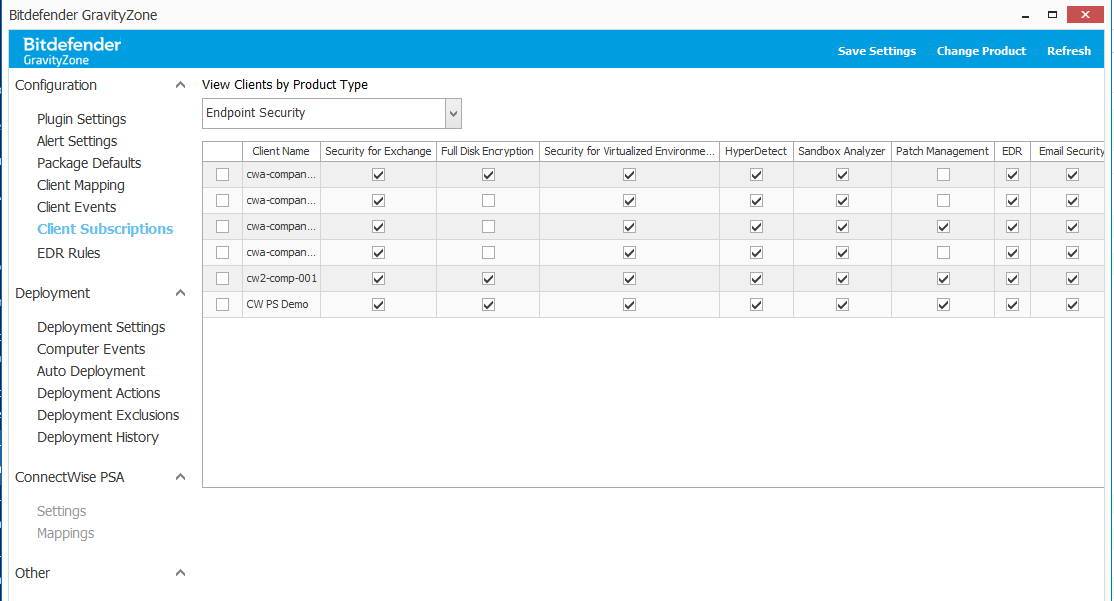
Client Subscriptions
In the Client Subscriptions page, you can control, through the Bitdefender Plugin, the product type, protection model and the services enabled on clients.
Configure services
To reconfigure the Bitdefender services for a client without changing the product type:
In the upper left-side corner of the Client Subscriptions page, click to view clients by product type.
Select or deselect the check boxes corresponding to the services you want to enable.
Notice
Services that are already included or are not compatible with the configured protection models, cannot be disabled/activated and are grayed out.
Click the Save Settings button.
Note
This operation does not automatically update the existing deployment packages. When creating a new package, you need to enable the corresponding modules in the Package Defaults page.
Reconfigure the client
To reconfigure the client and change the product type between Endpoint Security and Bitdefender EDR for a client, follow these steps:
In the upper left-side corner of the page, click to view clients by product type.
Select the client for which to change the product.
Click the Change Product button. A wizard will guide you through the process. Follow the on-screen indications:
Note
If your GravityZone for MSP license does not support the Bidefender EDR Standalone product, the button is renamed to Reconfigure Client.
Select the product. The following product types are available:
Endpoint Security, the fully-featured security solution, with all modules available for deployment on machines running Windows, Linux or macOS.
Bitdefender EDR, a lightweight Endpoint Detection and Response (EDR) solution for Windows-based systems that can run alongside any third-party protection platform.
Click Continue.
Select the protection model. Depending on the protection model, certain add-ons will be automatically included and not displayed for selection under the Add-on Management step.
The following protection models are available:
A la carte, custom tailored protection allowing you to select the features that align with your specific requirements.
Secure, actionable threat intelligence and prevention, and real time threat detection and incident response.
Click Continue.
Select what add-ons to be available with the product type. Depending on the add-ons, you will be able to install the Bitdefender security agent with certain features.
Tip
Depending on the selected protection model, certain add-ons will not be visible for selection as they are already included or not compatible with the selected model. Example: the Secure protection model already includes Advanced Threat Security (HyperDetect and Sandbox Analyzer) and Endpoint Detection and Response, and it is not compatible with Container Protection and Security for Virtualized Environments.
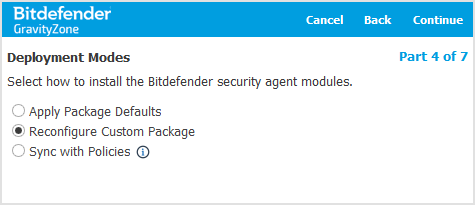
Configure the deployment modes. Select one of these options:
Apply Package Defaults - deploys the Bitdefender agent with the features set selected under Package Defaults.
Note
Please notice, the existing installation package in GravityZone for the Client will be overwriten.
Click Continue.
Reconfigure Custom Package - deploys the Bitdefender agent with custom features set.
Click Continue.
Next, configure these settings:
Under Language, select the package language from the drop-down menu.
Under Modules, select the protection module enabled in the custom package.
Under Installation, choose to uninstall existing security products or deploy on top of them.
Click Continue.
Under Deployer, choose the entity the endpoints will connect to for communication.
Under Settings, you can set an uninstall password for the security agent.
Sync with Policies - deploys the Bitdefender agent with features active in your default GravityZone policy.
The modules deployed through the Sync with Policies option will be continuously synchronized each 24 hours with the corresponding features active in the policy currently applied on the computers. If we detect more then 10 policies defined for your GravityZone company, a warning will be displayed to make sure that you have correctly applied them within your organization.
Note
Sync with Policies is only available for Windows operating systems. For Linux and macOS deployments, a default installation package will be created with the Antimalware feature available. To add more features, edit the installation package in the GravityZone Control Center.
Click Continue.
Select the EDRrules you want to assign to the client, if applicable, and click Finish.
The product will change for that client.
After changing the product, you need to you need to reconfigure the Bitdefender security agent installed on computers from GravityZone in order to include the new features. The existing product and its features expire in seven days.
Note
In case your license does not allow changing the product type for managed clients, the Reconfigure Client button replaces Change Product on the Client Subscriptions page. That means you can only modify the add-ons and the other settings within the existing product.
EDR Rules
In the EDR Rules section of the BitdefenderPlugin, you can create and manage custom rules to include or exclude specific behaviors from triggering incidents in Security Events.
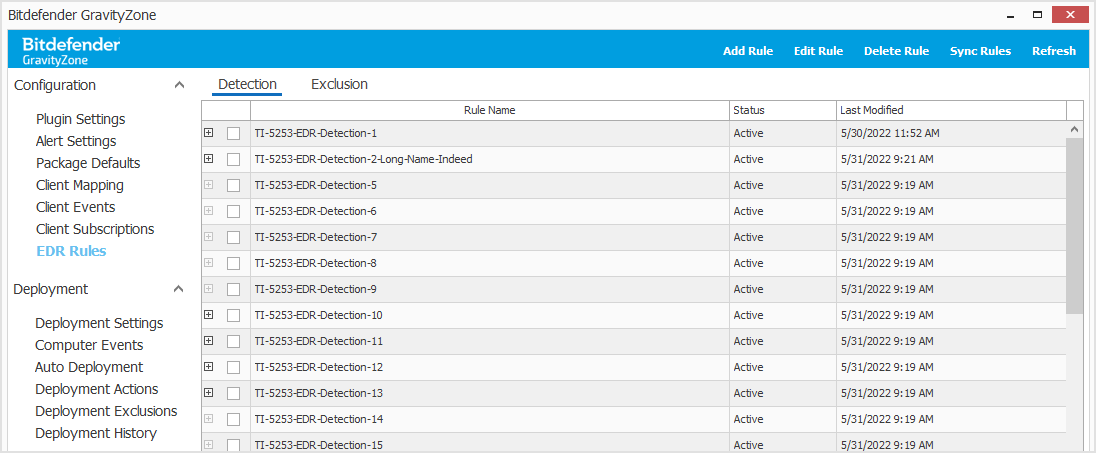
EDR rules include two categories:
To view rules in each category, select the Detection or Exclusion above the grid area.
In the grid area, click the + icon next to a rule to view the clients to which that rule has been assigned. The greyed-out + icon indicates that the rule is not assigned to any clients.
To create and manage EDRrules, use the following options on the upper-side of the window:
Add Rule - click to create a new rule and select the clients that will use it.
Edit Rule - click to modify an existing rule, including the list of the clients that use it. To edit a rule, you first need to select the corresponding check box in the grid area.
Delete Rule - click to remove a rule you no longer need. To delete a rule, you first need to select the corresponding check box in the grid area.
Sync Rules - click to synchronize the existing rules in the Bitdefender Plugin and in the GravityZone console.
Refresh - click to update the page with the latest data.
Changes made to EDR rules in the Bitdefender Plugin also reflect in the GravityZone console, in the EDR Custom Rules section.
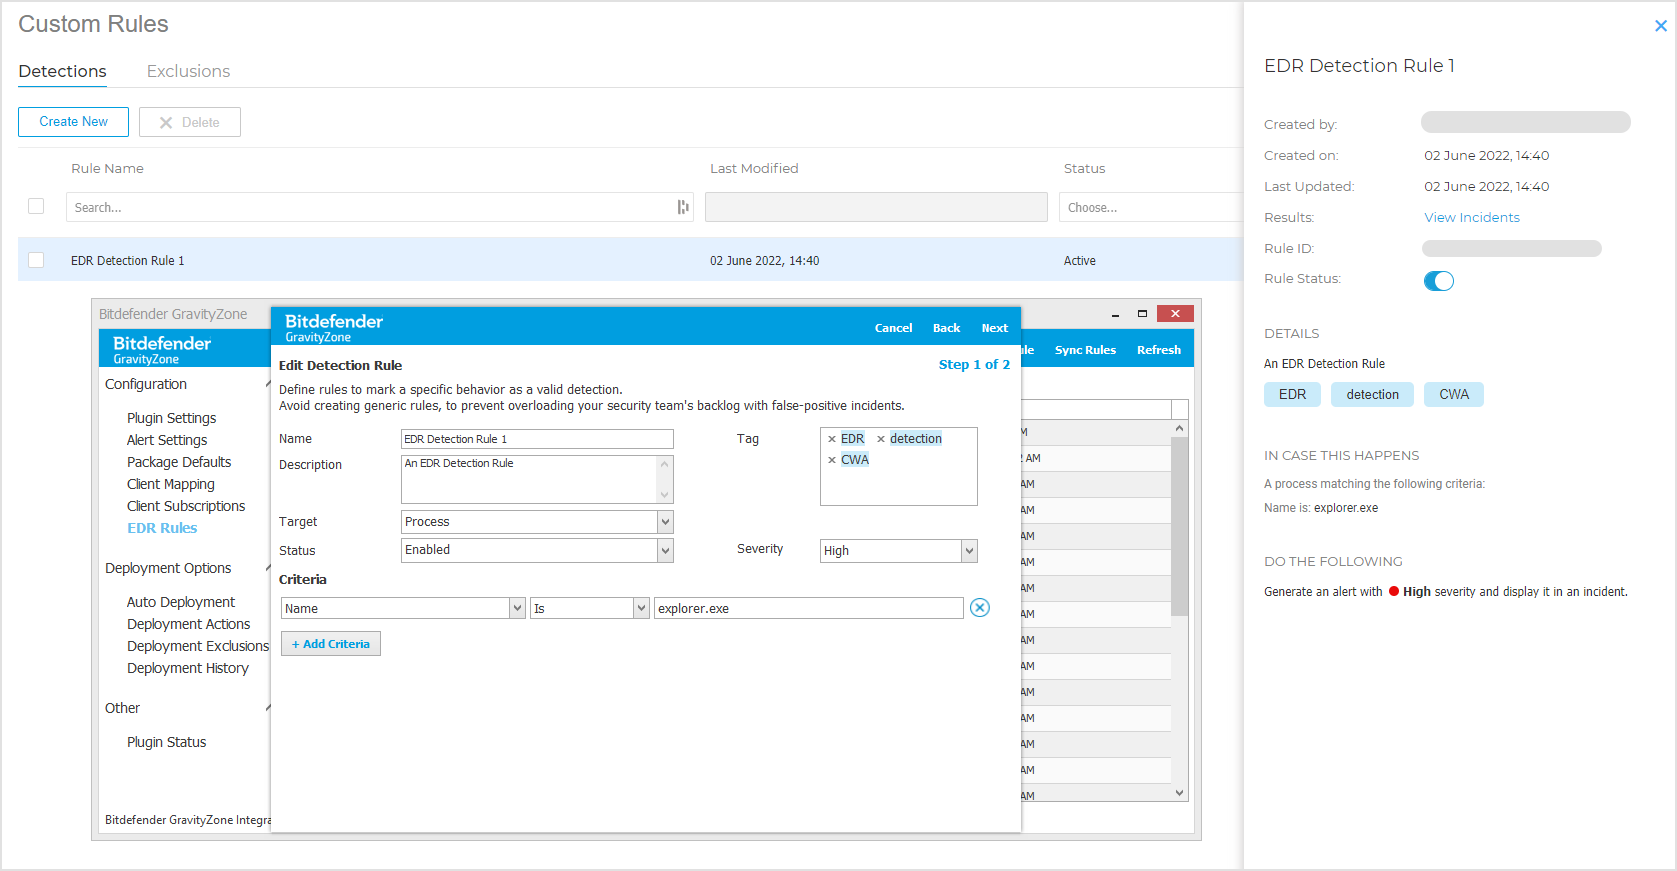
An EDR rule created in ConnectWise Automate as seen in GravityZone Control Center
The following sections describe how to create detection and exclusion rules. The procedure also applies to editing rules. For the procedure of creating EDR custom rules in the GravityZone console, refer to "EDR Custom Rules" in Investigating Incidents.
Detection rules
The Detection category provides you the framework to create and manage custom detection rules, to mark specific behavior from your environment as a valid detection, and generate corresponding incidents in Security Events.
To create a detection rule, follow these steps:
In the EDR Rules section, click the Detection tab.
In the top-right corner, click Add Rule.
In the subsequent page, fill in the following details:
Name of the rule. This field is mandatory.
A short description for easier rule identification.
Target – select what type of element to include in the rule:
Process
File
Connection
Registry
Status – specify whether the rule to be enabled or disabled.
Tag – add specific tags for easier rule grouping and management. Press
Enterafter each tag or click inside the box.Severity – from the drop-down list, set the level of the triggered security event to Low, Medium, or High.
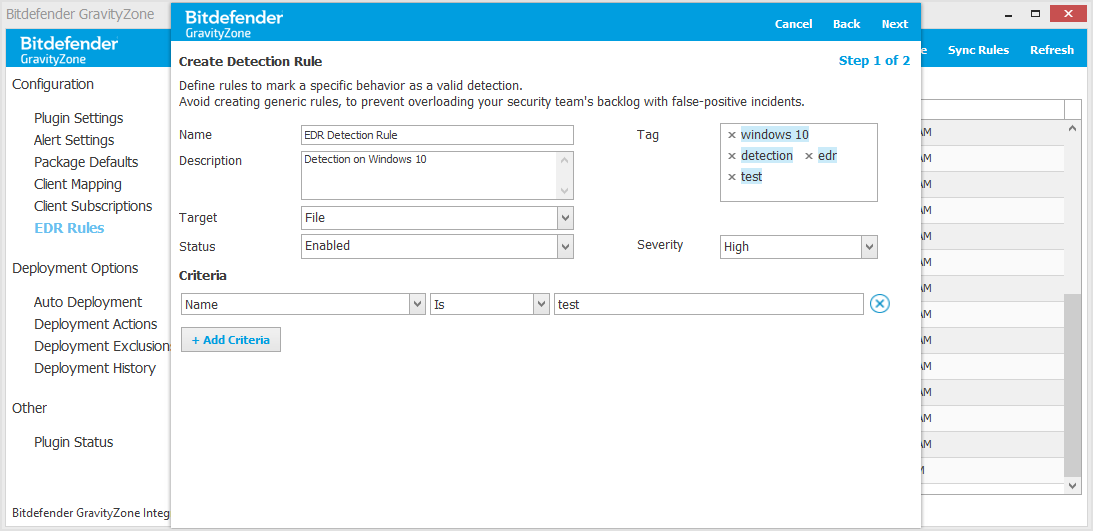
Under Criteria, specify the rule elements as follows:
Select one of the options depending on the chosen target. For example, for target File, select element Name.
Select the type of relationship between target and its value:
Is - includes all incidents with elements that match the exact value entered in the value field.
Contains - includes all incidents with elements that contain the value entered in the value field (for example wildcards, file extensions, etc.).
Is one of - includes all incidents with elements matching one of the values entered in the value field. The
ORoperator is applied between the entered values.
Enter the specific value for each criteria.
Note
When entering multiple values for a criterion (when using the Is one of condition), you must press
Enterafter each value, to complete the action.

To add more criteria for this rule, click Add Criteria.
Note
The rule will trigger incidents that include every defined criteria. The
ANDoperator is applied between multiple criteria added.To remove an entry, click the
 icon.
icon.After all the criteria have been defined, click Next.
In the Rule Application window, select the clients for which you want to apply the rule. Use the search box to find specific clients and the following buttons:
 - select all clients in the list.
 - click to deselect all clients in the list.
 - click to undo changes (for example, a selection you have made).
 - click to display the clients on multiple columns with horizontal scroll bar instead of a single column with vertical scrolling bar.
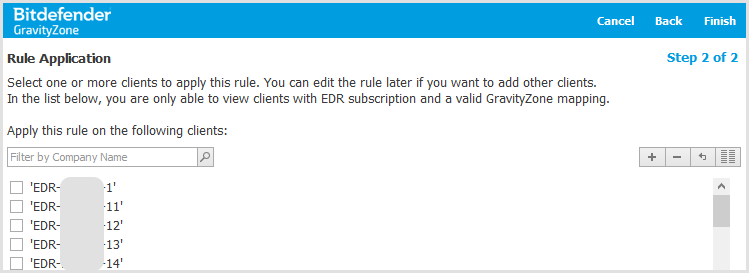
The list displays only clients that have Endpoint Detection and Response (EDR) subscription and a valid client mapping. Loading the list might take a while depending on the on the number of available clients.
Note
You can add different clients later on when editing the rule. Deselecting a client will result in removing the rule from that client to which it was previously assigned.
Click Finish to save the rule and apply it to the clients.
Exclusion rules
The Exclusion category provides you the framework to create and manage custom exclusion rules, to exclude incidents you find irrelevant for your organization, which otherwise would normally be flagged in Security Events.
To create an exclusion rule, follow these steps:
In the EDR Rules section, click the Exclusion tab.
In the top-right corner, click Add Rule.
In the subsequent page, fill in the following details:
Name of the rule. This field is mandatory.
A short description for easier rule identification.
Target – select what type of element to include in the rule:
Process
File
Connection
Status – specify whether the rule to be enabled or disabled.
Tag – add specific tags for easier rule grouping and management. Press
Enterafter each tag or click inside the box.Severity – from the drop-down list, set the level of the triggered security event to Low, Medium, or High.
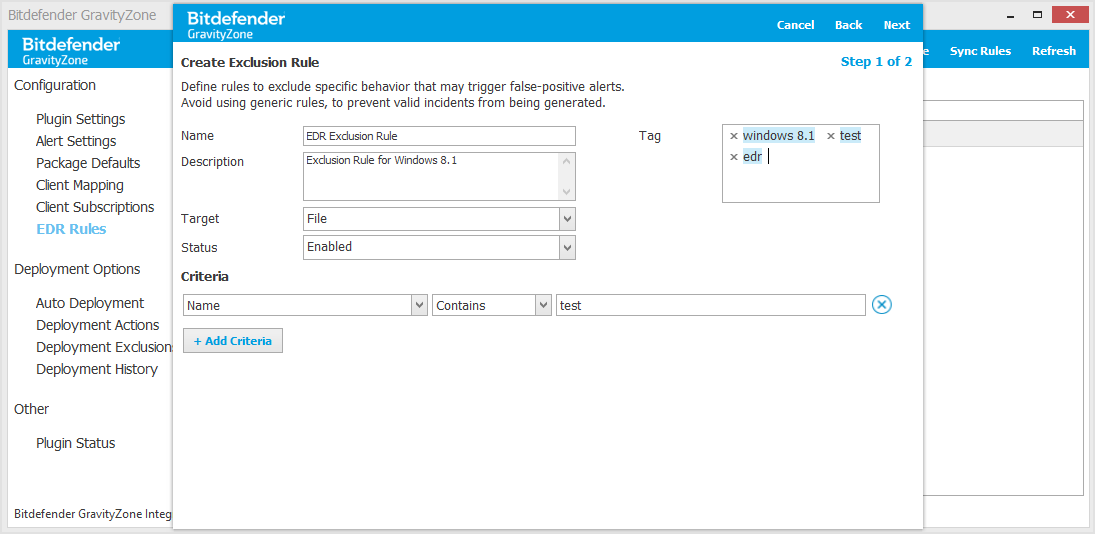
Under Criteria, specify the rule elements as follows:
Select one of the options depending on the chosen target. For example, for target File, select element Name.
Select the type of relationship between target and its value:
Is - excludes all incidents with elements that match the exact value entered in the value field.
Contains - excludes all incidents with elements that contain the value entered in the value field (for example wildcards, file extensions, etc.).
Is one of - excludes all incidents with elements matching one of the values entered in the value field. The
ORoperator is applied between the entered values.
Enter the specific value for each criteria.
Note
When entering multiple values for a criterion (when using the Is one of condition), you must press
Enterafter each value, to complete the action.
To add more criteria for this rule, click Add Criteria.
Note
The rule will trigger incidents that include every defined criteria. The
ANDoperator is applied between multiple criteria added.To remove an entry, click the
icon.After all the criteria have been defined, click Next.
In the Rule Application window, select the clients for which you want to apply the rule. Use the search box to find specific clients and the following buttons:
- - select all clients in the list.
- - click to deselect all clients in the list.
- - click to undo changes (for example, a selection you have made).
- - click to display the clients on multiple columns with horizontal scroll bar instead of a single column with vertical scrolling bar.
The list displays only clients that have Endpoint Detection and Response (EDR) subscription and a valid client mapping. Loading the list might take a while depending on the on the number of available clients.
Note
You can add different clients later on when editing the rule. Deselecting a client will result in removing the rule from that client to which it was previously assigned.
Click Finish to save the rule and apply it to the clients.
Computer Mapping
Note
Bitdefender has started a controlled rollout of advanced computer synchronization features. For users to be eligible for the rollout process, they need to install the plugin version 1.4.0.167 or later. In the following period, Bitdefender will progressively deliver the new features to eligible users, with the aim of reaching the entire installation base as soon as possible.
With the introduction of the new advanced computer synchronization features, the Computer Mapping feature will be removed as they are incompatible.
The integration automatically creates a record in Automate Control Center for computers with the Bitdefender security agent installed and maps computers associated with the GravityZone Control Center.
Computer mapping is required for the following functionalities to work correctly:
Quarantine management
Queue scans
View security event history
Alerts and monitors
If automatic mapping is unable to create a successful mapping, you can manually adjust this by completing the following steps:
Click Change Computer Mapping on the Bitdefender tab on the computer screen.
From the drop-down list select the target device in the GravityZone Control Center that you wish to link to.
Select Save in the upper right-hand corner of the window to save the changes and close the window.