Managing attack vectors
Attack vectors are mechanisms that PHASR uses to identify possible attack scenarios and help reduce attack surface exposure. Each attack vector can generate multiple recommendations.
The PHASR attack vectors page lists the attack vectors currently monitored in your environment. From this page, you can investigate activity and manage access for one attack vector at a time. To manage multiple attack vectors in the same flow, use PHASR MITRE Grouping.
Note
You do not need to wait for the PHASR learning period to complete before restricting access to an attack vector. To proactively reduce your attack surface, you can restrict an individual attack vector from the PHASR attack vectors page or manage multiple attack vectors from PHASR MITRE Grouping.
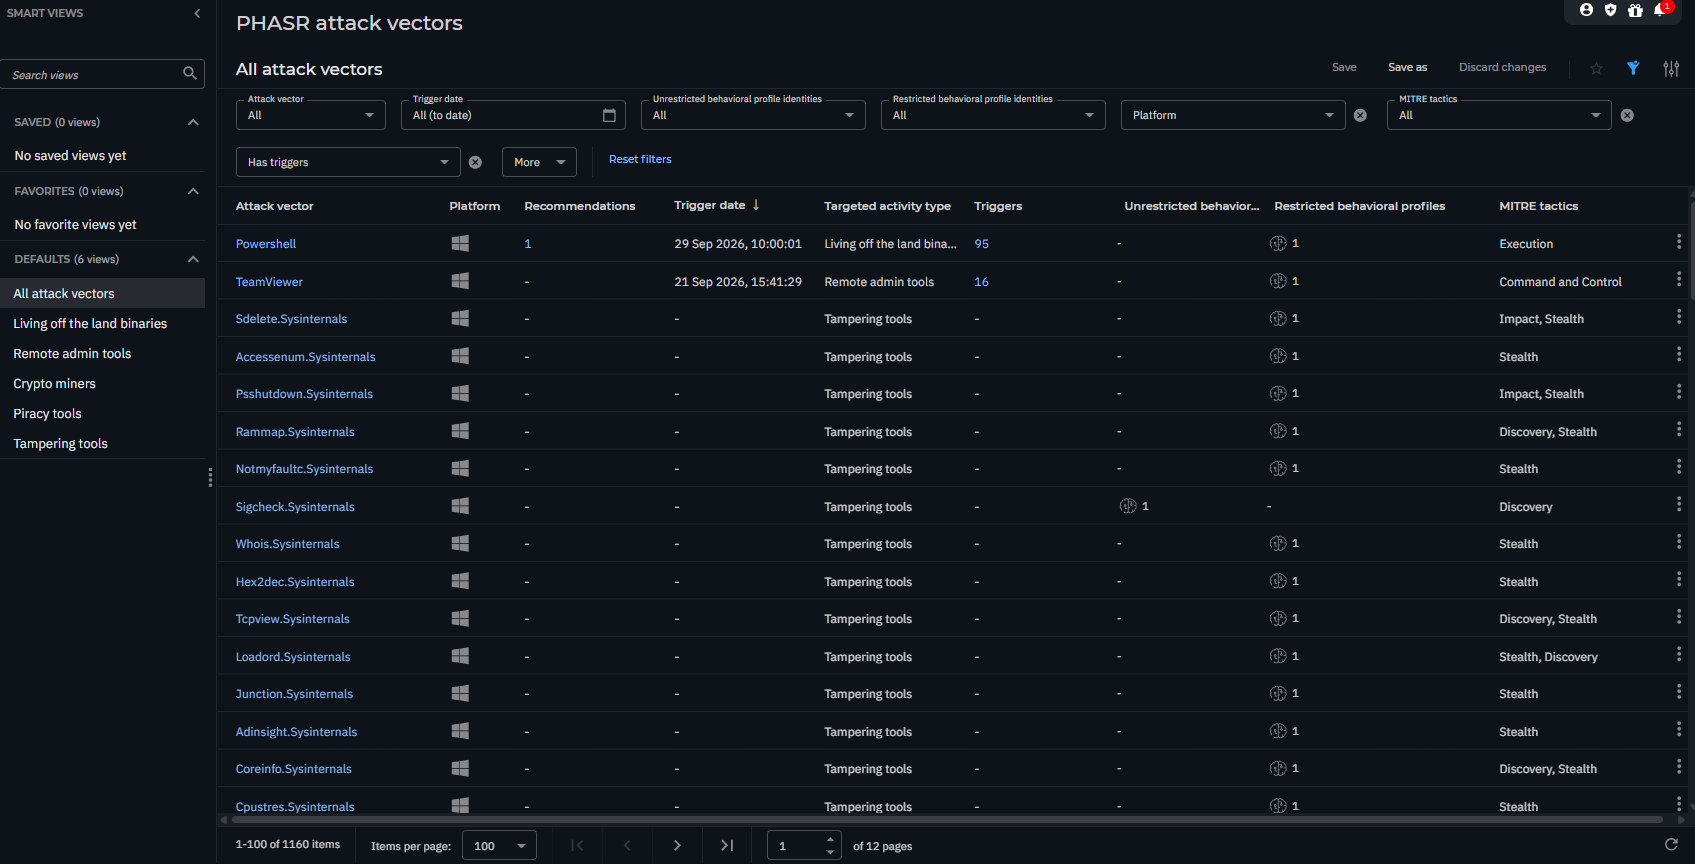
The View options menu. This section provides multiple functions for working with smart views:
Save - Saves the current smart view with your latest changes.
Save as - Creates a new smart view based on the current one.
Discard changes - Reverts all unsaved edits to the last saved version.
Add to favorites - Adds a saved smart view to your favorites.
Show or hide filters - Hides or displays the filters menu.
Open settings - Displays the Settings panel.
You can use this panel to customize which columns are displayed in the view and enable or disable the Compact view.
The Smart views section. Smart views let you customize the PHASR attack vectors page. You can create your own views or use predefined ones and quickly switch between them as needed.
The Filters section. Use these options to customize which attack vectors are displayed in the table below.
The following filters are currently available:
Filtering option
Details
Company
Use the searchable drop-down menu to filter the list of vectors based on the name of the company they belong to.
Only vectors belonging to the selected company are displayed. This filter is available only to Partner companies.
Vector name
Use the searchable drop-down menu to filter the list of vectors based on their name.
Only selected vectors are displayed.
Vector trigger date
Use the calendar to select two dates.
Only vectors triggered between the selected dates are displayed.
Unrestricted behavioral profile identities
Use the searchable drop-down menu to filter the list of vectors based on the associated identity names.
Only vectors associated with the selected identities are displayed.
Unrestricted behavioral profile resources
Use the searchable drop-down menu to filter the list of vectors based on the associated resource names.
Only vectors associated with the selected resources are displayed.
Targeted activity type
Use the drop-down menu to filter the vectors based on the targeted activity type.
Only vectors targeting the selected activity types are displayed.
The Attack vectors table. The table displays all active PHASR attack vectors.
The information available for each attack vector is displayed under the following columns:
Attack vector - The name of the vector.
Clicking the name displays the Vector details side panel.
Recommendations - The number of recommendations created based on this vector.
Clicking the value in this column opens the PHASR recommendations page, filtered to display recommendations generated by this vector.
Trigger date - The most recent date and time when the vector was triggered.
Targeted activity type - The type of activity the vector applies to.
Triggers - The number of events that triggered this vector.
Clicking the value displays the Triggers side panel.
Unrestricted behavioral profiles - The number of behavioral profiles for which access is not restricted for this vector.
Clicking the icon in this column displays the Behavioral Profiles side panel, which lists the associated users and devices.
Note
This section lists the profiles discovered by PHASR so far. However, this does not mean that their learning process has finished. New profiles may also be added as the system continues to collect and analyze data.
Restricted behavioral profiles - The number of behavioral profiles for which access is restricted for this vector.
Clicking the icon in this column displays the Behavioral Profiles side panel, which lists the associated users and devices.
MITRE tactics - The MITRE Tactics the attack vector belongs to.
Note
For more information about the available filtering options, refer to the Filters section.
Actions menu - Clicking the inline menu button displays the actions available for the attack vector:
View/edit access - Opens the Edit access flow for the selected attack vector. You can review the current restriction status and apply Restrict or Do not restrict decisions to departments, users, or individual behavioral profiles. You can also use this flow to override an access decision previously applied by Autopilot.
Viewing vector details
You can view additional information about a vector in the Vector details side panel. To open it, click the vector name in the Vector name column:
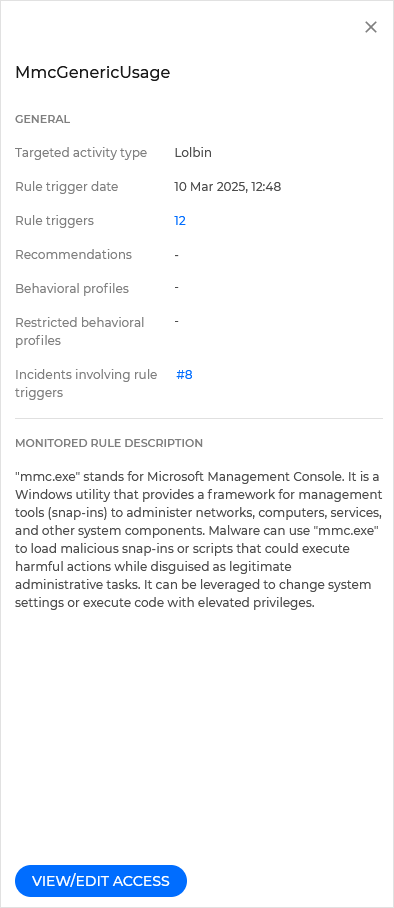
General - This section contains the following information:
Target activity type - The type of activity targeted by the vector.
Vector trigger date - The date and time when the vector was last triggered.
Vector triggers - The number of events that triggered this vector.
Clicking the value displays the Vector triggers side panel.
Recommendations - The number of recommendations created based on this vector.
Clicking the value opens the PHASR recommendations page, filtered to display recommendations generated by this vector.
Behavioral profiles - The number of behavioral profiles that this attack vector applies to.
Clicking the icon displays the Behavioral Profiles side panel, which lists the associated users and devices.
Restricted behavioral profiles - The number of behavioral profiles for which access is restricted for this vector.
Clicking the icon displays the Behavioral Profiles side panel, which lists the associated users and devices.
Incidents involving vector triggers - A list of incidents opened as a result of this vector triggering.
Clicking the incident name opens the Graph tab on the Incidents page in a new browser tab.
Vector description - Describes the vector and how it applies.
Edit access - Opens the access-editing flow for the selected attack vector.
Viewing and editing access
Use the Edit access flow to review and change access for a specific attack vector. The attack vector from which you start the flow is selected automatically, and all changes apply only to that vector.
Note
You can edit access before the learning period for the attack vector completes. This allows you to proactively restrict access without waiting for PHASR to finish learning the behavioral profiles associated with the vector.
To edit access, follow these steps:
Go to the PHASR attack vectors page.
Locate the attack vector you want to manage and select its name in the Vector name column.
The Vector details side panel is displayed.
Select Edit access.
Alternatively, open the attack vector's actions menu and select View/edit access.
The Edit access flow opens with the attack vector selected.
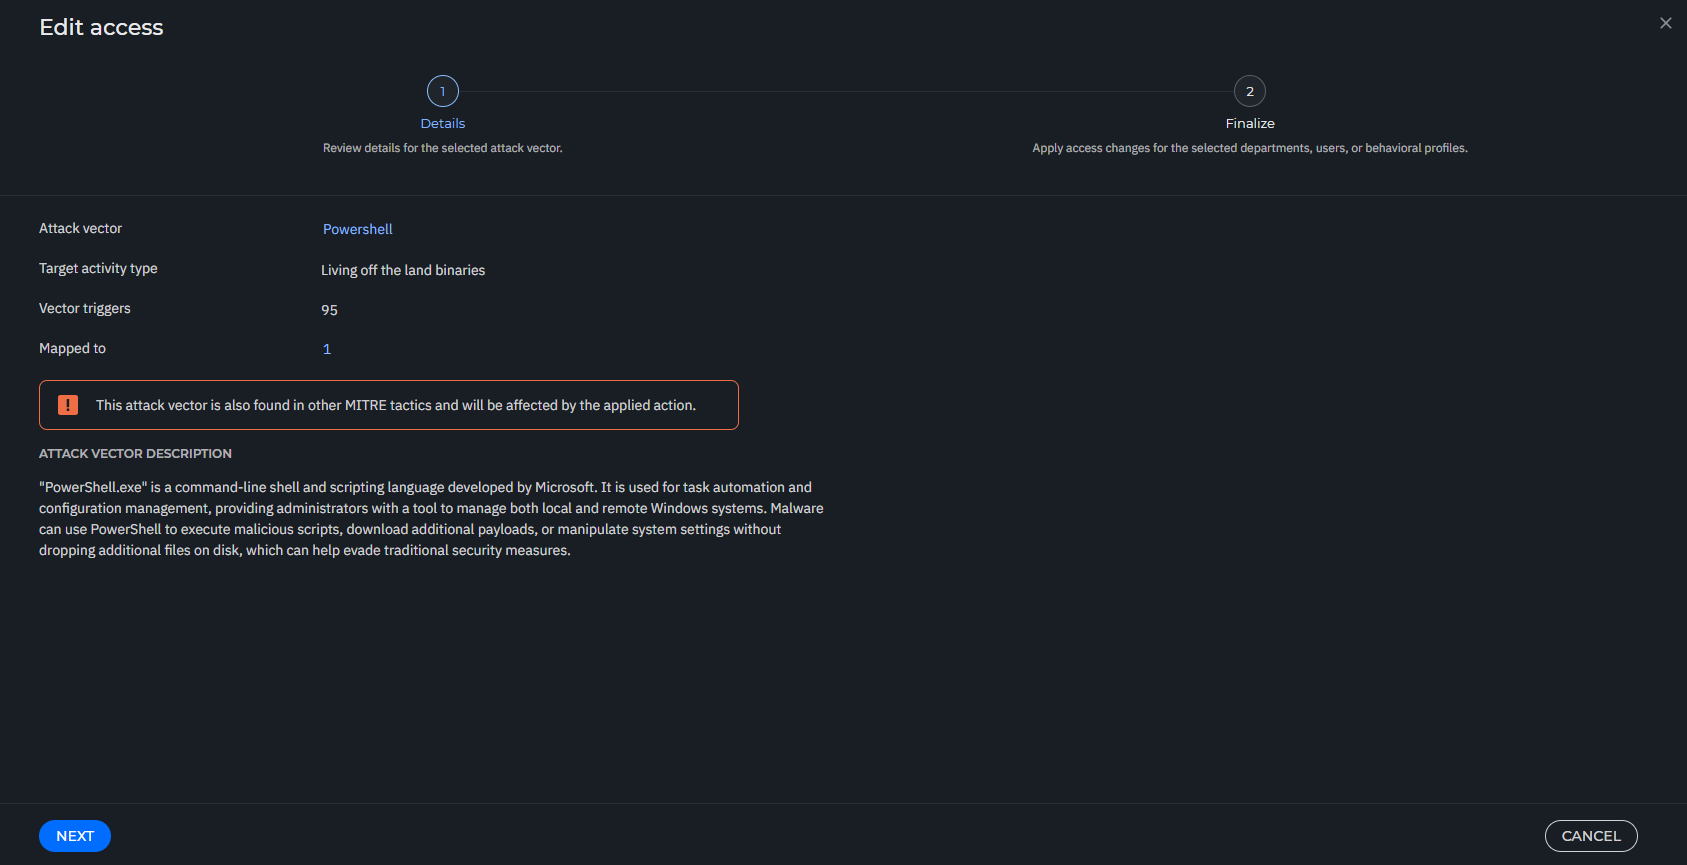
Under Target type, select the level at which you want to manage access:
Departments - Applies decisions to all users currently in the selected departments.
Users - Applies decisions to the selected users, regardless of their departments.
Behavioral profiles - Applies decisions to individual user-device profiles.
The grid updates according to the selected target type.
Note
PHASR retrieves department information from the Active Directory Department field and displays it only for monitored users. The endpoint must have access to Active Directory, and the field must contain a value. Otherwise, the user appears in the Unassigned group on the PHASR recommendations and PHASR attack vectors pages.
Use the available filters to find the departments, users, or behavioral profiles you want to manage.
Review the Restriction status of each item. Depending on the selected target type, the status can be:
Restricted - Access is restricted for all included behavioral profiles.
Unrestricted - Access is allowed for all included behavioral profiles.
Custom - The included behavioral profiles have different restriction statuses.
Apply one of the following decisions:
Restrict - Restricts access for the selected attack vector.
Do not restrict - Allows access for the selected attack vector.
If Autopilot previously applied a different decision, the decision you apply manually overrides it. PHASR continues monitoring and learning after the override.
You can apply a decision to individual rows or use Apply to all. When you filter the grid, this control changes to Apply to filtered and applies the decision only to the filtered results.
Restrictions applied through recommendations can also be removed from the PHASR attack vectors page.
Optional: Select the inline revert control to undo a change for an individual item, or select Revert changes to undo all pending changes in the current scope.
Select Save.
In the Apply changes? dialog, review the change summary:
The number of behavioral profiles that will be restricted.
The number of behavioral profiles that will be unrestricted.
The number of behavioral profiles that will remain unchanged.
The number of departments and users affected by the changes.
Select Apply to apply your changes.
GravityZone applies all saved changes, including changes made before or after filtering the grid, and displays a notification indicating whether the operation was successful.
If you select Cancel or close the flow after making changes, GravityZone asks you to confirm whether you want to discard them.
Overriding an Autopilot decision
When an activity type is configured in Autopilot mode, PHASR automatically applies access decisions based on observed behavior. If you need a different access state for a specific attack vector, you can manually override the Autopilot decision.
To override an Autopilot decision:
Go to the PHASR attack vectors page.
Locate the attack vector for which you want to override the access decision.
Open the actions menu and select View/edit access.
Under Target type, select Departments, Users, or Behavioral profiles, depending on the scope of the override.
Locate the targets for which you want to override the Autopilot decision.
Select Restrict or Do not restrict to override the current access decision.
Select Save, review the changes, and then select Apply.
Note
A manual override does not stop PHASR from monitoring and learning the behavioral profile. The override allows you to change the current access state while PHASR continues evaluating tool usage.
If you override an Autopilot restriction and allow access, PHASR continues learning the updated behavior. If the behavioral profile uses the tool, the usage is incorporated into its behavior and access remains allowed while the tool continues to be used during the applicable learning periods. If the behavioral profile stops using the tool and a subsequent learning period completes without detecting usage, PHASR can restrict access again. The learning period lasts a minimum of 30 days and can extend up to 60 days depending on the attack vector.
Autopilot override during the learning period
If you override a restriction while a behavioral profile is midway through its learning period and the user starts the tool, PHASR records the tool as being used for the remainder of that period. The tool remains allowed while PHASR continues monitoring usage during the next applicable learning period. If the tool is no longer used and that learning period completes without detecting additional usage, PHASR can restrict access again.
What happens after allowing access through an Autopilot override
An Autopilot override changes only the current Autopilot decision for a specific tool. It does not disable Autopilot. PHASR continues to monitor activity and learn from user behavior after the override is applied.
The 5-day usage window
When you allow access to a tool that was previously restricted, the user has 5 days to launch or use that tool.
If the tool is not used within 5 days, PHASR restricts it again.
If the tool is used within 5 days, PHASR learns this behavior and keeps the tool allowed. PHASR continues to monitor and learn from how the tool is used.
When an allowed tool stops being used
If an allowed tool stops being used and another learning period passes without activity, PHASR restricts the tool again.
Situation | PHASR action |
|---|---|
Override applied to a restricted tool | Tool is allowed and a 5-day usage window starts |
Tool is not used within 5 days | Tool is restricted again |
Tool is used within 5 days | PHASR learns the behavior and keeps the tool allowed |
Tool stops being used for a full learning period | Tool is restricted again |
Note
Overrides adjust individual decisions, but Autopilot stays active. Restrictions are based on actual usage, so tools that are no longer needed are automatically restricted over time.
Restricting attack vectors before learning completes
You can proactively restrict access to an attack vector without waiting for PHASR to complete its learning period. This is useful when you already know that a tool or activity should not be allowed in your environment.
To proactively restrict an individual attack vector, use the Edit access flow on the PHASR attack vectors page and apply Restrict to the required departments, users, or behavioral profiles.
To proactively manage several attack vectors associated with a MITRE tactic, technique, or sub-technique, use PHASR MITRE Grouping.
Note
Applying a restriction before learning completes does not stop the learning process. PHASR continues monitoring and learning the affected behavioral profiles.
Viewing vector triggers
To view additional details about the events that triggered a vector, follow these steps:
Go to the PHASR attack vectors page.
Locate the vector you want to investigate and select the number in the Vector triggers column.
The Vector triggers side panel is displayed.
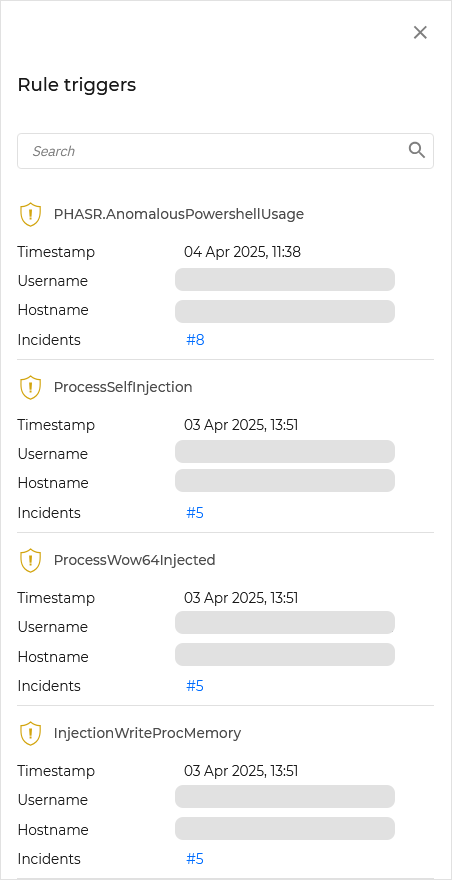
The side panel contains information about each event that triggered the vector:
Timestamp - The date and time when the vector was triggered.
Username - The username associated with the event that triggered the vector.
Hostname - The host name of the endpoint where the vector was triggered.
Incidents - The incident created as a result of triggering the vector.
Clicking the incident name opens the Graph tab on the Incidents page in a new browser tab.