Attack Path
To assist you in identifying and addressing the findings and vulnerabilities that require your attention, Attack Path analyzes and correlates multiple data sources to build a visual representation of the sequence of steps that an attacker could take in order to compromise your assets. This context-driven approach reduces noise and allows you to prioritize the risks that are most likely to be exploited.
An attack path always leads to a main asset that a potential attacker may target, such as a server or container. Each path also includes the intermediate nodes that an attacker may use to reach the main asset. These nodes may include two types of entities:
Entities that are part of your resource inventory, such as security groups, load balancers, workstations, servers, etc.
Derived resources, which are not part of the resource inventory but are included in the attack path because they provide crucial insight into how an attacker may reach the main asset. For example, an attack path may include the SMB service running on a server as a derived resource, because the exposed SMB service can act as an entry point for attackers looking to gain access to the server.
For information on using Attack Path, refer to the following sections:
Eligibility
To use the feature, you must meet the following requirements:
Your company has a valid license key that provides access to the Risk Management feature.
You have access to My company > Early access in the user menu to select Attack Path and enroll your company in the program.
The Attack Path page
To open the Attack Path page, select Risk management > Attack Path from the left-side navigation pane. The page displays a centralized list of potential attack paths, as well as essential information on the main asset targeted by each path, such as the risk factors and the risk score of the main asset. The main sections of the page are outlined below.
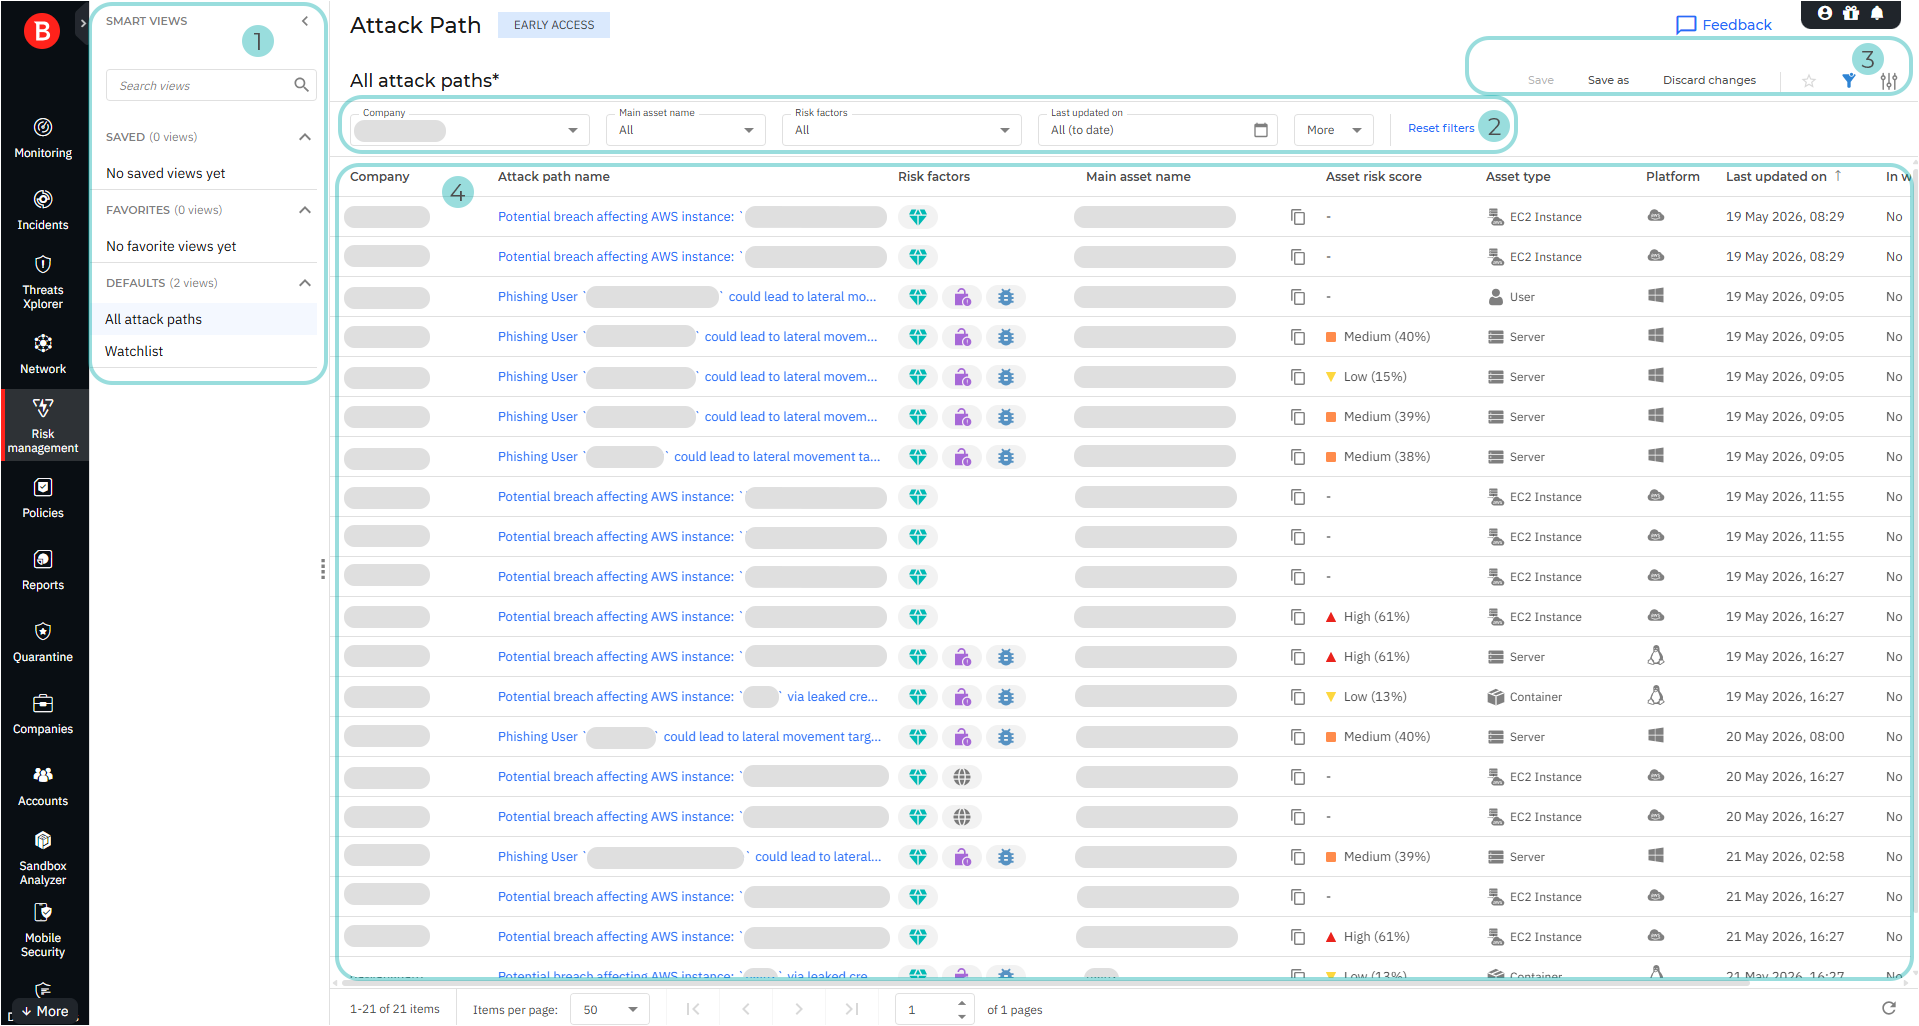
The Smart views panel. This feature allows you to customize, save, and switch between different loadouts of the Attack Path page. The panel has the following sections:
Search views - Use this search field to filter the views displayed in the sections below, by name.
Saved - This section displays a list of all your saved views that have not been marked as favorites.
Favorites - All views marked as favorites are displayed under this section.
Defaults - This section displays the views that are available by default:
All attack paths
Watchlist
For any view in the Saved and Favorites categories, you can click the actions button
 to Rename or Delete the view.
The Filters section. You can use these options to customize the information displayed in the grid. The following filters are available:
Filtering option
Details
Company
Select the company for which you want to view attack paths.
Main asset name
Use the searchable dropdown list to filter the list of attack paths by the name of the main asset targeted by the path. Select the main asset names you want and click Apply.
Only the attack paths whose main asset names you selected are displayed.
Risk factors
Use the searchable dropdown list to filter the list of attack paths by the risk factors involved. Select the risk factors you want and click Apply. Possible values:
Internet exposure - One or more of the assets in the attack path have vulnerabilities or configurations that expose them to an attack from the internet.
Exploitable CVE - One or more of the assets in the attack path have Common Vulnerabilities and Exposures (CVEs) that attackers have been proven to actively use, or which can easily be exploited in real environments using publicly known tools.
High-severity CVE - One or more of the assets in the attack path have CVEs with a risk score of 70% or higher.
Critical asset - One or more of the assets in the attack path are critical assets. A critical asset is a highly valuable, mission-critical asset, such as a server. A critical asset may power core systems, run unique processes, or hold sensitive data, such as customer information. Therefore, a critical asset being compromised would cause severe financial loss, operational disruption, or reputational damage.
Last updated on
Use the date selector to display only attack paths that were last updated during a set interval (Last 24 hours, Last 7 days, etc.), or select Custom to define a custom interval.
Only entries that were last updated during the interval you select are displayed.
Asset risk score
Select a risk score range between 0 and 100.
Only attack paths whose main asset has a risk score within the specified range are displayed.
Platform
Use the searchable dropdown list to filter the list of attack paths by the platform that they affect. Select the platforms you want and click Apply. Possible values:
Unknown
Windows
Linux
macOS
AWS
GCP
Azure
Kubernetes
Only attack paths that affect the selected platforms are displayed.
Cloud account ID
Use the searchable dropdown list to filter the list of attack paths by the cloud account ID associated with the main asset. Select the relevant cloud account IDs and click Apply.
Only attack paths whose main asset is associated with one of the selected cloud account IDs are displayed.
Created on
Use the date selector to display only attack paths that were created during a set interval (Last 24 hours, Last 7 days, etc.), or select Custom to define a custom interval.
Only entries that were created during the interval you select are displayed.
In watchlist
Use this option to filter the attack paths based on whether or not they are included in the watchlist.
The View options menu. This section provides you with multiple functions for working with views:
Save - Store your customized preferences as a saved view.
Save as - Save a modified view under a different name.
Discard changes - Revert a modified view to its original state.
Add to favorites - Add the view to the Favorites category.
Show or hide filters - Display or hide the filters menu.
Open settings - Display the Settings panel. You can use this panel to customize what columns are displayed in the view and enable or disable the Compact view option.
The attack paths grid. The grid displays all the attack paths identified for your company. The information available for each attack path is displayed under the following columns:
Company - The company where the attack path has been identified.
Attack path name - The name of the attack path.
Risk factors - Icons indicating the risk factors associated with the path:
 Internet exposure
 Exploitable CVE
 High-severity CVE
 Critical asset
Main asset name - The name of the main asset that the attack path targets.
Asset risk score - The risk score of the main asset.
Asset type - The type of the main asset.
Platform - The platform or operating system of the main asset.
Last updated on - The date and time of the last update made to the attack path.
In watchlist - Indicates whether or not the attack path is in the watchlist.
To add an attack path to the watchlist or remove it from the watchlist, click the actions button
at the end of its row and select either Add to watchlist or Remove from watchlist.
Attack path side panel
For any entry on the attack paths grid, you can click anywhere in its row, except for the attack path name and the actions button, to open a side panel that provides additional information about the attack path. The side panel includes the following sections:
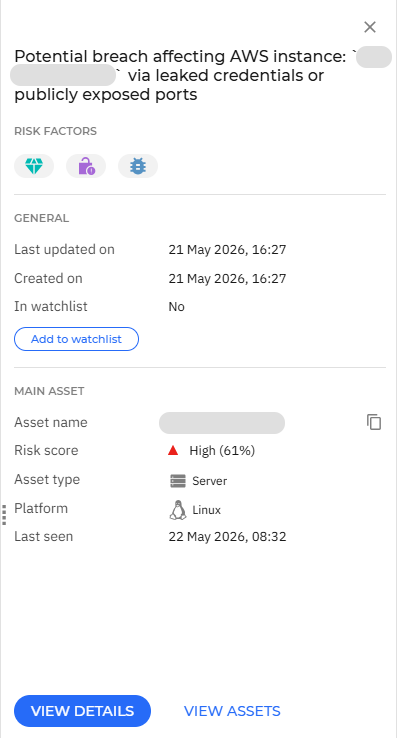
Risk factors
This section contains icons that indicate the risk factors associated with the attack path:
- Internet exposure
- Exploitable CVE
- High-severity CVE
- Critical asset
General
This section contains general information regarding the attack path:
Last updated on - The date and time of the when the entry was last updated.
Created on - The date and time when the attack path was created.
In watchlist - Indicates whether or not the attack path is included in the watchlist. To add the attack path to the watchlist or remove it from the watchlist, click Add to watchlist or Remove from watchlist at the bottom of the General section.
Main asset
This section contains information on the main asset targeted by the attack path.
Asset name - The name of the main asset.
Risk score - The risk score of the main asset.
Asset ID - (visible only for cloud assets) The identifier of the main asset.
Asset type - The type of the main asset.
Platform - The platform or operating system of the main asset.
Cloud account ID - (visible only for cloud assets) Identifier of the cloud account that the main asset is associated with.
Region - (visible only for cloud assets) The region where the main asset is located.
On the bottom edge of the side panel, you can use the following buttons to display further information about the current attack path:
View details - This button opens the Graph page for the attack path.
View assets - This button opens the Assets page for the attack path.
For detailed information on the Graph and Assets pages, refer to Viewing attack path details.
Viewing attack path details
To view detailed information about an attack path, locate its entry in the grid on the main Attack Path page, then click its name in the Attack path name column. This opens the attack path details screen, which consists of two tabs: Graph and Assets.
Graph
The Graph tab has two sections:
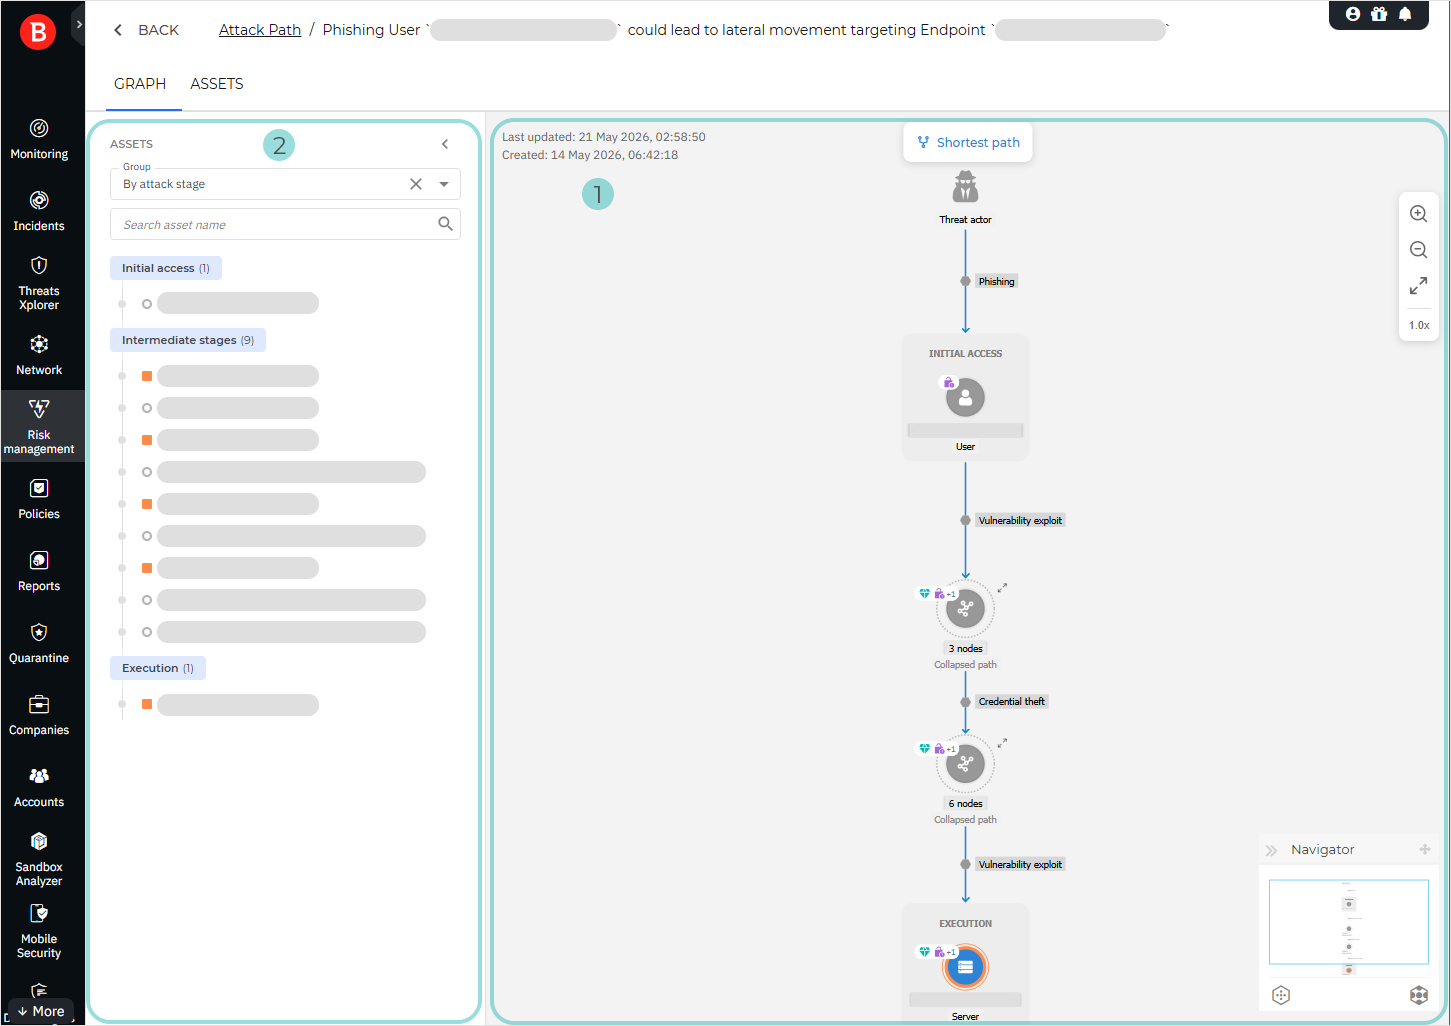
Attack path graph
The attack path graph provides a graphical representation of the sequence of steps that an attacker could take in order to reach and compromise the main asset. Each node in the graph represents an asset involved in the path, whose configurations or vulnerabilities attackers can exploit to move toward the main asset.
The following graph navigation controls are available:
To move the graph, click and drag anywhere in the graph window.
To zoom in or out of the graph, use the scroll wheel on your mouse or the zoom controls on the upper-right edge of the graph window.
To determine your position in the graph, use the Navigator mini-map in the bottom-right corner of the window. The magnifier tool (blue-outline rectangle) shows your current position, which you can change by clicking and dragging the magnifier to another area of the graph.
You can collapse or move the Navigator by using the controls along its title bar.
To provide an uncluttered overview of the attack path, the default graph view groups nodes into collapsed paths. Each collapsed path has a label indicating the number of grouped nodes that it contains. You can expand a collapsed path by clicking either its icon in the graph or the arrows button ( ) next to the icon.
Note
To collapse or expand all the grouped nodes in the graph at once, use the Collapse all ( ) or Expand all (
 ) buttons on the bottom edge of the Navigator.
For individual nodes, the color of the outline around each node icon provides a quick indication of the risk level for that asset:
yellow - low risk
orange - medium risk
red - high risk
Nodes may feature badges that indicate the risk factors associated with them:
- Internet exposure
- Exploitable CVE
- High-severity CVE
- Critical asset
Each transition between nodes has a label indicating the mechanism by which an attacker can move from one node to the next. Clicking this label displays a right-side panel that provides basic information on the source and target nodes, a description of the transition, and optional Path-related findings and Path-related CVEs sections displaying a subset of findings and CVEs that are relevant to the current attack path.
To highlight the shortest possible path between the initial node and the final node of the attack path, click Shortest path at the top of the graph window.
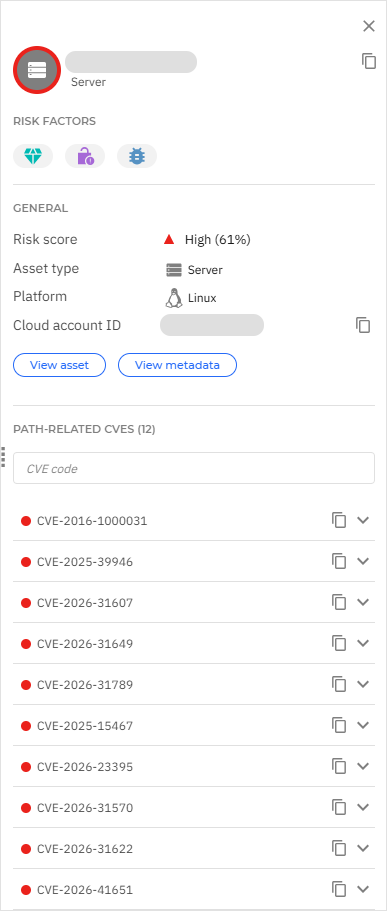
Node details panel
You can click any node in the graph to open a right-side panel that displays further information on the selected asset, as described below.
Note
Not all the sections and fields on the node details panel are displayed for all assets.
Risk factors
- Internet exposure
- Exploitable CVE
- High-severity CVE
- Critical asset
General
Identity - (visible only for account-type assets) - The identity of the asset.
Risk score - The risk score of the asset.
Asset type - (visible only for resource-type assets) The type of the asset.
Account type - (visible only for account-type assets) The type of the account.
Platform - The platform or operating system of the asset.
Cloud account ID - (visible only for cloud assets) The identifier of the cloud account that the asset is associated with.
Email - (visible only for account-type assets) The email address associated with the account.
Department - (visible only for account-type assets) The department to which the account belongs.
Depends on - (visible only for derived resources) The actual resource that the derived resource is associated with.
Region - (visible only for cloud assets) The region where the asset is located.
The General section also includes the following buttons:
View asset - (only visible if the asset is present on the Risk management > Resources page) This button opens the Resources page for the asset.
View account - (only visible if the asset is present on the Risk management > Accounts page) This button opens the Accounts page for the asset.
View metadata - This button displays the asset metadata in JSON format. You can then use the Copy to clipboard
 button in the upper-right corner of the metadata window to copy the contents of the JSON file to the clipboard.
Path-related CVEs
This section displays a searchable list of CVEs found for the selected asset. The list only includes CVEs that are relevant to the current attack path, not all the CVEs associated with the asset. Clicking any of the entries on the list displays detailed information on the CVE, including the risk score, affected application, description, etc.
Path-related findings
This section is visible only for non-cloud assets. It displays a subset of findings for the asset that are relevant to the current attack path.
Path-related account risks
This section is visible only for account-type assets. It displays a subset of risks for the account that are relevant to the current attack path.
Assets panel
The Assets panel is located to the left of the graph and displays a list of assets involved in the current attack path. You can use the Group dropdown menu to group the assets by attack stage, by risk factor, by asset type, or by asset name.
Clicking an asset in the list displays additional information about it, including the risk score, risk factors, asset type, path-related findings and path-related CVEs (for resource-type nodes) or path-related account risks (for account-type nodes), and a View more details button that displays the node details panel for the asset. If the asset you clicked is part of a collapsed path in the graph, the collapsed path automatically expands and the corresponding node is highlighted.
You can collapse the Assets panel by clicking the left-arrow button ( ) on the upper-right corner of the panel.
Assets
The Assets tab contains a grid consisting of two sections: Main asset and Other path-related assets.
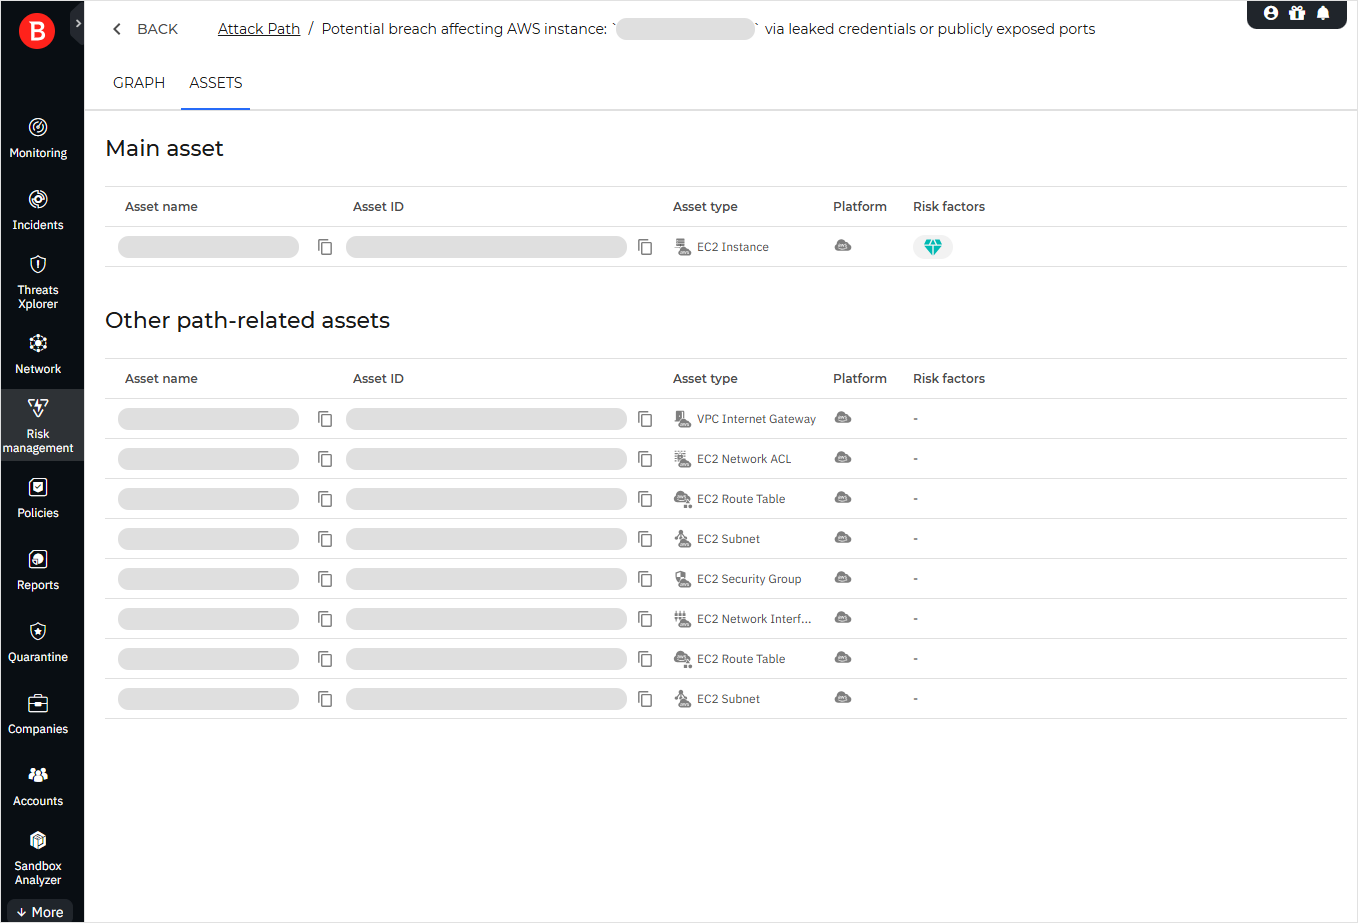
The grid includes the following columns:
Asset name
Asset ID (only displayed for cloud assets)
Asset type
Platform
Risk factors
Clicking an entry in the grid displays the right-side information panel described in Node details panel.
Submitting feedback
Let us know your thoughts by using the Feedback button available in the upper right corner of the Attack Path page. Additionally, you can use the feedback form available if you opt out of the program. We eagerly await and value your input on this feature.