The Attack Path page
To open the Attack Path page, select Risk management > Attack Path from the left-side navigation pane. The page displays a centralized list of potential attack paths, as well as essential information on the asset targeted by each path, such as the risk factors and the risk score of the target asset. The main sections of the page are outlined below.
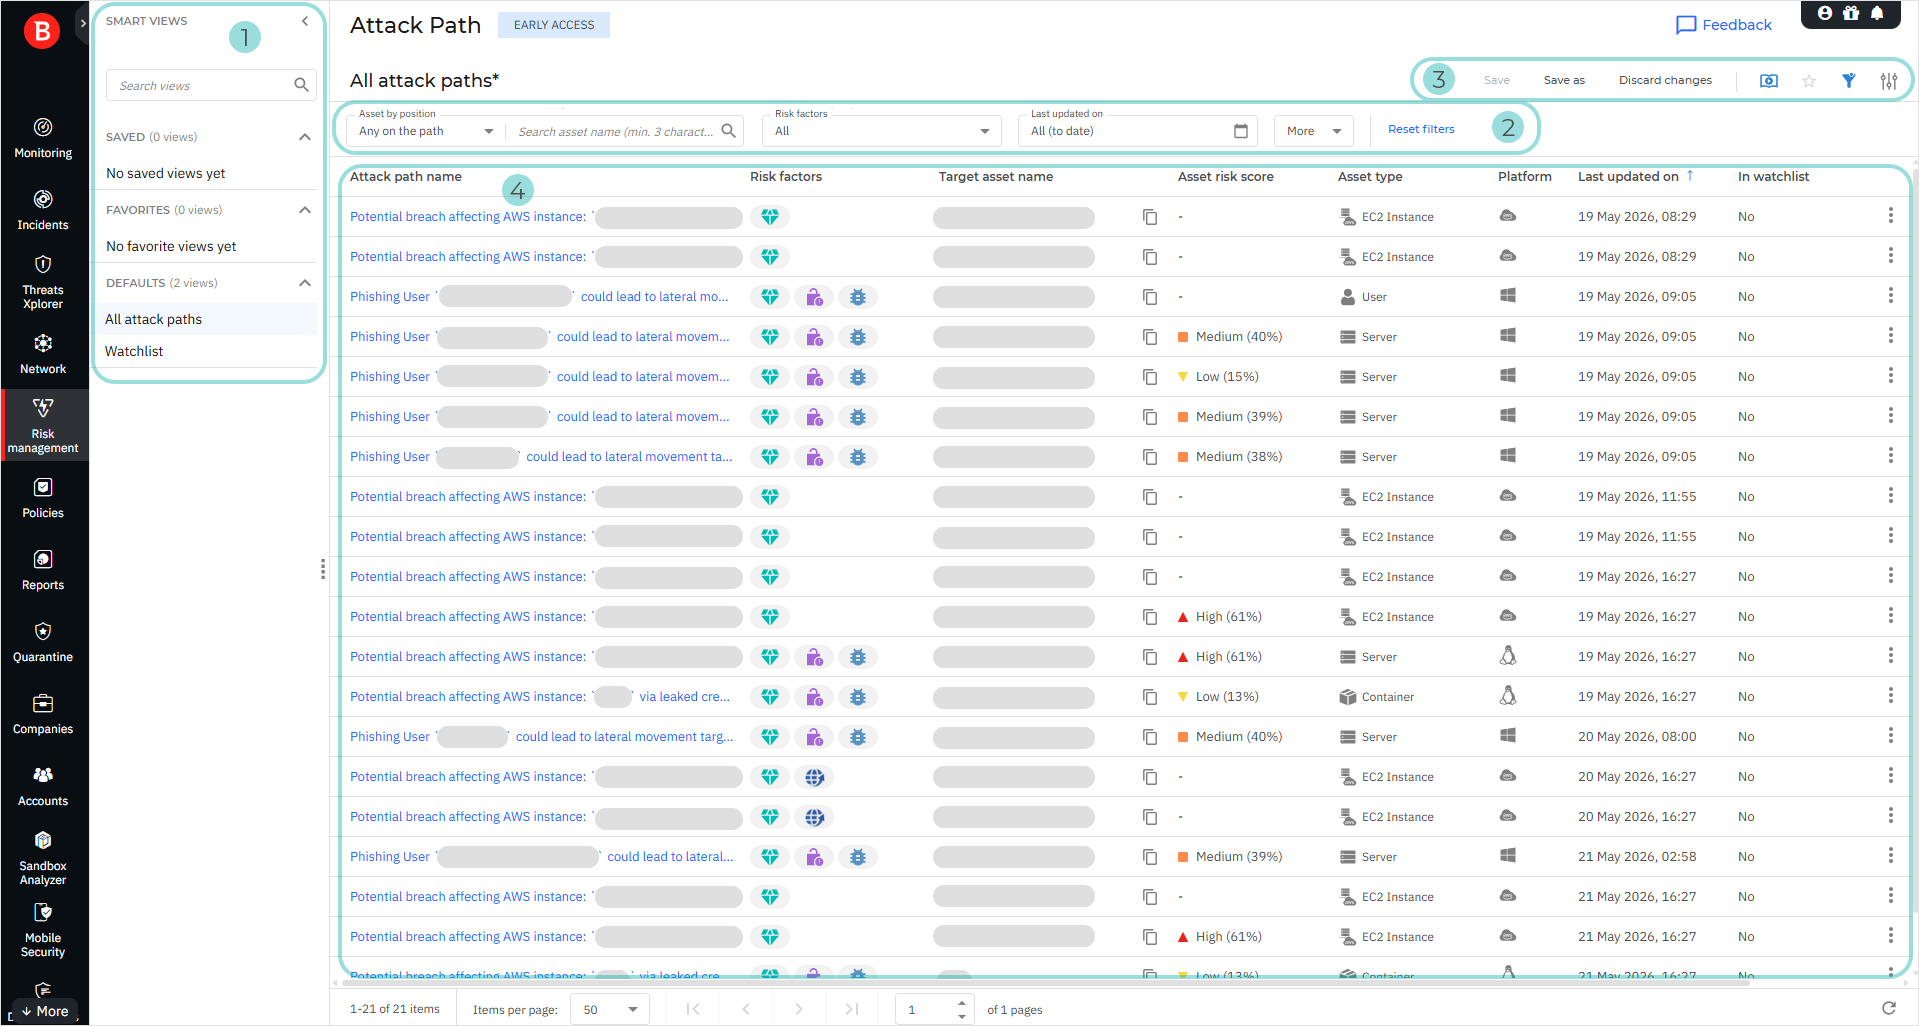
The Smart views panel. This feature allows you to customize, save, and switch between different loadouts of the Attack Path page. The panel has the following sections:
Search views - Use this search field to filter the views displayed in the sections below, by name.
Saved - This section displays a list of all your saved views that have not been marked as favorites.
Favorites - All views marked as favorites are displayed under this section.
Defaults - This section displays the views that are available by default:
All attack paths
Watchlist
For any view in the Saved and Favorites categories, you can click the actions button
 to Rename or Delete the view.
The Filters section. You can use these options to customize the information displayed in the grid. The following filters are available:
Filtering option
Details
Asset by position
Filter the list of attack paths by the name of an asset that they contain and the position of that asset on the path. Enter the asset name in the search field and select the desired position from the dropdown menu: Any on the path, Initial asset, or Target asset.
The filter returns only the attack paths that include the asset whose name you entered, in the position that you specified.
Risk factors
Use the searchable dropdown list to filter the list of attack paths by the risk factors involved. Select the risk factors you want and click Apply. Possible values:
Public exposure - One or more of the assets in the attack path have vulnerabilities or configurations that expose them to an attack from the internet, or have been flagged as exposed by EASM.
Exploitable CVE - One or more of the assets in the attack path have Common Vulnerabilities and Exposures (CVEs) that attackers have been proven to actively use, or which can easily be exploited in real environments using publicly known tools.
High-severity CVE - One or more of the assets in the attack path have CVEs with a risk score of 70% or higher.
Critical asset - One or more of the assets in the attack path are critical assets. A critical asset is a highly valuable, mission-critical asset, such as a server. A critical asset may power core systems, run unique processes, or hold sensitive data, such as customer information. Therefore, a critical asset being compromised would cause severe financial loss, operational disruption, or reputational damage.
Last updated on
Use the date selector to display only attack paths that were last updated during a set interval (Last 24 hours, Last 7 days, etc.), or select Custom to define a custom interval.
Only entries that were last updated during the interval you select are displayed.
Asset risk score
Select a risk score range between 0 and 100.
Only attack paths whose target asset has a risk score within the specified range are displayed.
Platform
Use the searchable dropdown list to filter the list of attack paths by the platform that they affect. Select the platforms you want and click Apply. Possible values:
Unknown
Windows
Linux
macOS
AWS
GCP
Azure
Kubernetes
Only attack paths that affect the selected platforms are displayed.
Cloud account ID
Use the searchable dropdown list to filter the list of attack paths by the cloud account ID associated with the target asset. Select the relevant cloud account IDs and click Apply.
Only attack paths whose target asset is associated with one of the selected cloud account IDs are displayed.
Created on
Use the date selector to display only attack paths that were created during a set interval (Last 24 hours, Last 7 days, etc.), or select Custom to define a custom interval.
Only entries that were created during the interval you select are displayed.
In watchlist
Use this option to filter the attack paths based on whether or not they are included in the watchlist.
The View options menu. This section provides you with multiple functions for working with views:
Save - Store your customized preferences as a saved view.
Save as - Save a modified view under a different name.
Discard changes - Revert a modified view to its original state.
Show demo attack path / Hide demo attack path - Show a demo attack path that allows you to explore the capabilities of the feature, or hide the demo path if you do not need to display it. For details, refer to How to interpret the demo attack path.
Add to favorites - Add the view to the Favorites category.
Show or hide filters - Display or hide the filters menu.
Open settings - Display the Settings panel. You can use this panel to customize what columns are displayed in the view and enable or disable the Compact view option.
The attack paths grid. The grid displays all the attack paths identified for your company. The information available for each attack path is displayed under the following columns:
Attack path name - The name of the attack path.
Risk factors - Icons indicating the risk factors associated with the path:
 Public exposure
 Exploitable CVE
 High-severity CVE
 Critical asset
Target asset name - The name of the asset that the attack path targets.
Asset risk score - The risk score of the target asset.
Asset type - The type of the target asset.
Platform - The platform or operating system of the target asset.
Last updated on - The date and time of the last update made to the attack path.
In watchlist - Indicates whether or not the attack path is in the watchlist.
To add an attack path to the watchlist or remove it from the watchlist, click the actions button
at the end of its row and select either Add to watchlist or Remove from watchlist.
Attack path side panel
For any entry on the attack paths grid, you can click anywhere in its row, except for the attack path name and the actions button, to open a side panel that provides additional information about the attack path. The side panel includes the following sections:
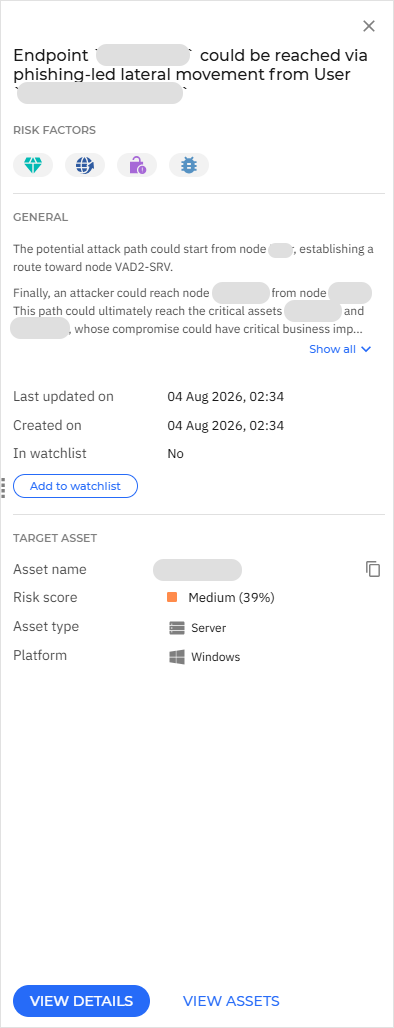
Risk factors
This section contains icons that indicate the risk factors associated with the attack path:
- Public exposure
- Exploitable CVE
- High-severity CVE
- Critical asset
General
This section contains general information regarding the attack path:
The attack path description.
Last updated on - The date and time of the when the entry was last updated.
Created on - The date and time when the attack path was created.
In watchlist - Indicates whether or not the attack path is included in the watchlist. To add the attack path to the watchlist or remove it from the watchlist, click Add to watchlist or Remove from watchlist at the bottom of the General section.
Target asset
This section contains information on the asset targeted by the attack path.
Asset name - The name of the target asset.
Risk score - The risk score of the target asset.
Asset ID - (visible only for cloud assets) The identifier of the target asset.
Asset type - The type of the target asset.
Platform - The platform or operating system of the target asset.
Cloud account ID - (visible only for cloud assets) Identifier of the cloud account that the target asset is associated with.
Region - (visible only for cloud assets) The region where the target asset is located.
On the bottom edge of the side panel, you can use the following buttons to display further information about the current attack path:
View details - This button opens the Graph page for the attack path.
View assets - This button opens the Assets page for the attack path.
For detailed information on the Graph and Assets pages, refer to Viewing attack path details.