Bitdefender Threat Intelligence for Splunk
Bitdefender Threat Intelligence for Splunk is an integration app that connects Bitdefender’s global threat intelligence feeds with Splunk Enterprise. It allows security analysts to correlate, visualize, and act upon threat data directly in Splunk, improving visibility into malicious activity and enabling faster incident response.
The app retrieves and analyzes indicators of compromise (IoCs) such as IPs, URLs, file hashes (MD5, SHA1, SHA256), and domains detected by Bitdefender’s worldwide sensor network. It presents this data through interactive dashboards, search actions, and correlation alerts.
Purpose and benefits
Bitdefender Threat Intelligence for Splunk provides organizations with real-time, actionable insights into cyber threats. The app offers the following benefits:
Quick detection and investigation of suspicious activity.
Enhanced SOC efficiency through automated correlation.
Enriching existing Splunk data with high-quality, continuously updated intelligence from Bitdefender’s global network.
Key features
Threat Intelligence integration
Connects to Bitdefender Intelligence API using a valid API key.
Fetches data from Bitdefender feeds, including details about malware, threat actors, and confidence levels.
Data is automatically indexed and available in the Splunk environment.
Correlation searches
Enables correlation between internal logs and Bitdefender’s IoC data.
When matching IoCs (for example, an IP or hash) are found, alerts are triggered both in the Correlation Alerts tab of the Bitdefender Threat Intelligence for Splunk app and in Splunk Enterprise Security.
Custom search actions
Allows users to query Bitdefender’s databases directly from Splunk searches.
For any IoC detected in your logs, you can fetch data from Bitdefender Intelligence API directly in the app interface.
The response provides detailed intelligence about that indicator.
Dashboards
The app provides several interactive dashboards:
Feeds Overview – Displays the total number of threats ingested per licensed feed.
Feed Details – Displays detailed insights into threats, related actors, malware families, and confidence levels.
Correlation Alerts – Displays alerts generated when Bitdefender data intersects with local data sources.
Installation
The Bitdefender Threat Intelligence for Splunk app integrates Bitdefender Threat Intelligence data into your Splunk Enterprise environment. To get started, install the app and connect it using your Bitdefender Intelligence API key.
You can install the Bitdefender Threat Intelligence for Splunk app from the Splunk Marketplace or by uploading the installation package manually. Once installed, the app becomes available in your Apps menu.
The following sections describe the requirements, installation methods, and initial setup steps required to start using the app.
1. Check the requirements
Before installing the Bitdefender Threat Intelligence for Splunk app, ensure you meet the following requirements:
A supported Splunk Enterprise version. For the list of currently supported versions, refer to the Bitdefender Threat Intelligence for Splunk page on Splunkbase.
A Bitdefender Intelligence API key with valid access permissions
2. Install and configure Splunk Enterprise
If Splunk Enterprise is not already installed, follow the instructions in the official Splunk Enterprise installation manual to install it. Perform the setup using administrative privileges.
3. Install the Bitdefender Threat Intelligence for Splunk app
You have two options for installing the app. Select one method at your convenience:
Log in to Splunk Enterprise.
From the menu at the top of the page, select Apps > Find more Apps.
Search for
Bitdefender Threat Intelligence.Review the prerequisites and app details.
Select Install.
Once installed, the app appears in the Apps list.
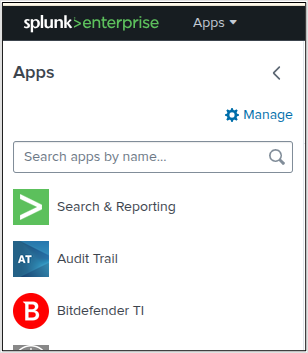
Log in to Splunk Enterprise.
In the Apps list, click Manage.
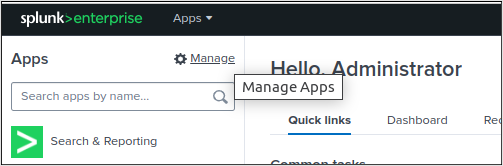
Select Install app from file.

In the window that opens, click Choose file, then select the downloaded Bitdefender Threat Intelligence for Splunk app package.
(Optional) Select the Upgrade app checkbox if you are updating a previous version.
Select Upload.
When the installation is complete, the app appears in the Apps list.
4. Verify the Installation
After installation, you should see Bitdefender TI listed in your Apps menu. Opening the app should display the configuration options, including the API key setup screen.
Configuration
To function correctly after installation, the Bitdefender Threat Intelligence for Splunk app must be configured with your organization’s API key and indexing settings. This setup process links your Splunk instance to Bitdefender’s global threat intelligence services, allowing the app to pull real-time data about threats and indicators of compromise (IoCs).
To configure your Bitdefender Threat Intelligence App for Spunk, follow these steps:
Log into Splunk Enterprise with an administrator account to ensure access to all app settings.
To configure the Bitdefender Threat Intelligence for Splunk app, select Bitdefender TI in the Apps menu at the top of the page.
To open the setup page, select Settings, then select Configuration Settings.
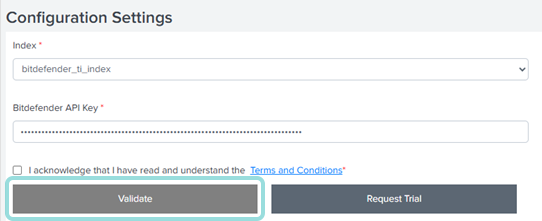
Under Index, enter the index where Bitdefender threat data will be stored. This determines where the app will save ingested data.
Under Bitdefender API Key, enter the API key received when you purchased your license.
Accept the Terms and Conditions.
To confirm the API key, click Validate.
The products associated with your API key are selected by default.
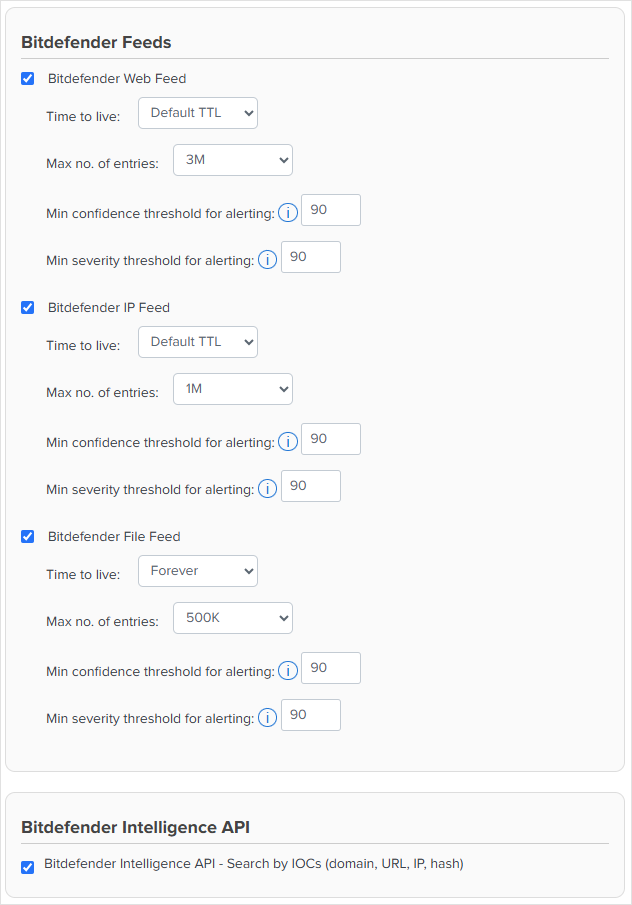
Select Submit to save your configuration and complete the setup.
Verify the connection by checking the dashboards to confirm that threat data is being ingested correctly.
Custom search
A custom search enables you to perform on-demand lookups of specific indicators of compromise (IoCs) directly within Splunk. This feature extends the app’s automated correlation capabilities by allowing you to manually query Bitdefender Intelligence API for deeper insight into suspicious activity.
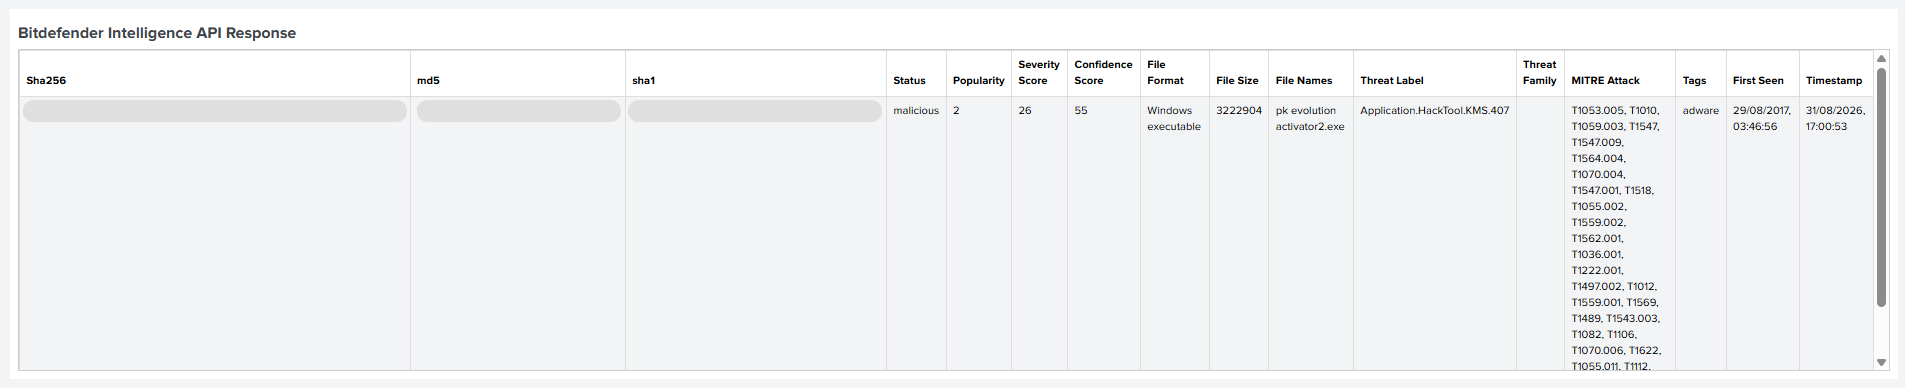
When you identify potential IoCs, such as IP addresses, URLs, or file hashes (MD5, SHA1, SHA256), within your Splunk data, you can query Bitdefender’s threat intelligence databases in real time. The returned results provide detailed context, including threat classification, confidence score, and malware family, helping you quickly determine whether the event represents a genuine security risk or a benign activity.
To perform a custom search, follow these steps:
Log into Splunk Enterprise with an administrator or analyst account.
Click Bitdefender TI in the Apps menu.
Go to Search.
Run a query for one of your indexes (for example,
main).Switch to Verbose Mode to display event field details.
To view additional information about an event, click its corresponding expand symbol (>).
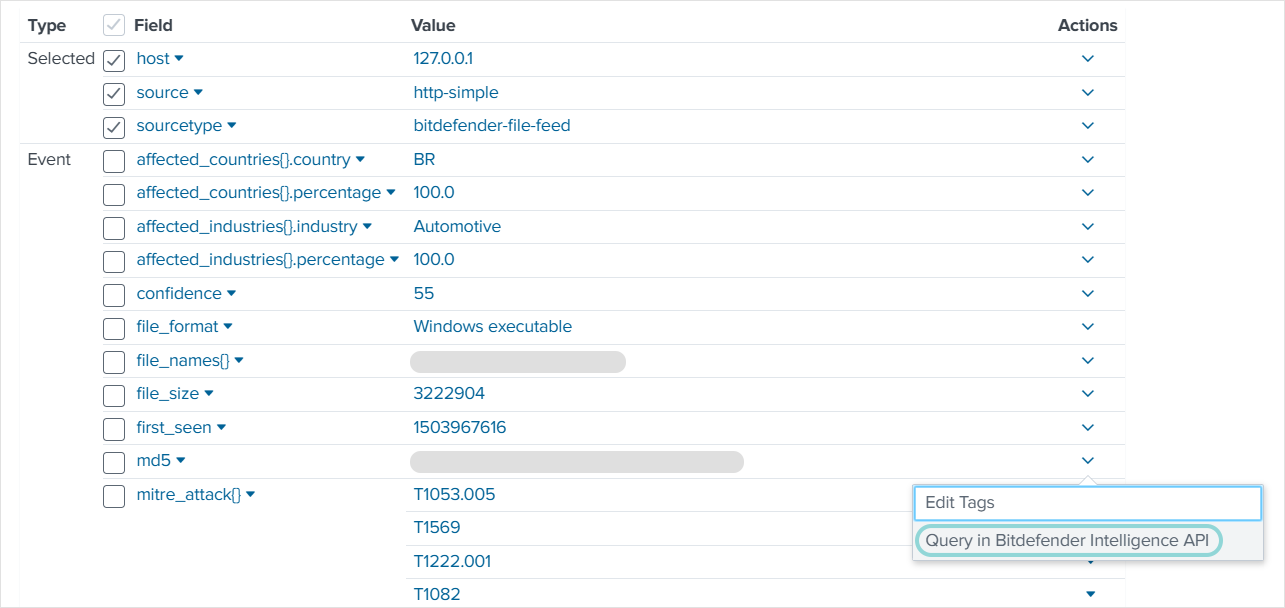
To display detailed information for fields containing IOCs (such as IP, URL, MD5, SHA1, or SHA256), scroll down to the section where the fields are displayed, then click the Actions (˅) button for the relevant field and select Query in Bitdefender Intelligence API.
To analyze the IoC details and assess the associated threat, review the information displayed in the response window.
Using correlation searches
Correlation searches allow you to automatically match internal data with Bitdefender’s global threat intelligence indicators. They are used to detect potential security incidents by finding overlaps between your organization’s network activity and known malicious indicators, such as IP addresses, URLs, or file hashes.
When enabled, correlation searches continuously scan the selected Splunk indexes for indicators of compromise (IoCs). If a match is found, the app automatically generates an alert, helping you quickly identify and investigate possible threats within your environment.
These searches are especially useful for real-time threat detection and response, allowing SOC teams to enrich their internal logs with Bitdefender’s intelligence data. The results appear in the Correlation Alerts dashboard and can also be integrated with Splunk Enterprise Security for centralized alert management.
To configure correlation searches, follow these steps:
Log into Splunk Enterprise with an administrator account.
In the Apps menu, select Bitdefender TI.
Click Settings in the menu at the top of the page, then select Correlation Searches to access the configuration page.
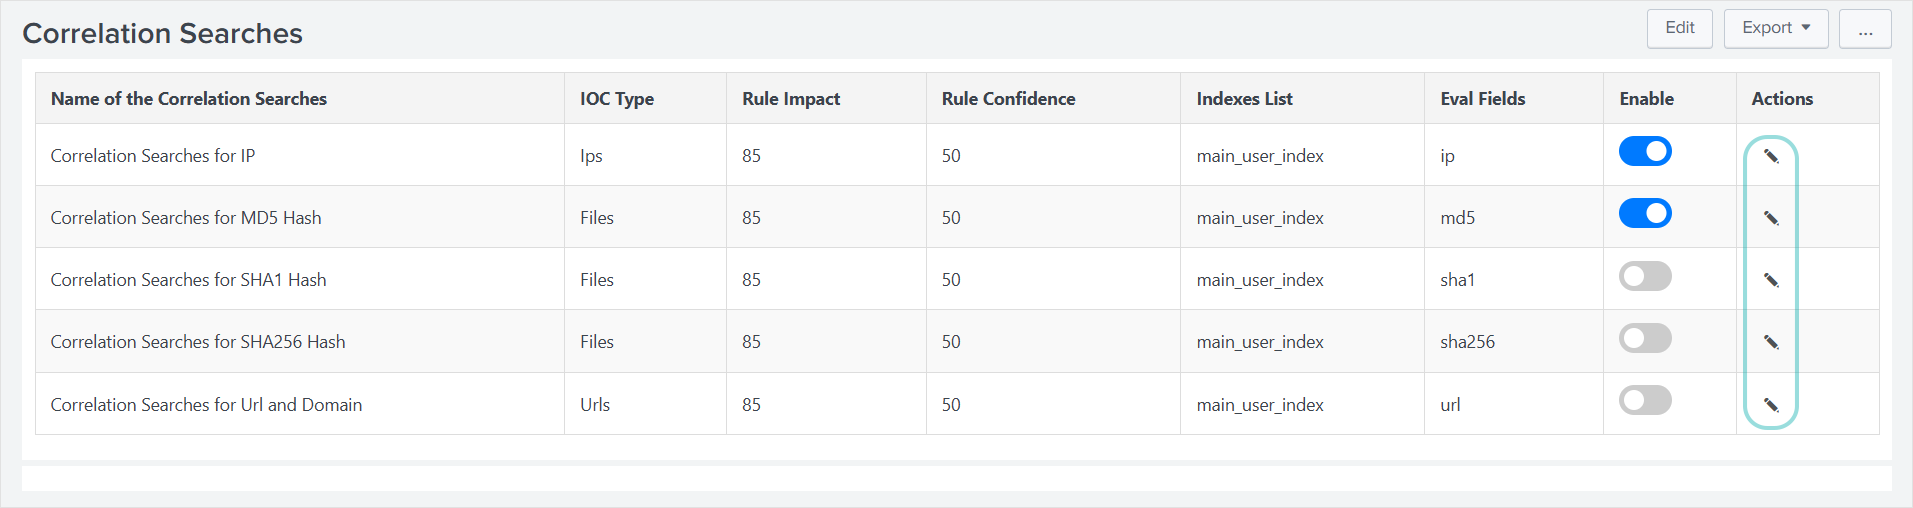
Under the Actions column, click the Edit (
 ) button for the search rules you want to modify.
Select the indexes you want to correlate with Bitdefender Threat Intelligence data. These indexes should contain logs or events where IoCs might appear.
Enable the correlation search using the toggle under the Enable column. This activates the rule and allows it to run automatically.
When a match is found between your indexed data and Bitdefender Threat Intelligence data, an alert is triggered.
Review alerts in the Correlation Alerts dashboard. To view matches between IoCs from your internal data and Bitdefender's global threat intelligence indicators, select View Results under the Actions column.
Dashboards
Dashboards provide a visual and interactive way to explore threat data collected from Bitdefender’s intelligence feeds. They allow you to monitor, analyze, and investigate indicators of compromise (IoCs) in real time, directly within Splunk.
Each dashboard focuses on a specific area of visibility: an overview of data ingested from feeds, feed details, and alert correlation. This gives you an at-a-glance understanding of your threat landscape and how it relates to your environment. The dashboards are automatically populated once the app is configured and data ingestion begins.
The following dashboards are available:
Feeds Overview
The Feeds Overview dashboard provides a high-level summary of the total number of threats ingested from each licensed Bitdefender feed. It provides quick visibility into which feeds are active, how much data is being collected, and how the ingestion volume changes over time. This dashboard serves as the starting point for monitoring overall feed activity and verifying that data collection is functioning correctly.
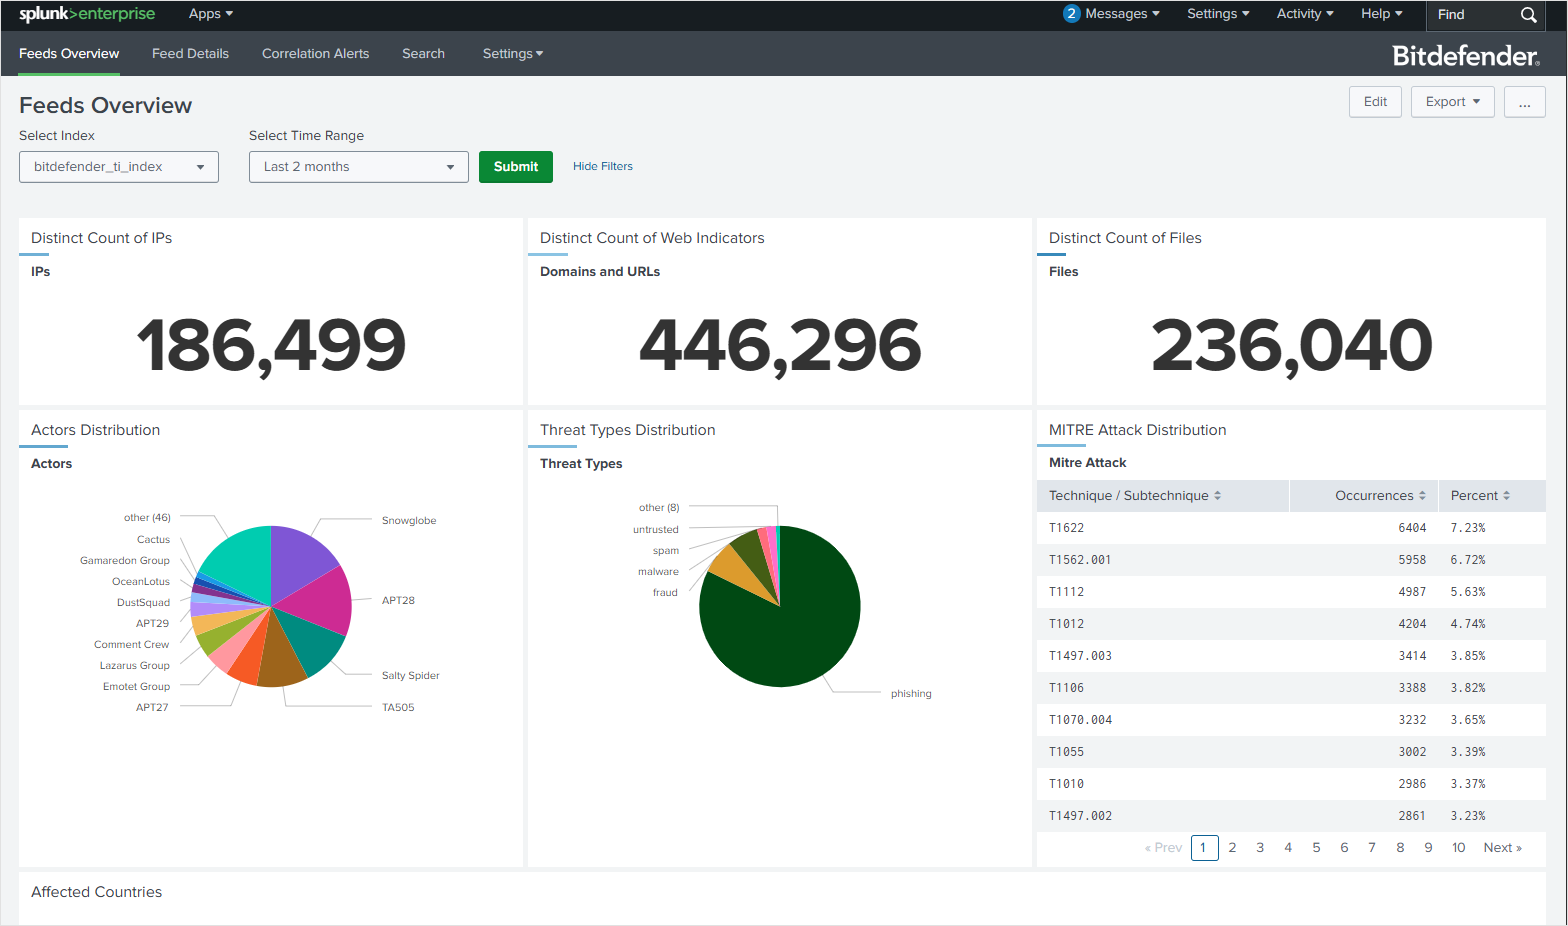
To access this dashboard, follow these steps:
Log in to Splunk Enterprise and go to Apps > Bitdefender TI.
The Feeds Overview dashboard opens by default.
Review the total number of threats ingested for each licensed feed.
Use the visual summaries to confirm that all configured feeds are actively delivering data to the selected index.
Note
If a feed shows no data, verify your configuration and API key under Settings > Configuration Settings.
Feed Details
The Feed Details dashboard displays the latest indicators of compromise (IoCs) detected by Bitdefender in real time through its global sensor network. You can filter by feed, time range, confidence score, etc., or search for a specific IoC. This dashboard helps you identify new or ongoing threats that could affect your organization.
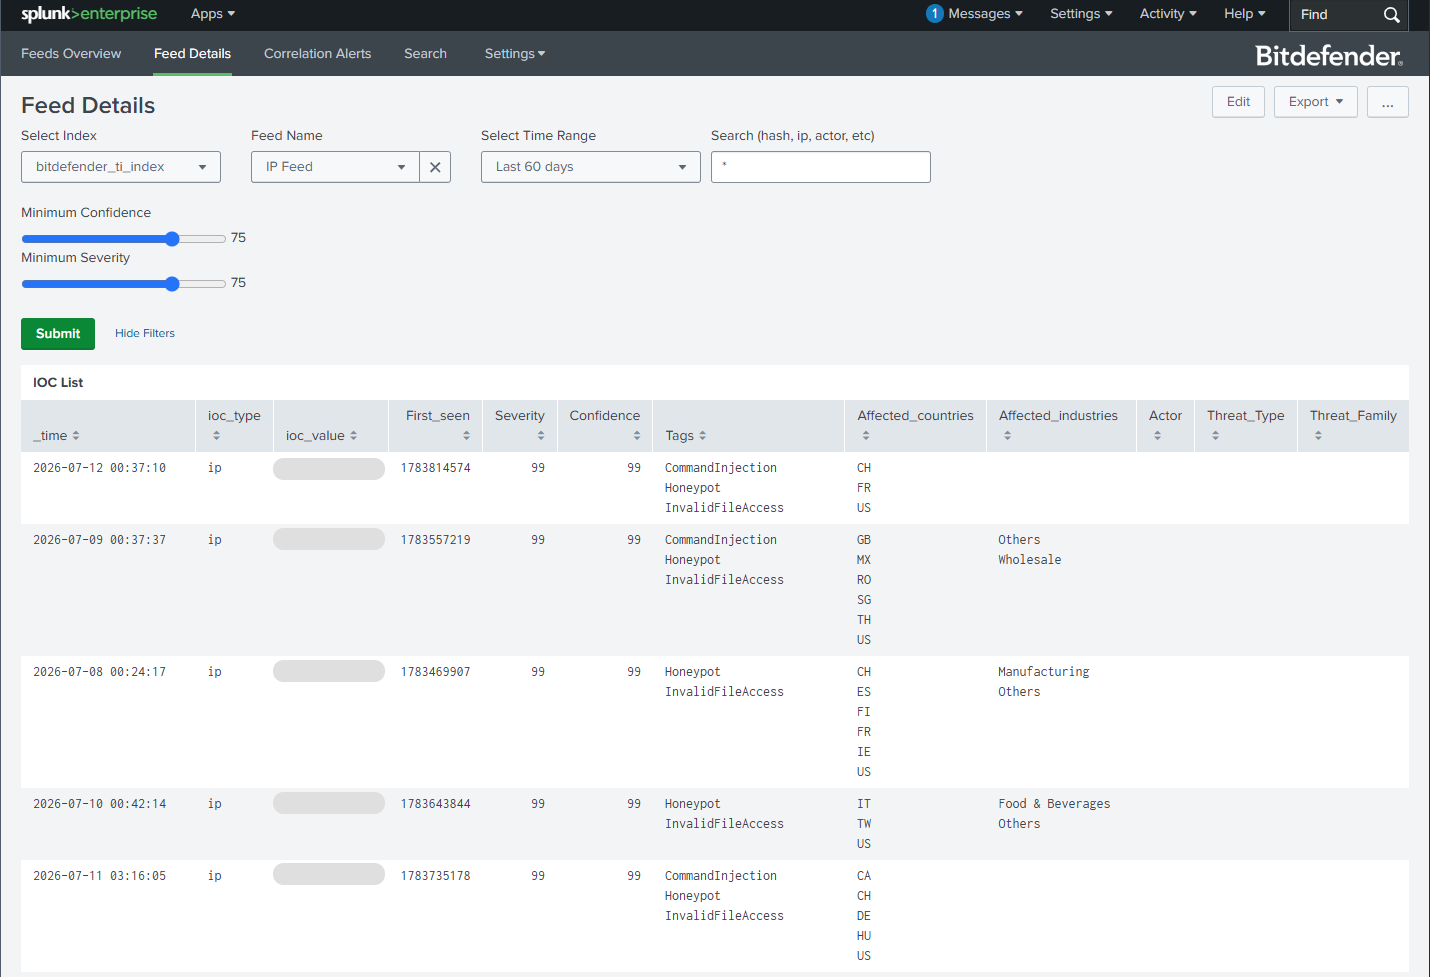
To access the Feed details dashboard, follow these steps:
Log into Splunk Enterprise and go to Apps > Bitdefender TI.
Click Feed Details on the navigation menu at the top of the page.
Select the feed you want to view from the Feed Name dropdown menu.
Use the filters to narrow down results by time range, confidence, severity, or keyword, then click Submit.
Review the IOC LIst for information on IoCs and their associated details.
Use this information to validate suspicious indicators or investigate new threats.
Correlation Alerts
The Correlation Alerts dashboard displays alerts generated when data ingested by Splunk matches Bitdefender’s threat intelligence indicators. It provides a centralized view of correlation results, helping you identify compromised assets or malicious activity quickly. You can view detailed IoC data directly from this dashboard for further investigation.
To access the dashboard, follow these steps:
Log into Splunk Enterprise and go to Apps > Bitdefender TI.
Open the Correlation Alerts dashboard.
Review the list of alerts generated by the correlation searches you configured in Settings > Correlation Searches.
Check the alert details, such as IoC type, source, timestamp, and matching index.
Click View Results next to an alert to open detailed IoC and event information.
Use this data to investigate the alert, determine its severity, and take response actions if necessary.
If you need to adjust the detection accuracy, update your correlation search settings or indexes.