Configure Citrix ADC VPX (Netscaler) for Security for Storage
This topic describes how to configure the Citrix ADC VPX (Netscaler) to use it with GravityZone Security for Storage.
Overview
Citrix ADC can be configured to integrate Bitdefender Security Server as an ICAP server that uses the Content Inspection technique for malware and security issues.
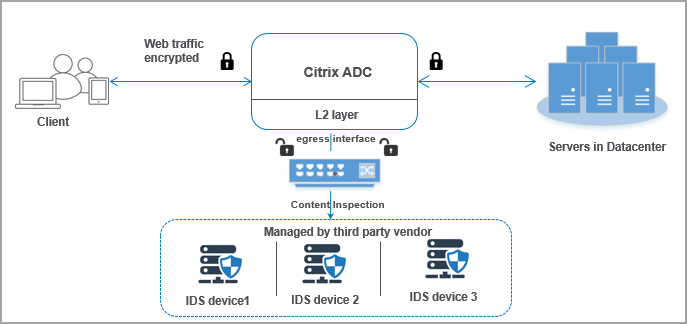
The figure above describes the components of the integration:
Clients make requests to the internet.
Citrix ADC is the ICAP client.
Bitdefender Security Server is the ICAP server that scans for malware and security issues.
The internet is one or more servers in a datacenter.
Requirements and prerequisites
For using GravityZone Security for Storage with Citrix ADC VPX (Netscaler), you need the following:
A Citrix ADC VPX deployment configured and functional on VMware ESXi, with Platinum license.
Your application running on the ESXi server.
A GravityZone environment with a Bitdefender Security Server deployed and configured to use ICAP scanning.
For details on how to install Bitdefender Security Server on VMware ESXi, refer to Install Security Server on an Ubuntu machine.
For details on enabling ICAP scanning in a GravityZone policy, refer to Storage Protection.
Configure Citrix ADC VPX on VMware ESXi for ICAP scanning
This procedure explains how to configure the Citrix ADC VPX appliance and how to integrate with Bitdefender Security Server.
Deploy the Citrix ADC VPX virtual appliance on VMware ESXi.
Configure Citrix ADC VPX. Take into account these indications:
The default username is nsroot and the default password is also nsroot.
Reserve and set an IP address for management, and a mask and a gateway in the Citrix ADC appliance console.
Set a subnet IP address.
In Configuration > System > Licenses, make sure you have set a Platinum license.
For details on the initial configuration of a Citrix ADC appliance, refer to the Citrix documentation.
Configure the virtual server, which intercepts the requests and the response:
Reserve an IP address for Virtual Server.
Set Virtual IP to be used.
Go to Configuration > Traffic Management > Load Balancing > Virtual Servers and click Add.
Set a name, an IP address and click Create.
Add the target server (the IP address of your application):
Go to Configuration > Traffic Management > Load Balancing > Servers and click Add.
Set the Target Server IP.
Bind the target server to the load balancing virtual server:
Go to Configuration > Traffic Management > Load Balancing > Virtual Servers and click on your virtual server.
In Services and Service Groups, select No Load Balancing Virtual Server Services Binding.
Click Add Binding.
For Selected Service, click Add.
From Existing Server, select the target server.
Set Service Name, Protocol and Port, and click OK.
Click Bind to link the virtual server to the target server.
This is how you check the binding was successful:
Load Balancing Virtual Server displays the status Up with a green dot.
You can access the target server interface over the IP address of the Load Balancing Virtual Server previously set.
For information on how to bind/unbind a service from/to a load balancing virtual server, refer to the Citrix documentation.
Create a content policy with Content Inspection for requests and assign it to the virtual server. In this step you will connect the Bitdefender Security Server to Citrix ADC VPX.
Go to Configuration > Traffic Management > Load Balancing > Virtual Servers and click on your virtual server.
In Advanced Settings, select Policies and click + to add a new policy.
For Content Policy, select Content Inspection.
For type, select Request.
Click Add Binding.
For Select Policy, click Add.
Set a Policy Name.
In the Expression editor, type: true
Add an action.
Set a name for the action.
For type, select ICAP.
Enter the Bitdefender Server IP address. The Bitdefender Security Server must have a policy applied, with ICAP scanning enabled.
Set the ICAP port: 1344.
Add an ICAP profile: set a name, set URl for requests (/reqmod), set Mode: REQMOD, and click Create.
After creating the ICAP profile, click Create for action.
After creating the action, click Create for policy.
Click Bind for Policy.
Click Done for Content Policy.
Following the same pattern, you can also create a policy for response.
For details on how to configure the ICAP service for Content Inspection on Citrix ADC, refer to the Citrix documentation.
Test the integration
Make sure the Bitdefender Security Server has a policy applied, with ICAP scanning enabled.
Upload an infected file on your application hosted on the ESXi server.
The application’s webpage should display a message informing you that the file has been blocked because of a virus detection.