Mesh Gateway
Organizations on all email platforms can use Mesh Gateway as long as they can accept email on port 25 and can point the MX records to Mesh.
Mesh Gateway for Google Workspace
Mesh Gateway for all other email platforms
Mesh Gateway for Microsoft 365
This guide outlines how to install Mesh Gateway for organizations on Microsoft 365.
Tip: If this is your first time setting up a customer in Mesh (or even if it’s not), it is worthwhile familiarizing yourself with the following checklist Before You Start Checklist
Tip
Installation Time: 10-15 minutes
Create a Mail Flow for Rule for Mesh in Microsoft 365
In order to allow email filtered by Mesh to be delivered safely without any double filtering from Microsoft, you need to create a mail flow rule in Microsoft 365 for our IP ranges.
This video walks you through the process step by step:
Ensure that the IP ranges applicable to your region are used. You can find this here.
View our step by step guide on creating a mail flow rule.
Visit Microsoft’s documentation on this topic here.
Populating Users via Azure Sync
In order to allow users to receive quarantine digests and to be able to create their own allow/block rules, users need to be populated in the users table.
Login as Customer and navigate to Users > Import & Sync > Azure Sync.
Select O365 Authorize to permit Mesh to sync the users from Azure.
View more information on user population and role types.
Note
The Azure sync will automatically run every hour. For any mailboxes synced that do not require an account in Mesh, please select and set to disable.
Import Allow & Block Rules (optional)
You can import a list of safe senders or domains using our CSV template.
Update Your MX Records
Update your MX records with the values applicable to your service region.
MX records are region specific and there should be no other records present.
If you use MTA-STS, ensure you also update the MX entries there.
Note
Please wait at least 15 minutes after creating your account in Mesh before updating your MX records to ensure there is no interruption to delivery while our system updates.
Create a Connector In Microsoft 365
In order to prevent threats from bypassing Mesh filtering and ensuring emails from our MTAs can deliver to your mail environment, you should create a Connector for Mesh in Microsoft 365.
Note
Only complete this step after you point your MX records to Mesh. We recommend waiting 24 hours to allow for DNS propagation.
If you are moving from another Secure Email Gateway, you will likely have an existing connector in place to reject emails that aren't sent from a specific IP range.
You will need to remove this before changing MX records to prevent clean email filtered by Mesh from being rejected.
This video walks you through the process step by step:
Ensure that the IP ranges applicable to your region are used. You can find this here.
View our step by step guide on creating a connector.
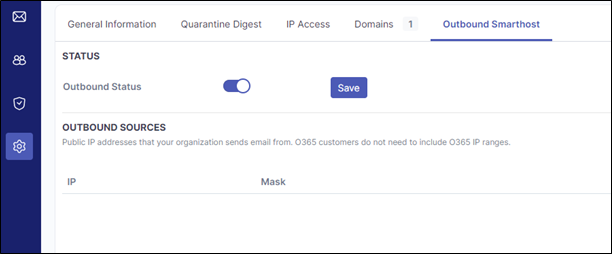
Enable Outbound Email Scanning (Optional)
View our step-by-step guide on enabling our outbound email scanning.
Note
If your tenant uses an autoforward in some capacity, please ensure you read the above guide.
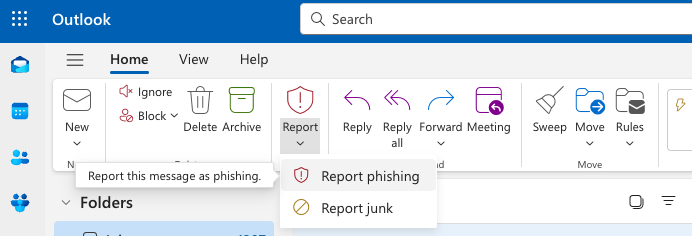
Configure Report Junk & Phishing Button (Optional)
The Outlook report button can be utilised to share potential false negatives / false positives with your helpdesk and the Mesh detection team. View our step-by-step guide.
Tip
You’re all set. Your email is now protected by Mesh Gateway.
Mesh Gateway for Exchange
This guide outlines how to install Mesh Gateway for organizations on Exchange.
Tip: If this is your first time setting up a customer in Mesh (or even if it’s not), it is worthwhile familiarizing yourself with this checklist ⟶ Before You Start Checklist
Tip
Installation Time: 10-15 minutes
Create a Mail Flow for Rule for Mesh in Exchange
In order to allow email filtered by Mesh to be delivered safely without any double filtering from Microsoft, you need to create a mail flow rule in Exchange for our IP ranges.
This video walks you through the process step by step:
Ensure that the IP ranges applicable to your region are used. You can find more information on this here.
View our step by step guide on creating a mail flow rule.
Visit Microsoft’s documentation on this here.
Populating Users via CSV Import
In order to allow users to receive quarantine digests and to be able to create their own allow/block rules, users need to be populated in the users table.
Login as Customer and navigate to Users > Import & Sync > Manual
View more information on user population and role types.
Import Allow & Block Rules (optional)
You can import a list of safe senders or domains using our CSV template.
Update Your MX Records
Update your MX records with the values applicable to your service region.
MX records are region specific and there should be no other records present.
If you use MTA-STS, ensure you also update the MX entries there.
Note
Please wait at least 15 minutes after creating your account in Mesh before updating your MX records to ensure there is no interruption to delivery while our system updates.
Create A Connector in Exchange
In order to prevent threats from bypassing Mesh filtering and ensuring emails from our MTAs can deliver to your mail environment, you should create a Connector for Mesh in Exchange.
Note
Only complete this step after you point your MX records to Mesh. We recommend waiting 24 hours to allow for DNS propagation.
If you are moving from another Secure Email Gateway, you will likely have an existing connector in place to reject emails that aren't sent from a specific IP range.
You will need to remove this before changing MX records to prevent clean email filtered by Mesh from being rejected.
This video walks you through the process step by step:
Ensure that the IP ranges applicable to your region are used. You can find this here.
View our step by step guide on creating a connector.
Enable Outbound Email Scanning (Optional)
View our step-by-step guide on enabling our outbound email scanning.
Note
If your tenant uses an autoforward in some capacity, please ensure you read the above guide.
Configure Report Junk & Phishing Button (Optional)
The Outlook report button can be utilised to share potential false negatives / false positives with your helpdesk and the Mesh detection team. View our step-by-step guide.
Tip
You’re all set. Your email is now protected by Mesh Gateway.
Mesh Gateway for Google Workspace
This guide outlines how to install Mesh Gateway for organizations on Google Workspace.
Tip: If this is your first time setting up a customer in Mesh (or even if it’s not), it is worthwhile familiarizing yourself with this checklist ⟶ Before You Start Checklist
Tip
Installation Time: 10-15 minutes
Useful links
Configure internal emails to remain within the tenant in Google Workspace
Create an Inbound Gateway for Mesh in Google Workspace
In order to allow email filtered by Mesh to be delivered safely without any double filtering from Google, you need to create a mail flow rule for our IP ranges.
View our step by step guide on creating an inbound gateway.
Note
If you are moving from another Secure Email Gateway, you will likely have an existing connector in place to reject emails that aren't sent from a specific IP range.
You will need to remove this before changing MX records to prevent clean email filtered by Mesh from being rejected.
Configure internal emails to remain within the tenant in Google Workspace
Unlike Microsoft 365, where internally sent emails are not seen by Mesh Gateway, Google routes internal email through the MX record. This means the emails are subject to filtering by Mesh Gateway and its impersonation detection, which will result in false positives. This can be avoided by configuring internal emails to remain within the Google Workspace tenant.
View our Routing Internal Emails in Google Workspace guide.
Populate users
In order to allow users to receive quarantine digests and to be able to create their own allow/block rules, users need to be populated in the users table.
Users can be populated manually or via our CSV import.
View more information on user population and role types.
Import Allow & Block Rules (Optional)
You can import a list of safe senders or domains using our CSV template.
Update your MX records
Update your MX records with the values applicable to your service region.
MX records are region specific and there should be no other records present.
If you use MTA-STS, ensure you also update the MX entries there.
Note
Please wait at least 15 minutes after creating your account in Mesh before updating your MX records to ensure there is no interruption to delivery while our system updates.
Reject all mail not from gateway IPs
We recommend locking down your mail environment to only accept emails from Google and Mesh. To do this check the box Reject all mail not from gateway IPs within the Inbound Gateway section. You can find more info on this here.
Note
Please wait 24 hours before completing this step to allow for DNS propagation.
Enable Outbound Email Scanning (Optional)
View our step-by-step guide on enabling our outbound email scanning.
Tip
You’re all set. Your email is now protected by Mesh Gateway.
Create an Inbound Gateway for Mesh in Google Workspace
To ensure email filtered by Mesh is delivered safely without any double filtering from Google, you need to create an inbound gateway for Mesh in Google Workspace.
We recommend consulting Google’s official documentation.
Note
Complete this procedure only after pointing your MX records to Mesh. We recommend waiting 24 hours to allow for DNS propagation.
If you are moving from another Secure Email Gateway, you may have an existing connector that rejects emails not sent from a specific IP range.
Remove the existing connector before changing your MX records to prevent clean email filtered by Mesh from being rejected.
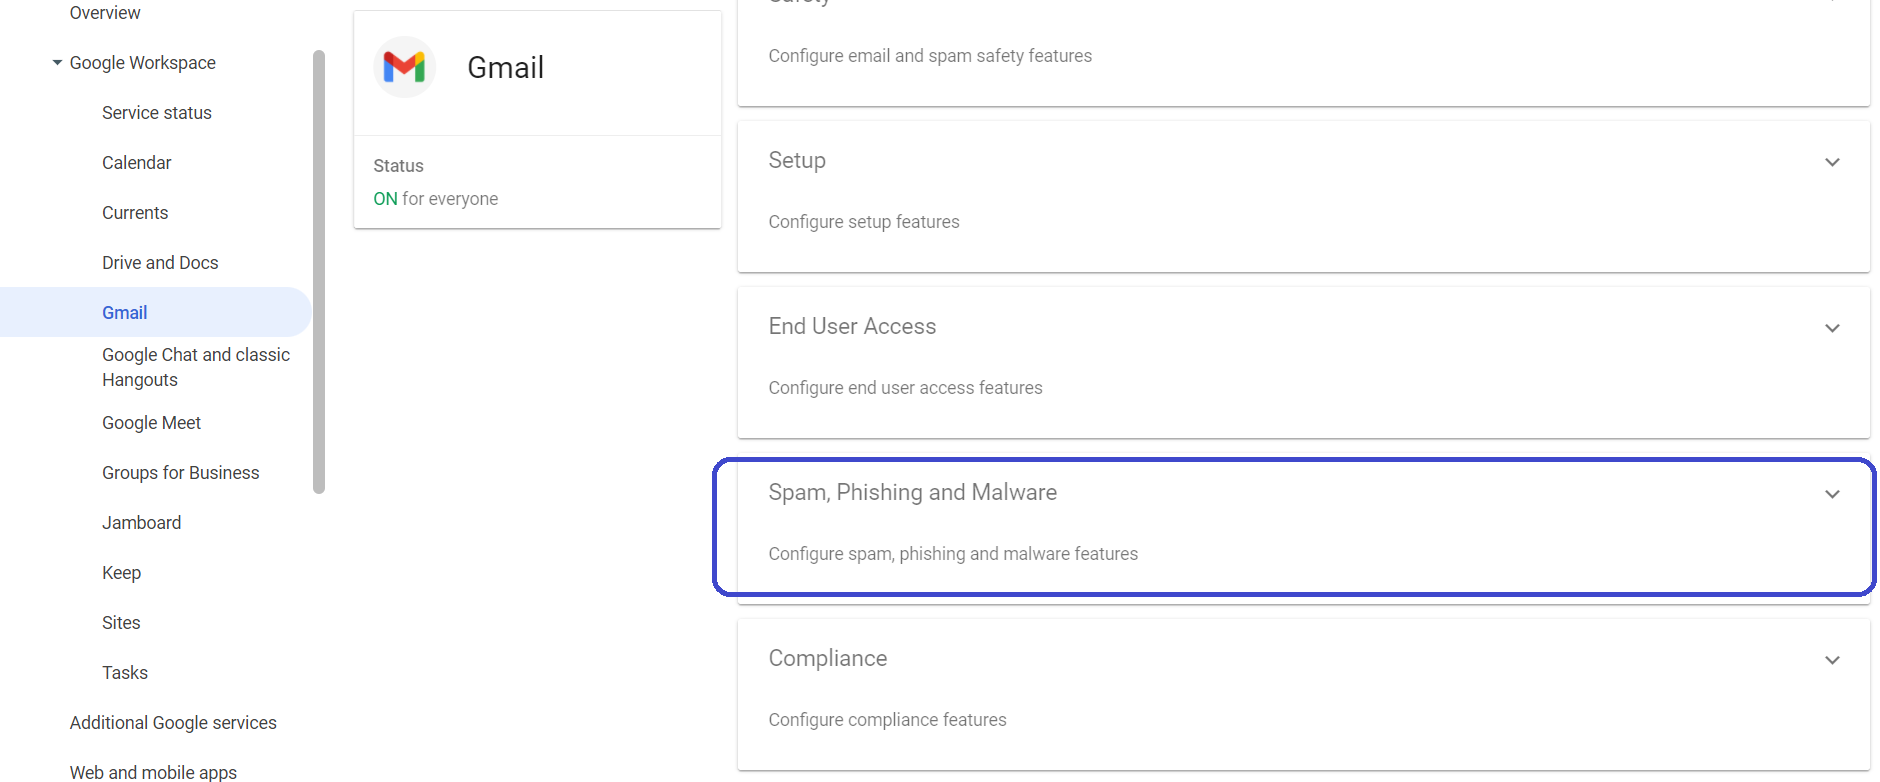
Navigate to Google Admin
Go to Google Admin > Gmail > Spam, Phishing and Malware.
Alternatively, open the Spam, Phishing and Malware settings directly.
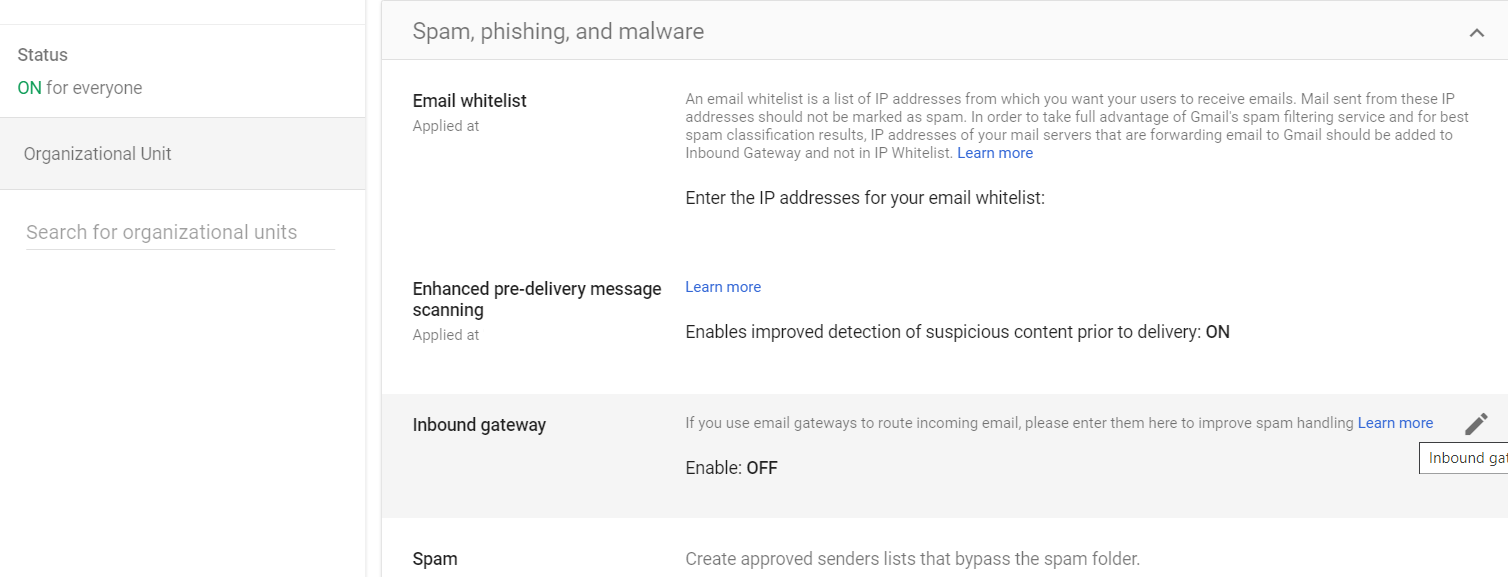
Edit the inbound gateway
Select Edit in the Inbound gateway section.
Add the gateway IP addresses
Add the following two sets of IP addresses:
Add the Mesh delivery IP ranges specific to your region.
Add Google’s sending IP ranges.
List of Google IPs
Extracted from _spf.google.com
(Google may change these without notice. We recommend verifying the current ranges.)
66.249.80.0/20
72.14.192.0/18
74.125.0.0/16
108.177.8.0/21
173.194.0.0/16
209.85.128.0/17
216.58.192.0/19
216.239.32.0/19
2001:4860:4000::/36
2404:6800:4000::/36
2607:f8b0:4000::/36
2800:3f0:4000::/36
2a00:1450:4000::/36
2c0f:fb50:4000::/36
172.217.0.0/19
172.217.32.0/20
172.217.128.0/19
172.217.160.0/20
172.217.192.0/19
172.253.56.0/21
172.253.112.0/20
108.177.96.0/19
Select the required options
Select the following checkboxes:
Automatically detect external IP (recommended).
Require TLS for connections from the email gateways listed above.
Note
Leave Reject all mail not from gateway IPs unchecked for now. You will enable this option at the end of the setup process.
When enabling Reject all mail not from gateway IPs, include Google’s sending IP ranges to prevent Google from rejecting emails sent from its own servers.
If you leave Reject all mail not from gateway IPs unchecked, senders may bypass the Mesh or Google gateway.
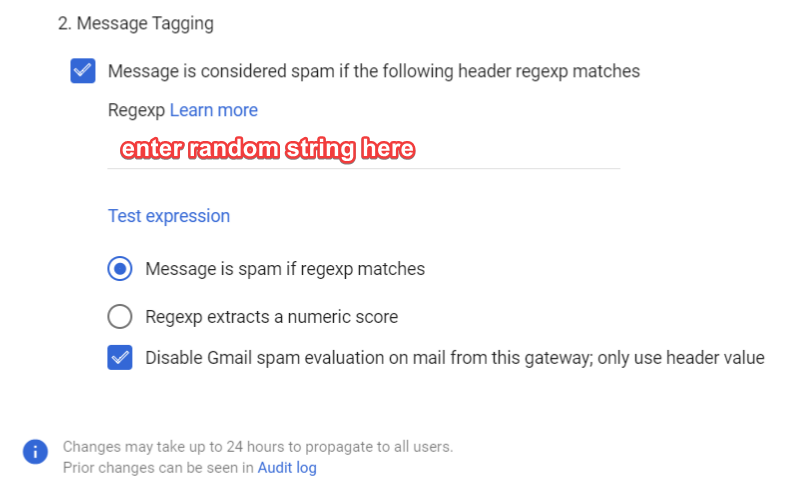
Create a regular expression
Select Message is considered spam if the following header regexp matches.
Enter a random string in the Regexp field.
The value does not matter, provided that it does not appear in email headers.
Disable spam evaluation
Select Disable Gmail spam evaluation on mail from this gateway; only use header value.
The configuration should now look as follows:
Continue the Mesh Gateway setup
Continue the Mesh Gateway setup by configuring internal emails to remain within Google Workspace.
Follow the Routing Internal Emails in Google Workspace guide.
Tip
You’re all set.
Route internal email in Google Workspace
Note
If you do not complete this configuration, internally sent email is likely to be quarantined as impersonation by Mesh. Internal email should remain within the Google tenant and must not pass through Mesh Gateway.
Create a mail route
Go to the Google Admin console.
Go to Apps > Google Workspace > Gmail.
Scroll to Hosts, and then select Add route.
Enter a name for the route, such as Internal Emails Route.
Under Specify email server, select Single host, enter
aspmx.l.google.com, and use port25. Alternatively, you can usesmtp.google.com. For more information, see Google SMTP relay service.Important: Clear Perform MX lookup.
Enable the following options:
Require mail to be transmitted via a secure (TLS) connection.
Require CA-signed certificate.
Validate certificate hostname.
Select Save.
Apply a routing rule
Go to Apps > Google Workspace > Gmail.
Scroll to the Routing section.
Select Configure or Add another rule.
Enter a name for the rule, such as Internal Emails Route Rule.
Select Internal - Sending.
In section 2, select Modify message. Enable Change route, and then select the host configured earlier.
Scroll to the bottom, and then select Show options.
Enable the following options:
Users.
Groups.
Under section C, select Only affect specific envelope senders. Select Pattern match, and then enter the customer domain in the Regexp field, for example,
example.com.Select Save.
Disable SPF and DKIM checks
SPF and DKIM checks are performed by Mesh. Revalidating email after it passes through the service can cause Gmail to incorrectly mark it as spam.
Go to Apps > Google Workspace > Gmail.
Open the Safety section.
Select Spoofing and authentication.
Clear Protect against any unauthenticated emails and Apply future recommended settings automatically.
Select Save.
Continue the Mesh Gateway setup
Return to the setup guide to complete the remaining steps:
Mesh Gateway for Google Workspace
Tip
You’re all set.
Mesh Gateway for all other email platforms
This guide outlines how to install Mesh Gateway for organizations NOT using Microsoft 365, Exchange, or Google Workspace.
Tip
If this is your first time setting up a customer in Mesh(or even if it’s not), it is worthwhile familiarizing yourself with the Before You Start Checklist.
Tip
Installation Time: 10-15 minutes
Create an Allow Rule for Mesh
In order to allow email filtered by Mesh to be delivered safely you need to create an allow rule for Mesh on your mail server. Please use the IP range for your specific region.
Note
If you are moving from another Secure Email Gateway, you will likely have an existing connector in place to reject emails that aren't sent from a specific IP range.
You will need to remove this before changing MX records to prevent clean email filtered by Mesh from being rejected.
Populating Users via CSV Import
In order to allow users to receive quarantine digests and to be able to create their own allow/block rules, users need to be populated in the users table.
Login as a customer and navigate to Users > Import & Sync > Manual.
View more information on user population and role types.
Import Allow & Block Rules (Optional)
You can import a list of safe senders or domains using our CSV template.
Update your MX records
Update your MX records with the values applicable to your service region.
MX records are region specific and there should be no other records present.
If you use MTA-STS, ensure you also update the MX entries there.
Note
Please wait at least 15 minutes after creating your account in Mesh before updating your MX records to ensure there is no interruption to delivery while our system updates.
Lockdown Your Server to Only Accept Email Filtered by Mesh
In order to prevent threats from bypassing Mesh filtering and ensuring emails from our MTAs can deliver to your mail server, you should configure it to reject email not from Mesh’s IP range.
Note
We recommend waiting 24 hours before completing this step to allow for DNS propagation.
Enable Outbound Email Scanning (Optional)
View our step-by-step guide on enabling our outbound email scanning.
Note
If your tenant uses an autoforward in some capacity, please ensure you read the above guide.
Tip
You’re all set. Your email is now protected by Mesh Gateway.