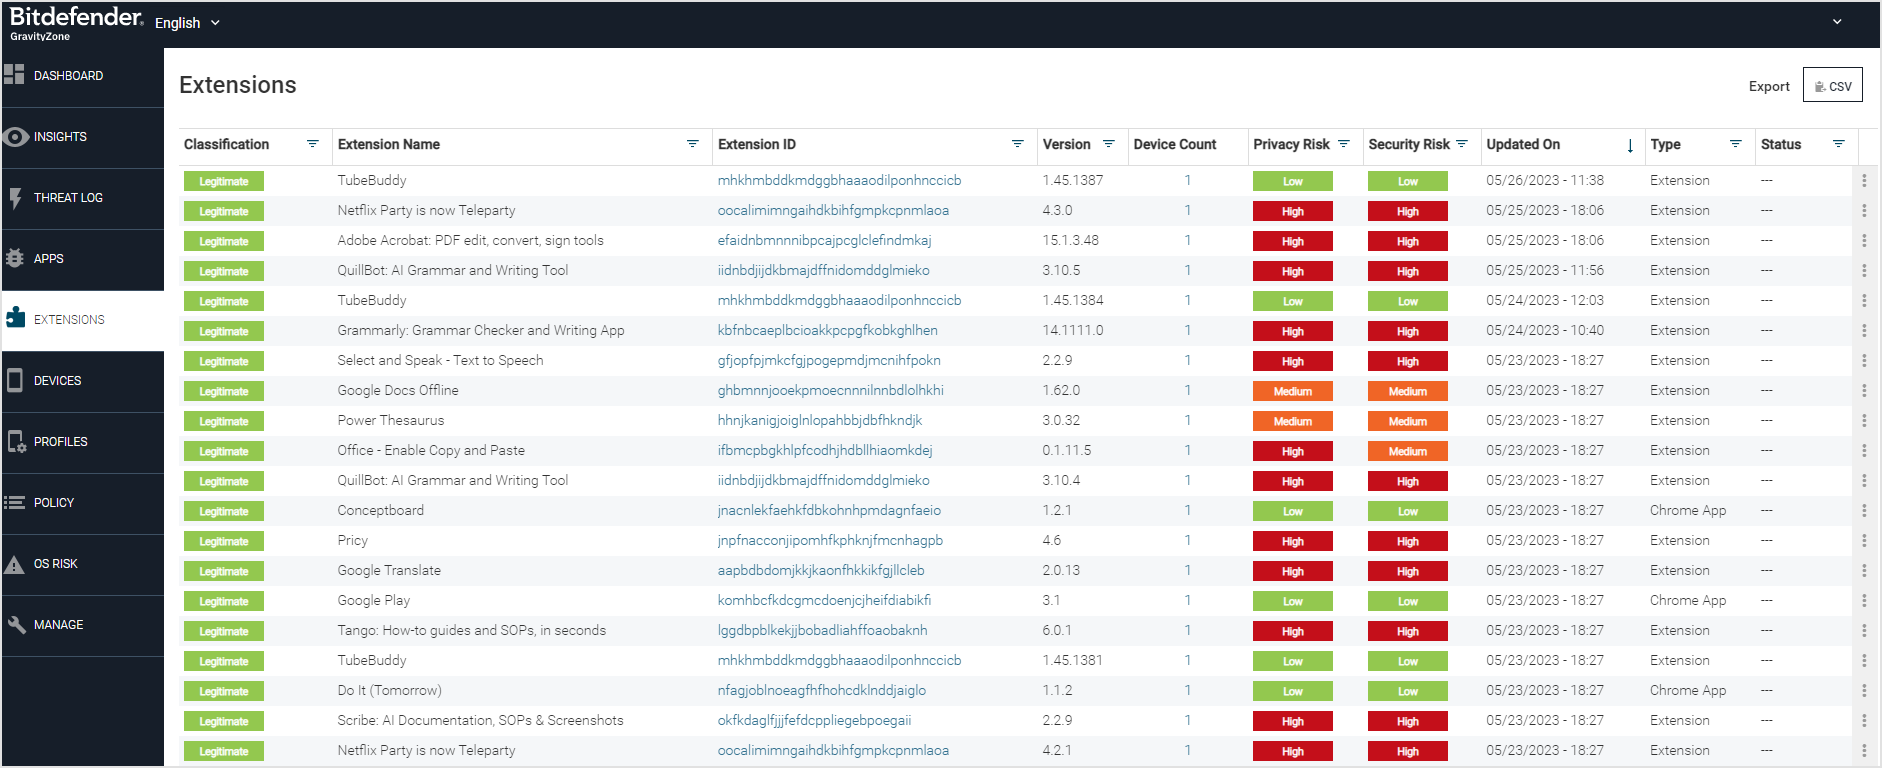
Extensions
Prior to conducting any classification or risk analysis of the extensions that are installed on the device, the Mobile Security console acquires an inventory of the extensions from all devices that have Security for Chrome Protection installed.
The process of extension discovery and scanning is executed through on-device scanning. This occurs during the download and installation of an extension.
You can access the Extensions page from the section located in the left navigation pane.
Security for Chrome
This software is a Chrome extension for Chromebooks that monitors other Chrome extensions to alert users of malware, out-of-compliance, and high-risk extensions. It also provides a Web Content Filtering feature to warn and protect users from accessing harmful websites and links, such as malware, phishing, botnets, and suspected domains.
Pre-requisites
For Chromebooks, the minimum Chrome browser version is 88 or later to support this extension.
Security for Chrome installation
This section describes the options and steps for the installation of the Security for Chrome product.
Installation options
You can install the Security for Chrome extension in different ways:
Set it up in the Google Admin Console.
Install it on your computer, which is typically for testing
Acceptor and activation URLs
Before installing and logging into the Security for Chrome extension, you must have these URL values:
Note
Manual activation is advised for testing purposes only, as when installed manually, Security for Chrome will register as a separate device even if there's already an existing Android agent on the Chromebook.
Acceptor URL
The acceptor URL is similar to the sample string:
https://demo-acceptor.bitdefender.com/srx/json
The acceptor URL can be obtained by following these steps:
Log into the Mobile Security console
Navigate to the Manage page
Click on the General tab
Copy the Default Channel field value that will look like this:
EU: https://gz2-acceptor.ms.gravityzone.bitdefender.com/srx/json
US: https://gz1-acceptor.ms.gravityzone.bitdefender.com/srx/json
Note
The vpcName is the name of your Mobile Security console.
Add the string
/jsonto the end of it resulting in:https://vpcName-acceptor.gravityzone.bitdefender.com/srx/json
Activation URL
The activation URL has the format of::
EU -  https://gz2-device-api.ms.gravityzone.bitdefender.com/activation?stoken=yourToken&redirect_uri=bitdefender
US -  https://gz1-device-api.ms.gravityzone.bitdefender.com/activation?stoken=yourToken&redirect_uri=bitdefender
Note
vpcName is the name of your VPC or the Mobile Security console. and your token is the token from the URL that you retrieved.
You get the activation URL from a local device group by performing these steps:
Log in toMobile Security console.
Navigate to the Devices page and the Local Device Group tab.
Crate a local device group if needed, and then expand a local device group.
Click the Copy Link button, and this is the activation URL value that you need.
Installing with the Google Admin Console
This method of installation is for a system administrator wanting to push the extension to numerous devices.
Note
Google MDM is the only tested MDM that registers a device with both Android and Chrome extensions as a single device. Contact your MDM provider to report the Android agent and Chrome extension on a single device with the same device IDs to avoid exceeding license limits. Check if specific platform settings are required.
Adding Security for Chrome for an unlisted extension
To add an extension not yet publicly available in the Chrome Web Store, perform these steps:
Log in to Google Admin Console here.
Click Devices, and then click Chrome.
Click Apps & Extensions, and then click Users & Browsers.
Click the plus button in the lower-right corner, and select Add Chrome app or extension by ID option.
Enter the Extension ID value by copying and pasting this value:
jihodgjhdnfdifminkpcjkfbibddhkpj
Click Save.
For your added extension, select Force install + pin to browser toolbar for the Installation policy value.
Click on the extension, and its properties will be displayed to the right.
Enter the JSON activation string with the two acceptor and activation URLs for the Policy for extensions field.
Click Save in the upper right corner.
Setting the Policy for Extensions field
After installing the extension with the Google Admin Console, you need to set the Policy for Extensions field. This text is an example of the JSON value for this field.
{
"acceptorUrl": {
"Value": " https://consolename-acceptor.ms.gravityzone.bitdefender.com/srx/json"
},
"activationUrl": {
"Value": " https://consolename-device-api.ms.gravityzone.bitdefender.com/activation?stoken=yourToken&redirect_uri=bitdefender"
}
}
Note
The consolename is the name of your cloud region.
gz2for Europegz1for the rest of the world
Manually installing the Security for Chrome for testing
After you have the acceptor and activation URLs, perform these steps to install the extension:
Access the extension from the Chrome store.
Add the GravityZone Security for Chrome extension.
After installation, click the extension icon in the browser. This extension icon looks like a puzzle piece.
Click the Security for Chrome extension name.
The system prompts for the two URL values, the Acceptor URL and the Activation URL fields
Enter the Acceptor URL and the Activation URL on the login screen.
You can now scan for risky extensions, view the details, and receive notifications.
Functionality
Notifications
Security for Chrome allows users to view malicious, non-compliant, and high-risk extensions on their Chromebook. Threat notifications are also communicated to Mobile Security console and shown in the threat log if the threat policy is enabled.
Suspicious Browser Extension
High-Risk Extension
Out of Compliance Browser Extension
Sideloaded Browser Extension
Note
By default, these are silent alerts, and the threat is reported to Mobile Security console and does not take any actions, such as disable, uninstall, or notify the user. If desired, change this in the threat policy settings on Mobile Security Console on the Policy page and Threat Policy tab.
Scanning for malicious and risky extensions
You can scan for malicious and risky extensions. Click the round logo button that looks like this figure to scan your list of extensions.
The scan results show a summary of what is found in the categories of:
Malware: These are considered malicious, and you need to consider removing them.
Non-Compliant: These extensions are out of compliance with the settings of your administrator, and you need to consider removing them.
High Risk: These extensions are at a higher risk level, and you can view what permissions they have and determine if they are needed and can be removed. After the scan is complete, you can click Details to see the information on each extension.
The Extension Scan button for Security for Chrome displays the summary of extension categories and the Web Content Protection button for risky sites and sites not approved. This figure shows the buttons and the scan result summary, which can be accessed by clicking on the pinned extension icon.
Removing risky extensions
After you run a scan and find the malware, out-of-compliance, and high-risk extensions, you can remove the extensions that put your device at risk. To remove an extension:
Open the Security for Chrome extension, click the Details button.
In the list of extensions and Chrome apps, click the trash can icon to remove an extension or app. You can alternatively click the icon to see more information and click the Remove button.
Optionally on the confirmation box, you can check the Report abuse from [Extension Name] box.
Click the Remove button.
Summary report for an extension scan
After a scan is complete, you can view the report that contains the evaluation of the analysis. If you click the icon, you can see more of the risks and permission information for the extension. The trash can icon removes the extension from your browser.
Extension details with risks and permissions
From the scan results list of extensions, you can click the icon and see more details on the extension.
Web Content Filtering
The Web Content Filtering feature allows tenants to view the total activity that has been risky and not approved sites by clicking on the Web Content Filtering button.
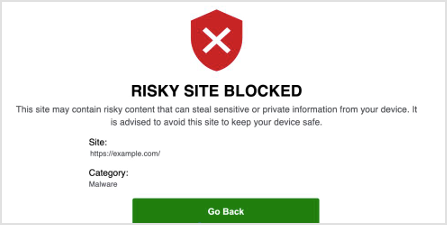
Visiting sites that are risky and not-approved
If you access a site that is malicious, this figure shows an example of the display in accessing a risky site.
If you access a site that is set for an alert in the policy, this figure shows an example of the display in accessing a site that is not approved by your organization.
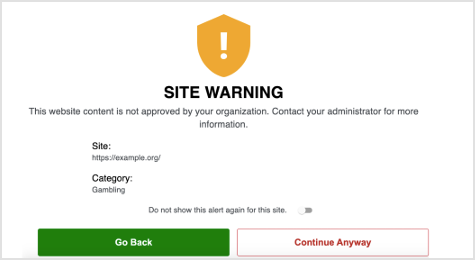
Note
If you toggle on the Do not show this alert again for this site toggle and select Continue Anyway, this warning will not display again for your device.
If you click Continue Anyway without clicking the toggle, this warning will be displayed again.