Exchange Protection quarantine
The Exchange quarantine contains emails and attachments. The Antimalware module quarantines email attachments, whereas Antispam, Content, and Attachment Filtering quarantine the whole email.
Note
The quarantine for Exchange Servers requires additional hard disk space on the partition where the security agent is installed. The quarantine size depends on the number of items stored and their size.
Emails and files quarantined by the Exchange Protection module are stored locally on the server as encrypted files. Using Control Center you have the option to restore quarantined emails, as well as delete or save any quarantined files or emails.
Viewing the quarantine details
The Quarantine page offers you detailed information about the quarantined objects from all Exchange Servers within your organization. The information is available in the Quarantine table and in the details window of each object.
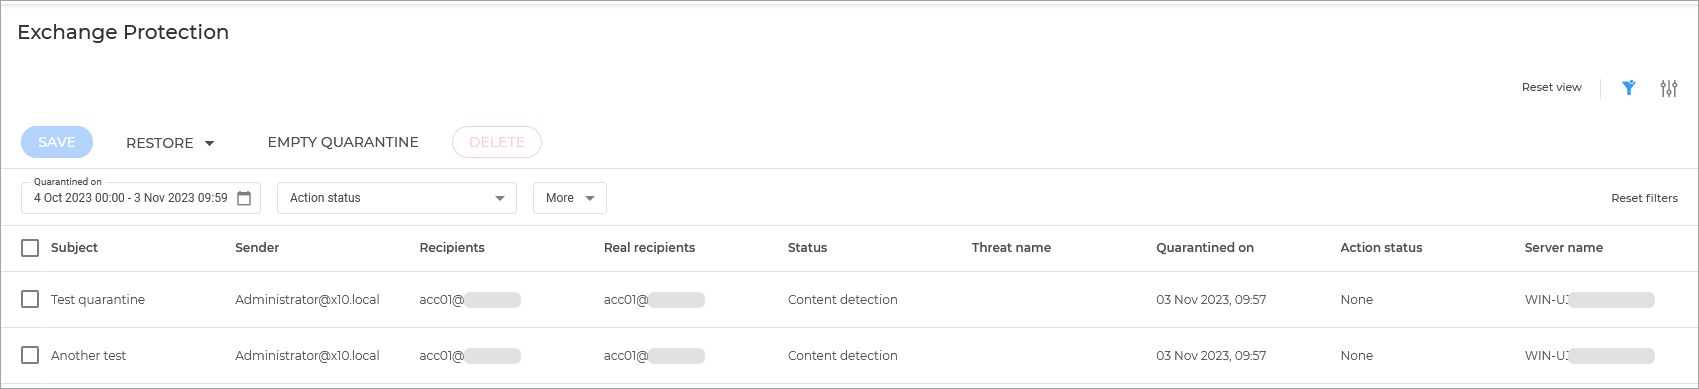
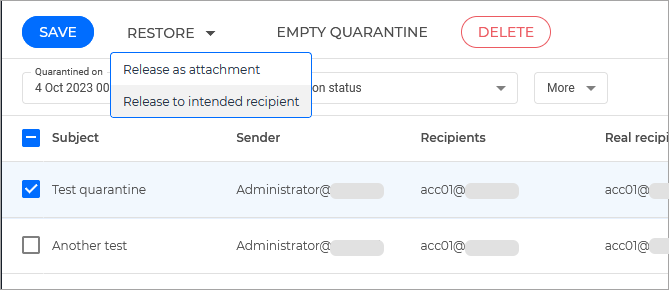
The Quarantine table provides you with the following information:
Subject — The subject of the quarantined email.
Sender — The sender's email address as it appears in the email header field From.
Recipients — The list of recipients as they appear in the email header fields To and Cc.
Real recipients — The list of individual users' email addresses to which the email was intended to be delivered before being quarantined.
Status — The object's status after it was scanned. The status shows if an email is marked as spam or contains unwanted content, or if an attachment is malware-infected, suspected of being infected, unwanted, or unscannable.
Company — The company in whose environment the email or attachment was detected and quarantined.
Threat name — Name given to the malware threat by the Bitdefender security researchers.
Server name — The hostname of the server on which the threat was detected.
Quarantined on — Date and time when the object was quarantined.
Action status — The status of the action taken on the quarantined object. This way you can quickly view if an action is still pending or it has failed.
Note
The columns Real recipients, Threat name, and Server name are hidden in the default view.
When several attachments from the same email get quarantined, the Quarantine table shows a separate entry for each attachment.
To customize the quarantine details displayed in the table use the options available on the upper right side. You can add or remove columns, clear filters, remove the filters section, and adjust the page to a compact view.
You can obtain more information by clicking the Subject link corresponding to each object. The Details window is displayed, providing you with the following information:
Quarantined object — The type of quarantined object, which can be either email or attachment.
Quarantined on — Date and time when the object was quarantined.
Status — The object's status after it was scanned. The status shows if an email is marked as spam or contains unwanted content, or if an attachment is malware-infected, suspected of being infected, unwanted, or unscannable.
Attachment name — The filename of the attachment detected by the Antimalware or Attachment Filtering modules.
Threat name — Name given to the malware threat by the Bitdefender security researchers. This information is available only if the object is infected.
Detection point — An object is detected either at the transport level or in a mailbox or public folder from the Exchange Store.
Rule matched — The policy rule that the threat matched with.
Server — The hostname of the server the threat was detected on.
Sender IP — Sender's IP address.
Sender (From) — The sender's email address as it appears in the email header field From.
Recipients — The list of recipients as they appear in the email header fields To and Cc.
Real recipients — The list of individual users' email addresses to which the email was intended to be delivered before being quarantined.
Subject — The subject of the quarantined email.
Note
The ellipsis mark at the end of the text indicates that a part of the text is omitted. In this case, move the mouse over the text to view it in a tooltip.
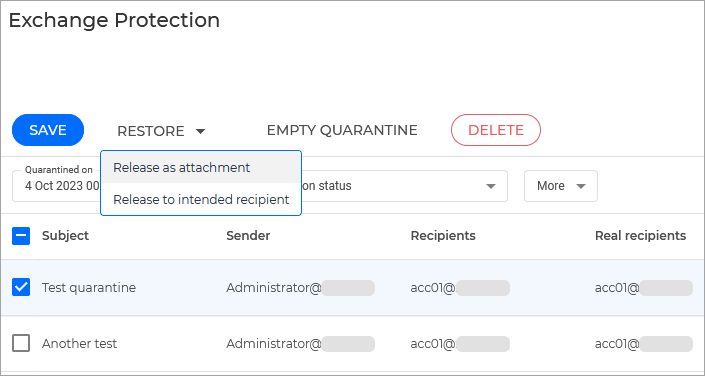
Restoring quarantined items
Release email as attachment
If you decide a quarantined email does not represent a threat, you can send it as an attachment to one or more email addresses. Using Exchange Web Services, Exchange Protection sends the quarantined email to a custom list of recipients as an attachment to a Bitdefender notification email.
Note
You can restore only emails. To recover a quarantined attachment, you must save it to a local folder on the Exchange server.
Unscanable items cannot be restored but can be saved locally on the Exchange server.
To restore one or several emails:
Log in to GravityZone Control Center.
Go to the Quarantine > Exchange Servers page from the left side menu.
Select the checkboxes corresponding to the emails you want to restore.
Click the Restore button on the upper side of the table and select Release as attachment.
The Restore credentials window will be displayed. It will contain a list of previous users added as recipients for releasing emails as attachments.
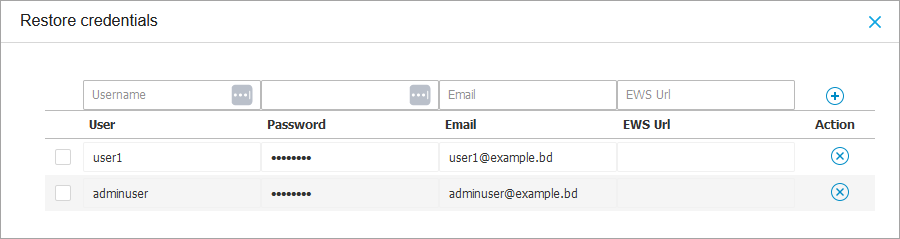
Select the credentials of an Exchange user authorized to receive the emails. If the credentials you intend to use are new, you have to add them to the Credentials Manager first.
To add the additional credentials follow these steps:
Enter the required information in the corresponding fields from the table header:
The username and password of the Exchange user.
Note
The username must include the domain name, as in
user@domainordomain\user.The email address of the Exchange user, necessary only when the email address is different from the username.
The Exchange Web Services (EWS) URL, necessary when Exchange Autodiscovery does not work. This is usually the case with Edge Transport servers in a DMZ.
Click the
 Add button at the right side of the table.
The new set of credentials is added to the table.
Click the Restore button.
A confirmation message will appear.
The requested action is sent to the target servers immediately. Once an email is restored, it is also deleted from quarantine, so the corresponding entry will disappear from the Quarantine table. You can check the status of the restore action in any of these places:
Action status column of the Quarantine table.
Network > Tasks page.
Release email to intended recipient
If you decide a quarantined email does not represent a threat, you can release it from the quarantine. The quarantined email, along with all its attachments is sent to its intended recipients.
To be able to use these options, the following prerequisites have to be met:
The Pickup and Replay functionalities need to be enabled on the Exchange Server. Learn more
The folders assigned to Pickup and Replay need to exist on the endpoint and be accessible by SYSTEM.
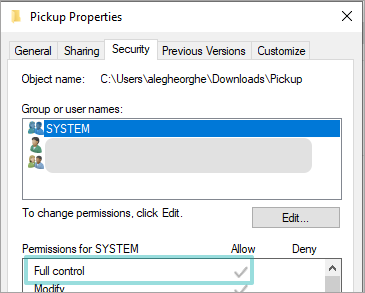
There needs to be enough space disk on the drive where Exchange is installed.
You can use the following entry to check the Pickup and Replay functionalities on your exchange server:
Get-TransportService <server> | Format-List Pickup*,Replay*
If they are enabled, a similar message should appear:
	ReplayDirectoryPath       : C:\Program Files\Microsoft\Exchange Server\V15\TransportRoles\Replay -> ENABLED
	PickupDirectoryPath       : C:\Program Files\Microsoft\Exchange Server\V15\TransportRoles\Pickup -> ENABLED
To restore one or several emails:
Log in to GravityZone Control Center.
Go to the Quarantine > Exchange Servers page from the left side menu.
Select the checkboxes corresponding to the emails you want to restore.
Click the Restore button on the upper side of the table and select Release to intended recipient.
A confirmation message will appear.
Click Restore to confirm the action.
The requested action is sent to the target servers immediately. Once an email is restored, it is also deleted from quarantine, so the corresponding entry will disappear from the Quarantine table. You can check the status of the restore action in any of these places:
Action status column of the Quarantine table.
Network > Tasks page.
Saving quarantined files
If you want to examine or recover data from quarantined files, you can save the files to a local folder on the Exchange Server. Bitdefender Endpoint Security Tools decrypts the files and saves them to the specified location.
To save one or several quarantined files:
Log in to GravityZone Control Center.
Go to the Quarantine page from the left side menu.
Choose Exchange Protection.
Filter the table data to view all files you want to save, by entering the search terms in the column header fields.
Select the checkboxes corresponding to the quarantined files you want to restore.
Click the Save button on the upper side of the table.
Enter the path to the destination folder on the Exchange Server. If the folder does not exist on the server, it will be created.
Important
You must exclude this folder from file system level scanning, otherwise the files will be moved to the Computers and Virtual Machines Quarantine. For more information, refer to Exclusions.
Click Save. A confirmation message will appear.
You can notice the pending status in the Action status column. You can also view the action status on the Network > Tasks page.
Deleting quarantined Files
To delete one or more quarantined objects:
Log in to GravityZone Control Center.
Go to the Quarantine page from the left side menu.
Select Exchange Protection.
Select the checkboxes corresponding to the files you want to delete.
Click the Actions button at the upper side of the table and select Delete. Click Yes to confirm your action.
You can notice the pending status in the Action status column.
The requested action is sent to the target servers immediately. Once a file is deleted, the corresponding entry will disappear from the Quarantine table.
Automatic deletion of quarantined files
By default, quarantined files older than 15 days are automatically deleted. You can change this setting by editing the policy assigned to the managed Exchange Server.
To change the automatic deletion interval for quarantined files:
Log in to GravityZone Control Center.
Go to the Policies page from the left side menu.
Click the name of the policy assigned to the Exchange Server you are interested in.
Go to the Exchange Protection > General page.
In the Settings section, select the number of days after which files are being deleted.
Click Save to apply changes.
Emptying the quarantine
To delete all the quarantined objects:
Log in to GravityZone Control Center.
Go to the Quarantine page from the left side menu.
Select Exchange Protection.
Click the Actions button on the upper side of the table and select Empty Quarantine.
In the confirmation window, select the option Include sub-companies quarantine to also delete the quarantined objects for your child companies, and click Yes.
All the entries from the Quarantine table are cleared. The requested action is sent to the target network objects immediately.