Policies
The Policies page defines the actions the mobile agent takes upon detecting a threat event and the ability to define policies for apps. It includes tabs such as Threat Policy, Apps Policy, Phishing and Content Policy, and Samsung Knox Policy.
The threat policy actions can be defined for the default group or for groups that the user defines. This information is displayed by selecting the Policy page and then the Threat Policy tab.
To access the Policies page, in the navigation pane, click Policy. At the top of the page you will discover the following tabs:
Threat Policy
Apps Policy
Phishing and Content Policy
Samsung Knox Policy
Threat policy
The threat policy actions can be defined for the default group or for groups that the user defines. This information is displayed by selecting the Policy page and then the Threat Policy tab.
The Threat Policy has the following options:
Enable or disable detection of a specific threat classification.
Determine whether the administrator wants to alert the user or not.
Specify the text of the alert.
Specify the protection actions to take (either locally at the device or MDM-related). If an email is sent, is SMS text also, or both sent to the logged-in administrator.
Click Deploy to send the new threat policy to the currently activated the devices. When integrated with an MDM or local device groups, each group is created as a Mobile Security console group with its own threat policy. The user selects which group to modify in the Selected Group drop-down list.
Note
Threat data is dynamically managed and continually changing instead of static for each release. Therefore, threat fields and threat values like severity default, category, or even the list of the threats themselves, can change before a release is published.
Enabling threats
The administrator has the option of enabling and disabling certain threat detections. To disable event severities, click the Save & Deploy button. The Threat Policy tab displays a description of the threat and MITRE tactics for each threat. Clicking on the MITRE tactic in the information box will display tactics that a potential adversary may employ.
Copying a Threat Policy
Copying a threat policy to destination groups within a tenant overwrites them with its properties.
Threat Enablement
Severity
User Alert Setting
Device Action
MDM Action*
Mitigation Action*
Notification Settings with Email or SMS
Note
* The MDM Action and Mitigation Action values are only copied to destination groups that match the MDM instance of the source group.
In specifying the destination groups, you can:
Search for a group name
Select more than one destination group
Click the Copy & Deploy button after you select the destination groups and confirm the copy operation.
Note
If you made any changes, make sure you click the Save and Deploy button on your source group, which is shown in the Selected Group field.
Default Threat policies
There are two types of default policies for threats:
About severity
The administrator has the option of changing the threat severity levels. This is useful for different business cases. The options are:
Critical
Elevated
Low
Normal
New threat default policy - The default policy type for new threats in Mobile Security console is to disable them, allowing administrators to enable them when needed.
The initial default threat policy - The initial default threat policy is the policy initialized on the device when the app is installed. This policy includes critical threats such as malware and phishing. The user's own policy is then downloaded shortly after activation.
The critical threats included in this policy are:
Device Jailbreaking/ Rooting
Elevation of Privileges (EOP)
MITM - ICMP Redirect
MITM - ARP
System Tampering
Rogue Access Point
MITM
Device actions
The device actions do not require integration with an MDM (with the exception of the iOS Disconnect Wi-Fi action).
To set the Device Action, select Policy in the navigation pane, and select the Threat Policy tab.
Locate the desired threat, and click the gear icon in the Device Action column.
Click the checkbox for the desired device action and click OK. The figure shows the actions provided for Android, iOS, Samsung Knox, and Browser Extension devices.
Note
The specific Data Loss Prevention actions to take for enabled threats must be defined in the Samsung Knox Policy tab.
The following sections describe the different actions for Android, iOS, and Knox.
Android
Disconnect Wi-Fi: Disable the Wi-Fi adaptor and fall back to cell data if enabled. The user can then enable the Wi-Fi adapter when they are safe.
Network Sinkhole: If Network Sinkhole Settings are configured in the Manage page, this option displays here. The action either blocks or allows defined network ranges/domains based on an IP network/mask and domains configured.
Note
This functionality is supported on Android OS versions greater than 10.
Disable Bluetooth: Disable the Bluetooth adaptor and disconnect any current Bluetooth connections.
Note
Disabling Bluetooth on devices running Android OS versions greater than 10 is not supported.
Tunnel Unsecured Traffic: When this is selected, a secure VPN tunnel is automatically initiated to handle traffic across an unsecured connection
Note
To use the Network Sinkhole and Tunnel Unsecured Traffic actions, the minimum supported Android OS version is Android 10.
The Disconnect Wi-Fi and Disable Bluetooth are not supported for Android OS versions greater than 10.
iOS
Enable VPN: This is enabled when VPN Settings are configured in the Manage page. Choose this option to bring up the defined VPN in response to a threat
Network Sinkhole: If Network Sinkhole Settings are configured in the Manage page, this option displays here. The action either blocks or allows defined network ranges/domains based on an IP network/mask and domains configured.
Disable Bluetooth: Disable the Bluetooth adapter and disconnect any current Bluetooth connections. This is supported only for the Mobile Security Apps for MDMs.
Tunnel Unsecured Traffic: When this is selected, a secure VPN tunnel is automatically initiated to handle traffic across an unsecured connection.
Disconnect Wi-Fi (Optional): A Disconnect Wi-Fi option for iOS is displayed for certain MDMs. When selected, a Wi-Fi profile is pushed down to the device through the MDM that effectively disconnects from the currently connected SSID. The Wi-Fi on the device then falls over to the next available SSID or cell data if no SSIDs are available.
Samsung Knox
Use Android Actions: This works in conjunction with the Knox action settings.
Disable/Uninstall/Block App: These remove or disable the app from running on the device.
Note
Inbuilt apps like Chrome cannot be uninstalled.
Isolate from Network: This disables any network communications from apps that are malicious but not yet uninstalled.
Data Loss Prevention: For the data loss prevention options on the Samsung Knox Advanced, click Policy in the navigation pane, then select the Samsung Knox Policy tab. Find an Android device and click the gear icon on that line. This pop-up window opens to allow selection of the actions to be taken for data loss prevention on the Samsung Knox devices. Click the Data Loss Prevention checkbox.
Browser extension:
Disable Extension: This disables the extension that is linked with the threat.
Uninstall Extension: This uninstalls the extension that is linked with the threat.
Setting a Secure VPN Tunnel for unsecured traffic
A policy can be set to automatically start a secured VPN tunnel for iOS and Android users accessing an unsecured communications link. This is done by following the steps in the Policy page.
In the navigation pane, click Policy
Click the Threat Policy tab.
Locate the desired device, and click the gear icon in the Device Action column
Click the Tunnel Unsecured Traffic checkbox under Android or iOS.
Click OK.
User alerts
User alerts can be enabled or disabled for all event severities by clicking the radio button enabled or disabled in the Set User Alert column. The administrator can choose the languages and text to use to alert the user.
Multiple languages can be set up at the same time, but the language defined on the device is the one used in the alert to the user.
Select the language to add, and also the text to be displayed for this event. The Button Label field provides a button that the user can press on to be taken to a website or to dial a number. To set up a link, enter a valid URL in the Button Link field such as: http://helpdesk.mycorp.com or tel://9735551212 to have the phone dial that number when pressed.
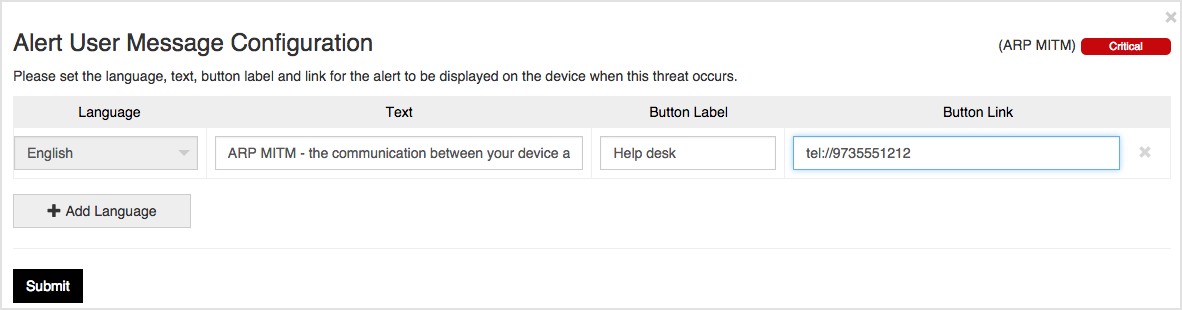
The Mobile Security app supports the optional use of variables within the user alert messages displayed to the user. These variables are inserted into the user alert text specified on the Policy page.
Variable | Definition |
|---|---|
[wifi_ssid] [date] | The name of the Wi-Fi network the device was connected to during the detected attack. Date of the attack. |
[ip] | The IP address of DNS, gateway, or network proxy. |
[app_name] [host_app_name] [profile_name] [os_version] | Name of detected malicious application. The host app name. The profile name. The operating system version. |
[blocked_domain] | The blocked domain name. |
[sideloaded_developer] | The sideloaded app developer. |
[nearby_ssids] [malicious_url] [category] | This is a list of the identifiers for nearby networks during the detected attack. If a malicious URL is related to the threat, this variable provides that value. This is the category for the threat. |
This is an example of a user alert message for a MITM network attack that uses one of these variables.
The Mobile Security app detected a network attack. The communication between the device and the network named [wifi_ssid] was intercepted. The attacker can hijack traffic and steal credentials or deliver malware to the device.
Note
The limit for the user alert text is 1000 characters. If more is given, only the first 1000 characters are saved.
MDM action
To enable an MDM action item, on the same row as the threat to be configured, pull down the list under the MDM Action column and choose the group to be applied to the device when this particular threat is detected.
Mobile Security console securely communicates with the MDM API and makes the assignment as defined in the selection. To remove an MDM action from occurring for a threat classification, change the threat MDM Action to 'No Action'.
Note
The Disconnect Wi-Fi action as an MDM action is supported for iOS devices only. For Android devices, this action currently needs to be performed as a 'Device Action' request.
Mitigation action
The Mitigation Action column is used to define specific actions that can be taken on the customer's MDM when a threat has been remediated and is no longer posing a threat to the device. For example, when a device is detected to be under an ARP MITM attack, it can be prevented from accessing various corporate resources. When the device is moved to a clean network, the administrator can automatically allow the device to access those resources again. The Administrator also has the option to move the device to another group available on the MDM. Due to the nature of some threats, not all threat classifications can be mitigated.
Apps policy
The administrator has the option of creating app policies. These policies aid in identifying apps with specific behavioral characteristics and allow an administrator to:
Whitelist apps and mark applications as safe.
Note
Apps marked as safe do not trigger threats.
Block apps and mark applications as malicious.
Note
Apps marked as blocked are marked as malicious apps and the appropriate action set by the admin (in threat policy) is executed for those apps.
Mark apps as out of compliance because they do not conform to enterprise policies.
Note
The action set for out of compliance applications in threat policy will be executed if there's one.
Request an email notification when new apps match the defined policies.
To define an app policy, select different characteristics of an app, such as camera or location access. As the user builds the app policy with matching characteristics, the page shows how many matching apps are found with the criteria.
When building an app policy, the user selects different behavior and app characteristics, such as one or more characteristics.
Categories | Example Characteristics |
|---|---|
Advertiser | The app uses a wide range of advertising and measurement SDKs, including AppLovin, Fyber, IAB Open Measurement, IronSource, Mintegral, Unity Ads, Vungle, AdMob, Apperhand, Apperian, Appsee, Greystrip, iAD, Kakao, SourMint (malicious advertising SDK), Mobclix, mobiSage, and Pushwoosh, as well as other mobile advertiser SDKs. |
Accessibility Permission | The app uses privileged permissions which could be abused. |
Android App Store | The app is categorized under a wide range of Android App Store classifications, including medical, beauty, board game, book & reference, business, card game, casino game, casual game, comic game, communication, dating, finance, food & drink, health & fitness, house & home, library & demo, lifestyle, maps & navigation, music & audio, music game, news & magazine, parenting, personalization, photography, productivity, puzzle game, racing game, role-playing game, shopping, simulation game, social, sports, sports game, strategy game, tools, travel & local, trivia game, video player & editor, weather, word game, action game, adventure game, arcade game, art &design, auto & vehicle, education, educational game, entertainment, and events. Additionally, the app is not listed in the Android App Store. |
Android Content Categories & Ratings | The app includes content rated for everyone 10+, ages 12+, teens, mature 17+, adults 18+, as well as PEGI 12+ and PEGI 18+ classifications. It features material involving alcohol, tobacco, drugs, drug references, strong or mild language, mild fantasy, nudity, sexual innuendo, sexual situations, sexual themes, suggestive themes, violence, blood, and additional drug usage. The content also spans diverse and potentially sensitive material, for which discretion is advised. |
Audio/Video | The app can access screenshots, the camera, the camera roll, and the microphone. It is also able to record video, record audio content, and update the camera roll. |
Behaviour | The app requests both unexpected permissions and dangerous permissions for its category, shows unexpected high-severity findings, and declares custom URL schemes. |
Cloud services | The app can access a variety of cloud platforms and storage services, including vulnerable AWS and Google cloud instances, as well as Amazon AWS, Box, Dropbox, Evernote, Facebook, Google Drive, Google storage, iCloud, Instagram, LinkedIn, OneDrive, Salesforce, SugarSync, Twitter, and Weibo. It can also send analytics data to Flurry and Google, and update stored content across multiple services, including Amazon AWS, Box, Dropbox, Facebook, Google Drive, Google storage, Office 365, OneDrive, Twitter, and Weibo. |
Communications | The app accesses emails, SMS messages, external servers, internal network addresses, and Wi-Fi connection information, and it can also connect to local IP addresses. It is able to compose and send emails, compose and send SMS messages, and even place calls without the dialer. It establishes network connections such as VPN tunnels, performs network scanning, and may operate through a proxy server. The app uses Bluetooth sharing, relies on the Monkeysocks SDK, and communicates over unencrypted HTTP or other unencrypted network connections. It additionally shows risky SSL behavior: it may experience SSL communication problems, sign its own SSL certificate, or skip certificate verification checks. User data may also be stored in cookies vulnerable to compromise. |
Crash Reporting | The app can send crash logs and diagnostic reports to third-party services, including Bugsense, Crashlytics, Critterism, and Flurry. |
Health Data | Access personal health data from the device. |
iOS App Store | The app spans a large range of iOS categories, including games (action, adventure, arcade, board, card, role-playing, strategy, and more), magazines (arts & photography, business & investing, entertainment, fashion, science, sports &a leisure, and others), and general app types such as business, finance, lifestyle, education, shopping, travel, utilities, weather, photo & video, and social networking, while also being configured as a TestFlight app and not listed in the iOS App Store. |
iOS Content & Ratings | The app includes content rated for ages 4+, 9+, 12+, and 17+. It features material involving alcohol, tobacco, or drugs, along with frequent and intense profanity, crude humor, sexuality, nudity, mature substance use, mature suggestive themes, and realistic violence. Additional elements include gambling, mild or mature suggestive themes, mild realistic violence, mild sexual content and nudity, and unrestricted web access. |
iOS Shortcuts | The app can execute and install iOS shortcuts. It also makes use of keyboard extensions, including functions that capture keystrokes—and in some cases transmit those keystrokes to third parties. |
Location | The app accesses both general and precise location information, and it may transmit location data unencrypted or send it to remote servers. |
Log Files | Write data to a file that could be read by any app. |
Mobile Trackers | The app is using an aggressive advertising tracker, an uncategorized tracker, and multiple named mobile trackers including AbstractEmu, Adeco, AhRat, AppMeasurement, AppsFlyer, Bearclod Malware, cerberusC2s, CoulusCoelib, Crashlytics, CubeIQ, Cynos, Donot, EvilEye Malware, Fleckpe, Goontact, Gravy, GriftHorse, Joker Malware, Kochava, Mintegral, NewRelic, Nextalive, nodleio, PhoneSpy, Postlo Spyware, Sense360, Speedspot, Starbolt, TangleBot, Triada Malware, Tutela, XcodeSpy, Xiaomi, xmodesocial, and xnspy. If you prefer a comma-separated list only, a bulleted list, or a sentence grouped by malware families vs analytics trackers, I can prepare that as well. |
Privacy | The app accesses a unique tracking ID used by advertisers to identify the device, as well as malware or phishing websites, the address book, calendar, call history, clipboard contents, the device IMEI number, device notifications, the device serial number, local device information, the telephony service, the unique device ID (UDID), the user’s browsing history, and websites that transmit sensitive data. It also exposes an AI Platform API key in network traffic, leaks clipboard information, and leaks personally identifiable information (PII). The app overlays one window with another, captures screenshots of user interactions, and sends contacts, the IMEI, videos, images, login-related content, and potentially sensitive data to remote servers. It also transmits location and user information to Uber, alters clipboard contents, and modifies local device information. The app uses Anthropic Claude, Cohere, DeepSeek, Hugging Face, OpenAI, ChatGPT, the Gemini AI service, and built-in OCR functionality. It includes speech recognition capabilities and can track user location by using the device microphone to detect ultrasonic beacons. The app includes the BeiTaAd adware plugin and can make use of the Glassbox SDK, Google Consent SDK, Luminati SDK, TestFairy SDK, Twilo API, Uber API, and YouMi SDK. It also relies on APIs that manage overlay permissions and spawn overlay windows. |
Provisioning Profile | The app can configure a password policy, a password removal policy, a SCEP payload, VPN add-on software, a VPN tunnel, a webclip, an identity preference, APN cell tower and internet settings, a CardDav payload, device restrictions, an email account, enterprise domains, an ethernet interface, Exchange Active Sync, global HTTP proxy settings, an LDAP directory service, managed preferences, Single Sign-On, the MDM service, and Wi-Fi settings with a profile, and it can also install a trusted certificate with a profile. |
Proximity Alert | Send an alert that user is near a specific location. |
Security | The app interacts with system resources in numerous ways: it accesses external servers and recent tasks, executes processes in the background, loads dynamic and native code, and may prevent the device from locking the screen. It can read the list of installed apps, request device admin permissions, request to run with security disabled, and even stop running other applications. In some cases, it may also operate without binary protection. The app exhibits several high-risk behaviors, such as containing internal private framework code, creating unprotected files accessible in any device state, disclosing source file paths, and detecting the VirusTotal emulator. It may also rely on SparkCat OCR malware or use Secure Computing features, including BPF. It makes use of capabilities that bypass or weaken platform controls, including Apple private entitlements, over-the-air update methods that circumvent the App Store, the get-task-allow flag, and frameworks such as JSPatch, MonoTouch, PhoneGap, and Signal. The app additionally communicates over unencrypted network connections and is able to write APN settings. |
Server Location | The app can communicate with servers in Afghanistan, Åland Islands, Albania, Algeria, American Samoa, Andorra, Anguilla, Antarctica, Antigua and Barbuda, Argentina, Armenia, Aruba, Australia, Austria, Azerbaijan, Bahamas, Bangladesh, Barbados, Belarus, Belgium, Belize, Bermuda, Bhutan, Bolivia, Bonaire (Sint Eustatius and Saba), Bosnia and Herzegovina, Botswana, Bouvet Island, Brazil, British Indian Ocean Territory, British Virgin Islands, Brunei Darussalam, Bulgaria, Burkina Faso, Burundi, Cabo Verde, Cambodia, Cameroon, Canada, Cayman Islands, Chad, Chile, China, Christmas Island, Cocos (Keeling) Islands, Colombia, Comoros, Congo, Cook Islands, Costa Rica, Côte d'Ivoire, Croatia, Curaçao, CW, Cyprus, Czech Republic, Denmark, Djibouti, Dominica, Dominican Republic, Ecuador, Egypt, El Salvador, Equatorial Guinea, Eritrea, Estonia, Ethiopia, Faroe Islands, Fiji, Finland, France, French Guiana, French Polynesia, Gabon, Gambia, Georgia, Germany, Ghana, Greece, Greenland, Grenada, Guadeloupe, Guam, Guatemala, Guernsey, Guinea, Guinea-Bissau, Guyana, Haiti, Honduras, Hong Kong, Hungary, Iceland, India, Indonesia, Iran, Ireland, Isle of Man, Israel, Italy, Japan, Jordan, Kazakhstan, Kenya, Kiribati, Kuwait, Kyrgyzstan, Latvia, Lesotho, Liberia, Libya, Lithuania, Luxembourg, Macao, Macedonia, Madagascar, Malawi, Malaysia, Maldives, Malta, Marshall Islands, Martinique, Mauritania, Mayotte, Mexico, Micronesia, Monaco, Mongolia, Montserrat, Morocco, Mozambique, Namibia, Nauru, Nepal, Netherlands, New Caledonia, New Zealand, Nicaragua, Niger, Nigeria, Niue, Norfolk Island, Northern Mariana Islands, Norway, Pakistan, Palau, Palestinian Territory, Panama, Papua New Guinea, Paraguay, Peru, Philippines, Pitcairn, Poland, Portugal, Qatar, Romania, Russian Federation, Rwanda, Saint Barthélemy, Saint Helena (Ascension and Tristan da Cunha), Saint Kitts and Nevis, Saint Lucia, Saint Martin (French part), Saint Pierre and Miquelon, Saint Vincent and the Grenadines, Samoa, San Marino, Sao Tome and Principe, Saudi Arabia, Serbia, Sierra Leone, Singapore, Sint Maarten (Dutch part), Slovakia, Slovenia, Solomon Islands, Somalia, South Africa, South Georgia and the South Sandwich Islands, South Korea, South Sudan, Spain, Sri Lanka, Sudan, Suriname, Svalbard and Jan Mayen, Swaziland, Sweden, Switzerland, Taiwan, Tajikistan, Tanzania, Thailand, Central African Republic, Democratic People's Republic of Korea, Democratic Republic of the Congo, Falkland Islands, French Southern Territories, Holy See, Lao People's Democratic Republic, United States Minor Outlying Islands, Timor-Leste, Togo, Tokelau, Tonga, Trinidad and Tobago, Tunisia, Turkey, Turkmenistan, Turks and Caicos Islands, Tuvalu, Uganda, Ukraine, United Arab Emirates, United Kingdom, United States of America, Uruguay, Uzbekistan, Vanuatu, Venezuela, Viet Nam, Virgin Islands, Wallis and Futuna, Western Sahara, Yemen, Zambia, and Zimbabwe. |
Social Media Connectivity | Connect to social media and send personal information. |
Social Networks SDKs | The app uses the following social networks: Amazon, Amity, AppAuth, DeepLinkKit, Fabric, Facebook, Gigya, Google, Kakao, Naver, Odnoklassniki, Pinterest, Schibsted, Tencent, TikTok, Twitter, U-Share, Vkontakte, WeChat, Weibo, Yandex. |
Swizzling | Allow data to be manipulated. |
Vulnerability | The app accesses vulnerable Azure, Elasticsearch, and Firebase cloud instances and contains multiple issues listed in the Common Vulnerabilities and Exposures (CVE) database, spanning privacy and security categories. It includes vulnerabilities with critical, high, medium, and low CVSS scores. The app exposes sensitive information, including Azure hardcoded credentials, Twilio credentials, and other hardcoded secrets embedded in URLs. It also suffers from SSL communication weaknesses, may leak private data through exposed URL parameters, and shows signs of unsafe data handling. It relies on components affected by known vulnerabilities, including libwebp (CVE-2023-4863), a WEBP version affected by CVE-2023-41064, and a Flutter build susceptible to CVE-2023-4863. The app is also linked to known malware families, having been identified as part of PROXYLIB and LumiApps. Additionally, the app leverages the MacDirtyCow exploit, further indicating high-risk behavior. |
To create an app policy follow the steps below:
Click the + Add Policy button.
Type in a unique name for the new policy.
Under the Available Characteristics list, find and select the characteristics:
Expand a topic and select the specific characteristics by clicking the plus sign.
Enter a value, in the search field and click the plus sign for the desired matching characteristics.
Select the whole characteristic category by clicking the green plus sign.
Note
The desired characteristics move to the Policy Characteristics list on the right and are added by default to the All Characteristics list.
With the up and down arrows on the right, move the characteristics from the All Characteristics section to the Any Characteristics section and vice-versa.
All Characteristics: Apps that are flagged by the policy must have all of the characteristics listed in the All Characteristics section.
Any Characteristics: Apps that are flagged by the policy must match at least one of the characteristics in the Any Characteristics section if any are present.
Flagged apps
Once an app policy is defined, click the matching apps number link.
The Apps Flagged by Policies page displays all apps that match that defined policy.
To widen the list to different policies, the list is filtered by the policy name.
These are the available columns on the Apps Flagged by Policies page:
Reviewed
App Versions
Policy Name
Devices
Privacy Risk
Security Risk
OS
Status
You can filter the apps by clicking on the column with a triangle. For each app displayed, you can request reports such as Executive PDF Report, Technical PDF Report, JSON Report, and Alternate Reports. The apps can also be marked as allowed, denied, or out of compliance for the organization.
Allow, Deny, and Out of Compliance Options for policies
Device app non-compliance with organizational policies must be reported to administrators. An administrator can mark an app as out-of-compliance (OOC) for the user's enterprise in the Apps Policy tab on the Policy page. Users are notified of non-compliant apps and instructed to uninstall them from their devices. Administrators can set up app policies based on particular characteristics like camera or microphone usage. The Mobile Security console displays the apps that meet the defined policy. The administrator can designate an app as:
Allowed
Denied
Out of compliance
None or N/A
The administrator has the ability to designate apps as reviewed for the purpose of monitoring their review progress. Applying specific app permissions by an administrator mitigates potential threats from certain developers or apps. MDM-loaded, internal, or sideloaded apps can be designated as safe. No threats were detected for these applications.
When an administrator denies specific apps, then it generates the ‘Suspicious iOS App’ or ‘Suspicious Android App’ threat for that app, which is similar to marking it as malware. When an administrator marks an app as out-of-compliance, then it generates the ‘Out of Compliance App’ threat.
An administrator has these options for marking an app as out of compliance:
The entire app bundle.
All versions of the app flagged by policies.
A specific version range of an app, such as indicating versions ‘Less Than 3.0’ are out of compliance.
Specific selected versions from the app version list.
Phishing and Web Content policies
The phishing and content policy settings allow an administrator to warn and protect users from:
Accessing harmful websites and links.
Accessing websites and links with content that requires an action, such as block, generate a threat, alert the user, or a combination of these actions.
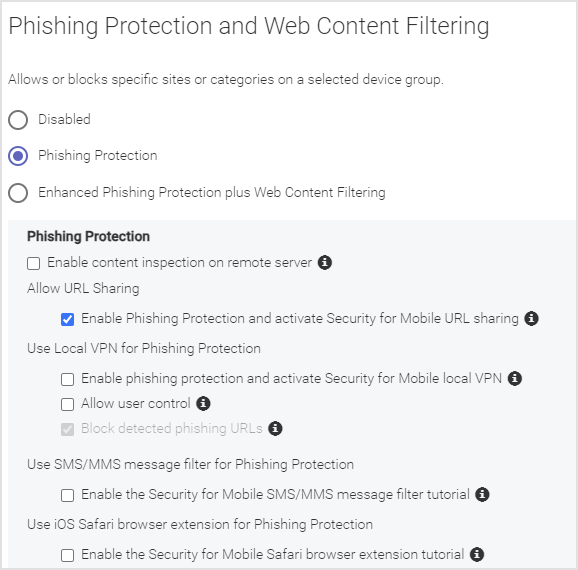
Enabling Phishing Protection
To enable phishing protection without content filtering, click the Policy navigation menu item. Then on the Phishing & Content Policies tab, select the Phishing Protection radio button. With this selection, you can, as an administrator, set up the following functionality on a device with the GravityZone MTD:
Enable a remote server check of the URL in addition to the on-device check.
Enable URL sharing so that a user can optionally use the device sharing feature when a web link (URL) is encountered. For example, the user can perform a long press on a link to share it with GravityZone MTD which then analyzes the URL for a phishing risk and responds back if the link is good or risky.
Enable a local Virtual Private Network (VPN) in GravityZone MTD to check the safety of web links (URLs).
Allow the user to enable or disable the mobile phishing protection (Site Insight) and use the local VPN on their own device.
Select between these options when phishing links are detected if a local VPN is enabled:
Warn the user.
Alert and block the web links.
Enable the SMS/MMS Message Filter for iOS in GravityZone MTD. Enabling this option allows the end user to activate this filter feature by following the tutorial. Disabling this option hides this tutorial in GravityZone MTD and disables its operation for all end users.
Enable the iOS Safari extension tutorial in GravityZone MTD. Enabling this option allows the end user to activate this Safari browser extension feature by following the tutorial. Disabling this option hides this tutorial in GravityZone MTD and disables its operation for all end users.
Note
These values are set for each device group. Users can set up URL sharing with the app without this enabled. However, to verify a URL, this option must be enabled and deployed.
You can set up a custom category list. See About Custom Categorization Lists for more information on this topic. In addition, you can navigate to the settings in the Access Control tab by clicking the Manage List link.
Enabling Enhanced Phishing Protection and Content Filtering
To enable content filtering and phishing protection, click the Policy navigation menu item. Then, click the Phishing & Content Policies tab, and select the Enhanced Phishing Protection plus Content Filtering radio button.
With the Enhanced Phishing Protection plus Content Filtering selection, you can, as an administrator, set up the following functionality on a device with GravityZone MTD:
Enable URL sharing so that a user can optionally use the device sharing feature when a web link (URL) is encountered. For example, the user can perform a long press on a link to share it with GravityZone MTD which then analyzes the URL for a phishing risk and responds back if the link is good or risky.
Enable a local Virtual Private Network (VPN) in GravityZone MTD to check the safety of web links (URLs).
Allow the user to enable or disable the mobile phishing protection (Site Insight) and use the local VPN on their own device.
Enable content filtering and URL categorization and use the recommended settings, or select one of these actions for each category:
Allow
Alert
Alert & Create Threat
Block
Block and Create Threat
Block with No Alert
Note
The option to enable content inspection for a URL on a remote server does not exist for enhanced phishing protection because this option always uses the remote server.
Enable the SMS/MMS Message Filter for iOS in GravityZone MTD. Enabling this option allows the end user to activate this filter feature by following the tutorial. Disabling this option hides this tutorial in GravityZone MTD and disables its operation for all end users.
Enable the iOS Safari extension tutorial in GravityZone MTD. Enabling this option allows the end user to activate this Safari browser extension feature by following the tutorial. Disabling this option hides this tutorial in GravityZone MTD and disables its operation for all end users.
About the phishing actions
Information about the available actions for different categories are detailed in this table below.
Action | Creates a Device Notification | Option to Allow-List Site | Threat is Visible on Console ** | Blocks the Site from Loading |
|---|---|---|---|---|
Allow |
| N/A | N/A | N/A |
Alert |
|
|
|
|
Alert & Create Threat |
|
|
|
|
Block |
|
|
|
|
Block & Create Threat |
|
|
|
|
Block with No Alert * |
|
|
|
|


*This option is mainly for frames inside other websites to avoid too many alerts.
**This assumes that the threat policy is set so that these threats are enabled.
Note
Restricted domains will appear as unreachable.
Setting Up specific actions for content
To set up specific actions in the content filtering categories:
Expand the high-level categories by clicking the bracket > icon.
Select the checkboxes for the desired action.
Click the Actions drop-down list and select the desired action.
Click the Apply button.
After you have selected all the desired actions, make sure you click the Save and Deploy button for the group.
Categories and Subcategories
There are two main content categories:
The Security/Risk content category includes the following subcategories: Anonymizers, Botnets, Cryptocurrency Mining, Hacking, Illegal Software, Malware, Phishing, Spam, Suspected Domain, Jailbreak/Rooting Tools, Third-Party App Stores
The Adult Content content category includes the following subcategories: Mature Content, Nudity, Pornography, Sex Education, Swimsuits and Intimate Apparel, Tasteless
About the dynamic nature of categories
The category data is dynamically managed and can change instead of being static for each release. Therefore, this subcategory list can change before a release is published.
About custom categorization lists
An administrator can set up a custom category list and they are also called Access Control Lists. This list allows an administrator to override the categorization defaults and actions for a category. An administrator can also add more websites to the list and assign a category and define the desired actions. One or more groups can reference a custom categorization list.
Managing an Access Control list
To manage these lists, click on the Manage page and then the Access Control tab. On this tab, you can:
Provide a URL and check its categorization.
See which groups are using a custom categorization list.
Download a sample CSV file to import a custom categorization list.
Import or Export a custom categorization list in a CSV file format.
Navigate to the Phishing and Content Filter Policy settings.
Create, rename, modify or delete a custom categorization list.
Note
The file size maximum for the CSV file is 1 MB or 1000 entries. The maximum number of characters to describe a domain or URL is 256. If you get errors in your import request, download a sample CSV file.
To describe a site, you can enter a complete URL or a domain name. You cannot use wildcards or special characters in the site URL or domain value. If you do use wildcards or special characters, the value is ignored.
To detect any sites using HTTPS/TLS, the site must only contain the domain name. A site complete URL is only applicable for HTTPS/non-TLS sites.
On the right-hand side of the page, under the Site Category Checker box, you can type in a URL or domain name and click the Check button. The display updates and shows the category for that site. It also shows the other lists that the URL is referenced. The Groups Using this List section displays the groups that reference this list. The link Go to Phishing Protection and Content Filtering Feature takes you back to the Policy page and the Phishing & Content Filter tab to manage the group details.
You can only delete an Access Control List when it is no longer referenced by any groups. The Groups Using this List section displays the groups that reference this list. The list must be disassociated from all groups before a delete is allowed.
Threat Generation with Content Filtering
Whenever an Alert & Create Threat or a Block & Create Threat action is selected for the category, threats are generated on the Threat Log page
Whenever an Alert & Create Threat or a Block& Create Threat action is selected for the category, threats are generated on the Threat Log page.
Risky Site - Link Tapped
Risky Site - Link Visited
Note
The existence of the link in a risky site detection is dependent upon the privacy policy settings.
Risky Site Blocked
If other categories other than the Security/Risk group are set, then these threats are generated:
Site Warning - Link Tapped
Site Warning - Link Visited
Site Blocked
Copying category settings from a group
You can copy the categorization's action settings from a different group to the current group if another group exists. If the "Default Group" is the only group available, then this feature is disabled.
Disabling Phishing Protection
To disable phishing protection and content filtering, click the Policy navigation menu item. Then on the Phishing & Content Policies tab, select the Disabled radio button. With this disabled, the phishing protection feature is no longer enabled on the devices in that group.
Handling a Server Verification incomplete message on the device
If a device user gets the notification of a "Server verification incomplete" message, you must ensure the corresponding threats for phishing protection are enabled. For devices with phishing protection enabled, these threats must be enabled in the threat policy:
Risky Site - Link Tapped
Risky Site - Link Visited
Risky Site - Blocked
Site Blocked
Site Blocked - Link Tapped
Site Blocked - Link Visited
Samsung Knox GravityZone MTD policy
The Samsung Knox Platform for Enterprise (KPE) is a mobile solution designed for IT administrators to effectively manage and enhance the security of Samsung Android phones, tablets, and Tizen watches in a business environment.
Integration with Samsung Knox combines Knox Platform for Enterprise (KPE) hardware-based capabilities with machine learning detection to provide users with the most advanced protection available.
Mobile Security, which integrates with Samsung Knox, utilizes the Samsung KPE for MTD API to offer advanced detections, improved group-based remediations, and comprehensive forensic information.
The GravityZone MTD utilizes the KPE for MTD API on Knox-capable devices to enable more advanced detections compared to other platforms. By utilizing the specific data from Samsung KPE for MTD, the app in conjunction with Samsung Knox is able to detect further abnormalities in the system, such as attempts to gain elevated privileges and suspicious network connections initiated by applications or processes.
Setting up the Knox KPE license on Mobile Security console
The administrator can manually input the Samsung Knox KPE license. There is one license for a tenant that you can set by following these steps:
From the navigation pane in Mobile Security console, click Manage, and then click the General tab.
Under the Samsung Knox KPE License section, enter the License Key field with the complete license key.
Click the Save button.
Defining policies for Samsung Knox devices
To set the policies for the Samsung Knox devices, click the Policy navigation menu and then the Samsung Knox Policy tab.
The top section of the Samsung Knox Policy tab shows:
Selected Group: To select the group, click in the box, and a drop-down menu opens to allow the selection of the desired group.
Deploy: This button is used after all the fields are selected in order to implement the Knox Policy on the devices.
In the bottom section of the Samsung Knox Policy tab, you can select these items:
Enable Knox – In order to enable the mobile devices in this group, this box must be checked to ensure that advanced detection, forensics, and remediation capabilities are activated for this device with the advanced Samsung Knox features.
Data Loss Prevention - The administrator can use this section to set a policy for restricting access to the mobile device or removing sensitive data if a threat is detected. The administrator chooses from action categories for device compromise response.
Bluetooth: Selecting the Bluetooth checkbox disables all Bluetooth connections until the remediation action occurs, and the device is deemed safe.
Wi-Fi: Selecting the Wi-Fi checkbox disconnects the Wi-Fi connection until the remediation action occurs, and the device is deemed safe.
Cellular: Selecting the Cellular checkbox disconnects all Cellular connections from the phone, including voice and SMS texting capabilities.
NFC: Selecting the Near Field Communication (NFC) checkbox disables the short-range high-frequency wireless communications. Selecting NFC disables the exchange of data (such as pictures, contacts, or other small bits of data) between the phone and another device that is within a 1.5 inch to 4 inch range (4 to 10 cm).
Beam: Selecting the Beam checkbox disables the ability to seamlessly share large data (such as larger files, movies, etc.) over the Wi-Fi connection to another NFC-compatible device.
Restrict Bluetooth Sharing: Selecting this checkbox disables the ability for apps on the phone to share data through the Bluetooth function to the other devices – even when the app is not being used. This Bluetooth Sharing app allows retailers, restaurants, and many other vendors to gather information from the phone regarding their service or product.
Restrict Clipboard: Selecting this checkbox disables the ability to make a copy of what is on the screen on the phone by tapping the clipboard icon next to the field that needs to be copied.
Restrict SD Card Transfer: Selecting this checkbox disables the ability to transfer data that is in memory on the phone to an SD card.
Screen Capture: Selecting this checkbox prevents the ability to perform a screen capture on the device.
Wipe Device Data: Selecting this checkbox deletes all the data on the SD card and erases all the app data.
Once the desired actions are selected, click the Deploy button to implement the selected items to all the Samsung Knox devices.
Data loss prevention
When the threat is identified, there are several actions that can be taken on the device and are set up in the Policies. Follow these steps to select data loss prevention in the policies:
Note
The KPE license is only necessary for data loss prevention actions.
Additional Samsung KNOX features, such as App blocking, are accessible through the Mobile Security license, provided that they are compatible with the safeguarded device.
In the Mobile Security console navigation menu, click Policy and the Threat Policy tab.
Locate the desired threat and click the gear icon in the Device Action column and a Device Action box opens.
In the Device Action box, click the checkbox under Samsung Knox next to Data Loss Prevention.
Click the OK button to apply the changes to the Samsung Knox devices.
When the box closes, click the Save and Deploy button at the top right to actually deploy the Data Loss Prevention action to the devices with the selected Policy.
A message appears at the top of the window indicating that the Policy is identified for deployment.
Note
The specific Data Loss Prevention actions to take for enabled threats must be defined in the Samsung Knox Policy tab.
Monitoring the Samsung Knox devices
To get the status of the Samsung devices included in the Devices window, perform these steps:
In the Mobile Security console, from the navigation pane, click Devices.
In the upper right corner of this window, click the gear icon.
To add the Samsung Knox device info, click the Knox checkbox and click Apply.
A new Knox column is added.
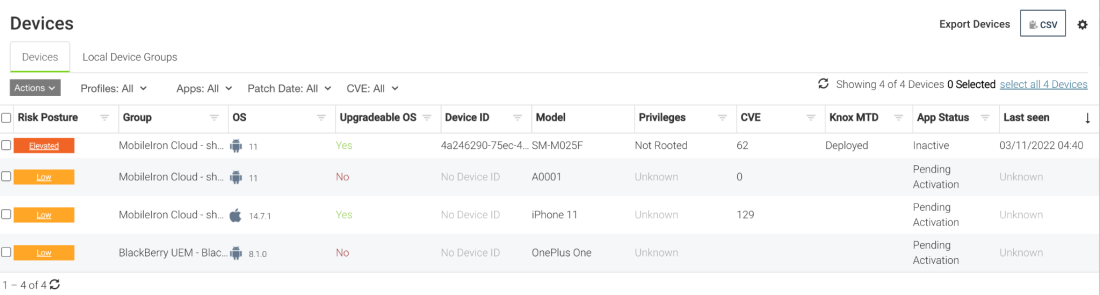
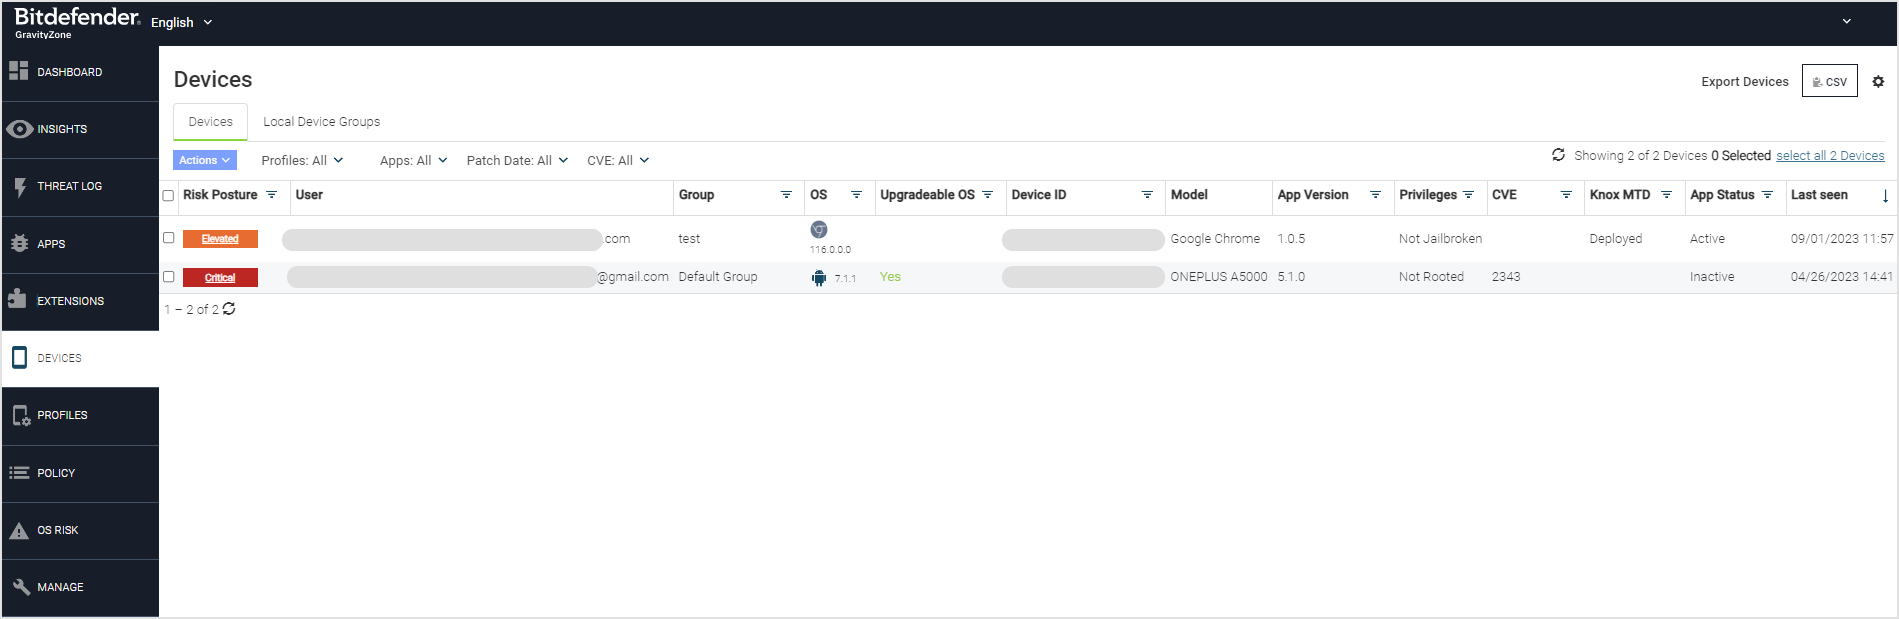
This window shows the following information for each of the individual devices.
Risk Posture: This identifies the risk posture if the phone is compromised and if it is Low, Elevated, or Critical, or if the phone is in a Normal state. Selecting the drop-down arrow allows the Admin to get only the devices listed of the selected (Critical, Elevated, Low, or Normal) risk level.
App Version: This column shows the version of the app.
User: This identifies the user of the device. By clicking on the drop-down arrow, a search can be performed for a specific user.
Group: This shows the Group to which the device is assigned. By clicking on the drop-down arrow, a search can be performed for a specific group, so that all devices in that group are displayed
OS: This determines if the device is an iOS or Android device, and the release of software on the device. By clicking on the drop-down arrow, the Admin can select to see only the iOS devices or the Android devices, and also select the specific version of the devices to display.
Upgradeable OS: This shows if the device is upgradeable to the newest release of software or not. By clicking on the drop-down arrow, the Admin can choose to see only the devices that are upgradeable or only the devices that are not upgradeable.
Device ID: This shows the device ID. Clicking on the drop-down arrow allows the Admin to search for a specific device ID.
Model: This column shows the actual model type of the Samsung device.
App Version: This column shows the version of the app.
Privilege: The Privilege column allows the Admin to select the devices listed by Privilege, including the following:
Jailbroken/Rooted: This status indicates that the device is jailbroken (for iOS) or rooted (for Android). Jailbroken means the iPhone has had privilege escalations applied for the purpose of removing software restrictions imposed by Apple on iOS devices. Rooted means that privileges are modified on the device so that root access to the operating system has the device potentially compromised.
USB Debugging: This status indicates that the device is currently in a restoring or repairing status.
3rd Party App Store: This status indicates that the specified app was downloaded from a 3rd Party app Store rather than the acceptable Apple Play or Google Play Store.'
High-Risk Devices: This status indicates that the device is identified as a “High Risk” device and may be the target of a surveillance company and may or may not be currently targeted.
Not Jailbroken: This status indicates that the device is not jailbroken.
Developer Mode: This status indicates the app is whitelisted by a developer.
CVE: This provides the Common Vulnerabilities and Exposure (CVE) that applies to the Risk Posture shown on the device (if a CVE has been logged).
Knox : This identifies if the Samsung Knox device is activated with advanced Knox security protection. Clicking on the drop-down arrow allows the Admin to select “Activated” or “Deployed” devices to be shown in the list.
Operational: This column specifies if the device is “Active”, “Inactive”, or “Pending Activation”. Clicking on the drop-down arrow allows the Admin to select which status of devices to be shown in the list.
Last Seen: This column shows the date and time that the specified alert was seen on the devices.
Privacy notice and Data loss prevention
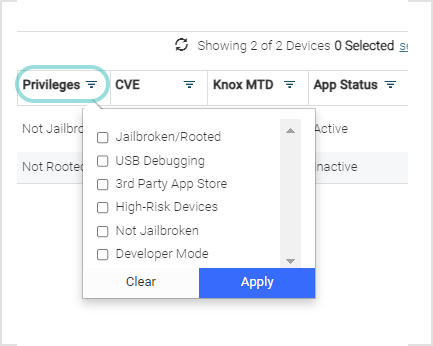
On the Samsung Knox devices having Advanced Support enabled, the following figures show the screens that come up on the device regarding the license agreement including Privacy Notices and Data Loss Prevention.
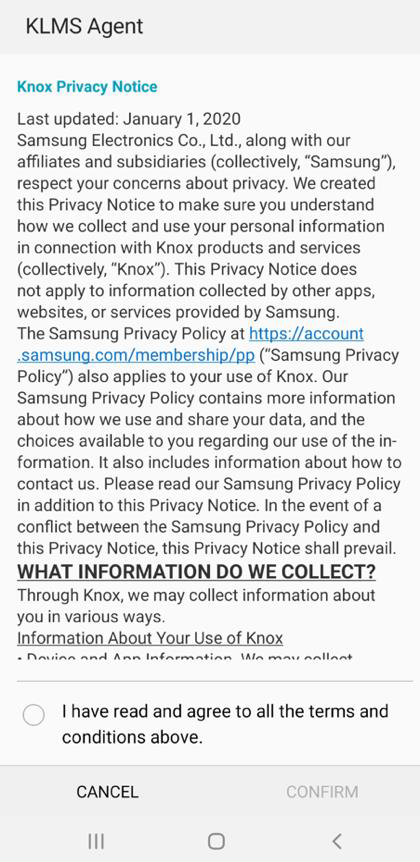
The user has to accept and agree to the terms and conditions for the device to be activated with the Advanced Knox Mobile Security features. The screen below shows the Data Loss Prevention activities that are activated on the mobile device if it is found to be compromised:
The Data Loss Prevention features on Samsung Knox devices with Advanced Support enabled are displayed in the Advanced Details window. This window identifies the disabled or restricted features, which include:
Disable NFC Interface - the short-range high-frequency wireless communications are disabled.
Restrict Bluetooth Sharing - the ability for apps on the phone to share data through the Bluetooth function to the other devices. All sharing through the Bluetooth device is restricted until remediation occurs.
Disable Bluetooth Interface - all Bluetooth connections are disabled until the remediation action occurs, and the device is deemed safe.
Disable Beam Interface - the ability to seamlessly share large data over the Wi-Fi connection to another NFC-compatible device is prohibited until remediation occurs.
Restrict Capture - the ability to perform a screen capture on the device is disabled until remediation occurs.
Threat policy
The threat policy actions can be defined for the default group or for groups that the user defines. This information is displayed by selecting the Policy page and then the Threat Policy tab.
The Threat policy has the following options:
Enable or disable detection of a specific threat classification.
Determine whether the user wants to alert the user or not.
Specify the text of the alert.
Specify the protection actions to take (either locally at the device or MDM-related). If an email is sent, is SMS text also, or both sent to the logged-in administrator.
Click Deploy to send the new threat policy to the currently activated devices. When integrated with an MDM or local device groups, each group is created as a Mobile Security console group with its own threat policy. The user selects which group to modify in the Selected Group drop-down list.
Enabling threats
The administrator has the option of enabling and disabling certain threat detections. To disable event severities, click the Save & Deploy button. The Threat Policy tab displays a description of the threat and MITRE tactics for each threat. Clicking on the MITRE tactic in the information box will display tactics that a potential adversary may employ.
Copying a threat policy
Copying a threat policy to destination groups within a tenant overwrites them with its properties.
Threat Enablement
Severity
User Alert Setting
Device Action
MDM Action*
Mitigation Action*
Notification Settings with Email or SMS
Note
* The MDM Action and Mitigation Action values are only copied to destination groups that match the MDM instance of the source group.
In specifying the destination groups, you can:
Search for a group name
Select more than one destination group
Click the Copy & Deploy button after you select the destination groups and confirm the copy operation.
Note
Note: If you made any changes, make sure you click the Save and Deploy button on your source group, which is shown in the Selected Group field.
Default threat policies
There are two types of default policies for threats:
New tenant default policy
The default policy type for new threats in Mobile Security console is to disable them, allowing administrators to enable them when needed.
The initial default threat policy
The initial default threat policy is the policy initialized on the device when the app is installed. This policy includes critical threats such as malware and phishing. The user's own policy is then downloaded shortly after activation.
The critical threats included in this policy are:
Device Jailbreaking/ Rooting
Elevation of Privileges (EOP)
MITM - ICMP Redirect
MITM - ARP
System Tampering
Rogue Access Point
MITM
About severity
The administrator has the option of changing the threat severity levels. This is useful for different business cases. The options are:
Critical
Elevated
Low
Normal
Setting a Secure VPN Tunnel for unsecured traffic
A policy can be set to automatically start a secured VPN tunnel for iOS and Android users accessing an unsecured communications link. This is done by following the steps in the Policy page.
In the navigation pane, click Policy
Click the Threat Policy tab.
Locate the desired device, and click the gear icon in the Device Action column
Click the Tunnel Unsecured Traffic checkbox under Android or iOS.
Click OK.
User alerts
User alerts can be enabled or disabled for all event severities by clicking the radio button enabled or disabled in the Set User Alert column. The administrator can choose the languages and text to use to alert the user.
Protection actions
The protection actions are applied on the device or via MDM integration.
Device action
The device actions do not require integration with an MDM (with the exception of the iOS Disconnect Wi-Fi action).
To set the Device Action, select Policy in the navigation pane, and select the Threat Policy tab.
Locate the desired threat, and click the gear icon in the Device Action column.
Click the checkbox for the desired device action and click OK. The figure shows the actions provided for Android, iOS, Samsung Knox, and Browser Extension devices.
The following sections describe the different actions for Android, iOS, and Knox.
Android
Disconnect Wi-Fi - Disable the Wi-Fi adaptor and fall back to cell data if enabled. The user can then enable the Wi-Fi adapter when they are safe.
Network Sinkhole - If Network Sinkhole Settings are configured in the Manage page, this option displays here. The action either blocks or allows defined network ranges/domains based on an IP network/mask and domains configured.
Disable Bluetooth - Disable the Bluetooth adaptor and disconnect any current Bluetooth connections.
Tunnel Unsecured Traffic - When this is selected, a secure VPN tunnel is automatically initiated to handle traffic across an unsecured connection.
iOS
Enable VPN - This is enabled when VPN Settings are configured in the Manage page. Choose this option to bring up the defined VPN in response to a threat.
Network Sinkhole - If Network Sinkhole Settings are configured in the Manage page, this option displays here. The action either blocks or allows defined network ranges/domains based on an IP network/mask and domains configured.
Disable Bluetooth - Disable the Bluetooth adapter and disconnect any current Bluetooth connections. This is supported only for GravityZone MTD for MDMs.
Tunnel Unsecured Traffic - When this is selected, a secure VPN tunnel is automatically initiated to handle traffic across an unsecured connection.
Disconnect Wi-Fi (Optional) - A Disconnect Wi-Fi option for iOS is displayed for certain MDMs. When selected, a Wi-Fi profile is pushed down to the device through the MDM that effectively disconnects from the currently connected SSID. The Wi-Fi on the device then falls over to the next available SSID or cell data if no SSIDs are available.
Samsung Knox
Use Android Actions - This works in conjunction with the Knox action settings.
Disable/Uninstall/Block App -These remove or disable the app from running on the device.
Note
Inbuilt apps like Chrome cannot be uninstalled.
Isolate from Network - This disables any network communications from apps that are malicious but not yet uninstalled.
Network Sinkhole -If Network Sinkhole Settings are configured in the Manage page, this option is available. The action either blocks or allows defined network ranges/domains based on an IP network/mask and domains configured.
Data Loss Prevention - For the data loss prevention options on the Samsung Knox Advanced, click Policy in the navigation pane, then select the Samsung Knox MTD Policy tab. Find an Android device and click the gear icon on that line. This pop-up window opens to allow selection of the actions to be taken for data loss prevention on the Samsung Knox devices. Click the Data Loss Prevention checkbox.
Browser Extension:
Disable Extension - This disables the extension that is linked with the threat.
Uninstall Extension - This uninstalls the extension that is linked with the threat.
MDM action
To enable an MDM action item, on the same row as the threat to be configured, pull down the list under the MDM Action column and choose the group to be applied to the device when this particular threat is detected.
Mobile Security console securely communicates with the MDM API and makes the assignment as defined in the selection. To remove an MDM action from occurring for a threat classification, change the threat MDM Action to 'No Action'.
Note
The Disconnect Wi-Fi action as an MDM action is supported for iOS devices only. For Android devices, this action currently needs to be performed as a 'Device Action' request.
Mitigation action
When a threat is remediated, and is no longer posing a threat to the device, the administrator can define specific actions that can be taken on the customer's MDM. For example, when a device is detected to be under an ARP MITM attack, it can be prevented fromaccessing various corporate resources. When the device is moved to a clean network, the administrator can automatically allow the device to access those resources again. The Mitigation Action column is used for this function. To remove the action that was performed as a response to a threat that is now mitigated, choose 'Remove'. The Administrator also has the option to move the device to another group available on the MDM. Due to the nature of some threats, not all threat classifications can be mitigated.