Install security agents - standard procedure
To protect your physical and virtual endpoints, you must install a security agent on each of them. Aside for managing protection on the local endpoint, the security agent also communicates with Control Center to receive the administrator's commands and to send the results of its actions.
To learn about the available security agents, refer to Security agents.
On Windows and Linux machines, the security agent can have two roles and you can install it the following way:
As a simple security agent for your endpoints.
As a Relay, acting as a security agent and also as a communication, proxy and update server for other endpoints in the network.
Warning
The first endpoint on which you install protection must have the Relay role, otherwise you cannot remotely install the security agent on other endpoints in the same network.
The Relay endpoint must be powered-on and online for the connected agents to communicate with the Control Center.
On macOS machines, the security agent cannot act as a Relay.
You can install the security agents on physical and virtual endpoints by running installation packages locally or by running installation tasks remotely from Control Center.
It is very important to carefully read and follow the instructions to prepare for installation.
In normal mode, the security agents have a minimal user interface. It only allows users to check protection status and run basic security tasks (updates and scans), without providing access to settings.
If enabled by the network administrator via installation package and security policy, the security agent can also run in Power User mode on Windows endpoints, letting the endpoint user view and modify policy settings. Nevertheless, the Control Center administrator can always control which policy settings apply, overriding the Power User mode.
By default, the display language of the user interface on protected Windows endpoints is set at installation time based on the language of your GravityZone account.
On Mac, the display language of the user interface is set at installation time based on the language of the endpoint operating system. On Linux, the security agent does not have a localized user interface.
To install the user interface in another language on certain Windows endpoints, you can create an installation package and set the preferred language in its configuration options. This option is not available for Mac and Linux endpoints. For more information on creating installation packages, refer to Create installation packages.
Prepare for the installation
Before installation, follow these preparatory steps to make sure it goes smoothly:
Make sure the target endpoints meet the Endpoint protection minimum system requirements.
For some endpoints, you may need to install the latest operating system service pack available or free up disk space.
Compile a list of endpoints that do not meet the necessary requirements so that you can exclude them from management.
Uninstall (not just disable) any existing antimalware or Internet security software from target endpoints.
Running the security agent simultaneously with other security software on an endpoint may affect their operation and cause major problems with the system.
Many of the incompatible security programs are automatically detected and removed during installation.
Note
Windows security features (Windows Defender, Windows Firewall) are automatically turned off before initializing the agent installation.
After the security agent installation, Windows Defender is automatically re-enabled if enforcement methods are in place (for example, GPO), or you can enable it through the available Windows controls. Once enabled, the security agent no longer manages the Windows Defender activation due to the lack of Windows Action Center.
This behavior may occur on the following servers: Windows Server 2016, Windows Server 2019, Windows Server 2022, and Windows Server 2025.
On Windows 10 and 11 systems the feature is dynamically controlled by Windows through the Action Center.
To learn more and to check the list of the security software detected by Bitdefender Endpoint Security Tools, refer to Software incompatible with Bitdefender Endpoint Security Tools.
Important
If you want to deploy the security agent on an endpoint with Bitdefender Antivirus for Mac 5.X, you first must remove the latter manually. For the guiding steps, refer to Deploying Bitdefender Endpoint Security Tools on a machine with Bitdefender Antivirus for Mac.
The installation requires administrative privileges and internet access. If the target endpoints are in an Active Directory domain, you should use domain administrator credentials for remote installation. Otherwise, make sure you have the necessary credentials at hand for all endpoints.
Endpoints must have connectivity to Control Center.
It is recommended to use a static IP address for the Relay server. If you do not set a static IP, use the machine's hostname.
When deploying the agent through a Linux Relay, the following additional conditions must be met:
The Relay endpoint must have installed the Samba package (
smbclient) version 4.1.0 or above and thenetbinary/command to deploy Windows agents.Note
The
netbinary/command is usually delivered with the samba-client and / or samba-common packages. On some Linux distributions (such as CentOS 7.4), thenetcommand is only being installed when installing the full Samba suite (Common + Client + Server). Make sure that your Relay endpoint has thenetcommand available.Target Windows endpoints must have Administrative Share and Network Share enabled.
Target Linux and Mac endpoints must have SSH enabled and the connection must be set up by using a username and password.
On macOS, after installing Bitdefender Endpoint Security Tools manually or remotely, users are prompted to approve Bitdefender extensions on their endpoints. Until the users approve the Bitdefender extensions, some features will not work. For the necessary procedures, refer to Bitdefender system extension blocked in macOS.
With macOS Big Sur (version 11), BEST requires additional user approvals following the changes made by Apple to the operating system. For details, refer to Changes to Endpoint Security for Mac in macOS Big Sur and later: network extension, proxy configurations and SSL certificate.
To eliminate user intervention, you can pre-approve the Bitdefender extensions by whitelisting them using a Mobile Device Management tool like Jamf. For details, refer to Whitelisting Bitdefender extensions in Jamf Pro 10.x.
Local installation
One way to install the security agent on an endpoint is to locally run an installation package.
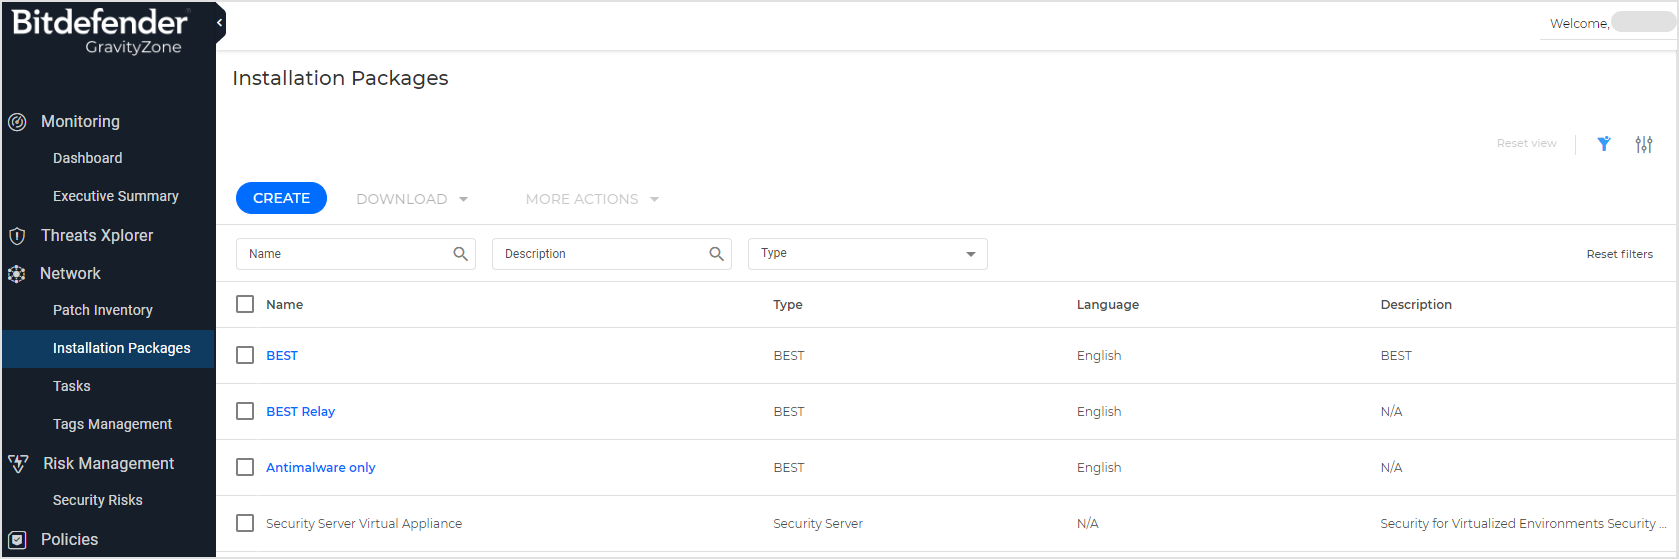
You can create and manage installation packages on the Network > Installation packages page.
Warning
The first machine on which you install protection must have a Relay role, otherwise you cannot remotely deploy the security agent on other unmanaged endpoints in the network.
The relay machine must be powered-on and online in order for the clients to communicate with Control Center.
Once the first client has been installed, it is going to be used to detect other endpoints in the same network, based on the network discovery mechanism. For detailed information on network discovery, refer to How network discovery works.
To locally install the security agent on an endpoint, follow these steps:
Create an installation package according to your needs.
Note
This step is not mandatory if an installation package has already been created for the network under your account.
Download the installation package on the target endpoint.
You can alternately send the installation package download links by email to several users in your network.
Run the installation package on the target endpoint.
Create installation packages
To create an installation package:
Connect and log in to Control Center.
Go to the Network > Installation Packages page from the left side menu.
Click the Create button at the upper side of the table. A configuration window is going to be displayed.

Enter a suggestive name and description for the installation package you want to create.
From the Language field, select the desired language for the client's interface.
Note
This option is available only for Windows operating systems.
Select the operation mode. This will impact the behavior of the security agents installed through the package deployment on your endpoints.
Note
This step is required only for licenses that include the EDR module.
Detection and prevention - This operation mode allows you to customize what modules to include in the package, and sets the prevention and detection modules to enable and make use of both block and report capabilities.
EDR (Report only) - This operation mode pre-configures your package structure to include a specific set of modules, and sets the prevention and detection modules to enable and make use only of report capabilities.
Note
The modules included in an EDR (Report only) package are Advanced Threat Control, EDR Sensor, Network Protection with Content Control and Network Attack Defense.
EDR (Report only) is supported only on Windows endpoints.
Select the protection modules you want to install.
Note
Only the supported modules for each operating system will be installed. On the right side of each module you will find icons indicating what operating systems the module is compatible with.
For more information, refer to Bitdefender Endpoint Security Tools.
Select the target endpoint role:
Relay, to create the package for an endpoint with Relay role.
For more information, refer to the Relay section related to Bitdefender Endpoint Security Tools.
Warning
Relay role is only available for Windows and Linux operating systems, and is not supported on legacy operating systems.
For more information, refer to Supported Operating Systems.
Patch Management Cache Server, to make the Relay an internal server for distributing software patches.
Note
This role is displayed only when Relay role is selected. For more information, refer to the Patch Caching Server section related to Bitdefender Endpoint Security Tools.
Exchange Protection, to install the protection modules for Microsoft Exchange Servers, including antimalware, antispam, content and attachment filtering for the Exchange email traffic and on-demand antimalware scanning of the Exchange databases.
For more information, refer to Installing Exchange Protection.
Remove Competitors. It is recommended to keep this check box selected to automatically remove any incompatible security software while the Bitdefender agent installs on endpoint. By deselecting this option, Bitdefender agent will install next to the existing security solution. You can manually remove the previously installed security solution later, at your own risk.
Important
Running the Bitdefender agent simultaneously with other security software on an endpoint may affect their operation and cause major problems with the system.
Scan Mode. Choose the scanning technology that best suits your network environment and your endpoints' resources. You can define the scan mode by choosing one of the following types:
Available scan modes:
Local Scan
Hybrid Scan with Light Engines (Public Cloud)
Hybrid Scan
Central Scan in Public or Private Cloud
Central Scan (Public or Private Cloud scanning with Security Server) with fallback on Local Scan (Full Engines)
Central Scan (Public or Private Cloud scanning with Security Server) with fallback on Hybrid Scan (Public Cloud with Light Engines)
Hybrid Scan with fallback on Central Scan
For more information on scan modes refer to Antimalware
Available scan types:
Automatic. In this case, the security agent will automatically detect the endpoint's configuration and will adapt the scanning technology accordingly:
Central Scan in Public or Private Cloud (with Security Server) with fallback on Hybrid Scan (Light Engines), for physical endpoints with low hardware performance and for virtual machines. This case requires at least one Security Server deployed in the network.
Local Scan (with Full Engines) for physical endpoints with high hardware performance.
Central Scan with fallback on Hybrid Scan for virtual machines
Note
For Central Scan, it is mandatory to firstly deploy a Security Server. For more information on how to install a Security Server, refer to Security Server.
Low performance endpoints are considered to have the CPU frequency less than 1.5 GHz, or RAM memory less than 1 GB.
Custom. In this case, you can configure the scan mode by choosing between several scanning technologies for physical and virtual machines:
Central Scan in Public or Private Cloud (with Security Server), which can fallback* on Local Scan (with Full Engines) or on Hybrid Scan (with Light Engines)
Hybrid Scan (with Light Engines)
Local Scan (with Full Engines)
Default scan modes:
The default scan mode for EC2 instances is Local Scan (security content is stored on the installed security agent, and the scan is run locally on the machine). If you want to scan your EC2 instances with a Security Server, you need to configure the security agent’s installation package and the applied policy accordingly.
Note
In this case, the Bitdefender Security Server hosted in the AWS region corresponding to the target EC2 instances is automatically assigned.
The default scan mode for Microsoft Azure virtual machines is Local Scan (security content is stored on the installed security agent, and the scan is run locally on the machine). If you want to scan your Microsoft Azure virtual machines with a Security Server, you need to configure the security agent’s installation package and the applied policy accordingly.
The default scan mode for BEST for Linux v7 when using the Bitdefender for Security Containers add-on is:
Hybrid Scan, for physical endpoints (including container hosts) and nodes (in case of Kubernetes).
Central Scan with the fallback on Hybrid Scan for endpoints (including container hosts) and nodes (in case of Kubernetes) that are either virtual machines or on a cloud infrastructure (whether IaaS or PaaS) supported by GravityZone integrations.
Note
A Security Server needs to be available for this scan to apply. If none is available the scan mode will be set to Hybrid.
For more information regarding available scanning technologies, refer to Antimalware.
Security Server Assignment.
When customizing the scan engines using Public or Private Cloud (Security Server) scanning, you are required to select the locally installed Security Servers you want to use and to configure their priority under Security Server Assignment section:
Click the Security Server list in the table header. The list of detected Security Servers is displayed.
Certain Bitdefender Partners can share their Security Servers with their customers. Here you can view the Security Servers your Bitdefender Partner has assigned to you, provided it has this ability.
Select an entity.
Click the
 Add button from the Actions column header.
The Security Server is added to the list.
In the Security Server Assignment section you can assign a specific name and IP address to the Security Server. After assigning the name click the
 to edit it.
Follow the same steps to add several security servers, if available. In this case, you can configure their priority using the
 up and
  down arrows available at the right side of each entity. When the first Security Server is unavailable, the next one will be used and so on.
To delete one entity from the list, click the corresponding
 Delete button at the upper side of the table.
You can choose to encrypt the connection to Security Server by selecting the Use SSL option.
For EC2 instances, the Bitdefender Security Server hosted in the corresponding AWS region is automatically assigned, so there is no need to configure the Security Server Assignment section.
On Windows endpoints, Bitdefender Endpoint Security Tools is installed in the default installation directory. Select Use custom installation path if you want to install Bitdefender Endpoint Security Tools in a different location. In this case, enter the desired path in the corresponding field. Use Windows conventions when entering the path (for example,
D:\folder). If the specified folder does not exist, it will be created during the installation.On Linux endpoints, Bitdefender Endpoint Security Tools is installed by default in the
/optfolder.We recommend setting up a password to prevent users from removing protection.
Select Set uninstall password and enter the desired password in the corresponding fields.
If the target endpoints are in Network Inventory under Custom Groups, you can choose to move them in a specified folder immediately after the security agent deployment finishes.
Select Use custom folder and choose a folder in the corresponding table.
Under Deployer section, choose the entity the endpoints will connect to for communication. The installation of the endpoint is made only through a relay. It's not necessary for the relay to be same as the one specified in the installation package.
In the Deployer section, in the Selected relay field, you can see the selected relay from the Relays table.
Bitdefender Cloud, if you want to update the clients directly from the Internet.
In this case, you can also define the proxy settings, if target endpoints connect to the Internet via proxy. Select Use proxy for communication and enter the required proxy settings in the fields below.
Endpoint Security Relay, if you want to connect the endpoints to a Relay client installed in your network. All machines with Relay role detected in your network are going to show-up in the table displayed below. Select the Relay machine that you want. Connected endpoints are going to communicate with Control Center only via the specified Relay.
Important
Port
7074must be open for the deployment through Bitdefender Endpoint Security Tools Relay to work.If you have a Relay with multiple network adapters, you can use it to deploy BEST to endpoints isolated from GravityZone. In this case, in the Custom server name/IP column, add the IP address that does not have connection to GravityZone.
For example, the Relay has two network adapters,
192.168.0.16and192.168.12.12. Only the first one communicates with GravityZone. After you add the second IP address as custom IP, the target endpoints will use the Relay as communication server to install the security agent.To add the desired IP address, follow these steps:
Click the three dots menu.
Click Edit custom server name/IP.
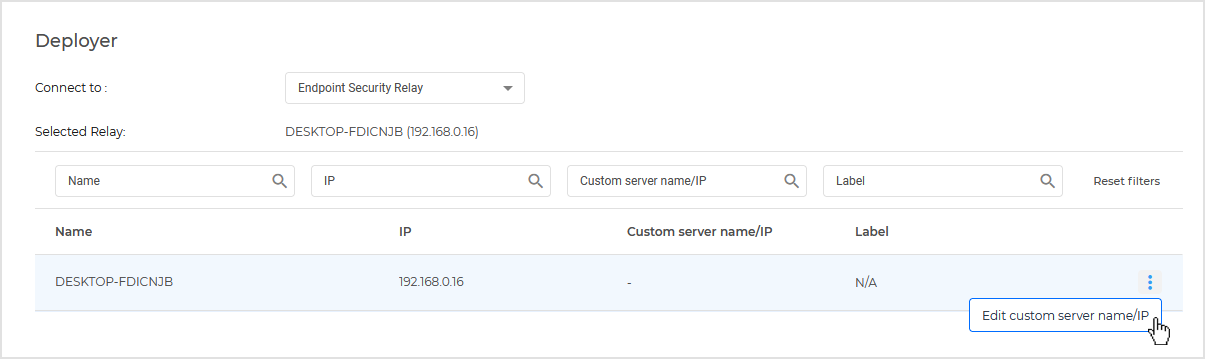
Enter the IP address in the editable field.
Click the
 OK icon to confirm the change.
Click Save.
The newly created package will be added to the list of packages.
Note
The settings configured within an installation package will apply to endpoints immediately after installation. As soon as a policy is applied to the client, the settings configured within the policy will be enforced, replacing certain installation package settings (such as communication servers or proxy settings).
Download installation packages
To download the installation packages of the security agents:
Log in to Control Center from the endpoint on which you want to install protection.
Go to the Network > Installation packages page in the left side menu.
Select the installation package you want to download.
Click Download at the upper side of the table and select from the drop down list the type of installer you want to use. These types of installation files are available:
Downloader. The downloader first downloads the full installation kit from the Bitdefender cloud servers and then starts the installation.
The downloader is small in size, and it can be run on 32-bit, 64-bit (Windows and Linux) systems, ARM64 systems (Windows only) or 64-bit macOS systems (both Intel x86 and Apple ARM architectures), which makes it easy to distribute. On the downside, it requires an active Internet connection.
Downloaders for staging rings. These downloaders are available by operating system for each of the Production ring, Test ring 1, and Test ring 2. For details about staging rings, refer to Update staging.
Full kit. The full installation kits are bigger in size and they have to be run on the specific operating system type.
The full kit is to be used to install protection on endpoints with slow or no Internet connection. Download this file to an Internet-connected endpoint, then distribute it to other endpoints using external storage media or a network share.
Note
Available full kit versions:
Windows OS: 32-bit, 64-bit and ARM systems
Linux OS: 32-bit and 64-bit systems
macOS: Intel x86, macOS Downloader and Apple M-series systems
Make sure to use the correct version for the system you install on.
You cannot download more than one installation kit per minute, therefore you must wait 60 seconds between each download attempt.
Save the file to the endpoint.
Warning
The downloader executable must not be renamed, otherwise, it will not be able to download the installation files from Bitdefender server.
Installation packages and links are private and uniquely generated for each company. Please do not distribute them.
Additionally, if you have chosen the Downloader, you can create an MSI package for Windows endpoints. For more information, refer to Install Bitdefender Endpoint Security Tools through an MSI package.
Send installation packages download links by email
You may need to quickly inform other users that an installation package is available to download. In this case, follow the steps described hereinafter:
Go to the Network > Installation packages page in the left side menu.
Select the installation package that you want.
Select the Send download links option. A configuration window will appear.
Enter the email of each user you want to receive the installation package download link. You can add multiple email addresses separated by comma. Press
Enteror click the Add button to create the list of the email addresses where the installation package will be sent .Note
Please make sure that each entered email address is valid and unique.
Select the preferred update ring: Slow ring, Production ring, Test ring 1, or Test ring 2.
For details about staging rings, refer to Update staging.
The installation links will also be visible in this window before sending them by email.
Click Send. An email containing the installation link is sent to each specified email address.
Run installation packages
For the installation to work, the installation package must be run using administrator privileges.
The package installs differently on each operating system as follows:
On Windows and macOS operating systems:
On the target endpoint, download the installation file from Control Center or copy it from a network share.
If you have downloaded the full kit, extract the files from the archive.
Run the executable file.
Follow the on-screen instructions.
Note
On macOS, the installation file is in DMG format. When opened, the file mounts two locations: one on the desktop and the other in Finder (in the left-side menu under Locations).
The security agent on macOS requires Full Disk Access permissions. You must approve them on the endpoint after the setup is complete, as the agent does not prompt for them during installation. For details, refer to Full Disk Access is not allowed for Bitdefender Endpoint Security Tools in macOS.
The security agent also requires you to approve Bitdefender system extensions on the endpoint. For details, refer to Bitdefender system extension blocked in macOS.
On Linux operating systems:
Connect and log in to Control Center.
Download or copy the installation file to the target endpoint.
If you have downloaded the full kit, extract the files from the archive.
Gain root privileges by running the
sudo sucommand.Change permissions to the installation file so that you can execute it:
#chmod +x installerRun the installation file:
#./installerTo check that the agent has been installed on the endpoint, run this command:
$systemctl status bdsec*
Once the security agent has been installed, the endpoint will show up as managed in Control Center (Network page) within a few minutes.
Important
If using VMware Horizon View Persona Management, it is recommended to configure Active Directory Group Policy to exclude the following Bitdefender processes (without the full path):
bdredline.exeepconsole.exeepintegrationservice.exeepprotectedservice.exeepsecurityservice.exeepupdateservice.exeepupdateserver.exe
These exclusions must apply to GravityZone as long as the security agent runs on endpoint. For details, refer to this VMware Horizon documentation page.
Watch a full video tutorial on the topic here:
Remote installation
Control Center allows you to remotely install the security agent on endpoints detected in the network by using installation tasks.
Once you have locally installed the first client with the Relay role, it may take a few minutes for the rest of the network endpoints to become visible in the Control Center. From this point, you can remotely install the security agent on endpoints under your management by using installation tasks from Control Center.
Bitdefender Endpoint Security Tools includes an automatic network discovery mechanism that allows detecting other endpoints in the same network. Detected endpoints are displayed as unmanaged in the Network page.
To enable network discovery, you must have Bitdefender Endpoint Security Tools already installed on at least one endpoint in the network. This endpoint is used to scan the network and install Bitdefender Endpoint Security Tools on unprotected endpoints.
For detailed information on network discovery, refer to How network discovery works.
Remote installation requirements
For remote installation to work:
Bitdefender Endpoint Security Tools Relay must be installed in your network.
On Windows:
The
admin$administrative share must be enabled. Configure each target workstation not to use advanced file sharing.Configure User Account Control (UAC) depending on the operating system running on the target endpoints. If the endpoints are in an Active Directory domain, you can use a group policy to configure User Account Control. For details, refer to Preparing workstations for Bitdefender Endpoint Security Tools remote deployment.
Disable Windows Firewall or configure it to allow traffic through File and Printer Sharing protocol.
Note
Remote deployment works only on modern operating systems, starting with Windows 7 / Windows Server 2008 R2, for which Bitdefender provides full support. For more information, refer to Supported operating systems.
On Linux: SSH must be enabled.
On macOS: remote login and file sharing must be enabled.
Run remote installation tasks
To run a remote installation task:
Log in to GravityZone Control Center.
Go to the Network page from the left side menu.
Select the desired group from the left-side pane.
The entities contained in the selected group are displayed in the right-side pane table.
Optionally, you can apply filters to display unmanaged endpoints only. In the upper-left corner, click View data recursively, then go to the Management status filter and select Unmanaged.
When working with EC2 instances, you can also select the Entity type filter with the EC2 instance option.
Select the entities (endpoints or groups of endpoints) on which you want to install protection.
Click the Actions button at the upper side of the table and choose Install agent.
The Install agent page is displayed.
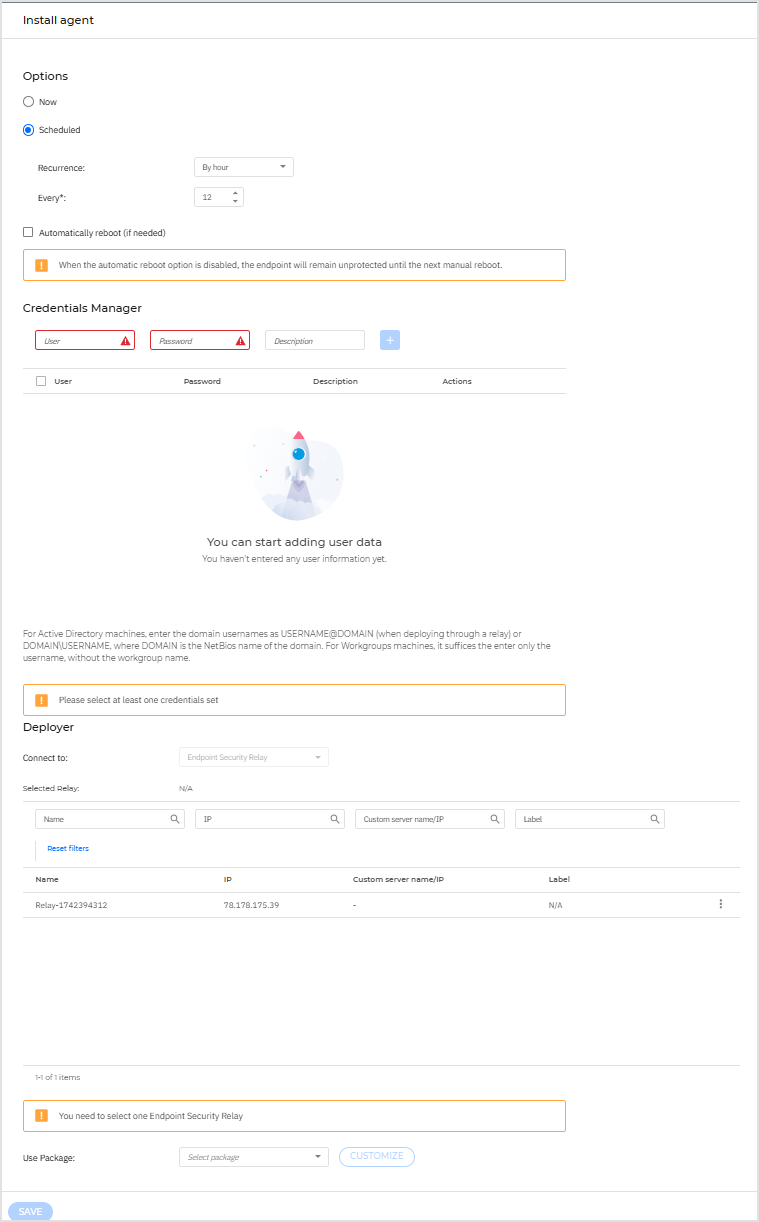
Under Options section, configure the installation time:
Now, to launch the deployment immediately.
Scheduled, to set up the deployment recurrence interval. In this case, select the time interval that you want (hourly, daily or weekly) and configure it according to your needs.
For example, when certain operations are required on the target machine before installing the client (such as uninstalling other software and restarting the OS), you can schedule the deployment task to run every 2 hours. The task will start on each target machine every 2 hours until the deployment is successful.
If you want target endpoints to automatically restart for completing the installation, select Automatically reboot (if needed).
Under the Credentials Manager section, specify the administrative credentials required for remote authentication on target endpoints. You can add the credentials by entering the user and password for each target operating system.
Important
For Windows 8.1 stations, you need to provide the credentials of the built-in administrator account or a domain administrator account.
To add the required OS credentials:
Enter the user name and password of an administrator account in the corresponding fields from the table header.
If computers are in a domain, it suffices to enter the credentials of the domain administrator.
Use Windows conventions when entering the name of a user account:
For Active Directory machines use these syntaxes:
username@domain.comanddomain\username. To make sure that entered credentials will work, add them in both forms (username@domain.comanddomain\username).For Workgroup machines, it suffices to enter only the user name, without the workgroup name.
Optionally, you can add a description that will help you identify each account more easily.
Enter the user name of an administrator account in the corresponding fields from the table header.
Use Windows conventions when entering the name of a domain user account, for example,
user@domain.comordomain\user. To make sure that entered credentials will work, add them in both forms (user@domain.comanddomain\user).Note
If computers are in a domain, it suffices to enter the credentials of the domain administrator.
Use Windows conventions when entering the name of a domain user account, for example,
user@domain.comordomain\user. To make sure that entered credentials will work, add them in both forms (user@domain.comanddomain\user).Select the authentication type from the menu:
Password, to use the administrator's password.
Upload .pem file, to use a private key.
If you authenticate using a password, enter the password in the field next to the menu.
If you authenticate using a private key, click the Browse button and select the
.pemfile containing the corresponding private key.Optionally, you can add a description that will help you identify each account more easily.
Click the
 Add button. The account is added to the list of credentials.
Specified credentials are automatically saved to your Credentials Manager so that you do not have to enter them the next time. To access the Credentials Manager, click the
 user icon in the upper-right corner of the console.
Important
If the provided credentials are invalid, the client deployment will fail on the corresponding endpoints. Make sure to update the entered OS credentials in the Credentials Manager when these are changed on the target endpoints.
Select the checkboxes corresponding to the accounts you want to use.
A warning message is displayed as long as you have not selected any credentials. This step is mandatory to remotely install the security agent on endpoints.
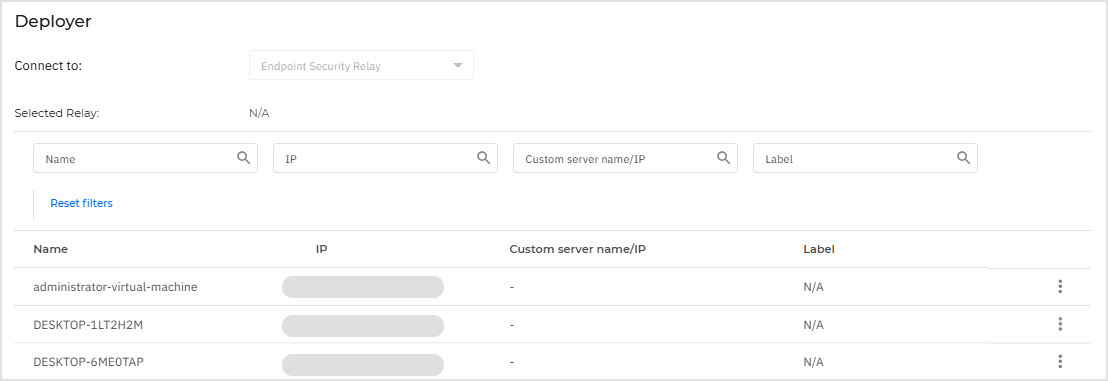
Under Deployer section, configure the Relay to which the target endpoints will connect for installing and updating the client:
All machines with Relay role detected in your network will show-up in the table available under the Deployer section. Each new client must be connected to at least one Relay client from the same network, that will serve as communication and update server. Select the Relay that you want to link with the target endpoints. Connected endpoints will communicate with Control Center only via the specified Relay.
Important
Port 7074 must be open, for the deployment through the Relay agent to work.
If target endpoints communicate with the Relay agent via proxy, you also need to define the proxy settings. In this case, select Use proxy for communication and enter the required proxy settings in the fields below.
You need to select one installation package for the current deployment. Click the Use package list and select the installation package that you want. You can find here all the installation packages previously created for your account and also the default installation package available with Control Center.
If needed, you can modify some of the selected installation package's settings by clicking the button Customize next to the Use package field.
The installation package's settings will appear below and you can make the changes that you need. To find out more about editing installation packages, refer to Create installation packages.
If you want to save the modifications as a new package, select the Save as package option placed at the bottom of the package settings list, and enter a name for the new installation package.
Click Save.
A confirmation message will appear.
You can view and manage the task in the Network > Tasks page.
If using VMware Horizon View Persona Management, it is recommended to configure Active Directory Group Policy to exclude the following Bitdefender processes (without the full path):
bdredline.exeepconsole.exeepintegrationservice.exeepprotectedservice.exeepsecurityservice.exeepupdateservice.exeepupdateserver.exe
These exclusions must apply as long as the security agent runs on endpoint. For details, refer to this VMware Horizon documentation page.
Prepare Linux systems for On-access scanning
Bitdefender Endpoint Security Tools for Linux includes on-access scanning capabilities that work with specific Linux distributions and kernel versions. For more information, refer to Linux system requirements.
Requirements for using on-access scanning with DazukoFS
For DazukoFS and on-access scanning to work together, a series of conditions must be met. Please check if any of the statements below apply to your Linux system and follow the guidelines to avoid issues.
The SELinux policy must be either disabled or set to permissive. To check and adjust the SELinux policy setting, edit the
/etc/selinux/configfile.Bitdefender Endpoint Security Tools is exclusively compatible with the DazukoFS version included in the installation package. If DazukoFS is already installed on the system, remove it prior to installing Bitdefender Endpoint Security Tools.
DazukoFS supports certain kernel versions. If the DazukoFS package shipped with Bitdefender Endpoint Security Tools is not compatible with the system's kernel version, the module will fail to load. In such case, you can either update the kernel to the supported version or recompile the DazukoFS module for your kernel version. You can find the DazukoFS package in the Bitdefender Endpoint Security Tools installation path:
/opt/bitdefender-security-tools/share/dazukofs-modules.tar.gz
When sharing files using dedicated servers such as NFS, UNFSv3 or Samba, you have to start the services in the following order:
Enable on-access scanning via policy from Control Center.
Start the network sharing service.
For NFS:
#service nfs startFor UNFSv3:
#service unfs3 startFor Samba:
#service smbd start
Important
For the NFS service, DazukoFS is compatible only with NFS User Server.
How network discovery works
Besides integration with Active Directory, GravityZone also includes an automatic network discovery mechanism intended to detect workgroup endpoints.
GravityZone relies on multiple network scanning techniques to perform network discovery. On Windows, systems information is gathered from multiple sources, such as Function Discovery, Active Directory (when the system is joined to a domain). Therefore, the list of systems identified and reported by network discovery can be different than the list of machines displayed under File Explorer > Network on the machine running network explorer.
On Linux, systems network discovery relies on the ARP protocol to discover entities in a Local Area Network and also on port scanning in order to reliably identify machines.
By contrast, macOS systems do no actively participate in network discovery, but they allow to be discovered.
To enable automatic network discovery, Bitdefender Endpoint Security Tools Relay should be already installed on at least one Windows or Linux endpoint in the network and it should have applied a policy with Automatic discovery of new endpoints checked. This endpoint will be used to scan the network.
Besides the automatic network discovery, there is also the possibility of running one time only network discovery by selecting any managed Windows or Linux endpoint and applying a Run network discovery task.
Important
On Linux systems that are domain-joined, Active Directory is not used as a source of information.
BEST Relay only queries the network to obtain the list of workstations and servers (known as the browse list), and then sends it to Control Center. Control Center processes the browse list, appending newly detected endpoints to its Unmanaged endpoints list.
Previously detected endpoints are not deleted after a new network discovery query, so you must manually exclude and delete endpoints that are no longer on the network.
Note
BEST Relay performs network discovery and communicates with Control Center via the epintegrationservice for Windows and the bdsec-epagng.service for Linux.
On macOS machines, the security agent cannot act as a Relay.
The initial query for the browse list is carried out by the first BEST Relay installed on the network.
If the Relay is installed on a workgroup endpoint, its workgroup is used as a source of information.
If the Relay is installed on a domain endpoint, its domain is used as a source of information. Only endpoints from that domain and the network the Relay belongs to will be visible in Control Center. Endpoints from other domains can be detected if there is a trust relationship with the domain where the Relay is installed.
Important
Network discovery uses all information sources that are present on an endpoint. For example, if a Windows endpoint has Function Discovery services running and it is domain-joined, network discovery pulls data from both sources.
Subsequent network discovery queries are performed regularly every 4 hours when Automatic discovery of new endpoints is checked in the applied policy. For each new query, Control Center divides the managed endpoints space into visibility areas and then designates one Relay in each area to perform the task.
A visibility area is a group of endpoints that detect each other. Usually, a visibility area is defined by a workgroup or domain, but this depends on the network topology and configuration. In some cases, a visibility area might consist of multiple domains and workgroups.
If a selected Relay fails to perform the query, Control Center waits for the next scheduled query, without choosing another Relay to try again.
For full network visibility, the Relay should be installed on at least one endpoint in each workgroup or domain in your network and it should have applied a policy with Automatic discovery of new endpoints checked. Ideally, Bitdefender Endpoint Security Tools should be installed on at least one endpoint in each subnetwork.
Network discovery will report IPv4 addresses of the discovered endpoints.
Network discovery requirements
To successfully discover all the endpoints (servers and workstations) that will be managed from Control Center, the network scanning techniques require the following settings and services:
Windows systems
Endpoint is joined in a workgroup or domain, connected via an IPv4 local network.
Media streaming is turned on.
Network discovery is enabled in the Control Panel > Network and Sharing Center > Change advanced sharing settings section.
The following services are running:
DNS Client
Function Discovery Provider Host
Function Discovery Resource Publication
SSDP Discovery
UPnP Device Host
For environments with multiple domains, a trust relationship between domains is set up and endpoints can access browse lists from other domains.
Linux systems
A Web Service Discovery host daemon implemented by a custom wsdd service is running (applies for Ubuntu OS).
Mac systems
File sharing is enabled.
Note
The best results are achieved, meaning the largest amount of endpoints are discovered, when all the above requirements are met.