Use cases
Integrating the AWS Marketplace Inventory with GravityZone Control Center
To use Bitdefender Security for AWS, you must subscribe to it in the AWS Marketplace. Afterwards you must integrate the GravityZone Control Center with your Amazon EC2 inventory by using cross-account access.
Subscribe to Bitdefender Security for AWS
Login to your AWS Marketplace account.
Access Bitdefender Security for Amazon Web Services page.
Click the Continue button on the right side of the page.
Read the subscription details and click Subscribe.
A message is going to inform that you are subscribed to Bitdefender Security for AWS.
Click Set Up Your Account. You are going to be redirected to a registration form hosted by Bitdefender. Follow these steps according to your customer status:
As new GravityZone customer:
Fill in the required information.
Click Finish purchase.
If the details you provided are valid, a customer company and a user account are going to be created for you in the GravityZone Control Center. You are going to receive your login details to the specified email address. At this moment, you can access GravityZone Control Center using the link provided in the email.
As existing GravityZone customer:
Click the link provided under the form’s title.
Enter your GravityZone credentials.
Click Find company and finish purchase.
If the login credentials are valid, a confirmation message is displayed. Access GravityZone Control Center using the provided link.
Note
For the registration to succeed, you must not have had an Amazon EC2 integration in the past.
For details about subscribing to Bitdefender Security for AWS, refer to Subscribe to Bitdefender Security for Amazon Web Services in AWS Marketplace.
Integrate GravityZone with Amazon Web Services
Log in to Control Center using your GravityZone credentials.
In the upper-right corner of the console, go to Integrations.
If you do not have an active integration, click Add > Add Amazon EC2 Integration. The Amazon EC2 Integration Settings window is going to be displayed.
Under Name, add the integration name.
Under External ID, click the Generate button.
Open a new tab in your browser and log in to the AWS console.
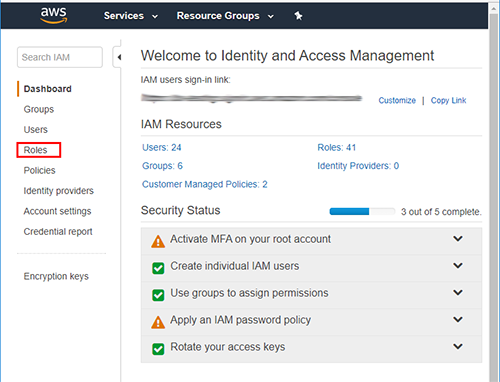
Click Services at the upper-side of the AWS console and select Security, Identity and Compliance > IAM.
In the left-side menu, click Roles. A new page is displayed.
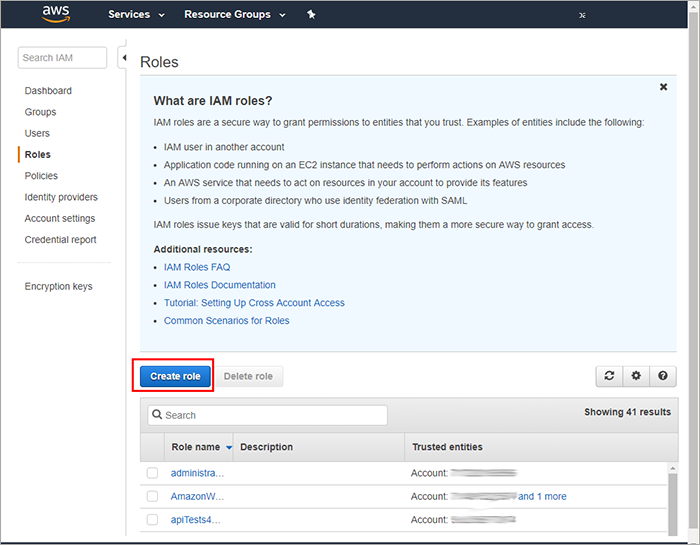
Click the Create role button.
Select Another AWS account.
Switch to the Control Center and copy the Account ID from the Amazon EC2 Integration Settings window.
Go back in AWS console and paste the string in the Account ID field.
Select Require external ID (Best practice when a third party will assume this role).
Switch to Control Center and copy the External ID from the Amazon EC2 Integration Settings window by either:
Selecting the string and use CTRL + C.
Clicking the Copy to clipboard icon at the end of the string.
In the AWS console, paste the string in the External ID field.
Click Next: Permissions.
Check the
AmazonEC2ReadOnlyAccesspermission and click Next: Review.In the new page, provide a name and a description in the required fields.
Click Create Role.
You are going to view the list of all existing roles. Wait for about 1 minute for the changes to propagate across all AWS regions.
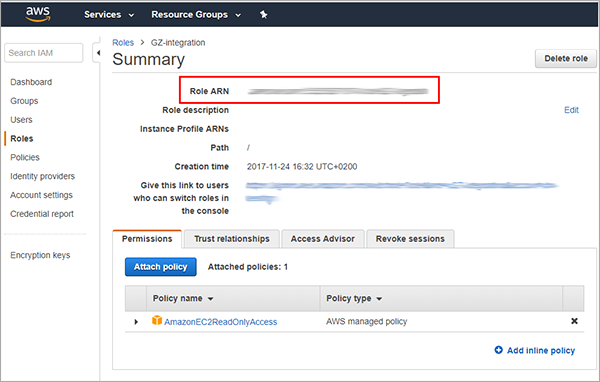
Click your role name to view the details.
Copy the ARN.
Switch to the Control Center tab and paste the ARN into the dedicated field.
Click Save.
GravityZone is going to import the Amazon EC2 instances in the Network page, where they are going to be visible by regions and availability zones.
For details about integrating GravityZone with the Amazon EC2 inventory, refer to Set up the GravityZone integration with Amazon EC2 using a cross-account role.
Set up Bitdefender Security for AWS from the AWS Marketplace
This section provides you with instructions on how to set up Bitdefender Security for AWS in your Amazon EC2 environment. It is useful to first get familiar with the Bitdefender Security for AWS components (described in Bitdefender Security for AWS compatibility and requirements).
Overview
Before you start, check the Bitdefender Security for AWS compatibility and requirements and make sure to have the required Amazon and GravityZone credentials at hand. You can find all necessary information in the Bitdefender Security for AWS compatibility and requirements page.
To set up Bitdefender Security for AWS on your Amazon EC2 instances follow these steps:
Subscribe to the service in AWS Marketplace.
Integrate GravityZone with Amazon EC2 inventories.
Install BEST on the instances you want to protect.
Subscribe to Bitdefender Security for AWS
Log in to your AWS Marketplace account.
Access the Bitdefender Security for Amazon Web Services page.
Click the Continue button on the right side of the page.
Read the subscription details and click Subscribe. A message will inform that you are subscribed to Bitdefender Security for AWS.
Click Set Up Your Account. You will be redirected to a registration form hosted by Bitdefender. Follow these steps according to your customer status:
As new GravityZone customer:
Fill in the required information.
Click Finish purchase.
If the provided details are valid, a customer company and a user account is going to be created for you in the GravityZone Control Center. You are going to receive your login details to the specified email address. At this moment, you can access GravityZone Control Center using the link provided in the email.
As existing GravityZone customer:
Click the link provided under the form’s title.
Enter your GravityZone credentials.
Click Find company and finish purchase.
If the login credentials are valid, a confirmation message is going to be displayed. Access GravityZone Control Center using the provided link.
Note
For the registration to succeed, you must not have had an Amazon EC2 integration in the past.
For details about subscribing to Bitdefender Security for AWS, refer to Subscribe to Bitdefender Security for Amazon Web Services in AWS Marketplace.
Integrate GravityZone with Amazon Web Services
Log in to Control Center using your GravityZone credentials.
In the upper-right corner of the console, go to Integrations.
If you do not have an active integration, click Add > Add Amazon EC2 Integration. The Amazon EC2 Integration Settings window is going to be displayed.
Under Name, add the integration name.
Under External ID, click the Generate button.
Open a new tab in your browser and log in to the AWS console.
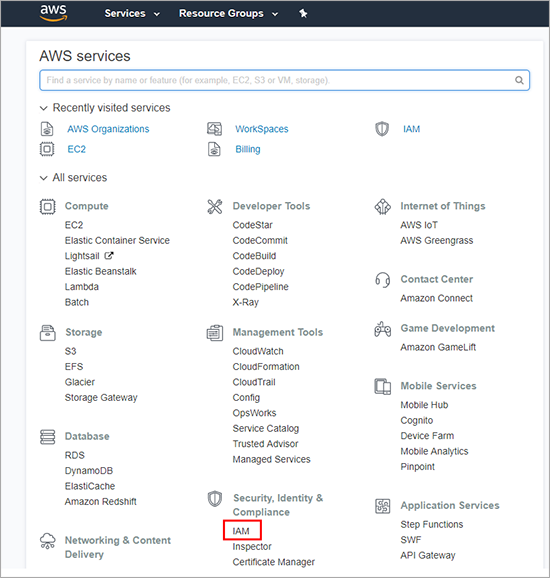
Click Services at the upper-side of the AWS console and select Security, Identity and Compliance > IAM.
In the left-side menu, click Roles. A new page is displayed.
Click the Create role button.
Select Another AWS account.
Switch to the Control Center and copy the Account ID from the Amazon EC2 Integration Settings window.
Go back in AWS console and paste the string in the Account ID field.
Select Require external ID (Best practice when a third party will assume this role).
Switch to Control Center and copy the External ID from the Amazon EC2 Integration Settings window by either:
Selecting the string and use CTRL + C.
Clicking the Copy to clipboard icon at the end of the string.
In the AWS console, paste the string in the External ID field.
Click Next: Permissions.
Check the
AmazonEC2ReadOnlyAccesspermission and click Next: Review.In the new page, provide a name and a description in the required fields.
Click Create Role. You will view the list of all existing roles. Wait for about 1 minute for the changes to propagate across all AWS regions.
Click your role name to view the details.
Copy the ARN.
Switch to the Control Center tab and paste the ARN into the dedicated field.
Click Save.
GravityZone is going to import the Amazon EC2 instances in the Network page, where they are going to be visible by regions and availability zones.
For details about integrating GravityZone with Amazon EC2 inventory, refer to Set up the GravityZone integration with Amazon EC2 using a cross-account role.
Install Bitdefender Endpoint Security Tools on Instances
To protect instances with Bitdefender Security for AWS, you must install Bitdefender Endpoint Security Tools (BEST) on each of them. BEST uses automatic (default) scan modes for EC2 instances set on Central Scan with Bitdefender Security Server hosted in the corresponding AWS region, with fallback on Hybrid Scan (with Light Engines using in-the-cloud scanning and, partially, the local signatures).
Prepare for BEST Installation
You can prepare for Silent Agent installation by following these steps:
Make sure the instances you want to protect run a supported operating system.
BEST has the ability to remove competitor Antivirus solutions. Should the automatic removal fail, uninstall (not just disable) any existing antimalware software from instance. Running other security software simultaneously with Bitdefender Security for AWS may affect their operation and cause major problems with the system.
The installation requires administrative privileges. Make sure to have all the necessary credentials at hand (for example: the private keys of your Amazon EC2 key pairs).
Configure the Amazon EC2 security groups to allow SSH and Remote Desktop Protocol access from your computer and SSH access from the Control Center instance.
If you run firewall software on your instances, make sure to configure it to allow access to the Bitdefender Security for AWS communication ports.
Local Installation
You connect to individual instances via a SSH or Remote Desktop client and use the installation link from Control Center to download and install Silent Agent locally.
To obtain the download links for the installation files follow these steps:
Connect to Control Center using your Company Account.
Go to the Network > Installation Packages page from the left side menu.
Select the package you want to install.
Select Send download links from the More Actions button.
The newly displayed window provides you with the download links for the Windows web installer and the Linux installation script.
Run the installation file using administrator/root privileges.
Remote Installation
On instances running Linux operating systems, you can install BEST remotely, from the Control Center. For any of these methods, you must first specify the remote authentication credentials:
Connect to Control Center using your Administrator's Account.
Go to your name or your company's name in the right upper corner of the page and select Credentials Manager.
For each key name, you must specify the private key and, if needed, complete the list of user names to authenticate with. To specify the necessary credentials, click the Edit icon in the Action column. You can either upload the Amazon private key file or insert its content in the text box. You can remove or add user names as needed.
To remotely install BEST from the GravityZone Control Center you must:
Go to the Computers > View Computers page.
This page displays your Amazon EC2 instances.
Click the Show menu located above the table and select Unmanaged Computers.
Select the check boxes corresponding to the Linux instances on which you want to install protection.
Use the menu under the OS column to filter instances by operating system.
Click Tasks and select Install from the menu.
Click Install.
A new window is displayed, prompting for additional information such as credentials and the package that is required for the install.
You can view task execution status and results on the Computers > View Tasks page. The installation takes minutes to complete.
Subscribe to Bitdefender Security for Amazon Web Services in AWS Marketplace
This section provides information about subscribing, unsubscribing and reporting the usage of Bitdefender Security for AWS on your Amazon EC2 instances.
About Bitdefender Security for AWS on Marketplace
Bitdefender has updated its Security for AWS product on AWS Marketplace to support consolidated billing directly from customer’s AWS account.
Subscription on AWS Marketplace is available for new GravityZone customers and for existing users who have not had an AWS subscription in the past.
To subscribe to Bitdefender Security for Amazon Web Services, you must have an active AWS account.
As a best practice, it is strongly recommended that you create and use IAM user accounts associated to your AWS root account. For more information, refer to the official IAM documentation page.
After you subscribe to the Bitdefender Security for AWS, your account is going to be charged by Amazon on hourly usage of the service, as part of your AWS monthly invoice.
Subscribe to Bitdefender Security for AWS
To be able to use Bitdefender Security for AWS on your Amazon EC2 instances, you must subscribe on AWS Marketplace by following these steps:
Login to your AWS Marketplace account.
Access the Bitdefender Security for Amazon Web Services page.
Click the Continue button on the right side of the page.
Read the subscription details and click Subscribe.
A message is going to inform that you are subscribed to Bitdefender Security for AWS.
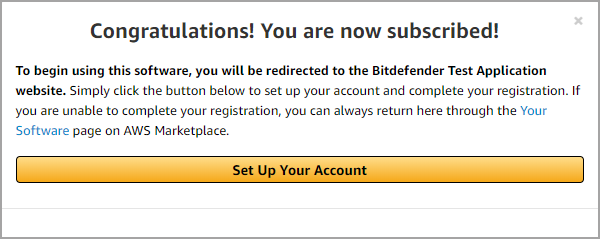
Click Set Up Your Account.
You are going to be redirected to a registration form hosted by Bitdefender. Follow these steps according to your customer status:
As new GravityZone customer:
Fill in the required information.
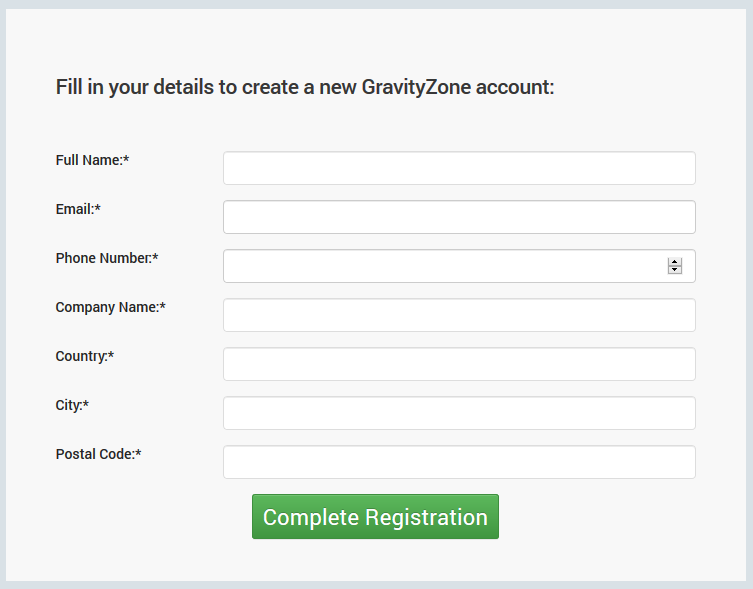
Click Complete Registration.
If the provided details are valid, a customer company and a user account is going to be created for you in the GravityZone Control Center. You are going to receive your login details to the specified email address. At this moment, you can access GravityZone Control Center using the link provided in the email.
As existing GravityZone customer:
Click the link provided under the form’s title.
Enter your GravityZone credentials.
Click Find company and finish purchase.

If the login credentials are valid, a confirmation message is going to be displayed. Access GravityZone Control Center using the provided link.
Make sure the company meets the following conditions:
The company account is registered as a Customer, not Partner.
The company account is not suspended.
The company account has AWS visibility in the Integrations section of your profile.
After you subscribe to Bitdefender Security for AWS, you need to configure the Amazon EC2 integration and deploy Bitdefender Endpoint Security Tools on your Amazon EC2 instances to protect them. For details, refer to Set up the GravityZone integration with Amazon EC2 using a cross-account role.
Once you have subscribed and the integration is completed:
All your Amazon EC2 instances having BEST installed will become licensed.
The AWS Marketplace widget is going to be displayed in the Control Center > My Company page. Click it to go to AWS Marketplace.
Error messages
If the subscription cannot be validated, you are going to receive an error message with explanations adapted to certain situations:
Could not find the company linked to these credentials. The credentials may be invalid or the company does not exist.
To fix this error, you must:
Re-enter your GravityZone credentials by accessing the provided link.
Contact the Bitdefender Enterprise Support team.
The company could not be created.
To fix this error, you must:
Contact the Bitdefender Enterprise Support team.
Amazon EC2 product activation for this company failed. It may be already activated, or the activation is not possible at this moment.
To fix this error, you must:
Re-enter your GravityZone credentials by accessing the provided link.
Contact the Bitdefender Enterprise Support team.
Usage reporting
While subscribed to Bitdefender Security for AWS, you are charged by Amazon on a monthly basis, according to the usage reported by Bitdefender.
The usage of your company is reported hourly per protected instance. Invoicing is performed by AWS according to the instance size:
Small – for micro and small EC2 instances.
Medium – for medium EC2 instances.
Large – for large EC2 instances.
xLarge – for xlarge or larger EC2 instances.
Check the AWS Marketplace product page to view the price list for each instance size.
Unsubscribe from Bitdefender Security for AWS
You can unsubscribe anytime from Bitdefender Security for AWS if you do not need to protect your Amazon EC2 instances anymore. For details, refer to Uninstall Security for AWS.
Set up the GravityZone integration with Amazon EC2 using a cross-account role
This section describes how to integrate your Amazon Web Services account with GravityZone Control Center by using a cross-account role.
Should you need to subscribe to Bitdefender Security for AWS from Amazon Web Services Marketplace, refer to Subscribe to Bitdefender Security for Amazon Web Services in AWS Marketplace.
Overview
GravityZone administrators can integrate Control Center with Amazon EC2 by using a cross-account role associated with an IAM (Identity and Access Management) user. To learn more about IAM, refer to the official Amazon Web Services page.
GravityZone integration with Amazon EC2 implies the following security elements:
Account ID – the unique identifier of the Bitdefender AWS account. The Account ID is necessary for your IAM user to create the GravityZone specific role for cross-account access.
External ID – a unique identifier linked to your GravityZone company, used for security reasons and necessary to create the GravityZone specific role for cross-account access.
ARN (Amazon Resource Name) – a unique identifier for AWS resources, associated with a role attached to your AWS user account.
Note
It is recommended to set up the Amazon integration using an IAM user account created specifically for this purpose. The IAM user requires the IAMFullAccess permission to be able to create the role required for the AWS integration in GravityZone.
Prerequisites
Before starting to configure the AWS integration:
Make sure you have the appropriate AWS user account credentials at hand.
Open the AWS Console and the GravityZone Control Center in two browser tabs, at the same time. You are going to need to work on both of them to create the AWS integration successfully.
Before starting the process, make sure that you change the session timeout in Control Center > My Account from 15 minutes to at least 1 hour. If the session expires, you must restart the integration steps.
Integrate GravityZone with Amazon Web Services
Log in to the Control Center using your GravityZone credentials.
In the upper-right corner of the console, go to Integrations.
If you do not have an active integration, click Add > Add Amazon EC2 Integration. The Amazon EC2 Integration Settings window is going to be displayed.
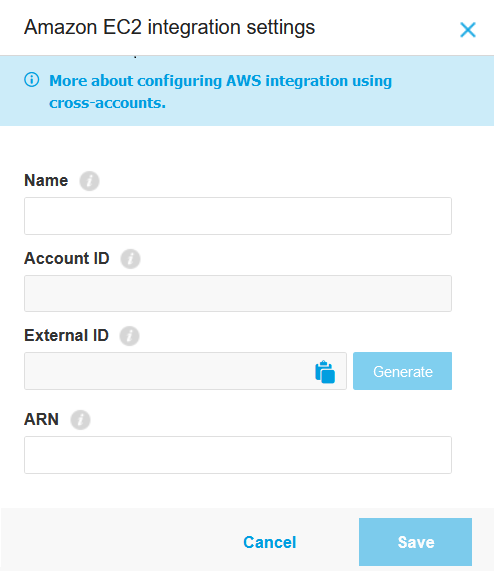
Under Name, add the integration name.
Under External ID, click the Generate button.
Open a new tab in your browser and log in to the AWS console.
Click Services at the upper-side of the AWS console and select Security, Identity and Compliance > IAM.
In the left-side menu, click Roles.
A new page is displayed.
Click the Create role button.
Select Another AWS account.
Switch to the Control Center and copy the Account ID from the Amazon EC2 Integration Settings window.
Go back to the AWS console and paste the string in the Account ID field.
Select Require external ID (Best practice when a third party will assume this role).
Switch to Control Center and copy the External ID from the Amazon EC2 Integration Settings window by either:
Selecting the string and use CTRL + C.
Clicking the Copy to clipboard icon at the end of the string.
In the AWS console, paste the string in the External ID field.
Click Next: Permissions.
Check the
AmazonEC2ReadOnlyAccesspermission and click Next: Review.In the new page, provide a name and a description in the required fields.
Click Create Role. You will view the list of all existing roles. Wait for about 1 minute for the changes to propagate across all AWS regions.
Click your role name to view the details.
Copy the ARN.
Switch to the Control Center tab and paste the ARN into the dedicated field.
Click Save.
GravityZone is going to import the Amazon EC2 instances in Network page, where they are going to be visible by regions and availability zones.
Control Center automatically synchronizes with Amazon EC2 inventory every 15 minutes. You can also manually synchronize with Amazon inventory using the Synchronize with Amazon EC2 button placed at the upper side of the Network page.
The GravityZone Control Center also synchronizes with the AWS console each time you click Save, in the Amazon EC2 Integration Settings window.
Install protection
To protect your Amazon EC2 instances, you must install the Bitdefender Endpoint Security Tools agent on them. When you install the agent, you must assign a Security Server. GravityZone has Security Servers distributed in several AWS regions. Select the Security Server from the same region as your instance.
For more information on installing security agents, refer to Security agents.
Useful considerations: change the External ID, errors, remove the integration
After setting up your integration, you must take into account certain aspects so that you won’t have issues further on.
Change the External ID for your Amazon EC2 integration
If needed, the External ID for your Amazon EC2 integration can be regenerated anytime, in the Control Center. This action is going to invalidate the currently used External ID and the integration. To restore the integration, you have to update your role in the AWS console with the new External ID.
To change the External ID, must follow these steps:
Go to Integrations.
Click the existing Amazon EC2 integration.
The Amazon EC2 Integration Settings window is going to be displayed.
Click Generate.
A warning message is going to inform you that the new External ID is going to invalidate the current one. Also, your current integration is going to become invalid until you update your AWS role with the External ID.
Click Confirm.
Copy the newly-generated External ID.
Log in to the AWS console in a new browser tab.
Go to Services > IAM > Roles and select your role.
Go to Summary > Trust Relationship.
Click Edit trust policy.
Enter the new External ID in the
sts:ExternalIDfield.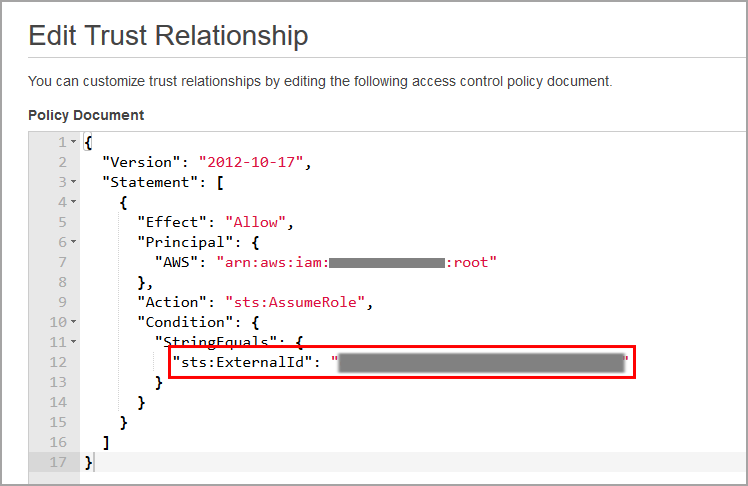
Click Update Policy.
Go back to the Amazon EC2 Integration Settings window in GravityZone Control Center. The time for the changes to propagate to AWS may vary. Wait for about 1 minute, then click Save.
Error Messages
Certain error messages are going to inform you when something goes wrong with your Amazon EC2 integration:
Not authorized to perform this operation. Check your credentials and permission policies attached to user/role.
This error is displayed when clicking Save in the Amazon EC2 Integration Settings window, in the following situations:
The Amazon EC2 policy for your role did not propagate to any AWS region. Wait for a few seconds and click again Save.
You have introduced an incorrect External ID when creating or updating your role in the AWS console.
This error is displayed when you have clicked Save in the Amazon EC2 Integration Settings window and the Amazon EC2 policy has propagated to some, but not to all AWS regions. Wait a little bit more and click Save again.
Not authorized to perform this operation. Check your credentials and permission policies attached to user/role.
This error is displayed when you have clicked Save in the Amazon EC2 Integration Settings window, if the
AmazonEC2ReadOnlypolicy is not attached to the role. To solve this issue, log in to the AWS console, go to Roles > [your role] > Permissions > Attach policy and select the missing policy.This error is displayed when you have clicked Save in the Amazon EC2 Integration Settings window after providing an invalid ARN. Check if the ARN is correct and click Save again.
Unknown communication error.
This is displayed appears if a communication error has been encountered when you have clicked Save in the Amazon EC2 Integration Settings window. Wait a few seconds and click Save again. If this error persists, contact your system administrator.
Remove the integration
If you do not want to manage the security of your Amazon EC2 instances with Bitdefender anymore, you can delete the integration from Control Center. For details, refer to Uninstall Security for AWS.
Active Directory instance within a Security for AWS integration
Currently, there is no full compatibility between the Active Directory instance and the Security for AWS integration. If you add an Active Directory instance within your Security for AWS integration, your machine is going to be set as unmanaged in the Security for AWS integration, without any IP, and its inventory managed by the Active Directory instance.
To best leverage both integrations, the Active Directory instance is prioritized in terms of inventory, policy assignment, and license flows.
If you already have an Active Directory instance in the Security for AWS integrations, you must delete and reconfigure the Security for AWS integration.
The set-up order must be:
Active Directory
Security for AWS
Configuring the instances in this order is going to set the instance managed in the Active Directory and unmanaged in the Security for AWS Inventory.
If another Security for AWS integration needs to be added with an Active Directory instance, you must:
Delete your previous Security for AWS integration.
Wait for the Active Directory instance to synchronize.
Reinstall the Security for AWS integration.