Container protection (deployed through BEST)
The Container Protection feature offers protection for Linux container workloads and their host, by extending and augmenting the security layers the host operating system. It makes use of offering server workload Endpoint Detection and Response, Advanced Anti-Exploit, Linux-specific anti-exploit technologies, and Antimalware scanning services and threat prevention. You can selectively enable or disable each security module.
Important
This feature can be deployed through two components:
A BEST agent with the Container Protection module included that has been installed on the Linux host that has Docker installed.
A Security Container deployed under the Linux host endpoint. A Security Container is a dedicated Docker container running an Ubuntu 20.04 base image and the official Debian package of BEST for Linux. It runs as a privilege container on a container host.
This guide provides you information for how to deploy the feature using a BEST agent installed on a Linux host.
Components
Container Protection uses the following components:
GravityZone Control Center
Security agent (Bitdefender Endpoint Security Tools installed on Linux endpoints)
Install and configure Container Protection
Important
The Network Attack Defense feature is not compatible with endpoints where Container Protection is installed.
There are three possible scenarios for installing this feature on your endpoints:
An endpoint does not have the BEST agent installed. In this case, use the Create an installation package procedure.
An endpoint has the BEST agent installed, but Content Control is not included in the modules list. In this case, use the Add Container Protection using a Reconfigure agent task procedure.
An endpoint has the BEST agent installed, and the Content Control module is included. In this case, go directly to the Configure and enable the Container Protection feature section.
Log in to GravityZone Control Center.
Go to the Installation Packages page from the left side menu.
Click the Create button in the upper-right side of the screen.
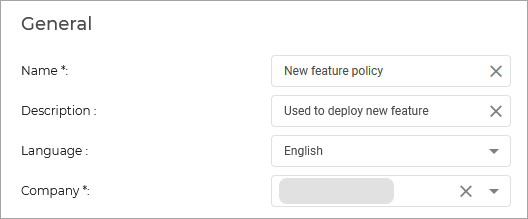
Type in the Name and Description for the new installation package.
Select the modules you want to include.
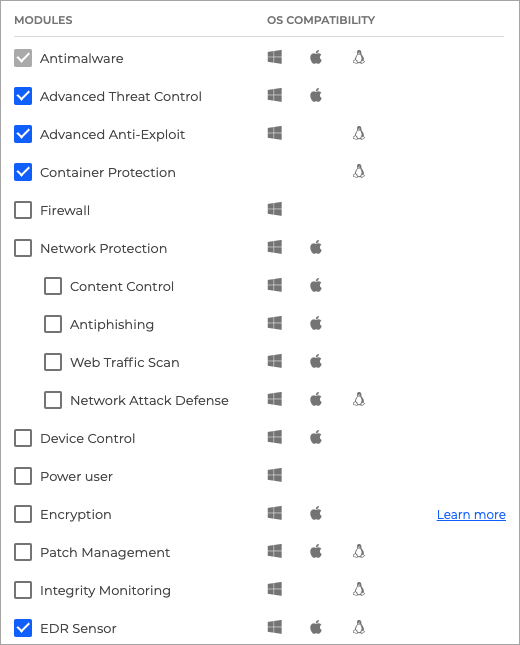
Note
Make sure you include the Container Protection, Advanced Anti-Exploit and EDR options.
Click Save.
Select the newly created package from the list of packages and click Send download links.

Enter the email addresses of the recipients and click Send.
Test out the new feature
Create a new container and make sure it is detected and appears in GravityZone inventory
For the purpose of this guide, we have chosen creating a Docker image for Ubuntu. You can use any supported Linux distribution when creating containers, as long as the image can be retrieved from the Docker registry. The distribution chosen for the container may differ from the container host’s distribution.
Create a new container:
root@ubuntu23-x64-tcor:~# docker run -dt ubuntu:latest bash
529ca9f8970c879eb8e1192077afb059a0a14dde291478863056417ef12a16dc
Check that the container is running:
root@ubuntu23-x64-tcor:~# docker ps
CONTAINER ID   IMAGE           COMMAND   CREATED          STATUS          PORTS     NAMES
529ca9f8970c   ubuntu:latest   "bash"    32 seconds ago   Up 17 seconds             xenodochial_hermann
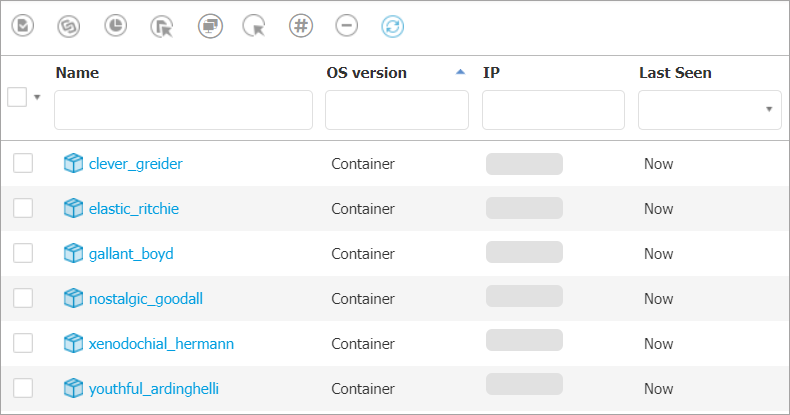
In GravityZone go to the Network page from the left side menu and check if the new container is displayed and has no issues. For more information, refer to Viewing endpoint details.
Check that the container is displayed on the page.
Test out On-Access protection
Log in to GravityZone with an account that has Manage Networks rights.
Go to the Policies page from the left side menu and open the previously created policy.
Go to the Antimalware > OnAccess and click on the Settings button on the upper right side of the On-access Scanning section.
Select the Advanced tab.
Make sure the On-Access Scanning for Linux setting is enabled and add the
/testpath in the box below.Click the Add button.

Go to the General tab and under the Scan Actions section, set the Default action for infected files setting to Delete.
Click Save.
Apply the policy on the previously created container. For more information refer to Assigning policies.
From the endpoint, open a shell in the previously created container:
root@ubuntu23-x64-tcor:~# docker exec -it 529c bash
root@529ca9f8970c:/#
Create a test path:
mkdir /test
Write an Antimalware test file inside a protected path:
root@529ca9f8970c:/# echo 'X5O!P%@AP[4\PZX54(P^)7CC)7}$EICAR-STANDARD-ANTIVIRUS-TEST-FILE!$H+H*' > /test/test1.txt
The Antimalware On-Access protection feature will automatically detect the EICAR file and move it to quarantine.
Check reports for Antimalware activity
Check GravityZone reports for information regarding the deleted file:
Go to the Network page in the left side menu of GravityZone Control Center.
Select the endpoints you want to generate a report for.
Click on the Reports button generate a Malware Status report.
Go to the Reports page and find the request.
Check that the report contains the previously deleted file:
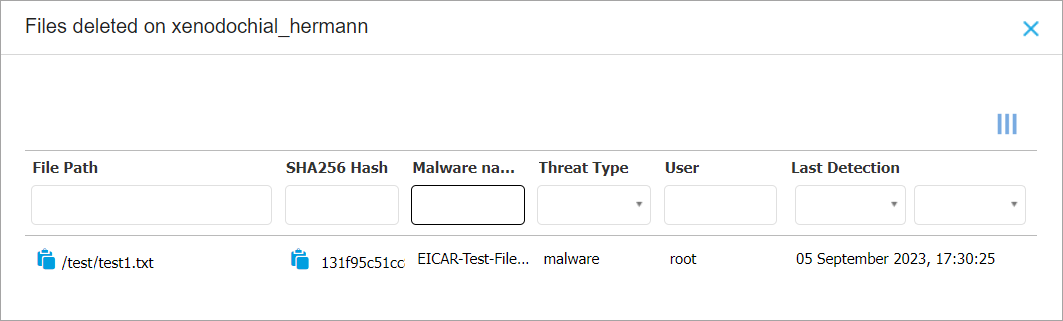
Important
The file was deleted because the taken action for infected files from the policy was set to Delete.
Depending on the action selected in the policy, the file will be marked differently:
Take no action - Ignored
Deny - Unresolved
Move to Quarantine - Quarantined
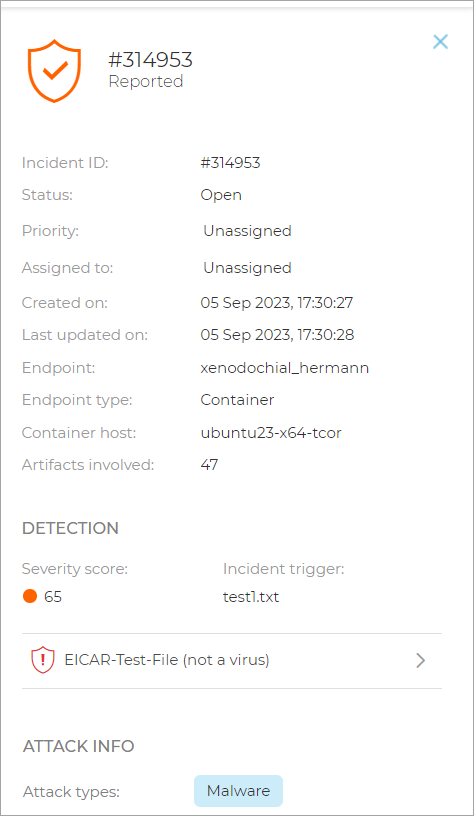
Check the Incidents Sensor for an event corresponding to the detection of the EICAR file
Check that the Incidents Sensor works for files inside the container:
Log in to GravityZone Control Center.
Go to the Incidents page from the left side menu.
Select the Detected Threats tab.
Locate an incident that mentions the hostname where the EICAR was generated:
Check that multiple containers can be created and protected
Create multiple containers (e.g. 5 more containers), from the endpoint:
root@ubuntu23-x64-tcor:~# for i in {1..5}; do docker run -dt ubuntu:latest bash; done
5b37d80408498340664f4c0b74043512a6af423734553c1b3802313b069e8e00
3356db2a2dbe2faea5589b520f81c4da71abc2561699a2ff6ab3f0a3e5bf9cc1
fb146eeab3c6db4cdccc281aa42e671118b7267e18e416baa2c21b84593ead0c
cbfea815f32300564fcf1698df20ad4b820a545a2f38945540259dbc5fb5862b
028c3597646dba1b7adca79767a4674552cfd843d2012b05f81dd67ebf083eab
In GravityZone go to the Network page from the left side menu and check if the new containers are displayed and have no issues. For more information, refer to Viewing endpoint details.