Application inventory
You can view all the applications discovered in your network by the Applications discovery task, in the Applications and groups section. For more information, refer to Applications discovery.
The applications and processes are automatically added under the Applications and groups folder, on the left-side pane.
You can organize applications and processes under custom groups.
All applications/processes under a selected folder are displayed in the right-side pane table. You can search by name, version, publisher/author, updater, location and policy.
To view the latest information in the table, click the  Refresh button at the upper side of the table. This may be needed when you spend more time on the page.

Important
New applications discovered each time you run the Application discovery task are automatically placed in the Ungrouped Applications folder. The processes that are not related to specific applications, are placed in the Ungrouped Processes folder.
Applications and Groups tree
To add a custom group in the Applications and groups tree:
Select the All applications folder.
Click the
 Add button at the upper side of the tree.
Enter a name in the new window.
Click OK to create the new group.
Select the Ungrouped applications folder. All applications grouped under a selected folder are displayed in the right-side pane table.
Select the desired applications from the right-side pane table. Drag and drop the selected items from the right-side pane to move them to the custom group that you want in the left-side pane.
To add a custom application:
Select the target folder under All applications.
Click the
Add button at the upper side of the tree.Enter a name in the new window.
Click OK to create the custom application.
You can add processes related to the new custom application from the Ungrouped processes folder, or from other folders displayed in the Applications and groups tree. After you select the folder, all processes are displayed in the right-side pane table.
Select the desired processes from the right-side pane table. Drag and drop the selected items in the left-side pane, to move them to the custom application.
Note
An application can be part of only one group.
To edit a folder or an application name:
Select it in the Applications and groups tree.
Click the
 Edit button at the upper side of the tree.
Change the name with the one you want.
Click OK.
You can move groups and applications anywhere inside the Applications and groups hierarchy. To move a group or an application, drag and drop it from the current location to the new one.
To remove a custom folder or application, select it in the Applications and groups tree and then click the  Remove button at the upper side of the tree.
Adding applications to policies
To add an application or a process to a rule directly from Application Inventory:
Select the desired folder from the Applications and groups tree. The folder contents is listed in the right-side pane.
Select the processes or applications that you want from the right-side pane.
Click the
Add to policy button to open the configuration window.In the Apply rule to these policies section, enter an existing policy name. Use the search box to find by policy name or owner.
In the Rule details section, enter a Rule name.
Select the Enabled checkbox to activate the rule.
The target type is automatically recognized. If needed, edit the existing criteria:
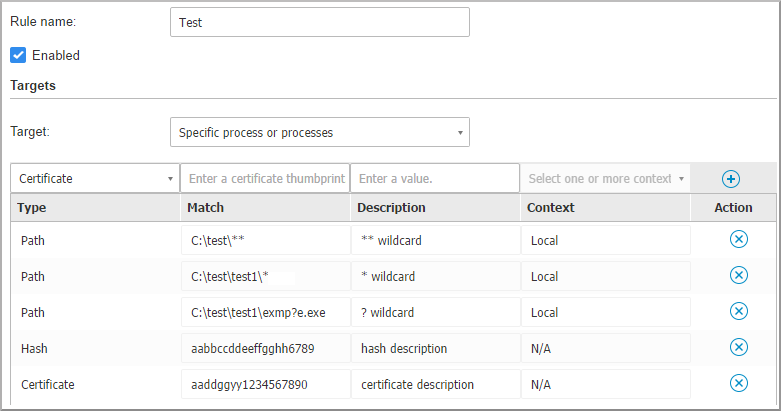
Specific process or processes, to define a process that is allowed or denied from starting. You can authorize by path, hash or certificate. The conditions inside the rule are matched by logical AND.
To authorize an application from a specific path:
Select Path in the Type column. Specify the path to the object. You can provide an absolute or relative pathname and use wildcard characters. The asterisk symbol (*) matches any file within a directory. A double asterisk (**) matches all files and directories in the defined directory. A question mark (?) matches exactly one character. You can also add a description to help identify the process.
From the Select one or more contexts drop-down menu you can choose among local, CD-ROM, removable and network. You can block an application executed from a removable device, or allow it if the application is locally executed.
To authorize an application based on hash, select Hash in the Type column and enter a hash value. You can also add a description to help identify the process.
Important
To generate the hash value, download the Fingerprint tool. For more information, refer to Application Control Tools
To authorize based on a certificate, select Certificate in the Type column and enter a certificate thumbprint. You can also add a description to help identify the process.
Important
To obtain the certificate thumbprint, download the Thumbprint tool. For more information, refer to Application Control Tools.
Click
Add to add the rule. The newly created rule will have the highest priority in this policy.Inventory applications or groups, to add a group or an application discovered in your network. You can view the applications running in your network on the Network > Application Inventory page.
Insert the applications or group names in the field, separated by a comma. The auto-fill function displays suggestions as you type.
Select the Include subprocesses checkbox to apply the rule to spawned child processes.
Warning
When setting rules for browser applications, it is recommended to turn off this option to prevent security risks.
Optionally, you can also define exclusions from the process start rule. The adding operation is similar to the one described in the previous steps.
In the Permissions section, choose whether to allow or deny the rule to run.
Click Save to apply the changes.
To delete an application or process:
Select the desired folder from the Applications and groups tree.
Select the processes or applications that you want from the right-side pane.
Click the
Delete button.
Filtering applications
To filter the applications existing in your network based on their location:
Select the Found on option from the filters.
In the drop-down select the value None.
The applications that are not used on any endpoints will appear in the table.
To filter the applications in your network according to their associated policies.
Select the Policies option from the filters.
In the drop-down select the value None.
Applications not linked to any policies will be displayed in the table.
Updaters
You must define updaters for the applications discovered in your network.
Warning
If you do not assign updaters, the whitelisted applications will not be allowed to update.
To assign an updater:
Select the desired folder in the Applications and groups tree. The folder content is listed in the right-side pane.
In the right side pane, select the file you want to use as updater.
Click the
 Assign updaters button.
Click Yes to confirm the assignment. Updaters are marked with a specific icon:
 .
.Click the Add to policy button to add the updater in the policy.
To dismiss an updater:
Select the desired folder in the Applications and groups tree. The folder content is listed in the right-side pane.
In the right side pane, select the updater you want to dismiss.
Click the
Dismiss updater button.Click Yes to confirm.