Use cases
Bitdefender GravityZone is delivered as a virtual appliance. The Bitdefender GravityZone appliance image is available in several formats, compatible with main virtualization platforms. Before proceeding, check the GravityZone virtual appliance requirements.
To receive a trial license, go to the Bitdefender website and register. For GravityZone on-premises, select one or more of the following products:
Bitdefender Security for Virtualized Environments
Bitdefender GravityZone Security for Endpoints
Bitdefender GravityZone Security for Exchange
Bitdefender GravityZone Security for Mobile
Install GravityZone on an Ubuntu system
Prerequisites
On the physical server, install Ubuntu Server 24.04 with a valid internet connection.
Select your location: C - no localization.
Select country: Recommended America/US (recommended for initial deploy).
Detect keyboard layout: No. Choose English (US), recommended for initial deploy.
Network: no special requirements (recommended DHCP for initial deploy).
Set up users and passwords:
Full name new user: bdadmin
Username: bdadmin
Password: [your desired bdadmin user password]
Encrypt home directory: No.
Choose time zone: any option, it will be later changed to UTC during GravityZone installation.
Partition disks: Guided – use the entire disk and set up LVM. Then accept all the default settings and write changes to disk when asked to do so.
Choose no automatic updates.
Select to install only Standard system utilities and OpenSSH server.
For more information about this, refer to the Official Ubuntu Installation Guide.
Installation steps
Connect to the server via SSH, with the bdadmin user.
Log in as root:
$ sudo -i
Remove the Ubuntu repositories:
# rm /etc/apt/sources.list.d/ubuntu.sources*
Note
Remove any other custom repositories, if applicable.
Install the GravityZone repositories:
# echo "deb https://download.bitdefender.com/repos/deb-hydra24-unified bitdefender non-free" > /etc/apt/sources.list.d/deb-hydra24-unified.list
Install the GravityZone repositories key:
# curl -sS http://download.bitdefender.com/repos/gzrepos.key.asc | apt-key add -
Set
DEBIAN_FRONTENDtononinteractiveto silently complete the installation:# export DEBIAN_FRONTEND="noninteractive"
Configure networking:
# sed -ri 's#^GRUB_CMDLINE_LINUX_DEFAULT=.*#GRUB_CMDLINE_LINUX_DEFAULT="netcfg/do_not_use_netplan=true net.ifnames=0 biosdevname=0 console=tty1 console=ttyS0,115200n8 earlyprintk=ttyS0,115200 rootdelay=300"#' /etc/default/grub
# sed -i 's/^GRUB_CMDLINE_LINUX=.*/GRUB_CMDLINE_LINUX="panic=3"/' /etc/default/grub
# sed -i 's/^GRUB_DISTRIBUTOR=.*/GRUB_DISTRIBUTOR="Bitdefender"/' /etc/default/grub
# update-grub
# apt clean
# apt update
# apt install -yq ifupdown net-tools isc-dhcp-client
# echo -e 'auto lo\niface lo inet loopback\n\nauto eth0\niface eth0 inet dhcp' > /etc/network/interfaces
# reboot
Make sure that the appliance OS timezone is set to UTC:
# timedatectl set-timezone UTC
# timedatectl set-local-rtc false
Disable the Ubuntu banners (they will be replaced by the specific GravityZone ones):
# chmod -x /etc/update-motd.d/*
Clean
aptand update the packages to the GravityZone repository versions:# apt clean # apt update # apt -yq dist-upgrade
Install the GravityZone initial packages:
# apt -yq install gzinstallwizard
Update the installation system:
# /opt/bitdefender/scripts/createInstallerXml.sh
Remove
snapd:# apt autoremove --purge -yq snapd
Remove any unneeded packages:
# apt -yq autoremove
Restart to complete the customization of the Ubuntu server into the GravityZone appliance:
# reboot
Optionally, you can open the GravityZone appliance interface using the command below, or you can continue and proceed to install the roles by opening the appliance interface from your virtualization management tool:
# sudo /opt/bitdefender/eltiw/installer
You can now install roles from the console interface of the GravityZone appliance. For the administration of the GravityZone machine, refer to Deploy and set up GravityZone VA.
Further on, if you want to install a standalone Security Server and you cannot use Bitdefender images to deploy it, you will need to manually install it in a similar manner to how you have installed the above GravityZone appliance. For details on the installation procedure of the Security Server, refer to Install Security Server manually.
Install the GravityZone Virtual Appliance in Amazon EC2
To install the GravityZone Virtual Appliance in Amazon EC2, you must follow these steps:
Connect to the server via SSH, with the ubuntu user.
Log in as root:
$sudo -i
Add the
bdadminuser with the following command:adduser bdadmin
Set a password for the user using the following command:
passwd bdadmin
Set elevated rights to the user using the following command:
usermod -aG sudo bdadmin
Remove the Ubuntu repositories:
# rm /etc/apt/sources.list.d/ubuntu.sources*
Note
Remove any other custom repositories, if applicable.
Install the GravityZone repositories:
# echo "deb https://download.bitdefender.com/repos/deb-hydra24-unified bitdefender non-free" > /etc/apt/sources.list.d/deb-hydra24-unified.list
Install the GravityZone repositories key:
# curl -sS http://download.bitdefender.com/repos/gzrepos.key.asc | apt-key add -
Set
DEBIAN_FRONTENDtononinteractiveto silently complete the installation:# export DEBIAN_FRONTEND="noninteractive"
Configure networking:
# sed -ri 's#^GRUB_CMDLINE_LINUX_DEFAULT=.*#GRUB_CMDLINE_LINUX_DEFAULT="netcfg/do_not_use_netplan=true net.ifnames=0 biosdevname=0 console=tty1 console=ttyS0,115200n8 earlyprintk=ttyS0,115200 rootdelay=300"#' /etc/default/grub
# sed -i 's/^GRUB_CMDLINE_LINUX=.*/GRUB_CMDLINE_LINUX="panic=3"/' /etc/default/grub
# sed -i 's/^GRUB_DISTRIBUTOR=.*/GRUB_DISTRIBUTOR="Bitdefender"/' /etc/default/grub
# update-grub
# apt clean
# apt update
# apt install -yq ifupdown net-tools isc-dhcp-client
# echo -e 'auto lo\niface lo inet loopback\n\nauto eth0\niface eth0 inet dhcp' > /etc/network/interfaces
# reboot
Make sure that the appliance OS timezone is set to UTC:
# timedatectl set-timezone UTC
# timedatectl set-local-rtc false
Disable the Ubuntu banners (they will be replaced by the specific GravityZone ones):
# chmod -x /etc/update-motd.d/*
Clean
aptand update the packages to the GravityZone repository versions:# apt clean # apt update # apt -yq dist-upgrade
Install the GravityZone initial packages:
# apt -yq install gzinstallwizard
Update the installation system:
# /opt/bitdefender/scripts/createInstallerXml.sh
Remove
snapd:# apt autoremove --purge -yq snapd
Remove any unneeded packages:
# apt -yq autoremove
Restart to complete the customization of the Ubuntu server into the GravityZone appliance:
# reboot
Optionally, you can open the GravityZone appliance interface using the command below, or you can continue and proceed to install the roles by opening the appliance interface from your virtualization management tool:
# sudo /opt/bitdefender/eltiw/installer
You can now install roles from the console interface of the GravityZone appliance. For more information on the administration of GravityZone, refer to Deploy and set up GravityZone VA.
Further on, if you want to install a standalone Security Server and you cannot use Bitdefender images to deploy it, you will need to manually install it in a similar manner to how you have installed the above GravityZone appliance. For details on the installation procedure of the Security Server, refer to Install Security Server manually.
Install GravityZone in Oracle VM VirtualBox
Download Bitdefender GravityZone OVA and MD5 files from the Bitdefender download website.
To be able to use GravityZone, you have to install it by following the steps below.
Import GravityZone OVA file in VirtualBox:
Open Oracle VM VirtualBox Manager.
Go to File > Import appliance or press (Ctrl + I). The import wizard is displayed.
Click the
 Browse button, navigate to the GravityZone OVA file, select it, and then click Open.
Click Next to continue and view the appliance settings.
Click Import to load the appliance into the VM manager. Wait until the progress bar disappears.
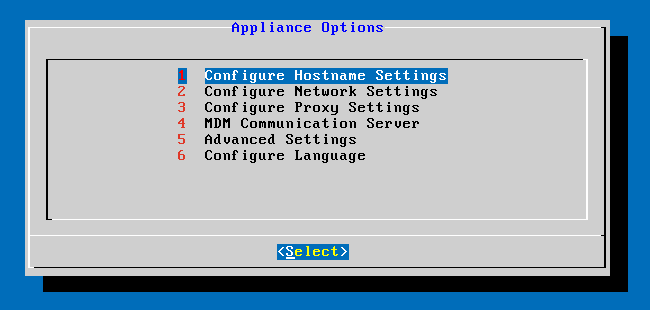
Configure main GravityZone settings:
From the left side pane, select the newly imported appliance and click Start to power it on. Wait until it finishes loading the system. The VM console window is displayed.
Set a password for bdadmin, the built-in system administrator, needed to access the GravityZone appliance configuration area.
Log in to GravityZone Virtual Appliance command line interface (CLI).
Set up Bitdefender GravityZone:
Configure network settings. Make sure it has access to the internet.
Install the GravityZone roles. First install the Database role. After that, install all the other roles.
For more information, refer to the Deploy and Set Up GravityZone Appliance section.
Install VirtualBox Guest Additions on the GravityZone appliance:
Power off the appliance.
Load the Guest Additions image into the CD/DVD drive:
Select the GravityZone appliance and then click Settings. The configuration window is displayed.
Go to the Storage tab.
In the Storage Tree, click
 Add CD/DVD Device.
Click Choose disk and select the VBoxGuestAdditions.iso file from the Virtualbox folder.
Click OK to apply the changes and close the window.
Power on the appliance.
Press Alt + F2 to switch to tty2, or connect through SSH with putty.
Enter the bdadmin's credentials.
Type
sudo suto get root privileges.Add the Ubuntu official repositories to the sources file:
Create file
/etc/apt/sources.list.d/ubuntu.sourcesand then open it with an editor of your choice.Copy and paste the text below:
Types: deb
URIs: http://archive.ubuntu.com/ubuntu/
Suites: noble noble-updates noble-backports
Components: main restricted universe multiverse
Signed-By: /usr/share/keyrings/ubuntu-archive-keyring.gpg

Types: deb
URIs: http://security.ubuntu.com/ubuntu/
Suites: noble-security
Components: main restricted universe multiverse
Signed-By: /usr/share/keyrings/ubuntu-archive-keyring.gpg
Save the file and close the editor.
Get the list with the latest package versions from the repositories.
#apt-get updateInstall the build-essential package.
#apt-get install build-essentialInstall DKMS.
#apt-get install dkmsInstall Linux headers.
#apt-get install linux-headers-$(uname -r)Mount the DVD with the Guest Additions ISO file.
#mkdir /mnt/dvd #mount /dev/dvd1 /mnt/dvdInstall the Guest Additions package.
#cd /mnt/dvd #sh ./VBoxLinuxAdditions.runRemove the Ubuntu repository:
rm /etc/apt/sources.list.d/ubuntu.sources*
You may now log in to GravityZone Control Center and continue with registration.
Install GravityZone in Nutanix
To install GravityZone in Nutanix, follow these steps:
Import the GravityZone virtual appliance
Download the latest GravityZone VMDK and MD5 files from the Bitdefender website.
Log in to the Nutanix Prism Web Console.
Import the VMDK file:
Click the gear button in the upper-right corner of the console to access the Settings menu, and then select Image Configuration.
The configuration window is displayed.
Click Upload Image. A new window pops up, asking you to enter image details.
Enter a name for the image.
Under Image Type menu, choose Disk.
Under Image Source, select Upload File, and then choose the VMDK file you have previously extracted.
Click Save. Wait while the virtual drive is being uploaded. When finished, you will be able to view the image in the list of existing images.
Create the virtual machine for GravityZone VMDK file:
Go to the Home drop-down menu and select VM.
Click the Create VM button at the upper right corner of the page.
In the new configuration window, enter the requested details:
A name and a description for the VM.
Hardware configuration such as number of CPUs, cores per CPU and memory. These values must meet the GravityZone requirements.
Click Add new disk. A configuration window is displayed.
Configure the disk settings as follows:
Type: Disk
Operation: Clone from Image Service
Bus Type: SCSI
Image: the image you have previously created.
Click Add.
Click Add new NIC and choose the network you want to use.
Click Save.
Deploy GravityZone
In the Nutanix Prism console, go to Home > VM > Table.
Power on the newly created machine.
Click Launch Console.
The GravityZone CLI interface is displayed and you can begin to configure and install GravityZone in your network. For details regarding installation steps, refer to this topic.
Install GravityZone in Microsoft Azure
To install GravityZone in Microsoft Azure, follow these steps:
Download the GravityZone virtual appliance image (VHD file) from the Bitdefender website to
C:\vhd.Create a virtual machine in Hyper-V with the VHD file.
Power on the machine and set the password for the default user, bdadmin.
Power off the virtual machine.
Recreate the the VHD file:
$sourceVhd = "C:\vhd\GravityZoneEnterprise.vhd" $recreatedVhd = "C:\vhd\GravityZoneEnterpriseHDD.vhd" Convert-VHD -VHDType Dynamic -Path $sourceVhd -DestinationPath $recreatedVhdNote
Depending on your Azure setup, you may need to use other values for the above mentioned paths.
Prepare PowerShell for Azure:
Install-Module AzureRM Login-AzureRmAccountUpload the file to Azure:
$resourceGroupName = "Resources" $recreatedVhd = "C:\vhd\GravityZoneEnterpriseHDD.vhd" $destinationVhd = "https://mystorearea.blob.core.windows.net/vhds/GravityZoneEnterpriseHDD.vhd" Add-AzureRmVhd -LocalFilePath $recreatedVhd -Destination $destinationVhd -ResourceGroupName $resourceGroupName -NumberOfUploaderThreads 5Note
Azure supports only fixed sized VHD files. The
Add-AzureRmVhdcommand takes the dynamic size VHD file and uploads it as a fixed size.$destinationVhdis a custom path. Make sure to choose a valid path in your Azure environment.Depending on your Azure setup, you may need to use other values for the above mentioned paths.
Create the virtual machine in Azure:
Get the network to be attached to the VM:
$virtualNetworkName = "Resources-vnet" $locationName = "westeurope" $virtualNetwork = Get-AzureRmVirtualNetwork -ResourceGroupName $resourceGroupName -Name $virtualNetworkNameNote
Depending on your Azure setup, you may need to use other values for the above mentioned variables.
Configure public IP:
$publicIp = New-AzureRmPublicIpAddress -Name "HydraSrv" -ResourceGroupName $ResourceGroupName -Location $locationName -AllocationMethod Dynamic $networkInterface = New-AzureRmNetworkInterface -ResourceGroupName $resourceGroupName -Name "HydraSrv-Interface" -Location $locationName -SubnetId $virtualNetwork.Subnets[0].Id -PublicIpAddressId $publicIp.IdConfigure VM settings:
$vmConfig = New-AzureRmVMConfig -VMName "HydraSrv" -VMSize "Standard_F4s" $vmConfig = Set-AzureRmVMOSDisk -VM $vmConfig -Name "HydraSrv" -VhdUri $destinationVhd -CreateOption Attach –Linux $vmConfig = Add-AzureRmVMNetworkInterface -VM $vmConfig -Id $networkInterface.IdCreate the VM in Azure:
$vm = New-AzureRmVM -VM $vmConfig -Location $locationName -ResourceGroupName $resourceGroupName
Install GravityZone roles:
Connect to the GravityZone appliance via SSH.
Log in with bdadmin.
Gain root privileges:
$ sudo suRun the GravityZone installer:
# /opt/bitdefender/eltiw/installerInstall the roles: Database Server, Endpoint Communication Server, Endpoint Events Proccessing Server, Update Server, Web Console.
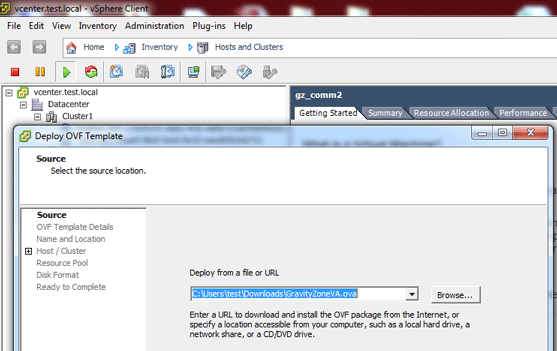
Import GravityZone virtual appliance in VMware vCenter
The Bitdefender GravityZone OVA file can be downloaded from the Bitdefender website: OVA and MD5.
To import Bitdefender GravityZone OVA file in VMware vCenter, follow these steps:
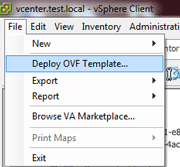
Open the vSphere client.
Go to File > Deploy OVF template. This works for both OVA and OVF.
Browse and select the package you would like to deploy, and then click Next.

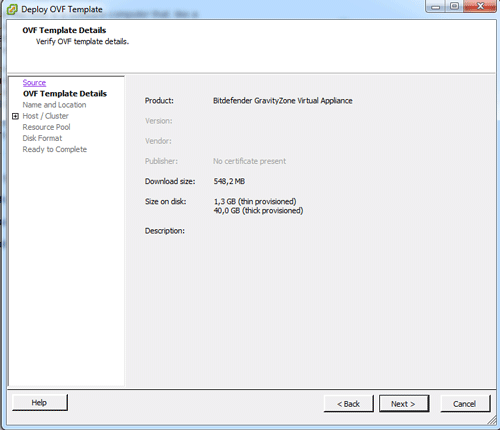
Details about the package are going to be displayed. Click Next.
Name your virtual machine and place it in the correct datacenter and folder.

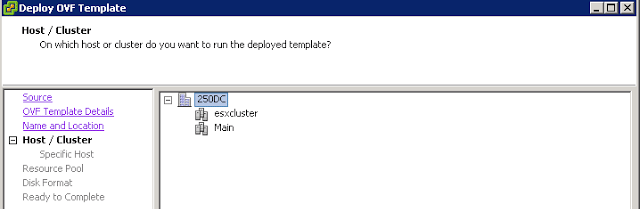
Select your cluster.
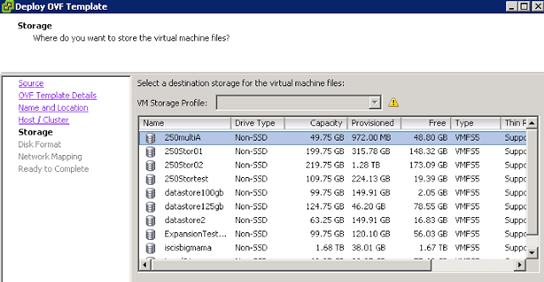
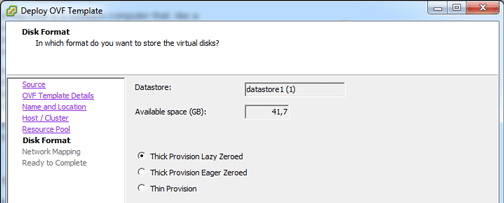
Select the storage locations.
Select the disk provisioning virtual machine type thin or thick.
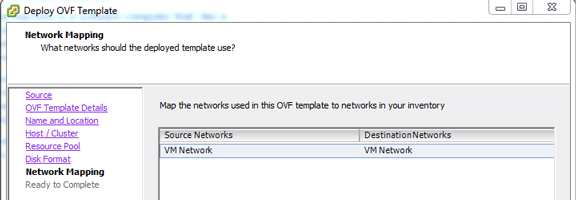
Select the network.

Click Finish and wait for your virtual machine to be created.
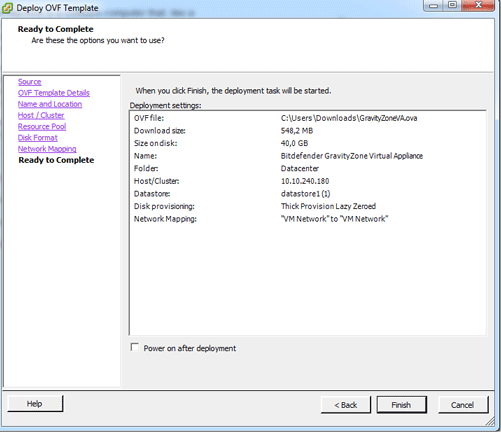
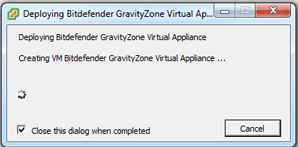
Wait while the virtual machine is deployed from the OVA.
Connect to the virtual machine and start the configuration.
Prerequisites for installing Bitdefender Endpoint Security Tools in VMware NSX environments
Current constraints
GravityZone Security for Virtualized Environments is designed to offer only agentless protection for VMware NSX through the Security Server. Installing Bitdefender Endpoint Security Tools (BEST) in such environments can lead to undesired behavior and malfunctions for the GravityZone infrastructure, such as:
Duplicated endpoints in GravityZone Control Center.
License key pools get depleted.
Protection stops working partially or completely.
Managed state reports from endpoints are inconsistent.
Power state reports from endpoints are inconsistent.
When to install Bitdefender Endpoint Security Tools in NSX
In some cases, endpoints hosted on an NSX infrastructure do need protection through Bitdefender Endpoint Security Tools:
Security for Exchange is not available with agentless protection. Therefore, you need to install Bitdefender Endpoint Security Tools on an Exchange Server that is hosted in an NSX protected cluster.
The protected operating systems are incompatible with the NSX introspection driver. In such cases, the NSX agentless protection does not work, and you need to install Bitdefender Endpoint Security Tools on these legacy endpoints.
When Virtual Desktop Infrastructure (VDI) environments are used, some endpoints could need the additional protection modules available only with Bitdefender Endpoint Security Tools, and through the agentless protection. This case also requires installing Bitdefender Endpoint Security Tools.
Note
Using both solutions on the same cluster means that endpoints using either one of the protection services are going to coexist in the same NSX protected cluster. You cannot protect an endpoint using Bitdefender Endpoint Security Tools and Security Server for NSX at the same time. In this case, Bitdefender Endpoint Security Tools must be configured to use an alternative to Central Scan mode, such as Local Scan or Hybrid Scan.
Prerequisistes
The following prerequisites must be met to safely separate the endpoints protected with Bitdefender Endpoint Security Tools from the GravityZone NSX agentless protection. In addition, these prerequisites must be met before installing the Bitdefender Endpoint Security Tools agents on the endpoints.
Endpoints to be protected by Bitdefender Endpoint Security Tools should not be included in any NSX Security Group on which a Bitdefender policy is applied.
If this prerequisite cannot be achieved due to how the NSX Security Groups memberships are defined, you can exclude the endpoints which use Bitdefender Endpoint Security Tools from that group.
On the Bitdefender Endpoint Security Tools protected endpoints, VMware Tools must be installed without the NSX Guest Introspection drivers.
If VMware Tools have been installed on endpoints with the NSX Guest Introspection drivers, run the VMware Tools setup again and remove them.
After these prerequisites are met, you can safely deploy Bitdefender Endpoint Security Tools agents on endpoints.
Note
Bitdefender Endpoint Security Tools can be installed only manually, because the Install agent task is not available.
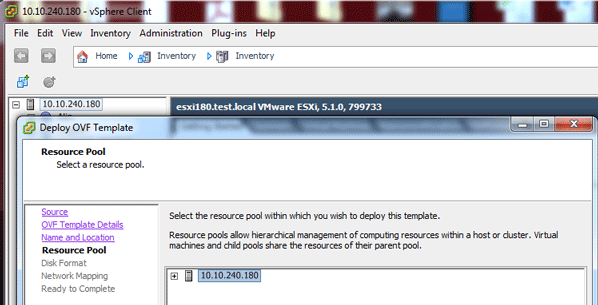
Import GravityZone virtual appliance in VMware ESXi
Bitdefender GravityZone OVA file can be downloaded from Bitdefender website as OVA and MD5.
To import Bitdefender GravityZone OVA file on ESXi Host, you have to:
Open the vSphere client.
Go to File > Deploy OVF template. This works for both OVA and OVF.

Browse and select the package you would like to deploy, and then click Next.
Details about the package are going to be displayed. Click Next.

Name your virtual machine and place it in the correct datacenter and folder.

Select your cluster.
Select the storage locations.

Select the disk provisioning virtual machine type thin or thick.

Select the network.
Click Finish and wait for your virtual machine to be created.
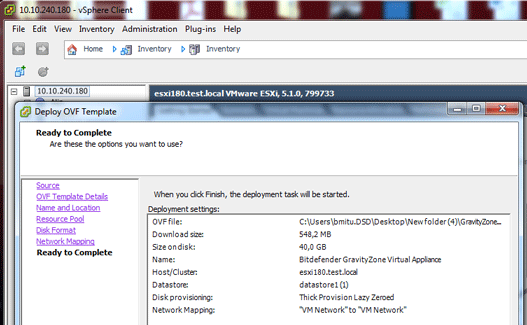
Wait while the virtual machine is deployed from the OVA.

Connect to the virtual machine and start the configuration.

Import GravityZone virtual appliance in Microsoft Hyper-V
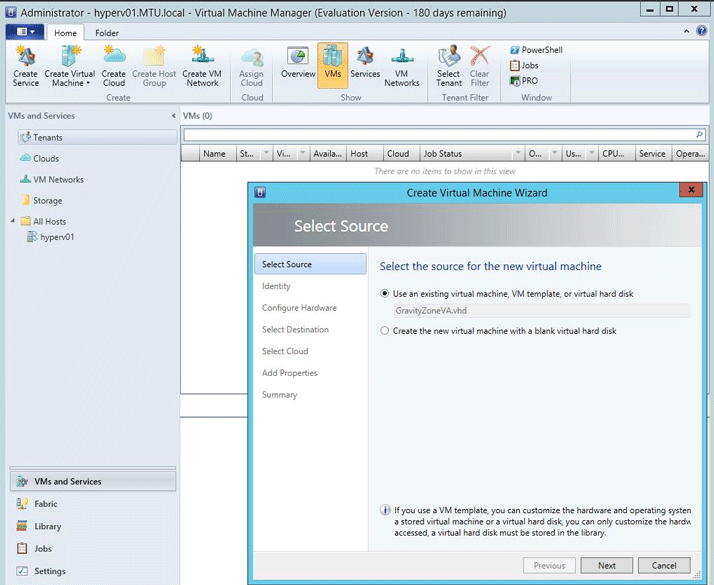
Import GravityZone virtual appliance in VMM (System Center 2012 - Virtual Machine Manager)
The Bitdefender GravityZone VHD file can be downloaded from the Bitdefender website: VHD and MD5.
To import the Bitdefender GravityZone VHD file on Hyper-V Manager, you must follow these steps:
Open System Center 2012 - Virtual Machine Manager.
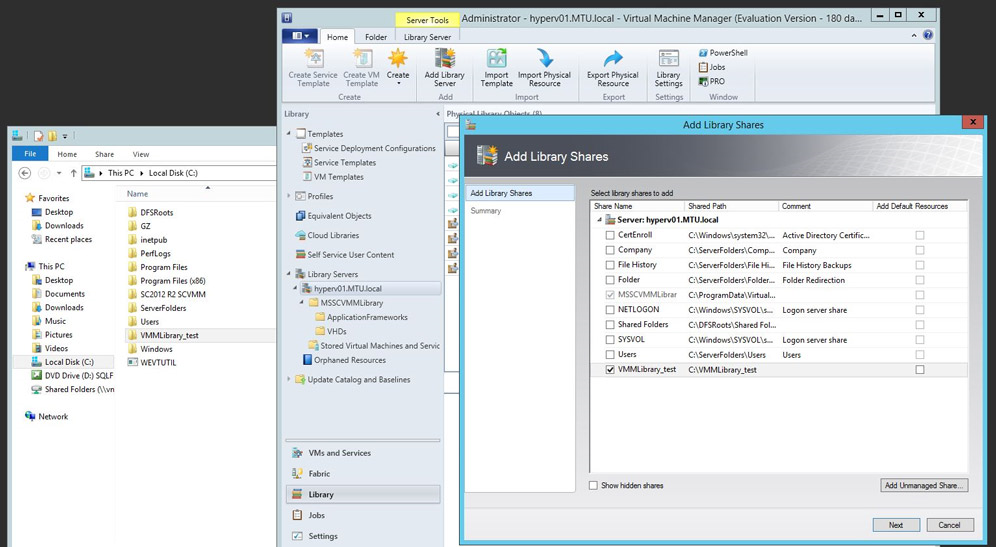
Select the Library tab.
Add that share location to Library Shares.
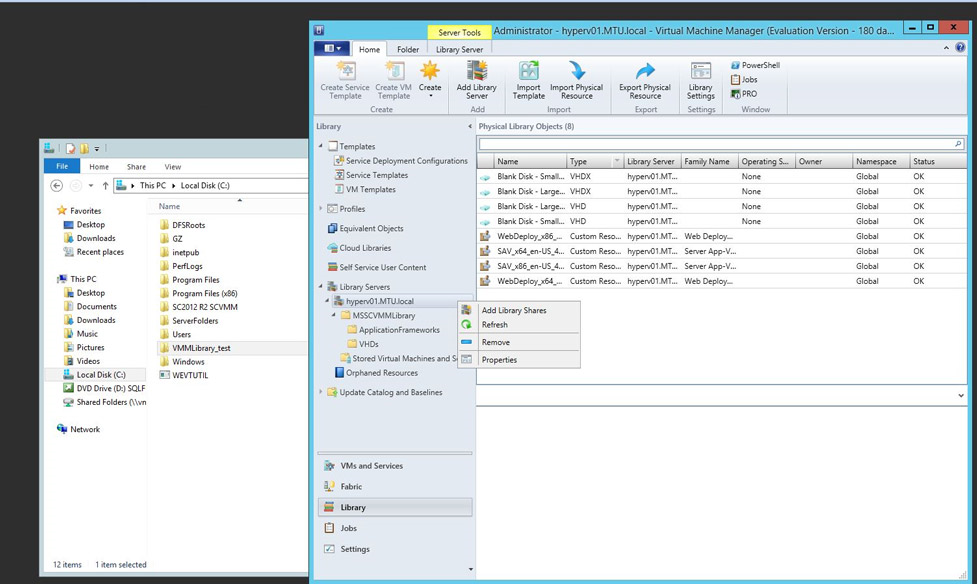
Select the share location where Bitdefender GravityZone VHD file has previously been copied.
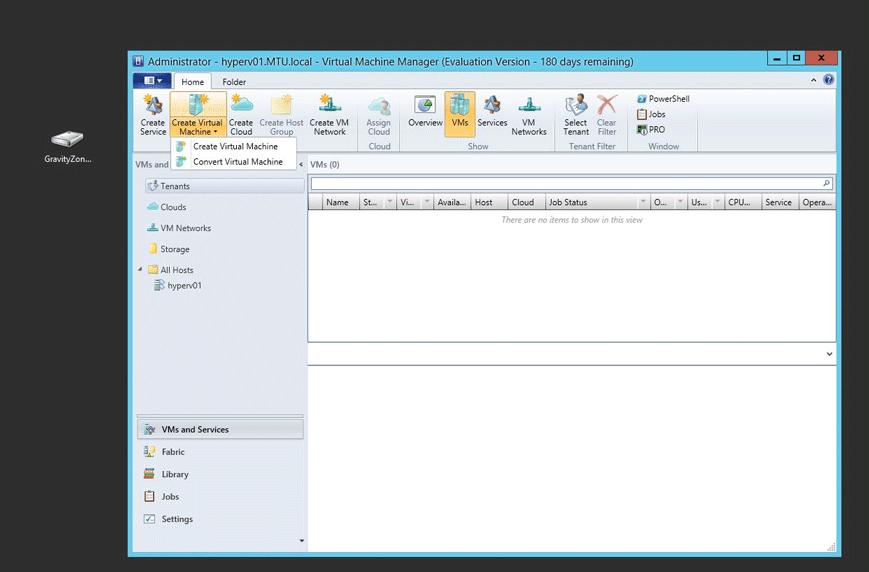
Select VMs and Services tab, from Virtual Machine Manager.
Click Create Virtual Machine.
In the next window, select the virtual machine source:
GravityZoneVA.vhdand click Next.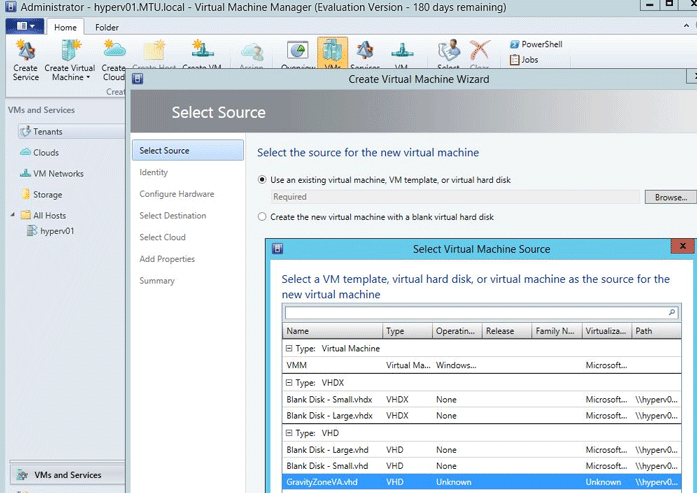
Select an existing virtual machine.
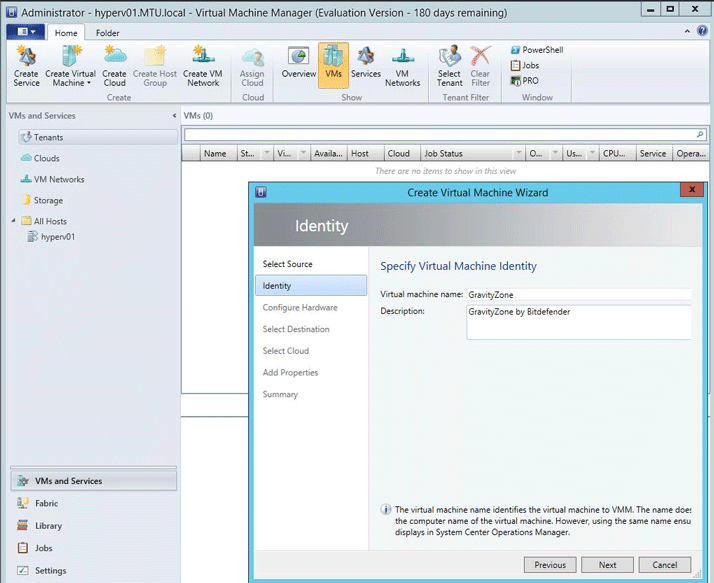
Name your virtual machine.
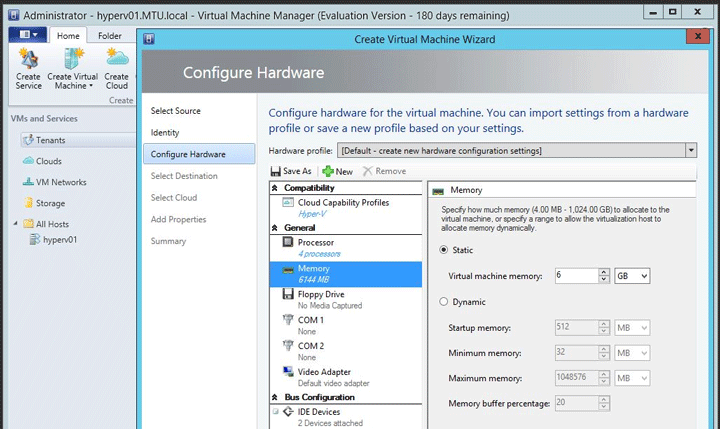
Configure the hardware for the virtual machine, as mentioned under Endpoint protection.
Select the destination.
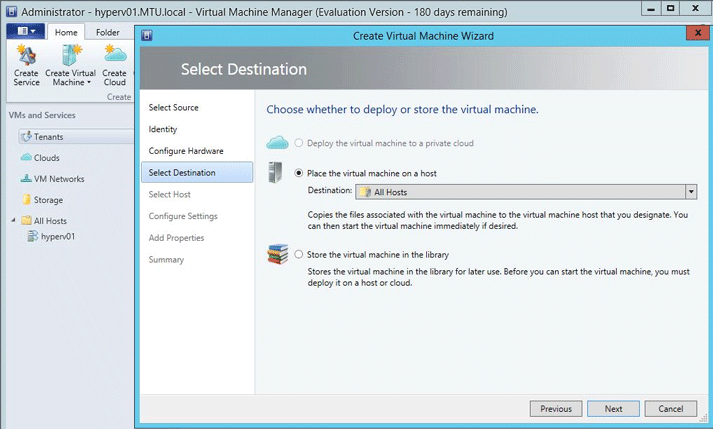
Select the Hyper-V Host destination.
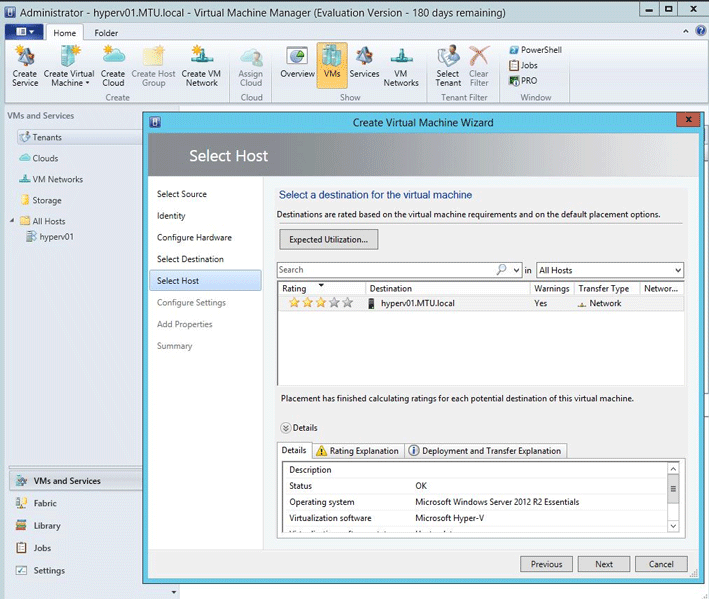
Review the virtual machine settings:
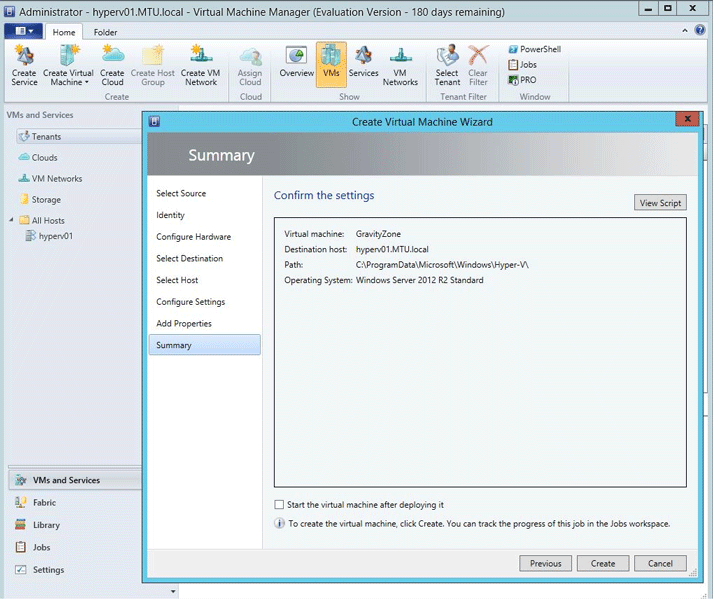
A task will be created.
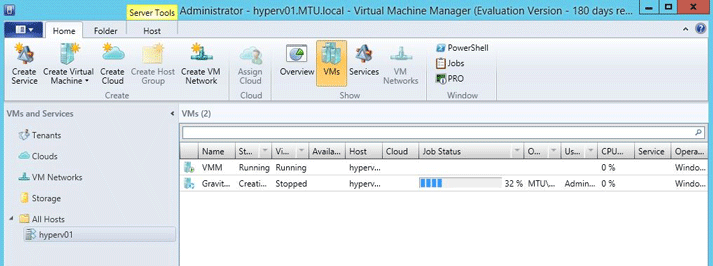
Connect to the virtual machine and start the configuration.

Import GravityZone virtual appliance in Hyper-V host
Bitdefender GravityZone VHD file can be downloaded from Bitdefender website: VHD and MD5.
To import the Bitdefender GravityZone VHD file on Hyper-V Manager, follow these steps:
Open Hyper-V Manager.
From the navigation pane of Hyper-V Manager, select the computer running Hyper-V.
Click New and then click Virtual Machine. The New Virtual Machine wizard opens.
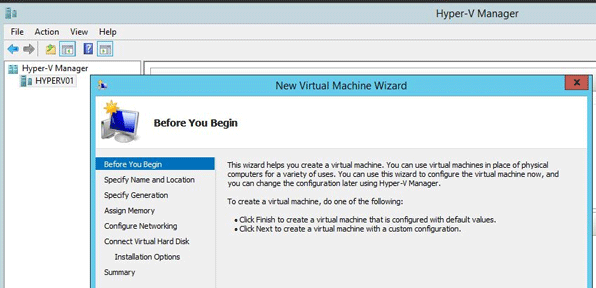
Click Next.
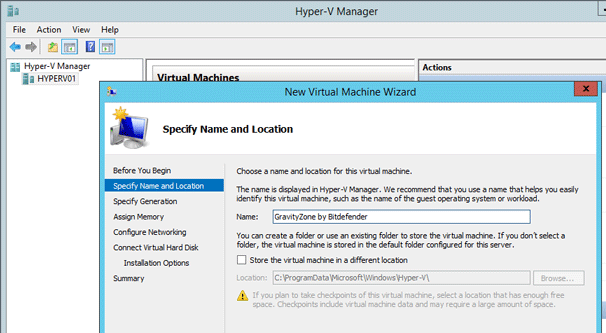
On the Specify Name and Location page, type the name for your VM.
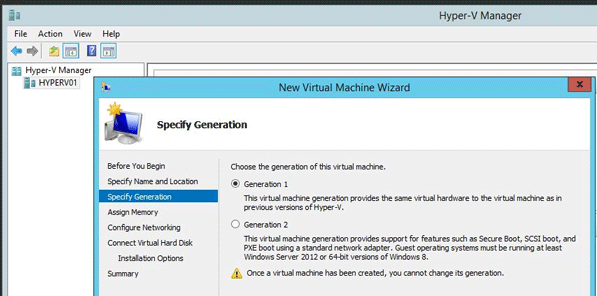
On the Specify Generation, select Generation 1.
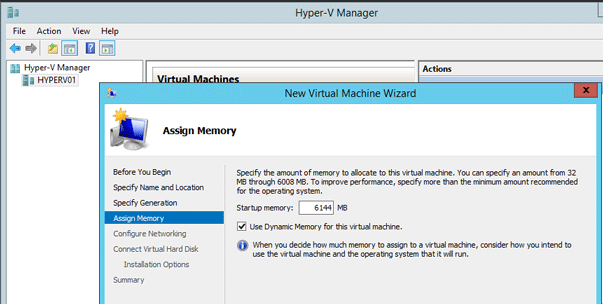
On the Assign Memory page, specify enough memory to start the guest operating system.
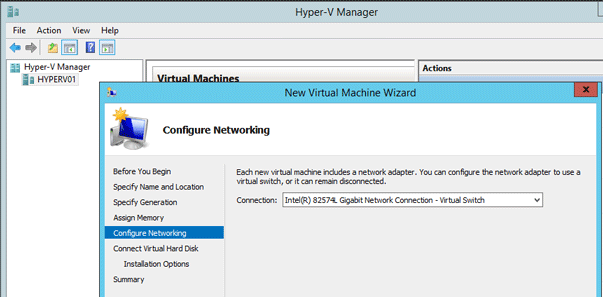
On the Configure Networking page, connect the virtual machine to the switch you created when you installed Hyper-V.
On the Connect Virtual Hard Disk page, select Use an existing virtual hard disk.

Browse for the location of Bitdefender GravityZone VHD file.
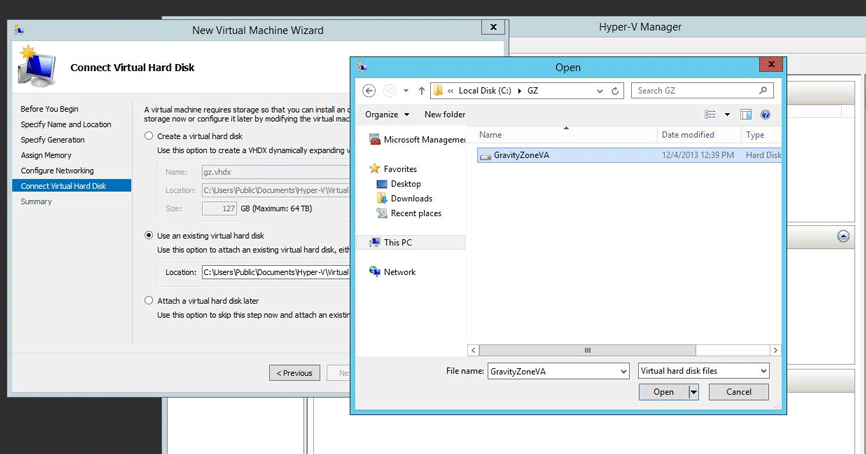
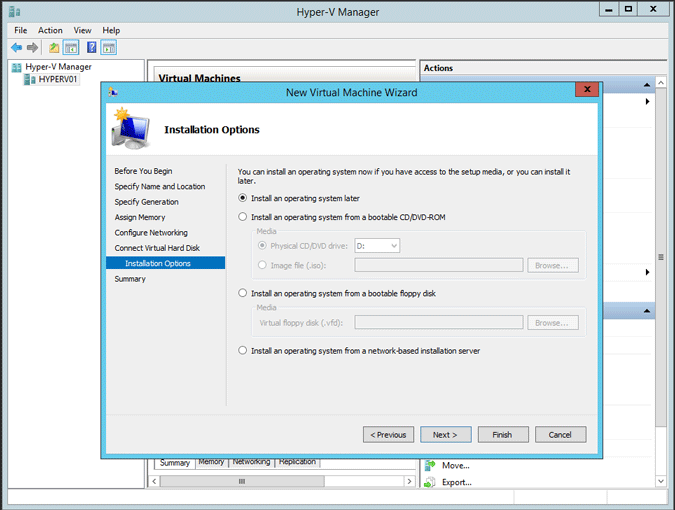
The guest operating system is already installed in a virtual hard disk, so choose Install an operating system later.
On the Summary page, verify your selections and then click Finish.
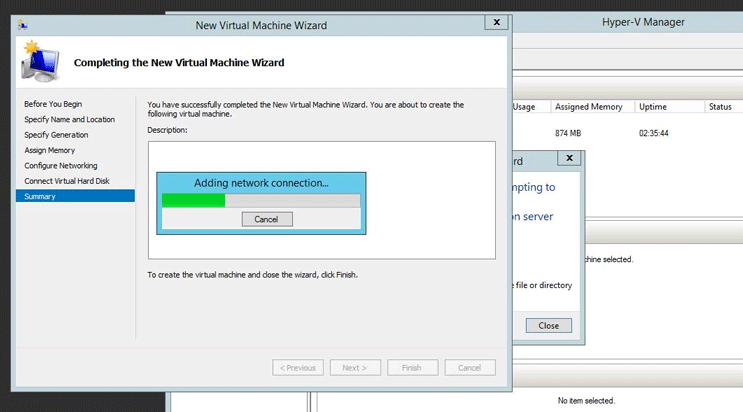
Connect to the virtual machine and start the configuration.

Import GravityZone virtual appliance in Citrix XenCenter
The Bitdefender GravityZone XVA file can also be downloaded from the Bitdefender website: XVA and MD5.
You can import the Bitdefender GravityZone XVA file using the XenCenter Import wizard.
Importing a VM from an XVA or ova.xml file involves the same steps as creating and provisioning a new VM using the New VM wizard, such as: nominating a home server, and configuring storage and networking for the new VM.
Open the Import wizard by following these steps:
On the File menu, select Import.
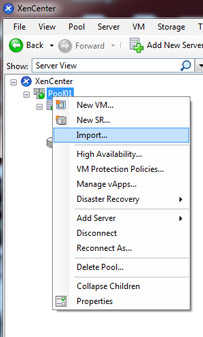
On the first page of the wizard, locate the XVA file you want to import and then click Next.
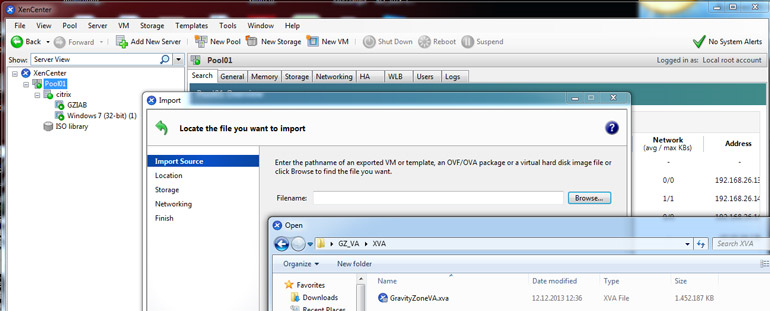
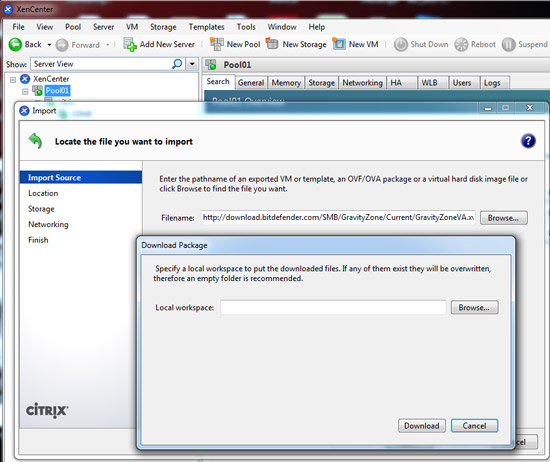
Alternatively you enter a URL location (
http|https|file|ftp) in the Filename box.
Click Next.
The Download Package dialog box opens and you must specify a folder on your XenCenter host where the file(s) will be copied.
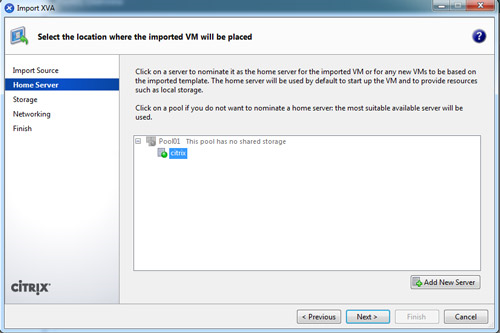
On the Home Server page, specify where to put the new VM:
To place the imported VM in a pool without assigning it a home server, select the destination pool in the list, and then click Next.
To place the imported VM in a pool and assign it to a specific home server (or to place it on a standalone server), select a server and then click Next.
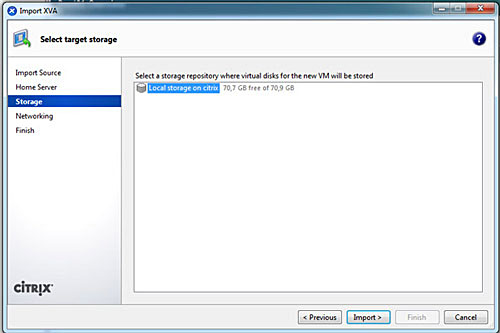
On the Storage page, select a storage repository (SR) where the imported virtual disks will be placed, then click Next to continue.
On the Networking page, map the virtual network interfaces in the VM you are importing to target networks in the destination pool. The Network and MAC address shown in the list on this page are stored as part of the definition of the original (exported) VM in the export file. To map an incoming virtual network interface to a target network, select a network from the list in the Target network column.
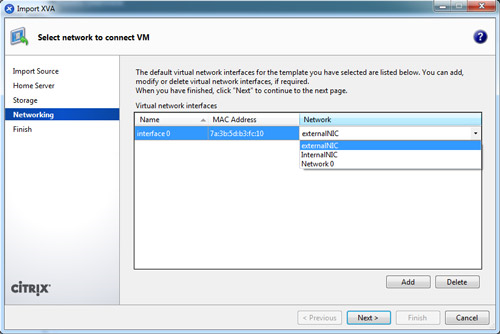
Click Next.
On the last page of the Import wizard, review the configuration options you have selected. To have the imported VM start up as soon as the import process has finished and the new VM is provisioned, select the Start VM after import check box.
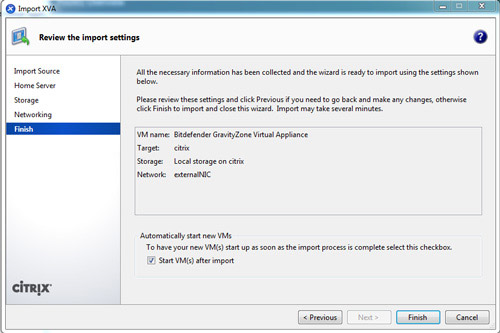
Click Finish to begin importing the selected file and close the wizard.
The import progress is displayed in the status bar at the bottom of the XenCenter window and also on the Logs tab.
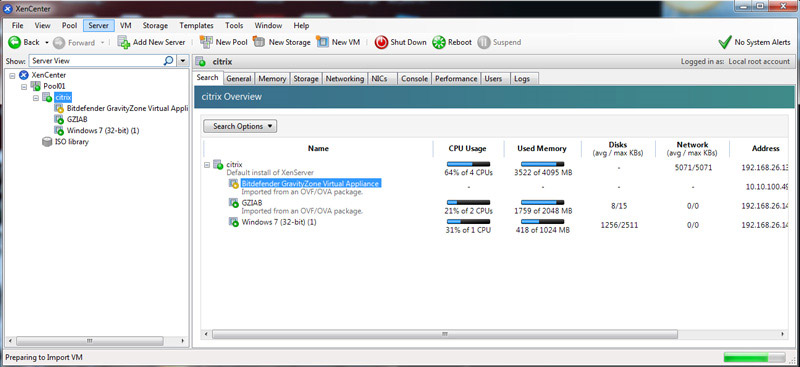
The import process may take some time, depending on the size of the imported VM's virtual disks, the available network bandwidth, and the disk interface speed of the XenCenter host. When the newly-imported VM is available, it appears in the Resources pannel.
Import GravityZone virtual appliance in KVM
Bitdefender GravityZone is delivered as a virtual appliance. The Bitdefender GravityZone appliance image is available in several different formats, compatible with the main virtualization platforms.
To receive a trial license, go to the Bitdefeder website and register for one.
The Bitdefender GravityZone KVM image can be downloaded from the Bitdefender website: RAW and MD5.
To import GravityZone image to KVM you have to install the Virtual Machine Manager tool on a Linux machine with GUI. The Linux with GUI machine should have connectivity with the KVM server.
Example of the Virtual Machine Manager installation on Ubuntu with GUI:
#apt-get install virt-manager
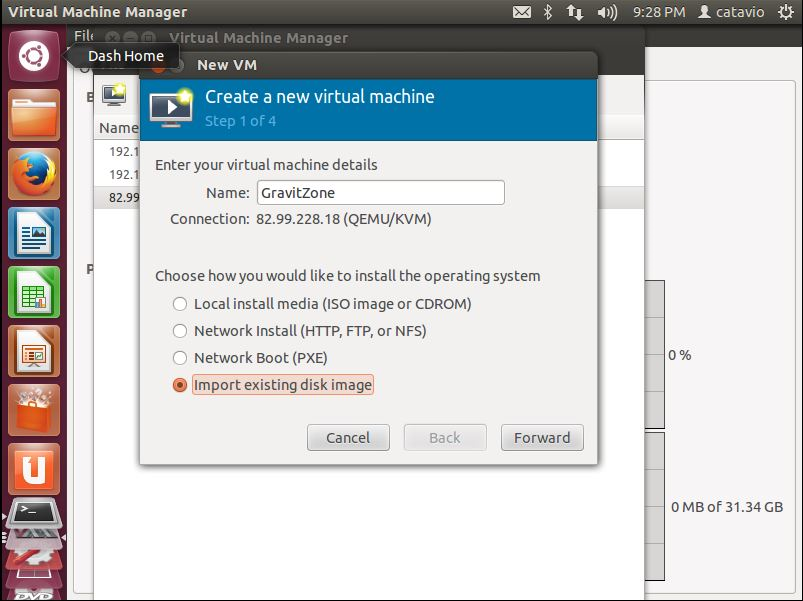
To import the GravityZone image using Virtual Machine Manager, follow these steps:
Upload the GravityZone KVM image to the KVM server storage pool location using WinSCP. By default the storage location is
/var/lib/libvirt/images.Extract GravityZone image archive using the following command:
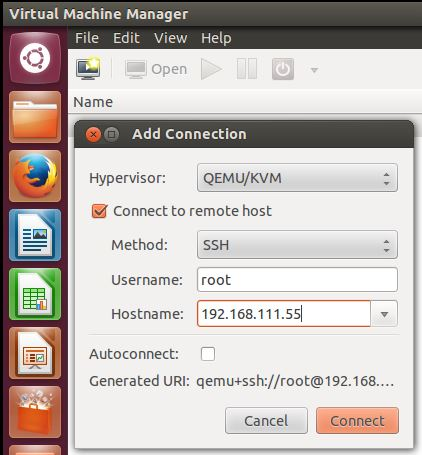
tar -jxf /var/lib/libvirt/images/GravityZoneVA_KVM.tar.bz2Go to the File > Add connection page to open the Virtual Machine Manager and connect to the KVM server.
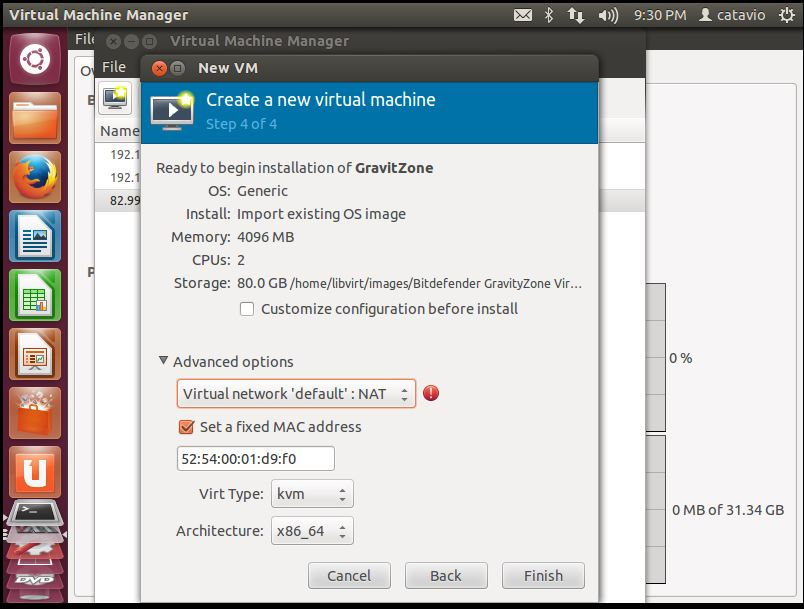
Click the Create Virtual Machine icon, to create a new virtual machine.
Type a name and select Import existing disk image.
Click Browse to provide a storage path.
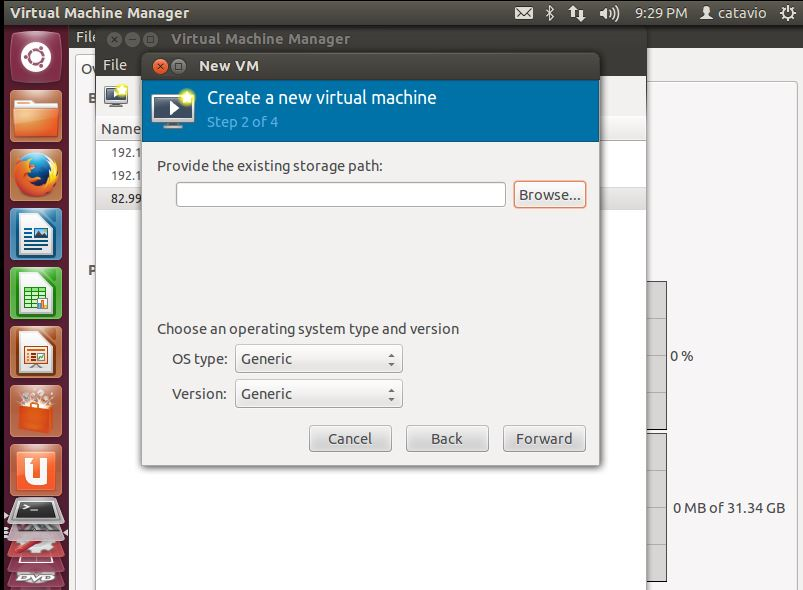
Select the GravityZone raw file extracted before.
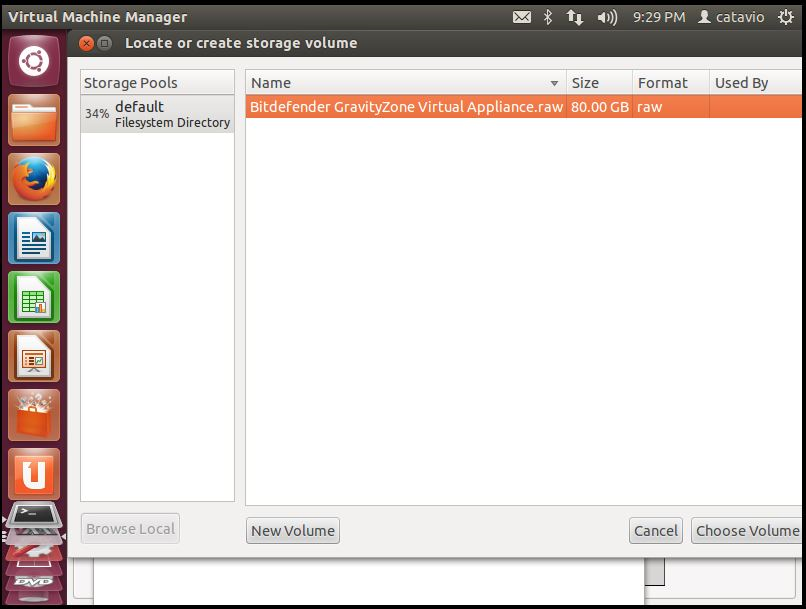
Note
If the GravityZone raw file is not listed, the
/var/lib/libvirt/imagespath is not the default storage location. To check or change the default storage location from Virtual Machine Manager, select the KVM connection Details option, under the Storage tab.Configure the GravityZone virtual machine CPU and memory.
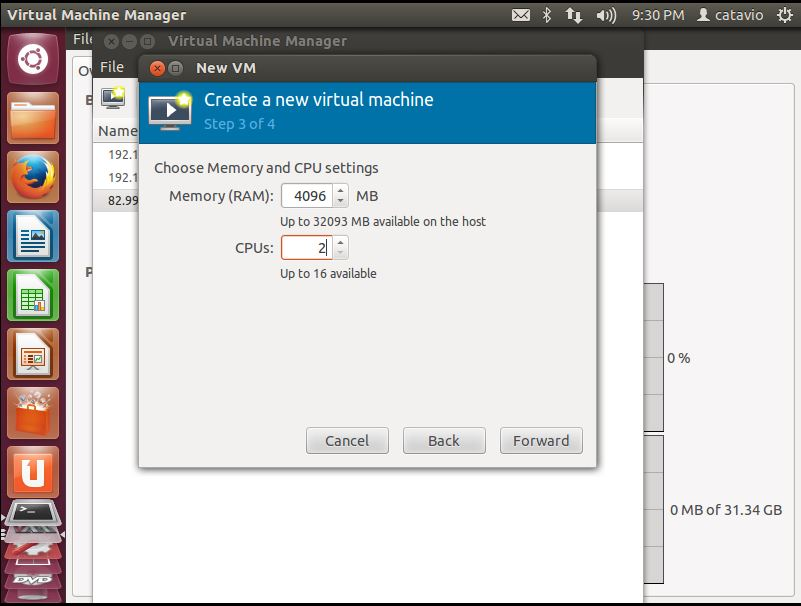
Configure the GravityZone virtual network and click Finish.
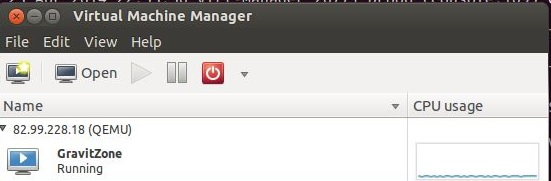
Right click the virtual machine icon to power it on.
Select Open to access the virtual machine.
Protect endpoints located in DMZ
In the default GravityZone setup, devices can be managed only when they are directly connected to the corporate network.
Networking prerequisites
To manage BEST clients located in the DMZ (demilitarized zone), the administrator must configure any firewall or network filter between the DMZ and the GravityZone appliance.
The following ports need to be opened for the communication to be successful:
Traffic from the DMZ communication server to the Production Database instance on port 27017.
Traffic from the DMZ communication server to the Production Update Server.
Traffic from the DMZ Update Servers.
Traffic from the DMZ Communication servers to the Production Web Consoles and Communication Servers on ports 4369, 5672, and 6150.
Traffic from the DMZ Communication servers to Production Web Consoles instances on port 443.
Traffic from the DMZ clients to the Bitdefender servers (upgrade.bitdefender.com) on port 80.
To guarantee proper communication between appliances across networks, ensure that all communication ports pertaining to Bitdefender are open. For more details, refer to GravityZone (on-premises) communication ports.
As administrator, you have 3 options to choose from, in terms of how the clients can communicate with the GravityZone appliance:
The endpoints can connect to the Communication Server of the main appliance directly on port 8443.
The endpoints can connect to a Relay in the DMZ on port 7074, which connects to the main appliance, therefore minimizing traffic.
Endpoints can connect to a second Communication Server from the DMZ.
Configure a new role balancer
This step is only required if you do not have an external balancer.
The role balancer is needed for configuring more than one communication server and can be set up a as role on a second GravityZone Appliance.
To configure a new balancer, follow the steps below:
Connect to the GravityZone VM Console from your Hypervisor.
Login as bdadmin.
Go to Advanced Settings > Connect to existing database.
Enter your database IP followed by
:27017:databaseIP:27017
Select OK to continue.
Go to Advanced Settings > Configure Role Balancers.
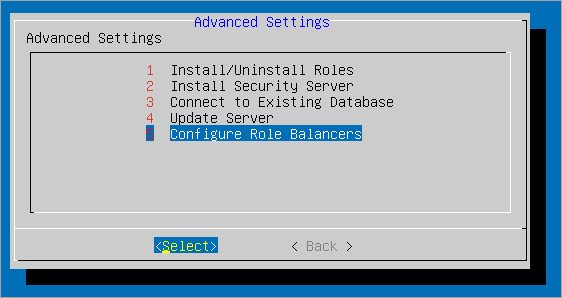
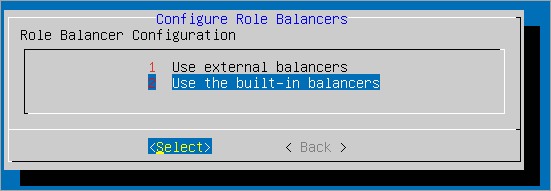
Select Use the built-in balancers from the available options and Select.
Select Communication Server Balancer from the available options.
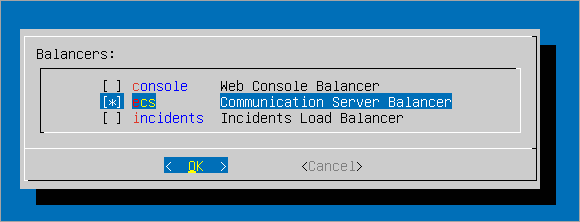
Select OK to continue.
Configure a new Communication Server in the DMZ
To configure a new Communication Server in the DMZ, use these steps:
Connect to the GravityZone VM Console from your Hypervisor.
Login as bdadmin.
If you have an external balancer and have not configured a new role balancer, follow the steps below:
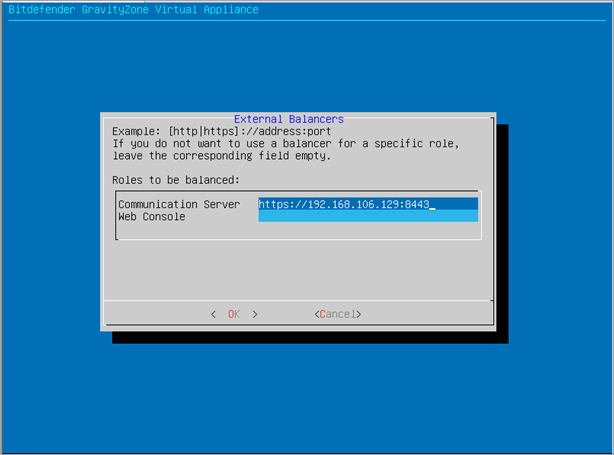
Go to Advanced Settings > Configure Role Balancers > Use external balancers.
Next to Communication Server, enter the IP address of the balancer, followed by port 8443:
https://IP_OF_BALANCER:8443
Select OK to save the changes made.
Note
Leave the Web Console field blank.
Import a new GravityZone virtual appliance image to your Hypervisor of choice on a virtual host in the DMZ.
Connect to the new GravityZone VM Console from your Hypervisor and configure the settings under the Configure Hostname Settings and Configure Network Settings sections.
Connect the appliance to an existing Database that is running on the Production Server.
Go to Advanced Settings > Install/Uninstall Roles > Add or remove roles > Add the Communication Server role only and click OK to finalize the changes.
Install BEST on the devices
The BEST client can be installed manually through an installation package or remotely deployed via the GravityZone Control Center.
The installation package used for the manual installation must be configured to communicate with the public IP address of the DMZ Communication Server.
Follow these steps:
Log in to GravityZone Control Center.
Go to the Installation Packages page from the left side menu.
Select Add.
Configure the installation package for your endpoints.
Note
For more information on the creating packages, refer to Create installation packages.
Under the Deployer section, apply these changes to set up communication with a DMZ relay:

Install the newly created packages to all endpoints located in the DMZ.
Go to the Policies page from the left side menu in GravityZone Control Center.
Click the Add button to create a new policy.
Under the General tab, select Communication.
Under the Endpoint Communication Assignment section, from the drop-down menu for the IP column, select the Communication Server’s IP address.
Note
Based on your network configuration, you can also select the IP address of your DMZ Relay, or GravityZone appliance.
Add the public IP of the DMZ under the Custom Name/IP field.
Click the Add button.

Under the same General tab, click the Save button in the lower part of the window.
While still editing the same policy, under the General tab, go the the Update page.
Under the Update locations section, add the relay server IP address (if any) in the Add location box and click the Add button.

Finish configuring the policy to fit your company's needs.
Note
For more information on creating policy templates, refer to Creating policies.
Assign the new policy template to each endpoint located in the DMZ.