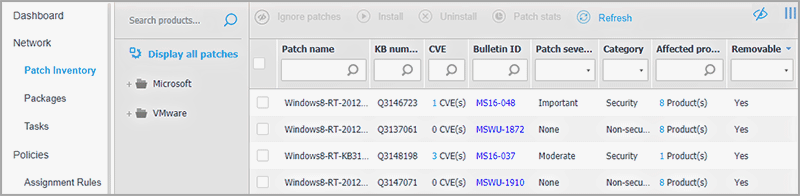
Patch Inventory
GravityZone discovers the patches your software needs through Patch Scan tasks and then adds it to the patch inventory.
The Patch Inventory page displays all patches discovered for the software installed on your Windows and Linux endpoints and provides several actions you can take on these patches.
Use Patch Inventory whenever you need to deploy immediately certain patches. This alternative allows you to easily resolve certain issues you are aware of. For example, you have read an article about a software vulnerability and you know the CVE ID, you can search the inventory for the patches addressing that CVE and then view which endpoints should be updated.
Note
To automatically manage patch scanning and patch installation on endpoints, use maintenance windows in Policies > Configuration Profiles.
To access the Patch Inventory page, click the Network > Patch Inventory option in the main menu of Control Center.
The page is organized in two panes:
The left-side pane displays the software products installed in your network, grouped by operating system and vendor.
The right-side pane displays a table with available patches and details about them.
Next, you will learn how to use the inventory. This is what you can do:
Viewing patch details
The patches table provides information that helps you identify patches, evaluate their importance, view their installation status and scope. The details are described herein:
Patch name: this is the name of the executable file containing the patch.
KB number: this number identifies the KB article that announces the patch release.
CVE: this is the number of CVEs addressed by the patch. Clicking the number will display the list of CVE IDs.
Bulletin ID: this is the ID of the security bulletin issued by the vendor. This ID links to the actual article, which describes the patch and provides installation details.
Patch severity: this rating informs you of the patch importance relative to the damages it prevents.
OS type: this category indicates if patches are available for either Windows, Linux or macOS operating systems.
Category: based on the type of issues they resolve, patches are groups in three categories: security, non-security, and manually approved. This field informs you in which category the patch is.
Installed / Pending installation: these numbers show how many endpoints have the patch installed and how many are waiting for the patch to be installed. The numbers link to the list of these endpoints.
Missing / Installation failed: these numbers show how many endpoints do not have the patch installed and on how many installation failed. The numbers link to the list of these endpoints.
Affected products: this is the number of products for which the patch was released. The number links to the list of these software products.
Removable: if you need to rollback a certain patch, you must first check if the patch can be uninstalled. Use this filter to find out which patches can be removed (rolled back). For more information, refer to Uninstall patches.
To customize the details displayed in the table:
Click the
 Columns button at the right side of the action toolbar.
Select the columns you want to view.
Click the Reset button to return to the default columns view.
While you are on the page, GravityZone processes that run in the background may affect the database. Make sure you view the latest information in the table by clicking the  Refresh button at the upper side of the table.
Searching and filtering patches
By default, Control Center displays all available patches for your software. GravityZone provides you with several options to quickly find the patches you need.
Filtering patches by product
Locate the product in the left side pane.
You can do this either by scrolling the list to find its vendor, or by typing its name in the search box at the upper side of the pane.
Click the vendor's name to expand the list and view its products.
Select the product to view the available patches, or deselect it to hide its patches.
Repeat the previous steps for the other products you are interested in.
Note
To search for system patches, use the asterisk (*) as a wildcard in the Patch Name field, followed by the desired keyword. The KB number field displays numbers usually starting with a Q and followed by a number, e.g. KB5019180 would be displayed as Q5019180.
If you want to view patches for all products again, click the Display all patches button at the upper side of the left-side pane.
Filtering patches by utility
A patch becomes needless if, for example, itself or a newer version is already deployed on the endpoint. Because the inventory may contain at some point such patches, GravityZone allows you to ignore them. Select these patches and then click the Ignore patches button at the upper side of the table.
Control Center displays ignored patches in a different view. Click the Managed/Ignored button at the right side of the action toolbar to switch between views:
 - to view ignored patches.
 - to view managed patches.
Filtering patches by details
Use the power of search to filter patches after certain criteria or after known details. Enter the search terms in the search boxes at the upper side of the patches table. Matching patches are displayed in the table as you type, or upon the selection made.
Clearing the search fields will reset the search.
Ignoring patches
You may need to exclude certain patches from patch inventory, if you do not plan to install them on your endpoints, by using the Ignore patches command.
An ignored patch will be excluded from automatic patch tasks and patch reports, and it will not be counted as a missing patch.
To ignore a patch:
In the Patch Inventory page, select one or several patches you want to ignore.
Click the
Ignore Patches button at the upper side of the table.A configuration window will appear, where you can view details about the selected patches, together with any subordinate patches.
Click Ignore. The patch will be removed from the patch inventory list.
You can find ignored patches in a specific view and take actions on them:
Click
Display ignored patches button at the upper-right side of the table. You will view the list of all ignored patches.You can obtain more information about a certain ignored patch by generating a patch statistics report. Select the ignored patch that you want and click the
 Patch stats button at the upper side of the table. For more details, refer to on this page.
To restore ignored patches, select them and click the
 Restore patches button at the upper side of the table.
A configuration window will appear, where you can view details about the selected patches.
Click the Restore button to send the patch to the inventory.
Installing patches
To install patches from Patch Inventory:
Log in to GravityZone Control Center.
Go to the Network > Patch Inventory page from the left side menu.
Locate the patches you want to install. If necessary, use the filtering options to quickly find them.
Select the patches and then click the
 Install button at the upper side of the table. A configuration window will appear, where you can edit the patch install details.
You will view the selected patches, together with any subordinate patches.
Select the target groups of endpoints.
Reboot endpoints after installing the patch, if required. This option will restart the endpoints immediately after the patch installation, if a system restart is required. Take into account that this action may disrupt the user activity.
Leaving this option disabled means that, if a system restart is needed on target endpoints, they will display the
 pending restart status icon in the GravityZone network inventory. In this case, you have the following options:
Send a Restart endpoint task to pending restart endpoints at any time you choose. For more details, refer to Restart machine.
Configure the active policy to notify the endpoint user that a restart is needed. To do that, access the active policy on the target endpoint, go to General > Notifications and enable the option Endpoint Restart Notification. In this case, the user will receive a pop-up each time a restart is needed due to changes made by the specified GravityZone components (in this case, Patch Management). The pop-up provides the option to postpone the reboot. If the user chooses to postpone, the restart notification will appear on-screen periodically, until the user restarts the system or until the time set by the Company Administrator has passed.
For more details, refer to Endpoint restart notification.
Click Install.
The installation task is created, together with sub-tasks for each target endpoint.
Note
You can also install a patch from the Network page, starting from the specific endpoints you want to manage. In this case, select the endpoints from the Network inventory, click the
 Tasks button at the upper side of the table and choose Patch Install. For more information, refer to Patch install.
After installing a patch, we recommend sending a Patch scan task to target endpoints. This action will update the patch information stored in GravityZone for your managed networks.
Uninstalling patches
You may need to remove patches that caused malfunctions on the target endpoints. GravityZone provides a rollback feature for patches installed in your network on Windows endpoints, which restores software to its previous state before applying the patch.
The uninstall feature is available for removable patches only. The GravityZone patch inventory includes a Removable column, where you can filter patches by their removability.
Note
The removability attribute depends upon how the patch was issued by the manufacturer or the changes made by the patch to the software. For patches that cannot be removed, you may need to reinstall the software.
GravityZone does not support uninstalling patches on Linux.
To uninstall a patch:
Log in to GravityZone Control Center.
Go to the Network > Patch Inventory page from the left side menu.
Select the patch you want to uninstall. To search for a specific patch, use the filters available on columns, such as KB number or CVE. Use the Removable column to display only the available patches that can be uninstalled.
Note
You can uninstall only one patch at a time for one or several endpoints.
Click the
 Uninstall button at the upper side of the table. A configuration window will appear, where you can edit the uninstall task details.
Task name. You can edit the default name of the patch uninstall task, if you want. Thus, you will identify easier the task in the network.tasks Tasks page.
Add patch to the list of ignored patches. Usually, you will not need any more a patch you want to uninstall. This option automatically adds the patch to the ignored list, once the patch is uninstalled.
Reboot endpoints after uninstalling the patch, if required. This option will restart the endpoints immediately after the patch uninstallation, if a system restart is required. Take into account that this action may disrupt the user activity.
Leaving this option disabled means that, if a system restart is needed on target endpoints, they will display the
pending restart status icon in the GravityZone network inventory. In this case, you have the following options:Send a Restart endpoint task to pending restart endpoints at any time you choose. For more details, refer to Restart machine.
Configure the active policy to notify the endpoint user that a restart is needed. To do that, access the active policy on the target endpoint, go to General > Notifications and enable the option Endpoint Restart Notification. In this case, the user will receive a pop-up each time a restart is needed due to changes made by the specified GravityZone components (in this case, Patch Management). The pop-up provides the option to postpone the reboot. If the user chooses to postpone, the restart notification will appear on-screen periodically, until the user restarts the system or until the time set by the Company Administrator field has passed.
For more details, refer to Endpoint restart notification.
Under Rollback targets table, select the endpoints on which you want to uninstall the patch.
You can select one or several endpoints from your network. Use the available filters to locate the endpoint that you want.
Note
The table displays only the endpoints where the selected patch is installed.
Click Confirm. A Patch Uninstall task will be created and sent to target endpoints.
A Patch Uninstall report is automatically generated for each finished patch uninstall task, providing details about the patch, the target endpoints and the uninstall patch task status.
Note
After uninstalling a patch, we recommend sending a Patch scan task to target endpoints. This action will update the patch information stored in GravityZone for your managed networks.
Creating patch statistics
If you need details about the status of a certain patch for all endpoints, use the Patch stats functionality, which generates an instant report for the selected patch:
In the Patch Inventory page, select the patch that you want from the right pane.
Click the
Patch stats button at the upper side of the table.A patch statistics report shows up, providing various patch status details, including:
A pie chart, showing the percentage of installed, failed, missing and pending patch status for the endpoints that have reported the patch.
A table displaying the following information:
Name, FQDN, IP and OS of each endpoint that has reported the patch.
Last Check: the time when the patch was last checked on the endpoint.
Patch Status: installed, failed, missing or ignored.
Note
The patch stats functionality is available for both managed and ignored patches.