On-access
In the Antimalware > On-access section of the policy, you can configure the antimalware protection when endpoint users access local and network files.
Important
This functionality is enabled only if the security agent installed on endpoints is running in Detection and prevention mode. To access this setting, go to the Installation packages page and click on the packages you want to use. You can find it as Operation Mode under the Security Modules and Roles section.
On-access Scanning
On-access scanning prevents new malware threats from entering the system by scanning local and network files when they are accessed (opened, moved, copied or executed), boot sectors and potentially unwanted applications (PUA).
Note
This feature has certain limitations on Linux-based systems. For details, see to the requirements for GravityZone.
To configure on-access scanning:
Click the toggle to enable On-access Scanning.
Warning
If you turn off on-access scanning, endpoints will be vulnerable to malware.
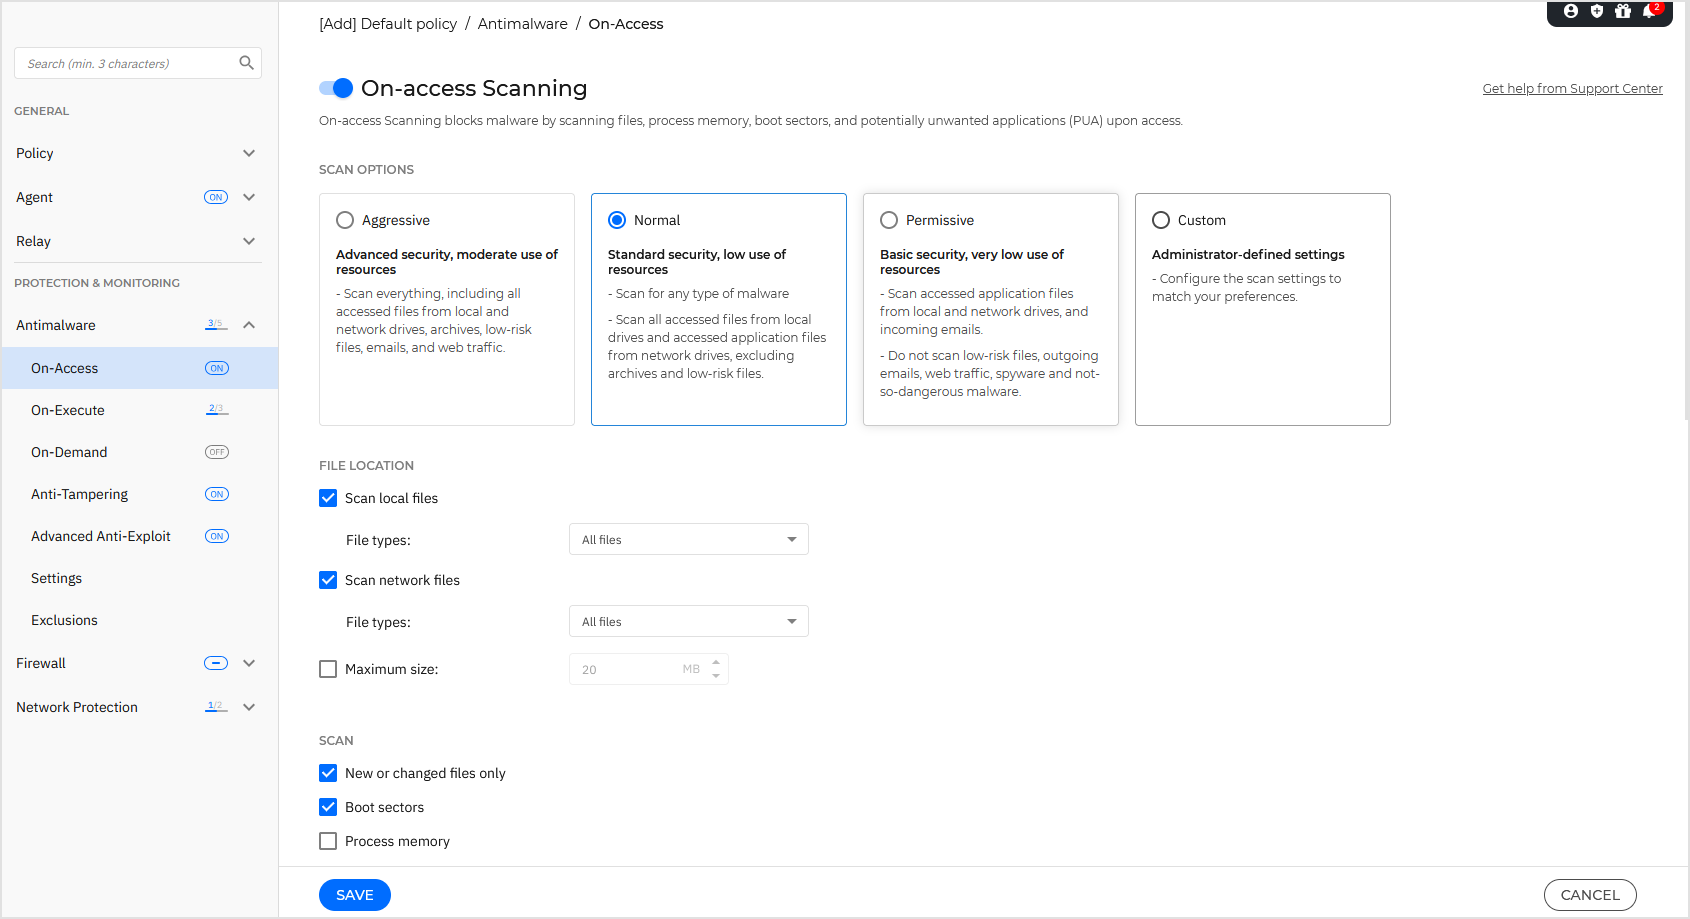
For a quick configuration, select the security level that best suits your needs (Aggressive, Normal or Permissive).
Use the descriptions to guide your choice.
Alternately, start configuring the task settings. The security level automatically becomes Custom.
The scan task settings are organized as follows:
File location - Use these options to specify which types of files you want to be scanned. Scanning preferences can be configured separately for local files (stored on the local endpoint) or network files (stored on network shares).
If antimalware protection is installed on all computers in the network, you may disable the network file scan to allow faster network access.
You can set the security agent to scan all accessed files (regardless of their file extension), application files only or specific file extensions you consider to be dangerous.
Scanning all accessed files provides the best protection while scanning applications only can increase the system's performance.
Note
Application files are considerably more vulnerable to malware attacks than other types of files. For more information, refer to Application file types.
If you want only specific extensions to be scanned, choose User-defined extensions from the menu and then enter the extensions in the edit field, pressing
Enterafter each extension.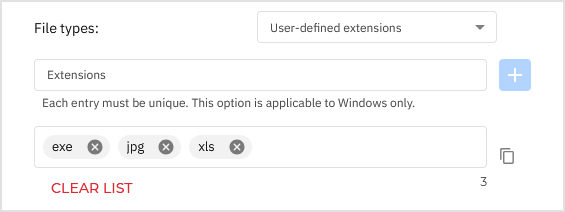
To use the list of extensions elsewhere, click the
 Copy to clipboard button.
To remove extensions one by one, click the
 Delete button next to them. To remove all extensions, click the Clear list option.
Note
On Linux-based systems, file extensions are case sensitive and the files with the same name but with different extension are considered distinct objects. For example,
file.txtis different fromfile.TXT.For system performance reasons, you can also exclude large files from scanning.
Select Maximum size checkbox and specify the size limit of the files which will be scanned. Use this option wisely because malware can affect larger files too.
Scan - Select the corresponding checkboxes to enable the desired scan options:
Only new or changed files
By scanning only new and changed files, you may greatly improve overall system responsiveness with a minimum trade-off in security.
Boot sectors
Scans the system’s boot sector.
This sector of the hard disk contains the necessary code to start the boot process.
When a virus infects the boot sector, the drive may become inaccessible and you may not be able to start your system and access your data.
Process memory
Scans the memory of a process to detect in-memory malicious behavior.
For keyloggers
Keyloggers record what you type on your keyboard and send reports over the Internet to a malicious person (hacker).
The hacker can find out sensitive information from the stolen data, such as bank account numbers and passwords, and use it to gain personal benefits.
For potentially unwanted applications (PUA)
A potentially unwanted application (PUA) is a program that may be unwanted on the PC and sometimes comes bundled with freeware software. Such programs can be installed without the user's consent (also called adware) or will be included by default in the express installation kit (ad-supported). Potential effects of these programs include the display of pop-ups, installing unwanted toolbars in the default browser or running several processes in the background and slowing down the PC performance.
Archives
Select this option if you want to enable on-access scanning of archived files. Scanning inside archives is a slow and resource-intensive process, which is therefore not recommended for real-time protection. Archives containing infected files are not an immediate threat to system security. The malware can affect the system only if the infected file is extracted from the archive and executed without having on-access scanning enabled.
If you decide on using this option, you can configure the following optimization options:
Archive maximum size
You can set a maximum accepted size limit of archives to be scanned on-access.
Select the corresponding check box and type the maximum archive size (in MB).
Archive maximum depth (levels)
Select the corresponding check box and choose the maximum archive depth from the menu.
For best performance choose the lowest value, for maximum protection choose the highest value.
Deferred scanning
Deferred scanning improves system performance when performing file access operations. For example, system resources are not affected when large files are copied. This option is enabled by default.
Scan actions - Depending on the type of detected file, the following actions are taken automatically:
Action for infected objects
Bitdefender detects objects (files, registries etc.) as infected through various advanced mechanisms, which include malware signatures, machine learning, and artificial intelligence (AI) based technologies.
Bitdefender security agent can normally move the infected object to the quarantine, deny access to it, and attempt to disinfect it by removing the malware code and reconstructing the original object.
By default, if an infected object is detected, Bitdefender security agent will automatically attempt to remediate it.
You can change this recommended flow according to your needs.
Important
For particular types of malware, disinfection is not possible because the detected file is entirely malicious. In such cases, the infected object is deleted from the disk.
Action for PUA
By default, detected potentially unwanted applications are only reported, but not remediated.
Action for network files
By default, the action for network files is deny access.
Though not recommended, you can change the default actions. The following actions are available:
Deny access
Access to infected objects is denied.
Important
For MAC endpoints, Move to quarantine action is taken instead of Deny access.
Remediate
Access to the infected objects is denied, and they are moved to quarantine. An attempt is then made to disinfect the system by removing the malware code and any artifacts created by the malware.
It is recommended to always keep this as the first action to be taken on infected objects.
Note
To automatically move the infected objects to quarantine, make sure you have selected Copy files to quarantine before applying the disinfect action in the Antimalware > Settings section of the policy.
Move to quarantine
Infected objects are moved from their current location to the quarantine folder. Quarantined objects cannot be executed or opened; therefore, the risk of getting infected disappears. You can manage quarantine objects from the Quarantine page of the console.
Report only
No action will be taken on infected objects. These objects will only appear in the scan log.
Linux directory scanning - Enter directory paths for on-access scanning on Linux endpoints.
By default, there are five entries in the table, each one corresponding to a specific location on endpoints:
/home,/bin,/sbin,/usr,/etc.To add more entries:
In the Add directories field, write one custom location at a time.
Click the
 Add button.
To edit an existing location:
Click the
 Edit button in the Actions column.
Edit the directory path.
Click the
 OK button to save the changes.
Alternately, click the
 Cancel button to discard the changes.
To delete a location, click the
Delete button in the Actions column.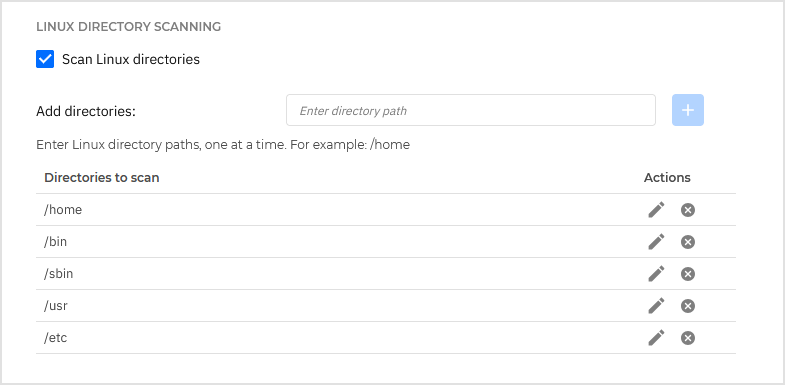
DazukoFS third-party kernel module
DazukoFS third-party kernel module enables Bitdefender Endpoint Security Tools to perform on-access scanning on Linux. For information on enabling on-access scanning and specifying the directories to be scanned on Linux, refer to the Antimalware On-access scanning section.
The Linux version of Bitdefender Endpoint Security Tools includes an on-access scanning module that, for specific Linux distributions and kernel versions, requires the third-party DazukoFS loadable kernel module. DazukoFS is a stackable file system that enables third-party applications to control file access on Linux systems.
The Bitdefender Endpoint Security Tools installation package includes and automatically installs DazukoFS for selected supported Linux kernel versions. The DazukoFS package shipped with Bitdefender Endpoint Security Tools is compiled for the kernel versions listed in the table below:
Linux Distribution | Kernel version |
CentOS 6.x | 2.6.32-754.35.1.el6 |
Red Hat Enterprise Linux 6.x |
To use on-access scanning on supported Linux distributions with lower kernel versions that are unsupported by DazukoFS, you must manually compile and install the DazukoFS package for the corresponding kernel.
Important
DazukoFS is a legacy solution. To perform on-access scanning on Linux systems with kernel versions 2.6.38 and higher, you need to enable Fanotify. For the on-access scanning requirements on Linux, including the list of kernels supporting DazukoFS and Fanotify, refer to this article.
To learn more about possible issues with on-access scanning on Linux, refer to On-access scanning in Bitdefender Endpoint Security Tools for Linux.
Other useful topics:
Manually compile and install the DazukoFS module
In this section, you will learn how to manually compile and install the DazukoFS module. Follow these steps:
Download the proper kernel headers.
On Ubuntu systems, run this command:
$ sudo apt-get install linux-headers-'uname-r'On RHEL/CentOS systems, run this command:
$ sudo yum install kernel-devel kernel-headers-'uname-r'
On Ubuntu systems, you need
build-essential:$ sudo apt-get install build-essentialOn RHEL/CentOS systems, you need
yum-utils:$ yum install -y yum-utils
Copy and extract the DazukoFS source code in a preferred directory:
# mkdir /tmp/Dazukotemp# cd /tmp/Dazukotemp# cp /opt/bitdefender-security-tools/share/src/dazukofs-source.tar.gz .# tar -xzvf dazukofs-source.tar.gz# cd dazukofs-3.1.4Compile the module:
# makeInstall and load the module:
# make dazukofs_install
DazukoFS limitations
For DazukoFS and on-access scanning module to work together, a series of conditions must be met. Please check if any of the statements below apply to your Linux system and follow the guidelines to avoid issues:
The SELinux policy must be either disabled or set to permissive. To check and adjust the SELinux policy setting, edit the /etc/selinux/config file.
Bitdefender Endpoint Security Tools is exclusively compatible with the DazukoFS version included in the installation package. If DazukoFS is already installed on the system, remove it prior to installing Bitdefender Endpoint Security Tools .
DazukoFS supports the following kernel versions:
2.6.32-754.35.1.el6.x86_642.6.32-754.35.1.el6.centos.plus.x86_642.6.32-754.35.1.el6.i6862.6.32-754.35.1.el6.centos.plus.i686
If the DazukoFS package shipped with Bitdefender Endpoint Security Tools is not compatible with the system's kernel version, the module will fail to load. In such case, you can either update the kernel to the supported version or recompile the DazukoFS module for your kernel version. You can find the DazukoFS package in the Bitdefender Endpoint Security Tools installation directory:
/opt/bitdefender-security-tools/share/modules/dazukofs/dazukofs-modules.tar.gzWhen sharing files using dedicated servers such as NFS, UNFSv3 or Samba, you first need to enable on-access scanning and then mount the network shares, as follows:
Enable on-access scanning via policy from Control Center. For more information, refer to On-Access policy settings.
Start the network sharing service.
Note
For NFS:
# service nfs startFor UNFSv3:
# service unfs3 startFor Samba:
# service smbd start
Important
For the NFS service, DazukoFS is compatible only with NFS User Server.