Security for mobile devices
Security for mobile devices is a mobile device management solution designed for iPhone, iPad and Android devices.
Before you start, make sure the mobile devices and the GravityZone environment meet the requirements and you have configured a public (external) address for the communication server appliance.
To manage Security for mobile devices from Control Center, you have to add mobile devices to Active Directory or custom users, then install the GravityZone Mobile Client application on devices. After setting up the service, you can run administrative tasks on mobile devices.
Note
GravityZone Security for mobile devices has reached End-of-Life. You will continue to receive support for the Security for mobile devices feature until your license expires. For more detail refer to this kb article.
To install Security for mobile devices:
If you do not have integration with Active Directory, you must create users for mobile device owners.
Install GravityZone Mobile Client on devices and activate it.
Requirements
To install and manage mobile device protection, you have to meet a series of conditions:
Mobile devices run on supported platforms. For details, refer to this section.
Connectivity requirements are satisfied. For details, refer to this section.
Push notifications services are enabled. For details, refer to this section.
You have provided the necessary security certificates for iOS in GravityZone Control Center. The required certificates are:
Communication server appliance certificate
Apple MDM Push certificate
iOS MDM Identity and Profile Signing certificate
iOS MDM Trust Chain
For details on how to create security certificates, refer to this section.
For details on how to add security certificates in GravityZone Control Center, refer to this section.
Configure external address for communication server appliance
In the default GravityZone setup, mobile devices can be managed only when they are directly connected to the corporate network (via Wi-Fi or VPN). This happens because when enrolling mobile devices they are configured to connect to the local address of the communication server appliance.
To be able to manage mobile devices over the Internet, no matter where they are located, you must configure the communication server appliance with a publicly reachable address.
To be able to manage mobile devices when they are not connected to the company network, the following options are available:
Configure port forwarding on the corporate gateway for the appliance running the Endpoint Communication Server and Endpoint Events Processing Server roles.
Add an additional network adapter to the communication server appliance and assign it a public IP address.
In both cases, you must configure the communication server appliance with the external address to be used for mobile device management:
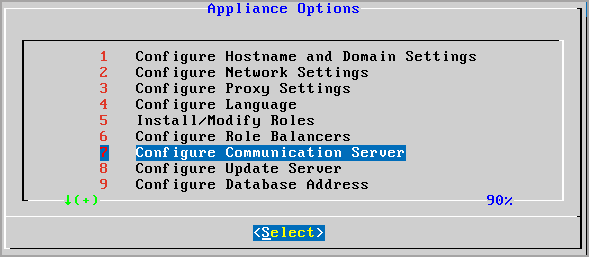
Access the appliance console from your virtualization management tool (for example, vSphere Client).
From the main menu, select Configure Communication Server.
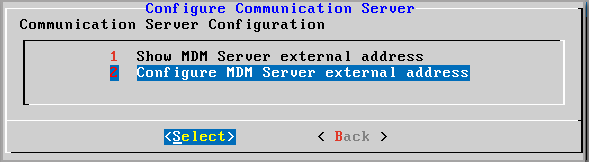
Select Configure MDM Server external address.
Enter the external address.
Use the following syntax:
https://<IP/Domain>:<Port>.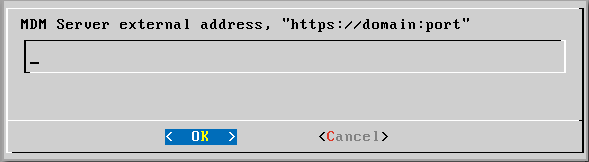
If you use port forwarding, you must enter the public IP address or domain name and the port open on the gateway.
If you use a public address for the communication server appliance, you must enter the public IP address or domain name and the communication server port. The default port is
8443.
Select OK to save the changes.
Create and organize custom users
In non-Active Directory situations, you must first create custom users in order to have a mean to identify the owners of mobile devices. Specified mobile device users are not linked in any way with Active Directory or with other users defined in Control Center.
Creating custom users
To create a custom user:
Go to the Network page from the left side menu in GravityZone Control Center.
Choose Mobile Devices from the views selector.
In the left-side pane, select Custom Groups.
Click the
 Add User icon on the action toolbar. A configuration window will appear.
Specify the required user details:
A suggestive username (for example, the user's full name)
User's email address
Important
Make sure to provide a valid email address. The user will be sent the installation instructions by email when you add a device.
Each email address can only be associated with one user.
Click OK.
Organizing custom users
To organize custom users:
Create custom groups.
Select Custom Groups in the left-side pane and click the
 Add icon on the action toolbar (above the pane).
Enter a suggestive name for the group and click OK. The new group is displayed under Custom Groups.
Move custom users into appropriate custom groups.
Select users in the right-side pane.
Drag and drop the selection over the desired group in the left-side pane.
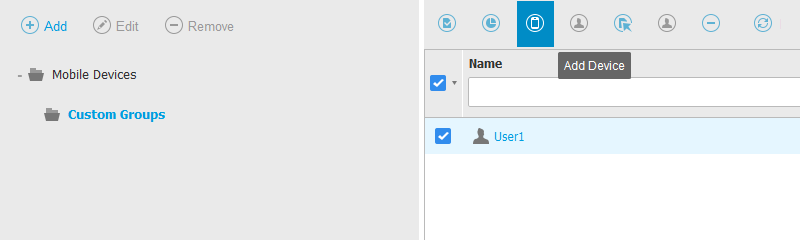
Add devices to users
To add a device to a user:
Go to the Network page from the left side menu in GravityZone Control Center.
Choose Mobile Devices from the views selector.
Search the user in the Active Directory folders or in Custom Groups.
Click the
Add Device icon on the upper side of the network table. A configuration window will appear.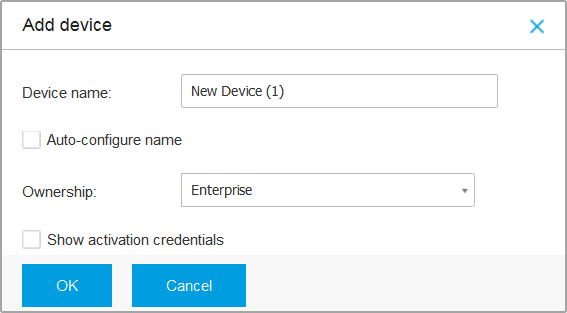
Enter a suggestive name for the device.
Use the Auto-configure name option if you want the device name to be automatically generated. When added, the device has a generic name. Once the device is activated, it is automatically renamed with the corresponding manufacturer and model information.
Select the device ownership type (Enterprise or Personal).
Select the Show activation credentials option after clicking the OK button if you are going to install the GravityZone Mobile Client on the user's device.
Click OK. The user is immediately sent an email with the installation instructions and the activation details to be configured on the device. The activation details include the activation token and the communication server address (and corresponding QR code).
Note
You can view the activation details of a device at any time by clicking its name in Control Center.
You can also add mobile devices to a selection of users and groups. In this case, the configuration window will allow defining the devices ownership only. Mobile devices created by multiple selection will be given by default a generic name. As soon as a device is enrolled, its name will automatically change, including the corresponding manufacturer and model labels.
Install GravityZone Mobile Client on devices
The GravityZone Mobile Client application is exclusively distributed via Apple App Store and Google Play.
To install GravityZone Mobile Client on a device:
Search for the application on the official app store:
Download and install the application on the device.
Start the application.
Make the required configuration:
On Android devices:
Allow GravityZone Mobile Client to access the device resources.
Enter the activation token and the communication server address or, alternatively, scan the QR code received by email.
Note
Activation information is available from Control Center in the mobile device's details and also in the email received by user.
Tap Trust when prompted to accept the communication server appliance certificate and confirm the action. This way, GravityZone Mobile Client validates the communication server appliance and will accept only messages from it, preventing man-in-the-middle attacks.
When prompted to enable GravityZone Mobile Client as device administrator, read carefully the provided information and tap OK.
Review the operations GravityZone Mobile Client is allowed to perform and tap Activate this device admin app.
Note
Lock task for Android devices (7.0 or above) will enforce the password set in your GravityZone console only if there is no lock protection configured on the device. Otherwise, the existing screen lock options such as Pattern, PIN, Password, Fingerprint or Smart Lock will be used to protect the device.
Unlock task is no longer available for Android devices (7.0 or above). Unlock task in not available on iOS.
On iOS devices, you are prompted to install the MDM profile. If your device is password protected, you will be asked to provide it. Also, you have to allow GravityZone to access your device settings, otherwise the installation process returns to the previous step.
Follow the on-screen instructions to complete profile installation. During installation, you must accept the Bitdefender certificate.
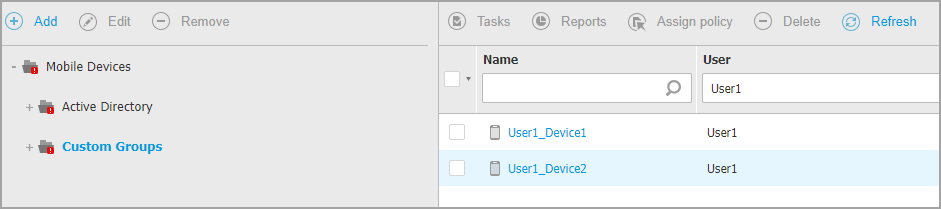
Once the installation is complete, you can view managed mobile devices in the GravityZone Control Center, under corresponding users.

Click the number of devices for the user you are interested in to display the list of attached mobile devices.
Caution
Starting with Android 10, GravityZone Mobile Client does not have access to the serial number, IMEI, IMSI, and MAC address of the device. This restriction leads to the following situations:
If the mobile device, already having GravityZone Mobile Client installed, upgrades from an older Android version to Android 10, Control Center will display the correct device details. Before upgrade, the device must run the latest version of GravityZone Mobile Client.
If GravityZone Mobile Client installs on an Android 10 device, Control Center will display inaccurate details about that device because of the limitation imposed by the operating system.