Connect to Control Center and set up user account
After deploying and setting up the GravityZone appliance, you must access the Control Center web interface to register the GravityZone product and configure your Company Administrator account.
In the address bar of your web browser, enter the IP address or the DNS hostname of the Control Center appliance (using the
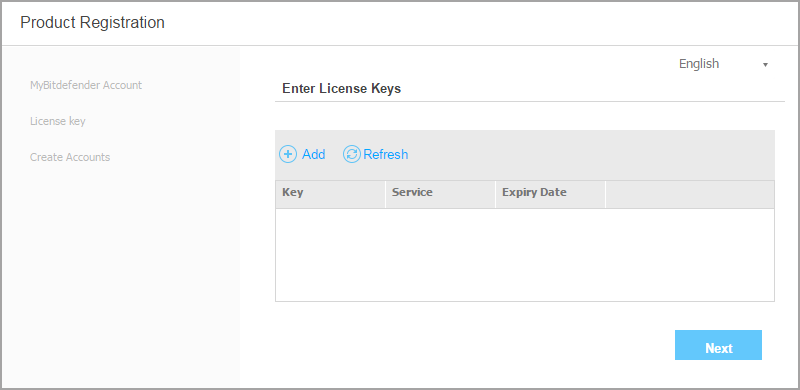
https://prefix). A configuration wizard will appear.Provide the license key(s) required for validating the purchased GravityZone solution.
You can also provide any GravityZone add-on key you may have.
Check the trial registration or purchase email to find your license keys.
Click the
 Add button at the upper side of the table. A configuration window will appear.
Select the license registration type (online or offline).
Enter the license key in the License key field.
Wait until the license key is validated. Click Add to finish.
The license key will appear in the license table. You can also view the security service, status, expiry date and current usage for each license key in the corresponding columns.
Note
During the initial setup, you must provide a valid basic license key to start using GravityZone. You can afterwards add license keys for add-ons, or to modify the existing ones.
You can use the add-ons as long as a valid basic license is provided. Otherwise you will view the features, but you will be unable to use them.
Click Next to continue.
Fill in your company information, such as company name, address and phone.
You can change the logo displayed in Control Center and also in your company's reports and email notifications as follows:
Click Change to browse for the image logo on your computer. The image file format must be .png or .jpg and the image size must be 200x30 pixels.
Click Default to delete the image and reset to the image provided by Bitdefender.
Specify the required details for your company administrator account: username, email address and a password. The password must contain at least one upper case character, at least one lower case character and at least one digit or special character.
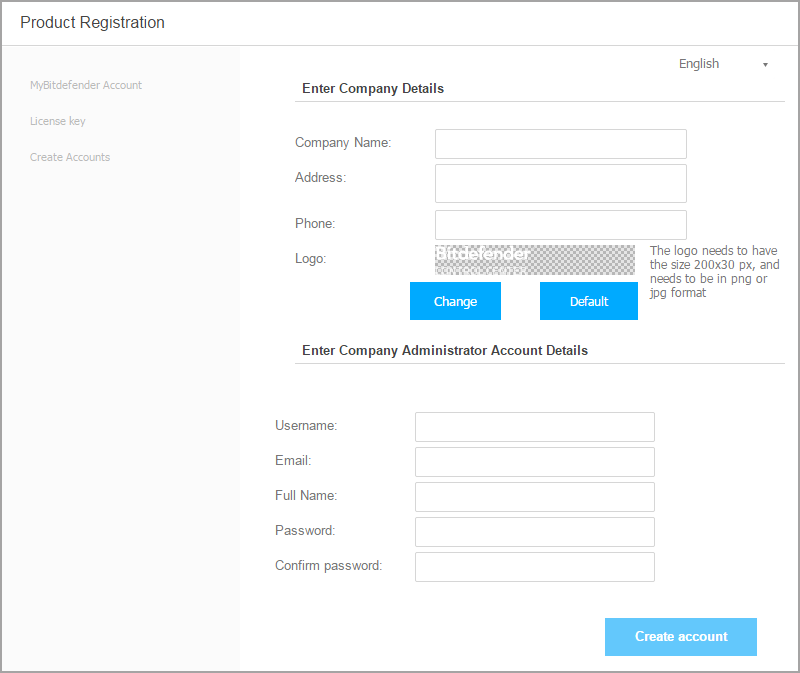
Click Create account.
The company administrator account will be created and you will automatically log on with the new account to Bitdefender Control Center.
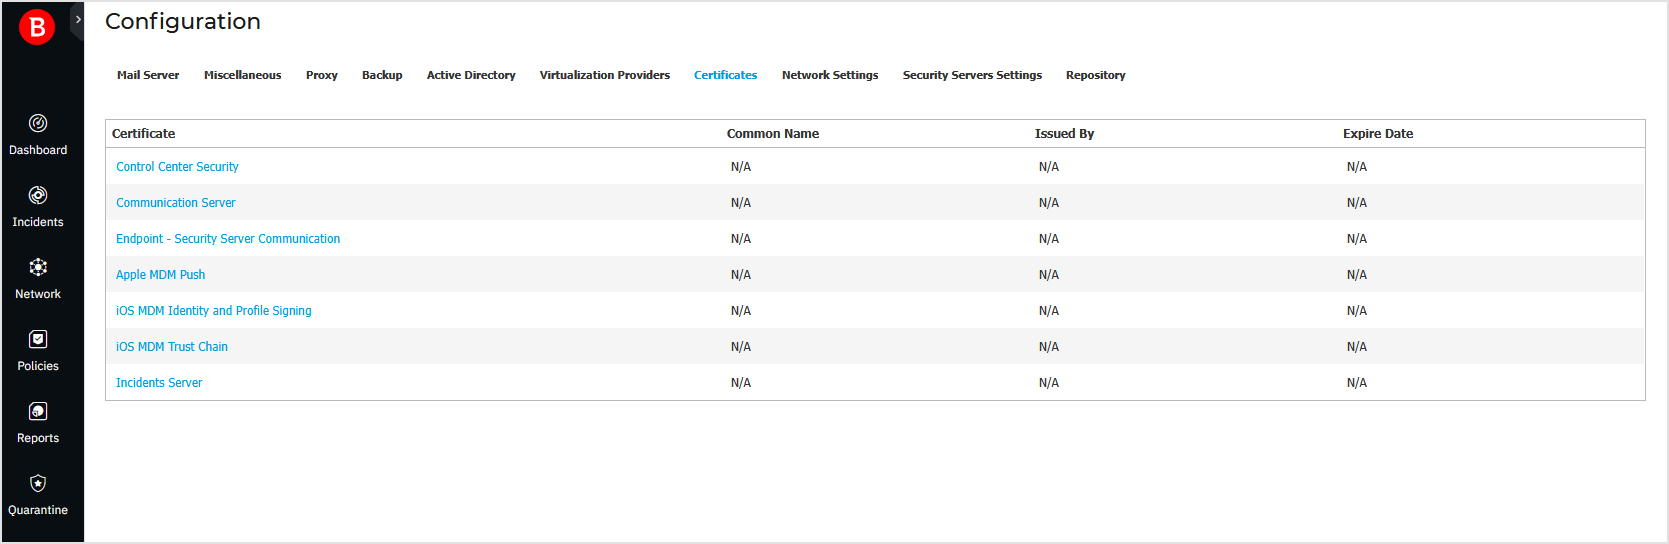
Certificates
For your deployment to operate correctly and in a secure manner, you must create and add a number of security certificates in Control Center.
Control Center supports the following certificate formats:
PEM (.pem, .crt, .cer, .key)
DER (.der, .cer)
PKCS#7 (.p7b, .p7c)
PKCS#12 (.p12, .pfx)
Note
The following certificates are required exclusively for managing security on Apple iOS devices:
Communication server appliance certificate
Apple MDM Push Certificate
iOS MDM Identity and Profile Signing Certificate
iOS MDM Trust Chain Certificate
If you do not plan to roll out iOS mobile device management, you do not need to provide these certificates.
Control Center security certificate
The Control Center Security certificate is needed to identify the Control Center web console as a trusted website in the web browser.
Control Center uses by default an SSL certificate signed by Bitdefender.
This built-in certificate is not recognized by web browsers and triggers security warnings.
To avoid browser security warnings, add an SSL certificate signed by your company or by an external Certificate Authority (CA).
To add or replace the Control Center certificate:
Log in to GravityZone Control Center.
Go to the Configuration page from the left side menu.
Click the Certificates tab.
Click the certificate name.
Choose the certificate type (with separate or embedded private key).
Click the Add button next to the Certificate field and upload the certificate.
For certificates with separate private key, click the Add button next to the Private key field and upload the private key.
If the certificate is password protected, enter the password in the corresponding field.
Click Save.
Important
If you import certificates, they must meet the following requirements:
They are RSA certificates
They have at least 2048 bits
They have a SHA-256 signature algorithm
We do not offer support for certificates that use elliptic-curve cryptography (ECC) keys.
Endpoint - Security Server communication security certificate
This certificate ensures secure communication between the security agents and the Security Server (Multi-Platform) they have assigned.
During its deployment, the Security Server generates a default self-signed certificate. You can replace this built-in certificate by adding one of your choice in Control Center.
To add or replace an Endpoint - Security Server Communication Certificate:
Log in to GravityZone Control Center.
Go to the Configuration page from the left side menu.
Click the Certificates tab.
Click the certificate name.
Choose the certificate type (with separate or embedded private key).
Click the Add button next to the Certificate field and upload the certificate.
For certificates with separate private key, click the Add button next to the Private key field and upload the private key.
If the certificate is password protected, enter the password in the corresponding field.
Click Save. A warning message may appear if the certificate is self-signed or expired. If expired, please renew your certificate.
Click Yes to continue uploading the certificate. Immediately after the upload finishes, Control Center sends the security certificate to the Security Servers.
If needed, you can revert to the original built-in certificate of each Security Server, as follows:
Click the certificate name in the Certificates page.
Choose No certificate (use default) as the certificate type.
Click Save.
Communication server appliance certificate
This certificate secures communication between the communication server appliance and iOS mobile devices.
Requirements:
This SSL certificate can be signed either by your company or by an external Certificate Authority.
Warning
The certificate may be invalidated if it is not issued by a public/trusted Certificate Authority (for example, self-signed certificates).
The certificate common name must match exactly the domain name or IP address used by mobile clients to connect to the communication server appliance.
This is configured as the external MDM address in the configuration interface of the appliance console.
Mobile clients must trust this certificate.
For this, you must also add the iOS MDM Trust Chain.
To add or replace the communication server appliance certificate:
Log in to GravityZone Control Center.
Go to the Configuration page from the left side menu.
Click the Certificates tab.
Click the certificate name.
Choose the certificate type (with separate or embedded private key).
Click the Add button next to the Certificate field and upload the certificate.
For certificates with separate private key, click the Add button next to the Private key field and upload the private key.
If the certificate is password protected, enter the password in the corresponding field.
Click Save.
Incidents Server certificate
This certificate ensures secure communication between the security agents and the Incidents Server. By default, GravityZone uses self-signed security certificates. You can change them with your own certificates by following the steps below.
To add or replace the certificate:
Log in to GravityZone Control Center.
Go to the Configuration page from the left side menu.
Click the Certificates tab.
Click the certificate name.
Choose the certificate type (with separate or embedded private key).
Click the Add button next to the Certificate field and upload the certificate.
For certificates with separate private key, click the Add button next to the Private key field and upload the private key.
If the certificate is password protected, enter the password in the corresponding field.
Click Save.
If you are using your own self-signed certificate, make sure it is imported into the certificate store on all endpoints in your network.
Apple MDM Push certificate
Apple requires an MDM Push certificate to ensure secure communication between the communication server appliance and the Apple Push Notifications service (APNs) when sending push notifications. Push notifications are used to prompt devices to connect to the communication server appliance when new tasks or policy changes are available.
Apple issues this certificate directly to your company, but requires your Certificate Signing Request (CSR) to be signed by Bitdefender. Control Center provides a wizard to help you easily obtain your Apple MDM Push certificate.
Important
You need an Apple ID to obtain and manage the certificate. If you do not have an Apple ID, you can create one on https://appleid.apple.com My Apple ID webpage. Use a generic and not an employee’s email address to register for the Apple ID, as you will need it later to renew the certificate.
Apple website does not work properly on Internet Explorer. We recommend using the latest versions of Safari or Chrome.
The Apple MDM Push certificate is valid for one year only. When the certificate is about to expire, you must renew it and import the renewed certificate to Control Center. If you allow the certificate to expire, you must create a new one and reactivate all your devices.
To obtain the Apple MDM Push certificate and import it in Control Center:
Log in to GravityZone Control Center.
Go to the Configuration page from the left side menu.
Click the Certificates tab.
Click the certificate name and follow the wizard as described below:
Obtain a Certificate Signing Request signed by Bitdefender
Select the appropriate option:
I need to generate a certificate signing request signed by Bitdefender (Recommended)
Enter your company name, your full name, and email address in the corresponding fields.
Click Generate to download the CSR file signed by Bitdefender.
I already have a certificate signing request and I need to get it signed by Bitdefender
Upload your CSR file and the associated private key by clicking the Add button next to their fields.
The communication server appliance needs the private key when authenticating with the APNs servers.
Specify the password protecting the private key, if any.
Click the Sign button to download the CSR file signed by Bitdefender.
Request a push certificate from Apple
Click the Apple Push Certificates Portal link and sign in using your Apple ID and password.
Click the Create a Certificate button and accept the Terms of Use.
Click Choose file, select the CSR file and then click Upload.
Note
You may find the Choose file button with a different name such as Choose or Browse, depending on the browser you use.
From the confirmation page, click the Download button to receive your MDM Push certificate.
Go back to the wizard from Control Center.
Import the Apple push certificate
Click the Add Certificate button to upload the certificate file from your computer.
You may check the certificate details in the field below.
Click Save.
To renew the Apple MDM certificate and update it in Control Center:
Log in to GravityZone Control Center.
Go to the Configuration page from the left side menu.
Click the Certificates tab.
Click the certificate name to open the import wizard.
Obtain a Certificate Signing Request signed by Bitdefender. The procedure is the same as for obtaining a new certificate.
Click the Apple Push Certificates Portal link and sign in with the same Apple ID used to create the certificate.
Locate the MDM Push certificate and click the corresponding Renew button.
Click Choose file, select the CSR file and then click Upload.
Click Download to save the certificate to your computer.
Go back to Control Center and import the new Apple push certificate.
Click Save.
iOS MDM Identity and Profile Signing certificate
The iOS MDM Identity and Profile Signing certificate is used by the communication server appliance to sign identity certificates and configuration profiles sent to mobile devices.
Requirements:
It must be an Intermediate or End-Entity certificate, signed either by your company or by an external Certificate Authority.
Mobile clients must trust this certificate.
For this, you must also add the iOS MDM Trust Chain.
To add or replace the iOS MDM Identity and Profile Signing certificate:
Log in to GravityZone Control Center.
Go to the Configuration page from the left side menu.
Click the Certificates tab.
Click the certificate name.
Choose the certificate type (with separate or embedded private key).
Click the Add button next to the Certificate field and upload the certificate.
For certificates with separate private key, click the Add button next to the Private key field and upload the private key.
If the certificate is password protected, enter the password in the corresponding field.
Click Save.
iOS MDM Trust Chain certificate
The iOS MDM Trust Chain certificates are required on mobile devices to ensure they trust the Communication server appliance certificate and the iOS MDM Identity and Profile Signing certificate.
The communication server appliance sends this certificate to mobile devices during activation.
The iOS MDM Trust Chain must include all intermediate certificates up to the root certificate of your company or to the intermediate certificate issued by the external Certificate Authority.
To add or replace the iOS MDM Trust Chain certificates:
Log in to GravityZone Control Center.
Go to the Configuration page from the left side menu.
Click the Certificates tab.
Click the certificate name.
Click the Add button next to the Certificate field and upload the certificate.
Click Save.