Endpoint types
Computers
To view the computers under your account, go to the Network page from the left side menu and choose Computers and Virtual Machines from the views selector.
You can view the available network structure in the left-side pane and details about each endpoint in the right-side pane.
At first, all computers and virtual machines detected in your network are displayed as unmanaged so that you can remotely install protection on them.
To customize the computer details displayed in the table:
Click the
 Columns button at the right side of the action toolbar.
Select the columns you want to view.
Click the Reset button to return to the default columns view.
From the Network page, you can manage computers as follows:
To view the latest information in the table, click the  Refresh button in the bottom-left corner of the table. This may be needed when you spend more time on the page.
Virtual machines
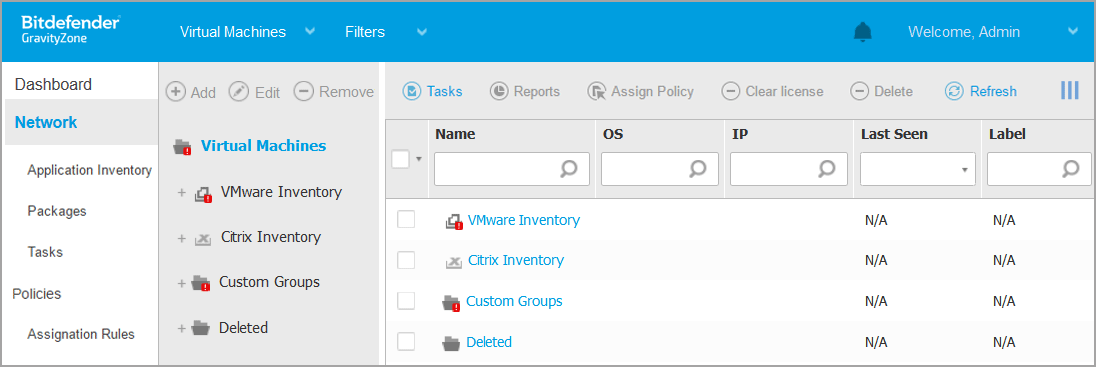
To view the virtualized infrastructure under your account, go to the Network page from the left side menu and choose Virtual Machines from the views selector.
Note
You can manage virtual machines also from the Computers and Virtual Machines view, but you can view your virtualized infrastructure and filter its content using specific criteria only from the Virtual Machines view.
For more details about working with network views, refer to Working with Network views.
You can view the available virtual machine networks in the left-side pane and details about each virtual machine in the right-side pane.
To customize the virtual machine details displayed in the table:
Click the
Columns button at the upper-right side of the right pane.Select the columns you want to view.
Click the Reset button to return to the default columns view.
The left-side pane displays a tree-like view of the virtual infrastructure. The root of the tree is called Virtual Machines and the virtual machines are grouped beneath the root, under the following categories based on the virtualization technology provider:
Nutanix Inventory
Contains the list of Nutanix Prism Element systems you have access to.
VMware Inventory
Contains the list of vCenter servers you have access to.
Citrix Inventory
Contains the list of XenServer systems you have access to.
Custom Groups
Contains the security servers and the virtual machines detected in your network outside any vCenter Server or a XenServer system.
The left-side pane also contains a menu called Views from which the user can select the view type for each virtualization technology provider.
To access the virtualized infrastructure integrated with Control Center, you must provide your user credentials for each vCenter Server system available. Once you have entered your credentials, they are saved to your Credentials Manager so that you do not need to enter them the next time. For more information, refer to Credentials Manager.
From the Network section, you can manage virtual machines as follows:
In the Configuration > Network Settings section, you can configure scheduled rules for automatic cleanup of unused virtual machines from the Network Inventory.
Containers
To view the containers infrastructure under your account, go to the Network page from the left side menu and choose Cloud Workloads from the views selector.
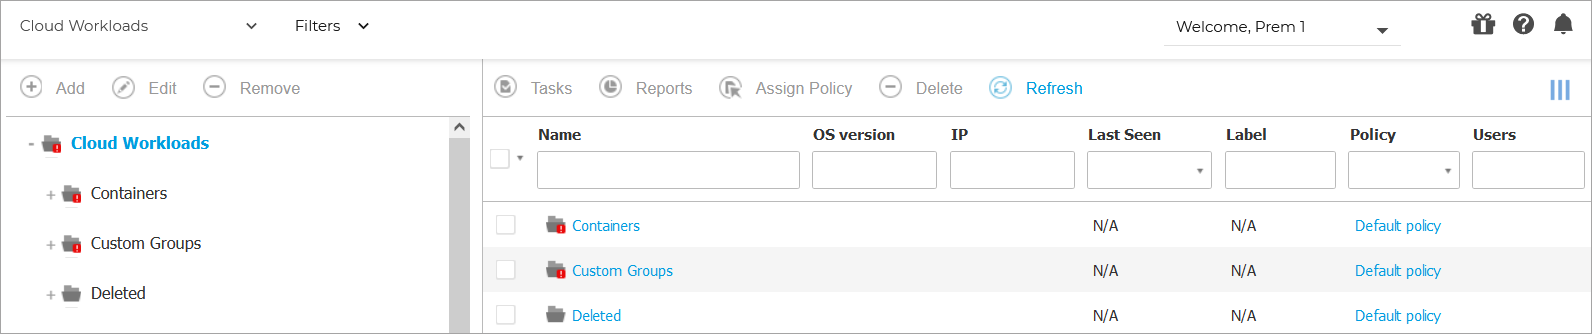
You can view the available container hosts in the left-side pane and details about each container in the right-side pane.
To customize the container details displayed in the table:
Click the
Columns button at the upper-right side of the right pane.Select the columns you want to view.
Click the Reset button to return to the default columns view.
The left-side pane displays a tree-like view of the virtual infrastructure. The root of the tree is called Containers and the containers are grouped beneath the root, under the following categories based on the virtualization technology provider:
From the Network section, you can manage containers as follows:
Mobile devices
To manage the security of mobile devices used in your company, first you have to link them to specific users in Control Center, then install and activate the GravityZone Mobile Client application on each of them.
Mobile devices can be enterprise-owned or personally-owned. You can install and activate GravityZone Mobile Client on each mobile device, then hand it to the corresponding user. Users can also install and activate GravityZone Mobile Client by themselves, following the instructions received by email. For more information, refer to Install mobile devices protection.
To view the mobile devices of users under your account, go to the Network section from the left side menu and choose Mobile Devices from the service selector. The Network page displays the available user groups in the left-side pane and the corresponding users and devices in the right-side pane.
If integration with Active Directory has been configured, you can add mobile devices to existing Active Directory users. You can also create users under Custom Groups and add mobile devices to them.
You can switch the right-side pane view to Users or to Devices using the View tab from the Filters menu located at the upper side of the table. The Users view allows you to manage users in Control Center, such as adding users and mobile devices and checking the number of devices for each user. Use the Devices view to easily manage and check the details of each mobile device in the Control Center.
Adding custom users
If integration with Active Directory has been configured, you can add mobile devices to existing Active Directory users.
In non-Active Directory situations, you must first create custom users in order to have a mean to identify the owners of mobile devices.
There are two ways to create custom users. You can either add them one at a time or import a CSV file.
To add a custom user:
Log in to GravityZone Control Center.
Go to the Network page from the left side menu.
Choose Mobile Devices from the service selector.
Click the Filters menu at the upper side of the table and go to the View tab. Make sure that the Users option is selected.
In the left-side pane, select Custom Groups.
Click the
 Add User button at the upper side of the table. A configuration window will appear.
Specify the required user details:
A suggestive username (for example, the user's full name)
User's email address
Important
Make sure to provide a valid email address. The user will be sent the installation instructions by email when you add a device.
Each email address can only be associated with one user.
Click OK.
To import mobile device users:
Log in to GravityZone Control Center.
Go to the Network page from the left side menu.
Choose Mobile Devices from the service selector.
Click the Filters menu at the upper side of the table and go to the View tab. Make sure that the Users option is selected.
In the left-side pane, select Custom Groups.
Click Import users. A new window opens.
Select the CSV file and click Import. The window closes and the table is populated with the imported users.
Note
If any errors occur, a message is displayed and the table is populated only with the valid users. Existing users are skipped.
You can afterwards create user groups under Custom Groups.
The policy and tasks assigned to a user will apply to all devices owned by the corresponding user.
Adding mobile devices to users
A user may have an unlimited number of mobile devices. You can add devices to one or multiple users, but only one device per user at a time.
Adding a device to a single user
To add a device to a specific user:
Log in to GravityZone Control Center.
Go to the Network page from the left side menu.
Choose Mobile Devices from the views selector.
Locate the user in the Active Directory group or in Custom Groups and select the corresponding check box in the right-side pane.
Note
The Filters must be set on Users in the View tab.
Click the
 Add Device button at the upper side of the table. A configuration window will appear.
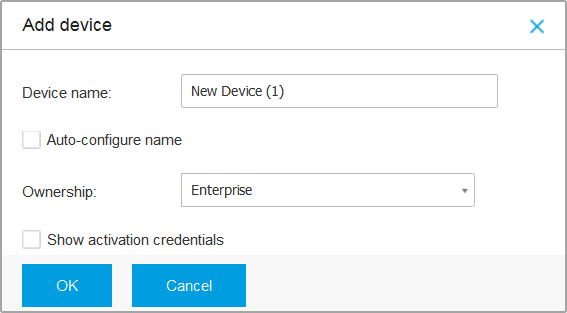
Configure the mobile device details:
Enter a suggestive name for the device.
Use the Auto-configure name option if you want the device name to be automatically generated. When added, the device has a generic name. Once the device is activated, it is automatically renamed with the corresponding manufacturer and model information.
Select the device ownership type (enterprise or personal). You can anytime filter mobile devices by ownership and manage them according to your needs.
Select the Show activation credentials option if you are going to install the GravityZone Mobile Client on the user's device.
Click OK to add the device. The user is immediately sent an email with the installation instructions and the activation details to be configured on the device. The activation details include the activation token and the communication server appliance address (and corresponding QR code).
If you have selected the Show activation credentials option, the Activation Details window appears, displaying the unique activation token, the communication server appliance address and corresponding QR code for the new device.
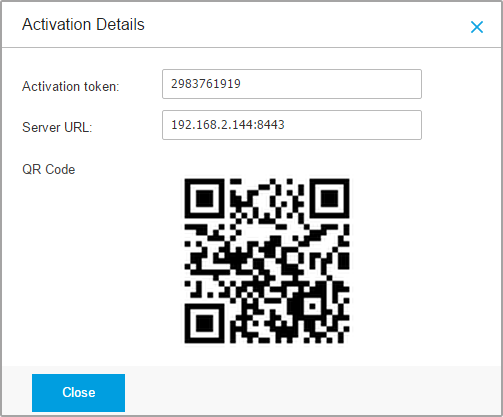
After installing the GravityZone Mobile Client, when prompted to activate the device, enter the activation token and the communication server appliance address or scan the provided QR code.
Adding devices to multiple users
To add mobile devices to a selection of users and groups:
Log in to GravityZone Control Center.
Go to the Network page from the left side menu.
Locate the users or groups in the Active Directory folders or in Custom Groups and select the corresponding check boxes in the right-side pane.
Note
The Filters must be set on Users in the View tab.
Click the device.png Add device button at the right-side of the table. In this case, you have to define in the configuration window the device ownership only.
If there are users with unspecified email address, you are immediately notified with a message. The list of corresponding users will be available in the Notification area of Control Center.
Mobile devices created by multiple selection have by default a generic name in Control Center. Once a device is activated, it is automatically renamed with the corresponding manufacturer and model information.
Click OK to add the devices. The users are immediately sent an email with the installation instructions and the activation details to be configured on their devices. The activation details include the activation token and the communication server appliance address (and corresponding QR code).
Compliant and not compliant mobile devices
Once the GravityZone Mobile Client application has been activated on a mobile device, the Control Center checks if the corresponding device meets all the compliance requirements.
Mobile devices can have the following security statuses:
Without Security Issues, when all compliance requirements are satisfied.
With Security Issues, when at least one of the compliance requirements is not satisfied. When a device is declared non-compliant, the user is prompted to fix the non-compliance issue. The user must make the required changes within a certain time period, otherwise the action for non-compliant devices defined in the policy will be applied.
For more information regarding the non-compliance actions and criteria, refer to Compliance .
To check the devices compliance status:
Log in to GravityZone Control Center.
Go to the Network page from the left side menu.
Choose Mobile Devices from the views selector.
In the left-side pane, select the group you are interested in.
Click the Filters menu located at the upper side of the table and make the following settings:
Go to View tab and select Devices.
Go to Security tab and select the status you are interested in under Security Issues section. You can select one or several filter criteria at the same time.
You can also choose to view all devices recursively, by selecting the corresponding option in the Depth tab.
Click Save.
All the mobile devices corresponding to the selected criteria are displayed in the table.
You can view the device compliance ratio for each user:
Click the Filters menu located at the upper side of the table and select Users from the View category. All the users in the selected group are displayed in the table.
Check the Compliance column to view how many devices are compliant from the total number of devices owned by the user.
You can also generate a Device Compliance report on one or several mobile devices. This report provides detailed information regarding the compliance status of each selected device, including the non-compliance reason. For more information, refer to Creating quick reports.
Checking User and Mobile Devices Details
You can obtain detailed information about each user and mobile device from the Network page.
Checking User Details
Log in to GravityZone Control Center.
Go to the Network page from the left side menu.
Choose Mobile Devices from the views selector.
Select the desired group in the left-side pane.
Click the Filters menu located at the upper side of the table, go to the View tab and select Users.
To display users recursively, go to the Depth tab and select All items recursively.
Click Save.
All users in the selected group are displayed in the table.
Check the information displayed in the table columns for each user:
Name.
The user name.
Devices.
The number of devices attached to user.
Click the number to switch to the Devices view and display the corresponding devices only.
Compliance.
The ratio of compliant devices to total devices attached to user.
Click the first value to switch to the Devices view and display the compliant devices only.
Click the name of the user you are interested in.
A configuration window appears, where you can view and edit the user's name and email address.
Checking Device Details
Log in to GravityZone Control Center.
Go to the Network page from the left side menu.
Choose Mobile Devices from the start.gui.service views selector.
Select the desired group in the left-side pane.
Click the Filters menu located at the upper side of the table, go to the View tab and select Devices.
Click Save.
All devices belonging to users in the selected group are displayed in the table.
Check the information displayed in the table columns for each device:
Name.
The device name.
User.
The name of the user owning the corresponding device.
OS.
The operating system of the corresponding device.
Click the name of a device for more details.
The Mobile Device Details window appears, where you can check the following information grouped under Overview and Details tabs:
General.
Name.
The name specified when adding the device in Control Center.
User.
The device owner's name.
Group.
The mobile device's parent group in the network inventory.
OS.
The mobile device's operating system.
Ownership.
The mobile device ownership type (enterprise or personal).
Security.
Client Version.
The version of GravityZone Mobile Client application installed on the device, only detected after enrollment.
Policy.
The policy currently assigned to the mobile device.
Click the policy name to go to the corresponding Policy page and check the security settings.
Important
By default, only the user who created the policy can modify it. To change that, the policy owner must check the option Allow other users to change this policy from the policy’s Details page.
The changes made to a policy will affect all devices assigned with the corresponding policy.
For more information, refer to Assigning Policies.
License status. View license information for the corresponding device.
Compliance status. The compliance status is available for managed mobile devices. A mobile device can be Compliant or Not compliant.
Note
For not compliant mobile devices, a notification icon
 is displayed. Check the icon's tooltip to view the non-compliance reason.
For more details regarding mobile devices compliance, refer to Compliance .
Malware Activity (last 24h). A quick overview regarding the number of malware detections for the corresponding device in the current day.
Lock Password.
A unique password automatically generated at device enrollment, which is used for remotely locking the device (for Android devices only).
Encryption status. Some of 3.0 Android devices or newer support the device encryption feature. Check the encryption status in the device details page to find out if the corresponding device supports the encryption feature. If the encryption has been required by policy on the device, you can also view the encryption activation status.
Activation Details
Activation Code.
The unique activation token assigned to the device.
The communication server appliance address.
QR Code.
The unique QR Code containing the activation token and the communication server appliance address.
Hardware. You can view here the device hardware information, available only for managed (activated) devices. Hardware information is checked every 12 hours and updated if changes occur.
Network. You can view here network connectivity information, available only for managed (activated) devices.